background image

Settings 


23 

Settings 


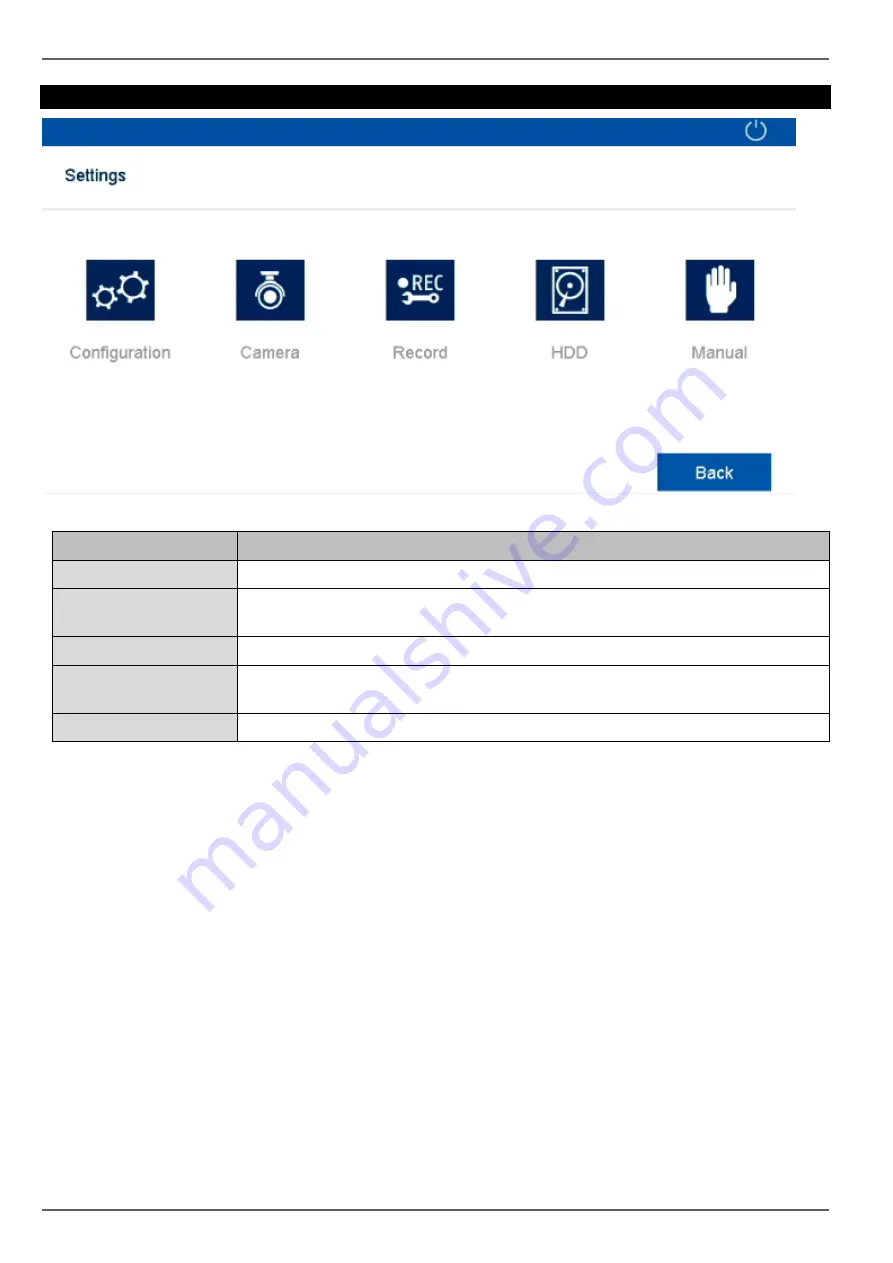
Menu description 

Menu 

Description 

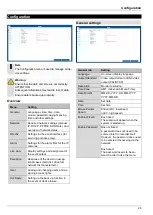
Configuration 

Used to manage all device settings (General, Network, Live View, Warning and User). 

Camera 

Menu for setting camera parameters (OSD configuration, image mode, motion detec-
tion, private zone, tamper monitoring and video loss). 

Recording 

Menu for setting recording parameters (schedule, camera resolution, holiday etc.) 

HDD 

Used to initialise and manage a built-in hard disk drive (assign read/write functionality, 
cameras, manage network drive etc.) 

Manual Management 

Menu for setting manual recordings. 


Содержание TVVR35002

Страница 1: ...ABUS embedded NVR Local user interface user guide Date 04 05 2016 Firmware 3 3 4 ...

Страница 2: ... on starting operation and using the device Make sure that this user guide is handed over when the product is given to other persons Keep this user guide to consult later You will find a list of contents with the corresponding page numbers in the contents ...

Страница 3: ...era recording 13 Live view 14 Overview 14 Pop up menu with mouse operation 14 Selection bar in the camera image 15 Settings 15 Setting the camera output 16 Playback in live view 17 General 17 Playback screen 17 Control via the control panel 17 Selecting playback type 18 Playback Duration 19 Playback Event 19 Playback Tag 19 Playback Smart 19 Playback Multi Timeshift 20 Playback External File 20 Pl...

Страница 4: ...35 Camera 35 Camera tab 35 IP Camera Import Export tab 36 OSD 37 Image 37 PTZ 37 Motion 38 Settings 39 Private Zone 40 Tamper monitoring 40 Video Loss 41 VCA 42 Recording 43 Schedule 43 Record tab 43 Parameters 44 Record tab 44 Substream tab 45 Capture tab 45 Advanced settings 45 Holiday 45 HDD 47 Hard disk drives 47 General 47 Advanced settings 48 RAID 49 TAP physical disk 49 TAP array 50 Panic r...

Страница 5: ...grade 58 Default 59 Net Detect 59 Traffic tab 59 Network Detection tab 59 Network Stat tab 60 HDD Detect 60 Checking the hard disk drive status 61 Technical data 62 Fault rectification 63 Disposal 63 Notes on EC directives for waste electrical and electronic equipment 63 Notes on RoHS EU Directive 63 Glossary 64 Technical terms used 64 ...

Страница 6: ...lance Note Data storage is subject to national data privacy guidelines When carrying out the installation advise your cus tomers of the existence of this guideline General Before using this recorder for the first time please read the following instructions carefully and observe all warn ing information even if you are familiar with the use of such recorders Warning All guarantee claims are invalid...

Страница 7: ...R35002 TVVR35011 TVVR45021 TVVR45030 TVVR60011 TVVR60021 Warning If in doubt have the device installed by a special ist technician Children Do not allow electrical devices to be handled by chil dren Do not allow children to use electrical devices unsupervised Children may not properly identify pos sible hazards Small parts may be fatal if swallowed Keep packaging film away from children Risk of su...

Страница 8: ...US Security Center GmbH does not accept any liabil ity for technical and typographical errors and re serves the right to make changes to the product and user manuals at any time and without prior warning ABUS Security Center GmbH is not lia ble or responsible for direct or indirect damage re sulting from the equipment performance and use of this product No guarantee is made for the con tents of th...

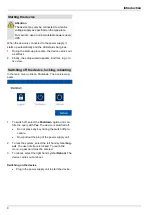
Страница 9: ...to go to live view Switching off the device locking rebooting In the main menu click on Shutdown The overview ap pears 1 To switch off select the Shutdown option and con firm the query with Yes The device is switched off Do not press any key during the switch off pro cedure Now pull out the plug of the power supply unit 2 To lock the system select the left hand symbol Log out The user interface is...

Страница 10: ...vanced settings can be found in the de vice menu see the overview on page 22 Following the first switch on the language selection ap pears 1 Click on the input field and select your language from the list To proceed click on The following query appears Click on Next to start the wizard Note After the system has been set up the checkbox can be deactivated the tick is hidden and the wiz ard no longe...

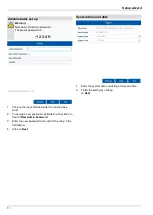
Страница 11: ...he input field and enter the admin pass word 2 To assign a new password activate the checkbox in front of New Admin Password 3 Enter the new password and confirm the entry in the field below 4 Click on Next System time and date 1 Enter the system time consisting of date and time 2 Finish the setting by clicking on Next ...

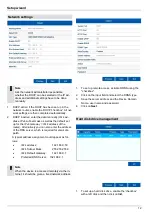
Страница 12: ... you can also enter the address of the DNS server which is required for email dis patch A typical address assignment could appear as fol lows IPv4 address 192 168 0 50 IPv4 Subnet Mask 255 255 255 0 IPv4 Default Gateway 192 168 0 1 Preferred DNS Server 192 168 0 1 1 To set up remote access activate DDNS using the checkbox 2 Click on the input field and select the DDNS type 3 Save the server addres...

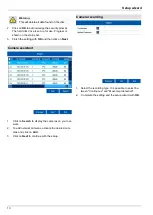
Страница 13: ...h the setting with OK and then click on Next Camera assistant 1 Click on Search to display the cameras on your net work 2 To add network cameras activate the desired cam eras and click on Add 3 Click on Next to continue with the setup Camera recording 1 Select the recording type It is possible to select be tween Continuous and Movement detection 2 Complete the setting and the setup wizard with OK ...

Страница 14: ...s are displayed depending on the operating status of the device Symbol Meaning Red motion recording recording only upon motion detection Blue Recording continuous recording Pop up menu with mouse operation Note Right click when the mouse pointer is positioned on a live image The following settings can be made The arrow pointing to the right indicates that a sub menu opens for selection Menu Opens ...

Страница 15: ...ollowing settings are available in the General tab Video Output In terface VGA HDMI Select the connection where the set tings are changed Live View Mode Various camera layouts 1x1 2x2 1 5 Dwell Time Switching time between the individ ual cameras during auto switch Enable Audio Output Activates the audio output VGA HDMI BNC for the live view Display status bar Activate deactivate the status bar Vol...

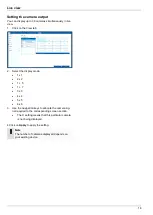
Страница 16: ... display mode 1 x 1 2 x 2 1 5 1 7 3 x 3 4 x 4 5 x 5 6 x 6 3 Use the navigation keys to allocate the camera sig nal required to the corresponding screen section The X setting means that this particular camera is not being displayed 4 Click on Apply to apply the setting Note The number of cameras displayed depends on your existing device ...

Страница 17: ...Running playback with date and time Selection of camera for playback Calendar with recording type Control panel with time bar see right Selection of playback type Control via the control panel The control panel 4 is used to control running playback The symbols have the following meanings No Meaning of the symbol 1 Time bar Click on the time bar with the mouse to continue playback from another poin...

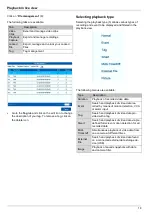
Страница 18: ...ding and event to be displayed and filtered in the playback view The following menus are available Type Description Duration Playback of recorded video data Event Search and playback of video data rec orded by means of motion detection VCA or alarm input Tag Search and playback of video data pro vided with a tag Smart Search and playback of video data via pre defined full screen motion detection f...

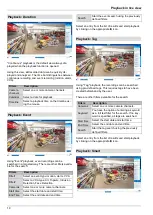
Страница 19: ...meras Select one or more camera channels Start time Select the start date and start time End Time Select the end date and end time Search Start the event search using the previously defined filters Select an entry from the list of results and start playback by clicking on the appropriate icon Playback Tag Using Tag playback the recordings can be searched using pre defined tags This requires tags t...

Страница 20: ...he analysis are displayed as a separate green line on the time bar Playback Multi Timeshift Using Multi Timeshift playback different points in time from one single camera channel can be simultaneously analysed in a targeted way To do this the channel is played back with a time delay of up to 16x according to the setting There are other filters available for the search Filters Description Camera Se...

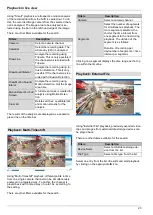
Страница 21: ...an be played back There are other filters available for the search Filters Description Cameras Select one or more camera channels Start time Select the start date and start time End Time Select the end date and end time Search Start the tag search using the previously defined filters Select an entry from the list of results and start playback by clicking on the appropriate icon ...

Страница 22: ... Playback Parameter controlled search for video and image recordings which were triggered by events such as motion detection as well as tags set in playback VCA Search Parameter controlled search for video and image recordings triggered by events such as tripwire detection as well as analysis of face search and people counting Export Export of video and image recordings to external data storage de...

Страница 23: ...mera parameters OSD configuration image mode motion detec tion private zone tamper monitoring and video loss Recording Menu for setting recording parameters schedule camera resolution holiday etc HDD Used to initialise and manage a built in hard disk drive assign read write functionality cameras manage network drive etc Manual Management Menu for setting manual recordings ...

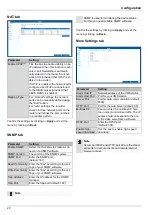
Страница 24: ...e device in excep tional cases hard disk drive full network disconnected etc User Adding and changing users and as signing access rights Hot Spare Setting up the back up function in the event of device failure General settings General tab Setting Language On screen display language Output Standard Video output format at BNC video output PAL NTSC Resolution Monitor resolution Time Zone GMT Greenwic...

Страница 25: ...ow there is an overview of terms related to using the device on networks Parameter Setting IP address An IP address is the unique address of a network device on a network It must only appear once on a network Certain IP address ranges are re served for public networks such as the internet Private ad dress range E g 10 0 0 0 10 255 255 255 Subnet mask 255 0 0 0 172 16 0 0 172 31 255 255 Subnet mask...

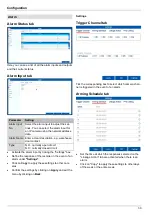
Страница 26: ...er the network clients and therefore the recorder are connected to the in ternet and vice versa You should make sure that you take protective measures such as using a firewall changing your password and changing the port to prevent unau thorised external access Network configuration Tab Setting General Settings for the local network and se lecting the network mode PPPOE PPPOE is used with ADSL con...

Страница 27: ...MAC address Hardware address of the integrated network card MTU Bytes Describes the maximum protocol packet size Preferred DNS Server Address of the domain name server usually the IP address of the gate way Alternate DNS Server IP address of the alternative DNS server Note In certain modes some of these settings cannot be selected PPPOE tab 1 Tick the Enable PPPOE box Then enter your user name int...

Страница 28: ...l account Select Receivers Select three potential recipients for the email Receiver Enter the name of the recipient here Receiver s Ad dress Enter the email address of the recipi ent Enable Attached Picture Tick the box if camera recordings should also be sent with the email as photo files Interval Select a trigger time of between two and five seconds The pictures will only be sent if motion is de...

Страница 29: ...MP port default 161 Read Community Enter the Key according to the set tings of your SNMP software Write Community Enter the Key according to the set tings of your SNMP software Trap Address Enter the IP address for the SNMP manager Trap Port Enter the trap port default 162 Note SNMP is used for monitoring the device status For this you need suitable SNMP software Confirm the settings by clicking o...

Страница 30: ...sed circuit Activate the alarm input by ticking the Settings box Define the response of the recorder in the event of an alarm under Settings Click on Copy to apply these settings to other cam eras Confirm the settings by clicking on Apply and exit the menu by clicking on Back Settings Trigger Channel tab Tick the corresponding box to select which camera chan nel is triggered in the event of an ala...

Страница 31: ...arm output is triggered in the event of an alarm PTZ Linking tab Here you can control specific PTZ presets patrols or pat terns for a taught in camera Parameter Notifications PTZ Select the camera to be con trolled using a PTZ com mand in the event of an alarm Call Preset Select the preset number Call Patrol Select the patrol number Call Pattern Select the pattern number Confirm the settings by cl...

Страница 32: ... Flow Ctrl Required to transfer data to the Speed Dome without the data transmission being per formed too quickly and data packages being lost Use Select your usage type Console only for service purposes or Transparent Channel for virtual RS 485 control Exception Set the response of the recorder for warning messages and system events here To do this activate the Enable Event Hint setting You can t...

Страница 33: ... address of the network adapter of the PC used by the corresponding user Note This limits access to the PC for which the MAC address has been entered here 2 Enter the name and password and confirm the pass word in the field below 3 Select the level and enter the MAC address 3 Confirm the settings by clicking on OK Warning Follow the instructions below on assigning access rights Setting permissions...

Страница 34: ...ease ensure that both devices are connected to your network If this is not the case please set them up as de scribed in the chapter Network Configuration Setting up hot spare mode 1 First set up the second device on the network and configure all basic functions date memory drives etc 2 In the Hot spare menu select the hot spare mode for this device You will need to restart the recorder in order to...

Страница 35: ...ick on Refresh to display the cameras on your net work Note The update function via USB is not available for all cameras Alternatively you can use the ABUS IP Installer for the IP camera firmware update Click on Delete to delete the cameras you have already added Click on Add All to add all the cameras displayed Select Custom Adding to manually add a camera Custom Adding Here you can manually add ...

Страница 36: ... Select any name Stream Type All values below Main Stream will be used for the main stream live record ing All values below Substream will be used for the substream multi view live Substream Enables the substream Type RTSP Transfer Pro tocol Use the auto setting provided that there are no special requirements Port RTSP port entered Path Specifies the RTSP streaming path on the IP camera Note You c...

Страница 37: ...aying the cam era name and date Image Select the camera channel to be processed under Cam era and adjust the image settings based on the lighting conditions PTZ Select the camera channel to be processed under Cam era Linear Scan under the menu item PTZ Parame ters is used for the configuration of a PTZ camera Parameter Setting Baud Rate Define the transmission rate Data Bit Standard 8 Stop Bit Def...

Страница 38: ...ens di rectly Note The displayed settings for motion detection are basic settings In the camera s web interface de tailed settings may be available If no live image from the camera is displayed in this dia logue all settings for motion screens and sensitivity must be set directly in the camera s web interface To set up motion detection proceed as follows 1 Select the camera channel to be processed...

Страница 39: ...ect whether or not the setting should be applied to every day of the week and the holiday settings 3 Confirm the settings by clicking on Apply and exit the menu by clicking on OK Linkage Method Select the Linkage Action tab Here you can configure the response of the recorder in the event of an alarm by ticking the corresponding box Parameter Notifications Full Screen Monitoring The camera is displ...

Страница 40: ...Video Tampering Detection Open the settings 1 Select the day and enter the schedule Note Up to eight time slots between 00 00 and 00 00 can be defined in each case but the individual time slots must not overlap 2 Under Copy select whether or not the setting should be applied to every day of the week and the holiday settings 3 Confirm the settings by clicking on Apply and exit the menu by clicking ...

Страница 41: ...e day and enter the schedule Note Up to eight time slots between 00 00 and 00 00 can be defined in each case but the individual time slots must not overlap 2 Under Copy select whether or not the setting should be applied to every day of the week and the holiday settings 3 Confirm the settings by clicking on Apply and exit the menu by clicking on OK Linkage Method Select the Linkage Action tab Here...

Страница 42: ...able Enables the VCA function in the camera Settings Define settings for re sponses in the event that an alarm is triggered email notification of Surveillance Centre etc Rule Select the number of rules Depending on the function several rules can be config ured simultaneously Rule Settings Select the sensitivity set tings for the function e g object size direction dwell time Draw Line Draw line for...

Страница 43: ...e display there is a colour key i e the time frames for recording are displayed in the schedule in a different colour depending on the trigger recording type in question Coloured icon Key Blue Duration period in hours Light green Event a recording is made when ever any type of event motion alarm input or VCA occurs Yellow Motion detection Red Alarm Input Orange Motion or alarm Light blue Motion an...

Страница 44: ...am to be set Stream Type Predefined video stream Resolution Resolution of the camera Bit rate Select a variable or constant bi trate Video Quality There are various quality levels medium quality high quality Frame rate Settings for the stream frame rate Max Bitrate Mode Select the mode for setting the bitrate Custom 32 3072 Max Bi trate Kbps Settings for the maximum bitrate Max Bitrate Range Recom...

Страница 45: ...d exit the menu by clicking on Back Capture tab The following parameters can be set Parameter Setting Camera Camera to be set Parameter type Individual settings for continuous and event recording Resolution Auto 4CIF 704x576 CIF 352x288 QCIF 176x144 Picture Quality There are various quality levels medium quality high quality Interval Period after which single images are saved between 1 second and ...

Страница 46: ...cking on Apply and then OK Name Manually enter the name of the holiday or bank holiday Activated Enable or disable the holiday set Model By Date By Week By Month Start time Select the start date start time End Time Select the end date end time ...

Страница 47: ...d and write Type Local device hard disk drive Free Space Shows the approximate amount of free memory for recordings Group Group ID Edit Delete Remove the hard disk drive Initialising the hard disk drive 1 Select the hard disk drive by ticking the box 2 Click on Init to start the process 3 Click on OK to acknowledge the security prompt 4 The status bar will show the progress of the initialisa tion ...

Страница 48: ...eping When this function is activated idle hard disk drives go into standby mode 1 Use Copy to specify if the setting is to be applied to all cameras 2 Confirm the settings by clicking on Apply and exit the menu by clicking on OK The group of hard disk drives will be saved 3 Click on Apply and confirm the reboot in the next window by clicking on OK Mode Group In this mode video data can be specifi...

Страница 49: ...orage device to an HDD group Important If only one hard disk drive is installed and this is set to Read only the device cannot be used for recording RAID In this menu you can create a RAID array for recording video data on the NVR Important RAID is a software RAID function This means that RAID data is managed via the recorder s inte grated CPU If the function is enabled the INPUT bitrate of the NV...

Страница 50: ...he hot spare data storage device is im mediately activated for use TAP array This view shows the current status of the RAID array The following actions can be performed Parameter Setting Rebuild Carry out a manual rebuild of the array This rebuilds the data structure of the RAID array Delete Delete the RAID array This ren ders the data storage devices free again such that they can be used for RAID...

Страница 51: ...gured for the camera it will be acti vated automatically green Continuous Capture Click on the camera channel to activate the function ON green snapshots according to time schedule ON yellow snapshots captured by manual operation Alarm Here you can select the alarm output which should be switched in the event of manual management You can switch several alarm outputs in the event of a manual respon...

Страница 52: ...e results search Parameter Description IP Camera Select one or more recorded camera channels Start time Set the start time End Time Set the end time Type Select the recording type Parameter Description Playback Select a line by clicking on the Play icon The recording is shown in the preview window 1 Using the playback controls displayed below the image the recording can be played back Browse When ...

Страница 53: ...a channels Start time Set the start time End Time Set the end time Type Select the recording type Parameter Description Playback Select a line by clicking on the Play icon The recording is shown in the preview window 1 Using the playback controls displayed below the image the recording can be played back Browse When several pages of results have been found navigate through the search results 2 usi...

Страница 54: ...port monthly report or annual report The arrangement of the X and Y axes on the graph changes according to the selec tion Statistics Time Select the point in time at which counting should begin Counting Using the button the counter data from the camera is read and the results dis played Export Export the counter data to an external data storage device Parameter Description People En tered Number o...

Страница 55: ...nts screen will appear Select the view using the available tabs Table or List The file size of each of the recordings and the total size of all recordings found are displayed Click on to view the corresponding recording Click on to lock and unlock a file Locked files can no longer be overwritten by the system 3 Click on Export to go to the Export screen 1 Select the connected medium to be used for...

Страница 56: ... export was suc cessful Event Define the period of the recordings to be searched for us ing the Start Time and End Time selection fields Se lect the camera by ticking or unticking the box and then click on Search Note Pre play recordings can only be viewed if record ing was started before the alarm Note The Normal and Picture sub menus are similar and will therefore not be described separately ...

Страница 57: ...Alarm All Motion detection Start stop Start Stop Video Tampering Detection Exception All Video Signal Loss Illegal Login HDD Full Note This menu is used for device maintenance and should only be used by experienced users Menu Setting System Info Device information Serial No Firm ware Status etc Log infor mation In Log Information log file you can search for recordings or information S M A R T hard...

Страница 58: ... forwards or backwards press 3 or 2 To jump to the first or last page press 4 or 1 To go to a specific page number enter it in field 5 and confirm by clicking on 6 Click on the Details icon for more information Click on the Play icon to start the recording for the event as required Click on Export to save the log file on a USB me dium Import Export Note The configuration data contains all of the s...

Страница 59: ...ecorder The amount of data sent and re ceived is shown in graph form Depending on the network settings the status and infor mation for one or two network connections is shown in the field underneath the graph Sending Shows the amount of data in Mbit s currently being sent out by the recorder The value in creases as more users access video streams from the recorder over the network web app PC appli...

Страница 60: ...ngs to 2 Click on Export After the progress display finishes and initialisation is successful an information window will appear Close it by clicking on OK Click on Status to display the status of the LAN con nections connected not connected Click on Net Detect to change your network settings Network Stat tab The bandwidth used by the device is displayed under this tab You can refresh the data by c...

Страница 61: ...Analysis and Reporting Technology information is stored in the log data Open the log file and search by infor mation S M A R T Hard disk drive Setting up the hard disk drive alarms You can specify which alarms will inform you of hard disk drive errors To do this open Exception in the Settings menu Note Select Lock to lock the operating menu Select Shutdown to switch the device off Select Reboot to...

Страница 62: ...DD 8 x 3 5 SATA HDD 8 x 3 5 SATA HDD Storage 2 x USB 2 0 3 x USB 2 0 3 x USB 2 0 3 x USB 2 0 3 x USB 2 0 3 x USB 2 0 Recording modes Manual time schedule motion detection alarm VCA Manual time schedule motion detection alarm VCA Manual time schedule motion detection alarm VCA Manual time schedule motion detection alarm VCA Manual time schedule motion detection alarm VCA Manual time schedule motion...

Страница 63: ...ettings DCHP IP address etc in correct Check and if necessary correct network con figuration see page 27 Recording is not possible No HDD or HDD not initialised Install and initialise hard disk drive Sudden switch off The internal temperature of the device is too high Clean the device and or remove any objects impeding the ventilation Disposal Notes on EC directives for waste electrical and electr...

Страница 64: ...o Blanking and Synchronisation signal The most simple variant of video signals also called Composite Signal Picture Quality is comparatively low H 264 MPEG 4 AVC standard for high efficiency compression of video signals Used in such things as Blu ray discs or video conferencing systems HDD Hard Disk Drive hard disk magnetic disk store Digital data store in computers or NVRs GIGABYTE Unit of storag...

Страница 65: ...work transmission process for establishing connection via dial up lines that are used with ADSL connections for example PROGRESSIVE Scanning by line or image display as opposed to line skip or Interlaced RTSP Real Time Streaming Protocol Network protocol for the control of continuous transmis sion of streams or software via IP based networks SNMP Simple Network Management Protocol A network protoc...

Страница 66: ...ABUS Embedded NVR Recorder Manufacturer ABUS Security Center GmbH Co KG Linker Kreuthweg 5 86444 Affing Germany ...

Отзывы: