background image

10

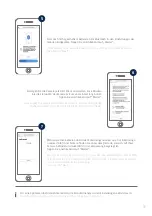
Für eine optimale Inbetriebnahme müssen die Kamera und das Smartphone/Tablet möglichst nahe 

nebeneinander sein, maximal in 3 Meter Entfernung.

For optimal startup, the camera and the smartphone/tablet must be as close as possible next to each 
other, at a maximum distance of 3 meters.

3a

3b

4

Option 1: Scannen Sie den QR-Code auf der Rückseite der Kamera. 

Option 1: Scan the QR code on the back of the camera.

Option 2: Wählen Sie Ihr Kameramodell aus.

 Option 2: Select your camera model.

Wählen Sie „Inbetriebnahme via Bluetooth“ aus.

Select "Setup via Bluetooth".

Содержание PPIC42520

Страница 1: ...W L A N S C H W E N K N E I G E A U S S E N K A M E R A W I F I PA N T I LT O U T D O O R C A M E R A Q U I C K G U I D E PPIC42520...

Страница 2: ...ine L nge von 31 Zeichen nicht berschreiten Wi Fi network with password and encryption The WLAN password must not exceed a length of 31 characters Der Standortdienst des mobilen Endger ts muss aktivie...

Страница 3: ...Fi pan tilt outdoor camera Netzteil 5V DC 2A Power supply 5V DC 2A 1 Innensechskantschl ssel Allen key Entnahmehilfe f r die microSD Karte Removal aid for the microSD card 1 2 Bohrschablone Drilling...

Страница 4: ...ung ist eine handels bliche microSD Karte max 128 GB Speicherkapazit t mind Klasse 10 erforderlich Zum Einsetzen und Entnehmen der microSD Karte muss die Kamera vom Strom getrennt werden Beim Einsetze...

Страница 5: ...d Power LED RJ45 Buchse f r LAN Anschluss RJ45 Connector for Ethernet A standard microSD card max 128 GB storage capacity min Class 10 is required for recording The camera must be disconnected from th...

Страница 6: ...en Sie f r mindestens 5 Sekunden die Reset Taste mithilfe eines d nnen Gegenstands z B der Entnahmehilfe f r die microSD Karte oder einer B roklammer bis die Power LED blinkt If there are any difficul...

Страница 7: ...die beiliegenden D bel ein Befestigen Sie Halterung mit den beiliegenden Schrauben Separate the wall plate of the bracket from the camera using the enclosed Allen key Mark the required position at the...

Страница 8: ...the enclosed screws 1 Setzen Sie Kamera samt Halterung komplett auf die Wandplatte und verschrauben Sie die Elemente an der Unterseite der Halterung mit dem Innensechskantschl ssel Place the camera an...

Страница 9: ...rtphones Tablets muss aktiviert sein Bluetooth of the smartphone tablet must be activated InstallationApp2CamPlusundInbetriebnahme InstallationofApp2CamPlusandstart up Starten Sie App2Cam Plus und w h...

Страница 10: ...and the smartphone tablet must be as close as possible next to each other at a maximum distance of 3 meters 3a 3b 4 Option 1 Scannen Sie den QR Code auf der R ckseite der Kamera Option 1 Scan the QR c...

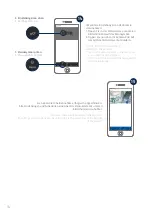
Страница 11: ...ummer DID Ihrer Kamera finden Sie unter dem QR Code der sich auf Ihrer Kamera befindet und zus tzlich in der Verpackung beigelegt ist Tippen Sie anschlie end auf Weiter Select your camera by its ident...

Страница 12: ...aft betreiben wollen Tippen Sie anschlie end auf Weiter Select your home network WLAN where you want to operate the camera permanently Then tap on Next Geben Sie das Passwort Ihres Netzwerkes ein Tipp...

Страница 13: ...mera Erlebnis empfehlen wir die Kamera immer mit der neuesten Firmware zu betreiben Den aktuellen Firmware Stand und bereitstehende Updates finden Sie unter Erweiterte Einstellungen Ger teeinstellunge...

Страница 14: ...n order to configure additional settings on the camera 1 Tap on the menu symbol in the menu bar at the bottom of the screen 2 Now tap on the icon with the two gearsin the camera image PPIC42520 Sie ha...

Страница 15: ...tions when motion is detected Gegensprechfunktion Zum Aktivieren des Mikrofons Ihres Endger tes und des Lautsprechers an Ihrer Kamera dr cken Sie dauerhaft auf das Mikro fon Symbol Die Verbindung zur...

Страница 16: ...videocamera consultate le istruzioni per l uso disponibili sul sito abus com For en alternativ opstart og detaljerede oplysninger om dit kamera henvises til betjeningsvejledningen som findes p abus c...

Отзывы: