background image


11 

English 

4. Mounting / installation 


IMPORTANT! 

The camera must be disconnected from the power supply during installation. 


4.1. PPIC32020 


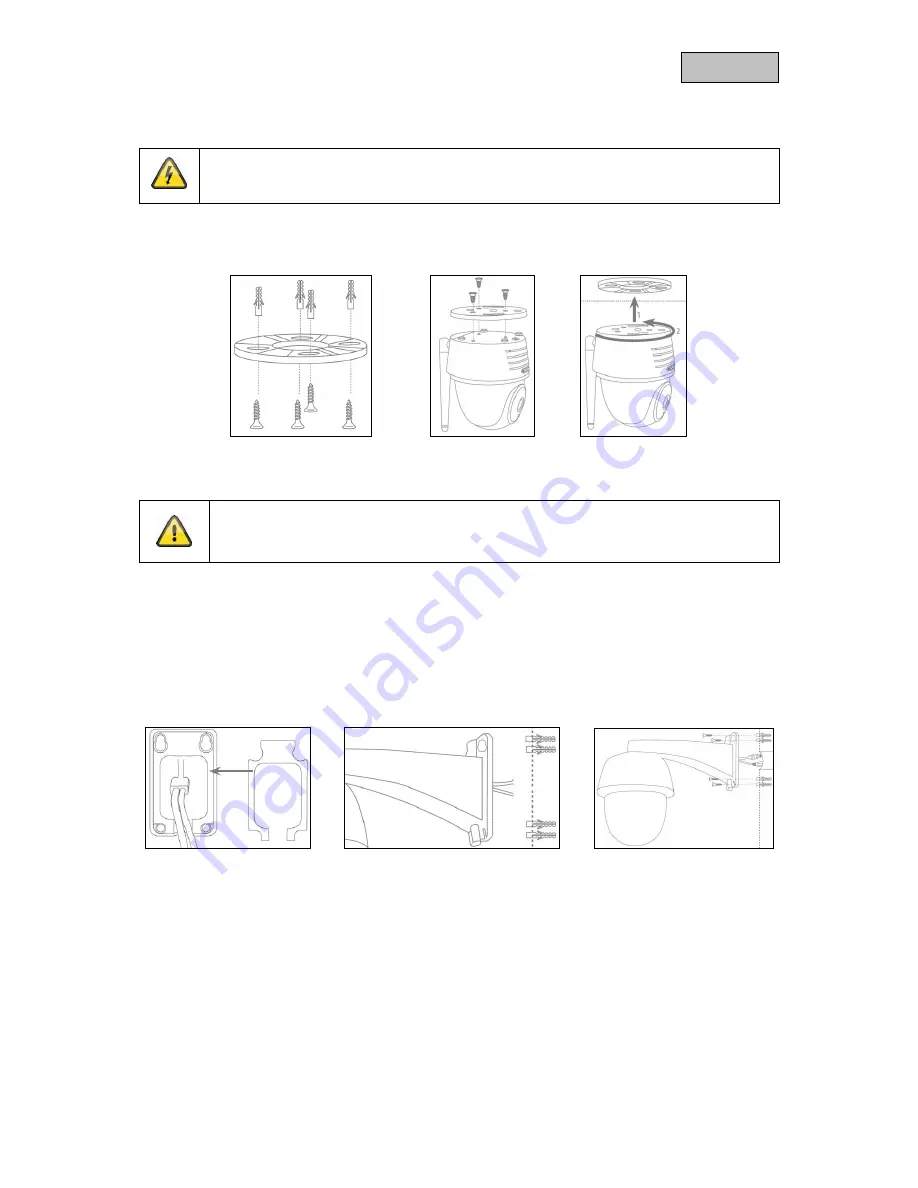
Position  the  mount  where  you  intend  to  install  the  camera.  Mark  up  and  drill  the  required  holes. 
Next, use the screw anchors and screws provided to fasten the mount in place.  


Attention! 

Make  sure  the  alignment  is  correct.  The  'LOCK'  text  must  point  in  the  direction  of  the 
scene to be monitored. 


Use the small screws provided to fasten the base plate to the camera. 

Position the camera with the base plate on the mount in such a way that the arrow on the base plate is 
aligned with 'UNLOCK' on the mount. Next, fix the camera in place by turning the camera clockwise. 
The arrow must be aligned with 'LOCK'.  


4.2. PPIC32520 


If the camera is being installed on a roughcast wall, use the EVA foam provided and glue it to the back 
of the mount. 

First  of  all,  disconnect  the  mount from  the  camera  using  the  Allen  key  provided.  Position  the  mount 
where you intend to install the camera. Mark up and drill the required holes. Insert the screw anchors 
provided. 

Reconnect the camera to the mount and feed the cable through the mount. Next, screw the camera 
and mount to the wall. 


Содержание PPIC35520

Страница 1: ...ortant information and FAQs about this and other products online at www abus smartvest com Version 1 2 Firmware 1 1 0 21 PPIC32020 PPIC32520 PPIC34520 Firmware 1 1 1 21 PPIC35520 English translation of the original German instruction manual Retain for future reference ...

Страница 2: ...t http www abus smartvest com Data storage is subject to national data privacy guidelines Warning as required by Section 201 StGB German Criminal Code Whosoever unlawfully makes an audio recording of the privately spoken words of another and uses or makes a recording thus produced accessible to a third party shall be liable to imprisonment or a fine Whosoever unlawfully overhears with an eavesdrop...

Страница 3: ...3 4 4 3 Cabling 14 4 4 4 Adjustable lens 16 4 4 5 Final installation 16 5 App2Cam Plus First access 17 5 1 Download app 17 5 2 Setting up the camera 17 5 2 1 Wi Fi set up Android 17 5 2 2 Wi Fi set up iOS 18 5 2 3 LAN set up Adding a camera that is already set up 19 6 App2Cam Plus Compatibility 19 7 App2Cam Plus Overview 20 7 1 Menu bar 20 7 2 Camera bar 21 7 3 Info app settings 21 8 App2Cam Plus ...

Страница 4: ...settings 28 11 1 Security settings 28 11 2 Video settings 29 11 3 Component settings PPIC35520 only 29 11 4 Sound settings PPIC35520 only 30 11 5 Relay settings PPIC35520 only 30 11 6 Network settings 30 11 7 Motion detection settings 31 11 8 Notification settings 31 11 9 Storage settings 31 11 10 Device settings 32 12 Updating firmware 33 12 1 Update via server 33 12 2 Update manually 33 12 3 Cur...

Страница 5: ...t 5 V DC 1 5 EU UK Network cable 1 m Antenna Wall bracket Installation material RJ45 coupling Quick guide PPIC34520 Wi Fi outdoor camera Power supply unit 5 V DC 1 5 EU UK Micro USB RJ45 adapter Antenna Wall bracket Installation material Quick guide PPIC35520 Wi Fi video intercom system Power supply unit 12 V DC 1 EU UK Power cable Network cable Network cable 1 m Triangle screwdriver Name plate In...

Страница 6: ... MicroSD card slot max 128 GB 9 Power Status LED 10 Power supply 5 V DC 11 Antenna connection RP SMA 2 2 PPIC32520 1 Internal MicroSD card slot 2 Internal reset button 3 Antenna connection RP SMA 4 IR LEDs 5 Power Status LED 6 Lens 7 Photo sensor 8 RJ45 male for LAN connection 9 Power supply 5 V DC 10 MicroSD card slot max 128 GB 11 Reset button ...

Страница 7: ... 2 Photo sensor 3 IR LEDs 4 Power and status LED 5 PIR sensor 6 Microphone 7 Antenna connection RP SMA 8 Reset button 9 Internal MicroSD card slot max 128 GB 10 Internal micro USB interface for LAN connection 11 Power supply 5 V DC ...

Страница 8: ...l free relay for connection for e g door opener Maximum input 2 A 24 V AC DC 14 C2 C1 connector block Potential free relay for connection for an external doorbell Maximum input 2 A 24 V AC DC 15 V V connection block Connection for power supply AC Alternating Current 9 36 V DC Direct Current 12 48 V 16 TD TD RD RD connector block LAN interface connection Individual intercom components 1 Mounting pl...

Страница 9: ...shes red Camera set to the factory settings Camera firmware is being updated Flashes red 2 x short 1 x long Camera connected to power Camera sends its own access point out Off Camera has no power supply Camera not connected to any network PPIC34520 PPIC35520 LED Status Description Power LED Lights up red Camera connected to power Flashes red Camera set to the factory settings Camera firmware is be...

Страница 10: ...roximity chips in the intercom with the help of the built in RFID reader The RFID reader is located behind the loudspeaker just above the call button To do this enable programming in the intercom s advanced settings and hold the chip in front of the intercom until you hear a beeping sound and the app displays the next step You can perform different actions by using the chip in different ways Respo...

Страница 11: ...ra Position the camera with the base plate on the mount in such a way that the arrow on the base plate is aligned with UNLOCK on the mount Next fix the camera in place by turning the camera clockwise The arrow must be aligned with LOCK 4 2 PPIC32520 If the camera is being installed on a roughcast wall use the EVA foam provided and glue it to the back of the mount First of all disconnect the mount ...

Страница 12: ...n the cover of the surface mounted box Install the surface mounted box in the desired installation location and screw the cover in place together with the camera 4 3 PPIC34520 Position the mount where you intend to install the camera Mark up and drill the required holes Next use the screw anchors and screws provided to fasten the mount in place Next install the camera on the mount by screwing the ...

Страница 13: ... 4 25 ft Insert the screw anchors provided Next run the existing or replacement cabling through the ring opening on the mounting plate We recommend you use the rubber ring provided for better protection against water and other fluids Perforate the ring at the specified points in order to run the cable through and place the ring in the ring shaped opening in the mounting panel Then use the screws p...

Страница 14: ...ing from an existing doorbell or if you want to connect the intercom to an additional actuator e g a door opener or to an LAN network use the wiring diagrams below to guide you Establishing a power supply using existing cabling In order to supply power via existing cabling you will need to have at least one pair of wires available These might come from an additional power supply unit or from the b...

Страница 15: ...separate wire to the doorbell and or actuator and the connector block C2 B2 Safety notice on use of a door opener The relay B2 B1 is a simple potential free relay It can be triggered manually by pulling off the intercom and connecting the wires manually We therefore advise you not to use this relay for a door opener connected to the outside doors of your home Should you still wish to connect it pl...

Страница 16: ...rder to ensure it is perfectly positioned Fix the position of the lens by tightening the screw on the rear of the bracket using the triangle screwdriver 4 4 5 Final installation To complete installation unscrew the aerial from the door station and mount the door station on the mounting plate using the triangle screwdriver and the four triangular screws provided Screw the aerial back on to the door...

Страница 17: ...be shown a list of cameras Select the required camera and press the arrow key to continue with installation Before connecting the camera to the Wi Fi the app prompts you to change the security code on the camera which is required to integrate the camera Enter a security code and confirm it Note This security code should consist of at least eight characters and meet at least two or three of the fol...

Страница 18: ...te the camera Enter a security code and confirm it Note This security code should consist of at least eight characters and meet at least two or three of the following criteria Uppercase letters A Z Lowercase letters a z Numbers 0 9 Special characters are not allowed The camera s standard security code 123456 is not permitted Select your home network Wi Fi from the list of Wi Fi networks then enter...

Страница 19: ...ty code previously assigned to the camera Press the Save button to add the camera Note If the camera has been added with the standard security code 123456 this has to be changed to the camera s live cast the first time it is accessed Note If the camera has already been set up via another smartphone or user select this method to add cameras that are already set up 6 App2Cam Plus Compatibility The A...

Страница 20: ...agged up in the respective items or as an addendum iOS only or Android only In the overview you can click on one of the preview images to open the camera s live cast There are other functions you can use in the menu bar camera bar and in the info app setting 7 1 Menu bar Set up new camera Add camera Enable disable camera bar Start new attempt to connect cameras not yet connected Open info app sett...

Страница 21: ...sion of the app data protection guidelines and API version User handbook Instructions You can call up the product page for the selected camera here You can download the instructions from the download sector Video acceleration Android only Enable disable hardware decoding Hardware decoding is available for use on Android Some Android devices have special hardware features which optimise the decodin...

Страница 22: ...re available to you depending on the model of camera A full screen view without functions is shown in landscape mode 8 1 Live cast functions Create capture Enable disable audio output Start manual recording Open pan tilt menu Activate two way communication PPIC35520 only Stop play picture ...

Страница 23: ...a You always have to enter the admin password Camera is switched on In its armed state the camera records when motion is detected and sends notifications push Camera is switched off In its disarmed state the camera takes no further action when motion is detected 8 4 Automatic adjustment of video quality If the quality of the connection to your camera gets worse and the video quality is set too hig...

Страница 24: ...erver for a short time so that your end device can get the data from the server This causes a delay to the stream Low Normal Good Display of the current assessment of the connection xxx KB s Display of the current kilobit consumption per second Note If the connection to your camera is always made via the relay server please check the following settings Check whether UPnP is enabled in your router ...

Страница 25: ...ll show you all recorded events in this period 9 1 1 Event list functions Create capture Enable disable audio output Start manual recording 9 1 2 Mode iOS only By clicking on the Mode button you can select whether to view the files on the SD card in the set period or to view the files already downloaded to your end device in the set period ...

Страница 26: ...hown in landscape mode The results usually need a short buffer time until the event can be played back Note During the playback of events the event is automatically downloaded to your end device For this reason we recommend using Wi Fi for the playback as much as possible to minimise the amount of data consumed 9 2 1 Playback functions Create capture Enable disable audio output ...

Страница 27: ...to discard the changes or save them with the Save button 10 2 Email notification Email notification If email was set up in the camera s advanced settings you can now activate this here 10 3 Open advanced settings The Settings button opens the advanced settings Use the standard password 123456 the first time The app then prompts you to change the admin password Note The admin password is a function...

Страница 28: ...s not apply when you are accessing the system from other end devices 11 Advanced camera settings Note Although the individual items have a different layout to in Android the functions are identical and available on both platforms 11 1 Security settings Device security code You can change the camera s security code here Admin password You can change the camera s admin password here Disable automati...

Страница 29: ...n countries the frequency is 50 Hz Image improvement Levels 1 5 You can change the light enhancement here A higher level will lighten the image more a lower level less Display orientation Normal Tilt Reverse Flip Reverse Change the camera s display orientation here Time stamp Change the position of the time stamp by dragging and dropping the time stamp into the desired corner Change the colour of ...

Страница 30: ...the relay switch connected to the external doorbell Alternatively you can disable it if you wish Relay 1 sec 3 sec 5 sec Here you can change the switching time for the actuator relay 11 6 Network settings Wi Fi Select your home Wi Fi network from the list of Wi Fi networks Enter the password for your Wi Fi network and confirm with OK The camera then sets up a new connection If you have used the ne...

Страница 31: ...al objects Sensitivity You can change the sensitivity of the software detection for day and night here A high value will lead to detection in the event of minor changes and a low value will trigger only in the event of more major changes to the camera image Motion screen If you have enabled software detection you can exclude individual image sectors from the detection Click the desired image secto...

Страница 32: ...the time is put forward by one full hour Profile settings You can save the camera s profile settings on your end device You can then load the settings on to other cameras or re load them following a reset Device information Information about the current firmware version MCU version storage capacity and free storage space on the SD card Update firmware If there is new firmware available for your ca...

Страница 33: ... time you access the advanced settings so that the update can then begin 12 2 Update manually Alternatively you can download the latest firmware from the Downloads tab on the product website www abus com product article number Example www abus com product PPIC32020 Copy both files rootfs cpio_master squashfs img rootfs cpio_master squashfs md5 on to an empty MicroSD card and insert the card into y...

Отзывы: