background image


ABB Welcome

® 


— 18 — 


4.4 

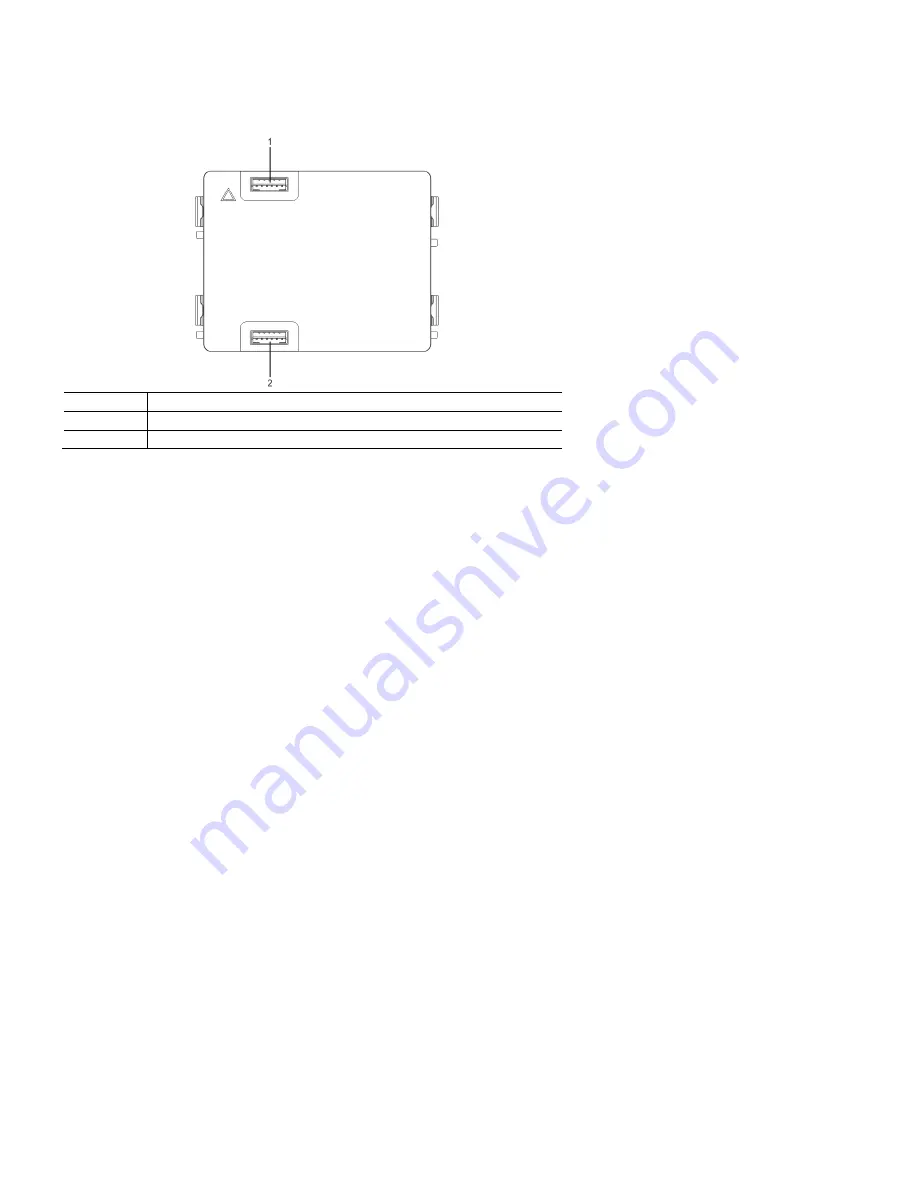
Pushbutton module 


No. 

Functions 

Connector for previous module 

Connector for next module 

Содержание Welcome 5101 P Series

Страница 1: ...ne Inh alt KNX Doo rEntry 832 20 AP xxx Tit elblat t 832 20 AP xxx ABB 1 9 m od_ 132 3249 806 476 _15 docx 11 108 4 1 VER 1 3 02 20 2017 ABB Welcome M25102xC M25102xA x M25102xPx M25102xK x M25102xCR 5102xDN 5101xPx Outdoor station ...

Страница 2: ...d pushbutton 1 button Round pushbutton 2 button Round pushbutton 3 button Pushbutton 3 6 button Pushbutton 4 8 button Round pushbutton 1 button with NFC IC Round pushbutton 2 button with NFC IC Round pushbutton 3 button with NFC IC Keypad 3 versions Stainless steel Aluminum White Display with ID Display with IC ...

Страница 3: ... a speech synthesis function 32 5 2 Pushbutton outdoor station with display module 34 5 3 Pushbutton outdoor station with keypad module 36 5 4 Round pushbutton outdoor station with IC NFC 38 5 5 Keypad outdoor station 42 5 5 1 Call a resident 3 types 42 5 5 2 Call the guard unit 44 5 5 3 If an indoor station is in leave home mode 44 5 5 4 If a guard unit is in intercept mode 45 5 5 5 System settin...

Страница 4: ...ABB Welcome 4 ...

Страница 5: ...nd operates exclusively with components from this system The device must only be used with suitable ABB flush mounted installation sockets and rain hood 3 Environment Consider the protection of the environment Used electric and electronic devices must not be disposed of with household waste The device contains valuable raw materials that can be recycled and should be disposed of at an appropriate ...

Страница 6: ...odule No Function 1 LED flashes slowly indicating a call has been established LED flashes fast indicating that the system is busy 2 LED illuminates indicating possible communication 3 LED illuminates indicating the door is unlocked 4 Call pushbuttons ...

Страница 7: ...or setting the address of OS 1 9 12 Set feedback tones for pushbuttons and for outdoor station when making a call ON or OFF 13 Configure pushbuttons in a single column or double column mode ON double column OFF single column This only affects the bar pushbutton not the round pushbutton 14 Configure functions of the first and second pushbuttons 3 OFF 4 OFF call indoor station and call indoor statio...

Страница 8: ...ABB Welcome 8 Default lock first lock Released by unlock button of the indoor station Factory setting is LOCK GND ...

Страница 9: ...ABB Welcome 9 Second lock Released by programmable button 1 of the indoor station Factory setting is COM NC NO 1 ...

Страница 10: ... to enter the setting mode 3 LED flashes green to show the setting mode for aluminum outdoor station prompt tone di for stainless outdoor station Tones for indication Lock 1 LOCK GND default lock Lock 2 NC NO COM default lock Short circuit Exit terminal on outdoor station to switch the default lock 30 seconds time available to save the setting and exit the programming mode ...

Страница 11: ...for 3 seconds to enter the setting mode 3 LED flashes green to show the setting mode for aluminum outdoor station Beep tone sounds for stainless outdoor station Record the time for first lock Then set the time for second Lock from 1 10 seconds 30 seconds time available to save the setting and exit the programming mode At last set the time back for 1st Lock Reset the time to the original time for f...

Страница 12: ...ABB Welcome 12 4 1 1 Lock connected with terminals 3 and 4 ...

Страница 13: ...ABB Welcome 13 4 2 Camera module No Functions 1 Connector for additional analog camera 2 Connector for audio module 3 Jumper for setting the video format PAL or NTSC 4 Adjust the camera view area ...

Страница 14: ...al can be connected with the camera module Generally the transmission distance from the analog camera to the outdoor station can reach up to 164 ft by coax cables or about 33 ft by other types of cables Two types of connections Option 1 The analog camera is powered on all the time Option 2 The analog camera is powered on only during working hours ...

Страница 15: ...ABB Welcome 15 4 2 2 Detached camera connection Camera module can be used as a detached camera Wiring is shown below 3 pairs 2 wire bus together Max 10 metres ...

Страница 16: ...module No Functions 1 Program button 2 Connector for previous module 3 Connector for device software update 4 Connector for Wiegand output Default format is 26 bits it can also be extended to 34 bits 5 Connector for next module 1 2 3 4 5 ...

Страница 17: ...call guard unit function is always assigned to the first and second button which is set by audio module 3 User names can be printed by using the labeling tool of the ABB Welcome configuration software 4 The round pushbutton module with NFC IC card reader supports the NFC IC card A mobile phone with NFC function is acceptable Door Open App required 2 ...

Страница 18: ...ABB Welcome 18 4 4 Pushbutton module No Functions 1 Connector for previous module 2 Connector for next module ...

Страница 19: ...utton numbers are listed from top to bottom and from left to right in the double column mode 2 Lighting switch and call guard unit function is always assigned to the first and second button 3 User names can be printed by the using the labeling tool of the ABB Welcome configuration software ...

Страница 20: ... 5 Keypad module No Functions 1 Program button 2 Connector for previous module 3 Connector for device software update 4 USB connector for connection to a PC Download upload the configuration 5 Connector for next module ...

Страница 21: ...ng the guard unit A visitor can call a guard unit by pressing the button if the guard unit is available in the system 3 Unlocking by password Press password to release the default lock to the audio module Press 2 password to release the 2nd lock connected to the audio module The initial password is 123456 Residents can set their own customized password with indoor stations 4 System engineering con...

Страница 22: ... module No Functions 1 Program button 2 Connector for previous module 3 Connector for device software update 4 Connector for Wiegand output 5 USB connector for connecting to a PC Download upload the configuration 6 Connector for the next module ...

Страница 23: ...mmed through the module itself or by using a PC to download the program file M251021CR is accompanied by an ID card reader while the M251022CR is accompanied by an IC card reader 3 Support Wiegand output The default Wiegand format is 26 bits but it can also be extended to 34 bits The display module must be connected after the audio module ...

Страница 24: ... frequency 125 kHz Standard ISO18000 2 Support card EM4100 EM4205 EM4305 EM4450 TK4100 T5567 Output format Wiegand 26 bit 34 bit M251022CR Display module with IC card reader Work frequency 13 56 MHz Standard ISO 14443A Support card Mifare One S50 S70 etc Output format Wiegand 26 bit 34 bit ...

Страница 25: ...25 4 7 Nameplate module No Functions 1 Connector for previous module 2 Connector for next module Labeling of the nameplate module can be printed by using the labeling tool of the ABB Welcome configuration software ...

Страница 26: ... 5 1 Pushbutton outdoor station 5 1 1 Addressing 1 Configure functions of the first and second pushbuttons No Functions 1 3 OFF 4 OFF 2 Call apartment 01 3 Call apartment 02 4 Call apartment 03 3 4 DIP 1 2 3 1 2 3 4 001 002 003 ...

Страница 27: ... ON 4 OFF 2 Switch on light The light is connected with a switch actuator The address of the switch actuator must be the same as the address of this outdoor station 3 Call apartment 01 4 Call apartment 02 3 4 DIP 1 2 1 2 3 4 001 002 ...

Страница 28: ...its will ring at the same time when a visitor presses the button call guard unit 3 Call apartment 01 4 Call apartment 02 No Functions 1 3 ON 4 ON 2 Switch on lights 3 Call guard unit 4 Call apartment 01 2 Configure pushbutton in single or double column modes 3 4 DIP 1 2 1 2 3 4 001 002 Guard unit 3 4 DIP 1 1 2 3 4 001 Guard unit ...

Страница 29: ...ABB Welcome 29 No Functions 1 2 OFF 2 Call apartment 01 3 Call apartment 02 4 Call apartment 03 5 Call apartment 04 2 ON 1 2 3 5 1 2 3 4 4 001 002 003 004 ...

Страница 30: ... 2 Call apartment 01 3 Call apartment 02 4 Call apartment 03 5 Call apartment 04 6 Call apartment 05 7 Call apartment 06 8 Call apartment 07 9 Call apartment 08 2 ON 1 3 5 9 7 2 4 8 6 2 4 6 8 1 3 5 7 001 001 002 003 004 005 006 007 008 ...

Страница 31: ... ON 2 Switch on lights 3 Call the guard unit 4 Call apartment 01 5 Call apartment 02 6 Call apartment 03 7 Call apartment 04 8 Call apartment 05 9 Call apartment 06 3 4 DIP 1 2 ON 3 5 9 7 2 4 8 6 2 4 6 1 3 5 Guard unit 001 002 003 004 005 006 ...

Страница 32: ...peech synthesis function M251024A the local language can be set Set outdoor station address as 0 and hold the first button for 3 seconds to play the voice message Click on this button to select the language After choosing the language hold this button to save and exit the setting 1 2 3 4 2 4 6 8 3 5 7 Single column Double column 1 1st button ...

Страница 33: ...oor gateway mode For detailed information please refer to the Gateway User Manual floor gateway chapter Apartment 01 A Apartment 02 B Apartment 03 C Apartment 04 A Apartment 05 B Apartment 06 C Outdoor station Left building Apartment 01 A Apartment 02 B Apartment 03 C Apartment 04 D Apartment 05 E Apartment 06 F Outdoor station Gate entrance Outdoor station Right building ...

Страница 34: ...ring this time will be designated as the new master card The prompt Register master card successfully will appear on the screen Please note that if you swipe this same card again the information will be deleted and the prompt Delete master card successfully will appear on the screen Only one master card can be registered at a time Enter system setting using master card 1 Swipe the master card to e...

Страница 35: ...within 5 seconds to move to next option Menu_________ Program Card Language Wiegand Output After 5 seconds of elapsed time the current option will be chosen Menu_________05 Program Card Language Wiegand Output Swipe the master card within 5 seconds to move to next option Proximity Card 05 Register Card Delete Card Delete All Swipe the master card enter the setting ...

Страница 36: ...ation system password 1 1 Gate Station system password 1 2 2 Modify system password system password 2 Enter new password 6 8 characters Enter the password again 3 Modify door open code system password 3 Enter new door open code 3 8 characters Enter the code again 4 Set the voice message If the audio module with the speech synthesis function M251024A is assembled the local language can be set syste...

Страница 37: ...en it The restoration of default factory settings does not delete the rest of the information programmed on the system such as user names or other settings 1 Disconnect the power supply 2 Reconnect the power 3 Within 30 seconds hold the program button for 5 seconds 4 A beep tone will sound and the system password will be reset to the default 345678 ...

Страница 38: ...can be implemented Function Command LED Enroll user Swipe admin card 1x Orange flash 1x Swipe card new user 1x Green Delete user Swipe admin card 2x Orange flash 2x Swipe card user x 1x Green Enroll new admin Swipe admin card 3x Orange flash 3x Swipe card new admin 1x Green Delete admin Swipe admin card 4x Orange flash 4x Swipe card admin x 1x Green Delete all users Swipe admin card 5x Orange flas...

Страница 39: ...long press the program button for 5 seconds Finish reset White Red green orange cycle Technical specifications for round pushbutton module with IC orNFC Work frequency 13 56 MHz Standard ISO 14443A Support card MIFARE One S50 S70 etc Output format Wiegand 24 bit 34 bit Supported NFC devices Most NFC mobile Not all testing is needed before using this function ...

Страница 40: ...e cards at the outdoor station the door will open but an unnecessary warning indication will be displayed on display module To eliminate this unnecessary warning validation needs to be switched off so it will not appear on the display module 1 Swipe admin card to enter system setting Orange LED is on 2 Long press first button for 3 seconds to switch validation on off Default validation is on The o...

Страница 41: ...vices are not required for commissioning Access the Google Play store https play google com store apps details id com abb allegro3_nfcdooropener hl en 1 Download and install the ABB Door Opener App from Google Play Store 2 Turn on the NFC function of your device 3 Enter the setting mode of your round pushbutton module 4 Start the app on your device 5 Set up your device as a user 6 Configure your p...

Страница 42: ... In standby mode a visitor can press the physical address corresponding to the residence from 001 to 250 For a complex building a visitor needs to press the building number 01 60 plus the physical address 001 250 or make a call in the gate station 2 Logical address The logical address is a code that a visitor can press to make a call The code must be assigned first and then associated with the phy...

Страница 43: ...ay resident names Use the and buttons to search for the desired residential station and press the to make a call A visitor can also enter the resident name using the keypad to make a call Resident names must be assigned first and then associated with the physical address system password system setting Contact Add User Names Physical Add 001 Logical Add 0101 Call Mode_______ Physical Add Logical Ad...

Страница 44: ...f an indoor station has been set in leave home mode a visitor can record a message for the resident after entering the following interface 30 s Guard Unit to Cancel 120 s Guard Unit to Cancel Accept the call 30 s Andy to Cancel 120 s Andy to Cancel Playing the message 001 s Recording to Cancel After a beep tone visitor can record a message ...

Страница 45: ...ion will be intercepted by the guard unit Once the caller s identity has been confirmed the guard unit can forward the call to the indoor station Guard unit accepts the call Guard unit transfers the call to an indoor station 30 s Guard Unit to Cancel 120 s Guard Unit to Cancel Call from an outdoor station to an indoor station 120 s Andy to Cancel ...

Страница 46: ...password Configurations Device Type Outdoor St Default Gate station system password Configurations Device Type Gate station 2 Set the call mode Make a call by a physical address or a logical code Set the call mode by Physical Address system password Configurations Call mode Physical Address Menu__________ Configurations Access Control Contact Device Type_____ Outdoor St Gate Station Device Type___...

Страница 47: ... Logical Code 3 System password setting Modify the system password system password Configurations System code Modify Reset the system password system password Configurations System code Reset Call Mode_______ Physical Add Logical Add New Password Re enter Done Reset System Code to Confirm to Cancel Done ...

Страница 48: ... A total of 6 000 passwords can be stored Set the door open password ON OFF default 123456 system password Access Control Door open code Enable disable Modify the door open password system password Access control Door open code Modify Reset the door open password system password Access control Door open code Reset Door Open Code__ Disable Modify Reset Done New Password Re enter Done Reset Door Ope...

Страница 49: ...ity card Delete All 4 Contact 3 000 names using a combination of 24 alphanumeric characters 1 Add Add the contact by user names system password Contact Add User Names Resident names must be associated with a physical address Enter Card No 0123456 Or Swipe the Card Enter Card No 0123456 Or Done Swipe the Card Enter Card No 0123456 Or Swipe the Card Enter Card No 0123456 Or Done Swipe the Card Delet...

Страница 50: ... the resident names with the corresponding physical address Modify contact by logical address system password Contact Modify Logic add Modify the logical address and its corresponding physical address using the alphanumeric keypad 3 Delete Delete the contact by user name system password Contact Delete User Names Physical Add 001 Logical Add 0101 Alexander G Bodin K Christian G Enter Logical Add 01...

Страница 51: ... address system password Contact Delete Logic add 4 Clear all system password Contact Clear all Clear all lists including resident names and logical address entries from this menu Enter Logical Add 0101 Delete All Names to Confirm to Cancel Done ...

Страница 52: ...ng the audio module with speech synthesis function M251024A the speech synthesis function can be enabled or disabled The logical language can also be chosen system password Settings Voice message If your audio module does not have a speech synthesis function this will be indicated when you enter the menu 2016 01 01 07 00 to Confirm Done Second Lock Open Time 1 10 seconds 3s to Confirm Done Voice M...

Страница 53: ... Wiegand output digits system password Settings Wiegand Output 7 Set the related door lock when swiping the card system password Settings Choose Door Choose the lock to be released when the registered card is swiped Language_______ English Français Italiano New Message ABB Welcome to Confirm to Cancel Done Wiegand Output__ 26 bit 34 bit Choose Door____ First Lock Second Lock ...

Страница 54: ...information e g user names logical addresses and card information will not be reset 9 Information system password Settings Information View the software information of each module of the outdoor station Reset to Factory Default to Confirm to Cancel Done Audio module V1 07_131106 Card reader V0 10_131107 ...

Страница 55: ...tten it The restoration of default factory settings does not delete the other information programmed on the system such as user names or other settings 1 Disconnect the power supply 2 Reconnect the power 3 Within 30 seconds hold the program button for 5 seconds 4 A beep tone will sound and the system password will be reset to the default 345678 ...

Страница 56: ...s In settings press to confirm press to cancel The default system password is 345678 1 Set the device as an outdoor station or a gate station Outdoor station system password 1 1 Gate station system password 1 2 2 Modify the system password system password 2 Enter new password 6 8 digits Enter the password again 3 Modify the door open code system password 3 Enter new door open code 3 8 digits Enter...

Страница 57: ...otten it The restoration of default factory settings does not delete the other information programmed on the system such as user names or other settings 1 Disconnect the power supply 2 Reconnect the power 3 Within 30 seconds hold the program button for 5 seconds 4 A beep tone will sound and the system password will be reset to the default 345678 ...

Страница 58: ...ABB Welcome 58 6 Advanced configuration Connect to a PC to configure the keypad or display ...

Страница 59: ...40 F to 158 F Protection cover frame assembled IP 54 Power supply door opener Lock GND 18V 4 A impulsive 250 mA holding Floating output door opener COM NC NO 30 V AC DC 1A Single wire clamps 2 x 22 AWG 2 x 18 AWG Fine wire clamps 2 x 22 AWG 2 x 18 AWG Bus voltage 20 V 30 V ...

Страница 60: ...llation endangers your life and that of the user of the electrical system Incorrect installation can cause serious damage to property e g fire The minimum necessary expert knowledge and requirements for the installation are as follows Apply the five safety rules DIN VDE 0105 EN 50110 1 Disconnect from power source 2 Secure against being re connected 3 Ensure that there is no voltage 4 Connect to t...

Страница 61: ...o not use common cables for the connecting wires of the door openers and wires of the system bus Avoid bridges between different cable types Use only two wires for the system bus in a four core or multi core cable When looping never install the incoming and outgoing bus inside the same cable Never install the internal and external bus inside the same cable The following installation situations mus...

Страница 62: ...BB Welcome 62 8 3 Mounting Dimension Wear gloves to protect your hands from possible laceration Audio module Camera module Nameplate module Pushbutton module Keypad module Display and card reader module ...

Страница 63: ...ABB Welcome 63 Cover frame Flush mounted box ...

Страница 64: ...ABB Welcome 64 Components of the outdoor station No Functions 1 Cover frame 2 Modules 3 Flush mounted box 4 Rain hood Rain hood 1 3 2 4 ...

Страница 65: ...s can be inserted e g the camera module audio module pushbutton module keypad module display and card reader module nameplate module 2 Pay special attention to the top to bottom orientation of each module Module wiring 1 Use cables to connect the modules together one by one 2 Ensure that the audio module is connected next to the camera module ...

Страница 66: ... Welcome 66 The distance zones for the installation of the outdoor station When selecting the installation site ensure that the minimum distance to the right side is adhered to for removal of the end strip ...

Страница 67: ...st not be longer than 039 Assemble the frame into the flush mounted box 1 Hang the device in the installation box 2 Fasten the safety loop 3 Connect the wires into the enclosed clamp and plug the clamp onto the contact pins Fold the device and shut it until it audibly snaps in 4 Screw on the front of the device ...

Страница 68: ...ABB Welcome 68 Four types of installation Option 1 Flush mounted with only flush mounted box Option 2 Flush mounted with a rain hood Option 3 Surface mounted with a rain hood ...

Страница 69: ...ABB Welcome 69 Option 4 Cavity wall installation ...

Страница 70: ...d mounting tool to remove the end strip 2 Remove the screw that is used to affix the cover frame 3 Push up and pull out the outdoor station on the bottom of the cover frame Dismounting the modules 1 Dismount the module from one side of the frame 2 Remove the modules ...

Страница 71: ...ABB Welcome 71 Replacing the nameplates 1 Remove the pushbutton cover and write the user names on the labels 2 Use a labeling sheet with appropriate software to correctly format and print the labels ...

Страница 72: ...BB Welcome 72 Adjusting the angle of the camera Fig 1 Adjust the angle of the camera 1 Unscrew the camera 2 Adjust the angle of the camera in four directions up down right and left 3 Screw on the camera ...

Страница 73: ...e outdoor station 1 Make a hole for the cable 2 Use the joining fixtures to assemble the flush mounted boxes horizontally 3 Run the connection wires between the boxes The extension is useful for multi outdoor station connections ...

Страница 74: ...hnical changes or modify the contents of this document without prior notice With regard to purchase orders and or contracts the agreed particulars shall prevail ABB Inc does not accept any responsibility what soever for potential errors or possible lack of information in this document We reserve all rights in this document and in the subject matter and illustrations contained therein Any reproduct...

Отзывы: