24
LMT10 0 A N D LMT 20 0 |
M AG N E TOS T R I C T I V E L E V EL T R A N SM I T T ER S | FF O I/L M T 10 0/ 2 0 0/FF - EN R E V. A
7 Commissioning
Transmitter factory configuration
consideration
The LMT Series level transmitters have been factory-calibrated
to reflect the published performance specification; no further
calibration is required under normal conditions ABB typically
configures the LMT Series level transmitters according to user
requirements A typical configuration includes:
• Tag number
• Calibrated span
• Display configuration
Preliminary checks prior to start-up
• Before beginning the commissioning procedure, ensure: The
power supply is OFF
• The power supply is within the specified range (12 to 42 V DC)
• The pin assignment matches the connection diagram
• The transmitter is correctly grounded
• The transmitter is within temperature limits
• The transmitter is installed in a location free of excessive
vibration
• The terminal cover is sealed
Local push buttons functionality
The LMT Series allows local adjustments via the on-board non-
intrusive push buttons, when selected The push buttons are
located under the identification nameplate To gain access to
the local adjustments release the fixing screws of the
nameplate and rotate clockwise the identification plate
NOTICE
Operating the control buttons with a magnetic screwdriver
is not permitted
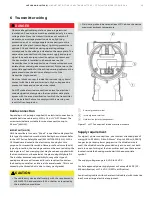
Figure 23 Push Button Functionalities
1
Identification nameplate
2
“Z” Zero push button
3
“S” Span push button
4
Write-protection button
Write protection
Write protection prevents the configuration data from being
overwritten by unauthorized users
The write-protect feature can be disabled using the write-
protect switch
If write protection is enabled, the “Z” and “S” buttons (either
internal or external) are disabled
Hardware write protection activation via external switch
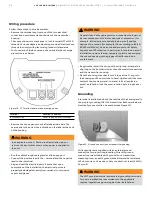
The instrument features the external, non-intrusive switch The
write protection function can be performed as follows:
• Remove the identification plate (see Figure 21) by loosening
the retaining screw that is situated on the bottom left corner
• Use a suitable screwdriver to fully press the switch down
• Turn the switch clockwise by 90°
IMPORTANT (NOTE)
To deactivate the switch, slightly push it down and turn
counterclockwise by 90°
Figure 24 Write Protection Push Button


