ABB IRB 920 Скачать руководство пользователя страница 626

5.6.10 Replacing the transmission module

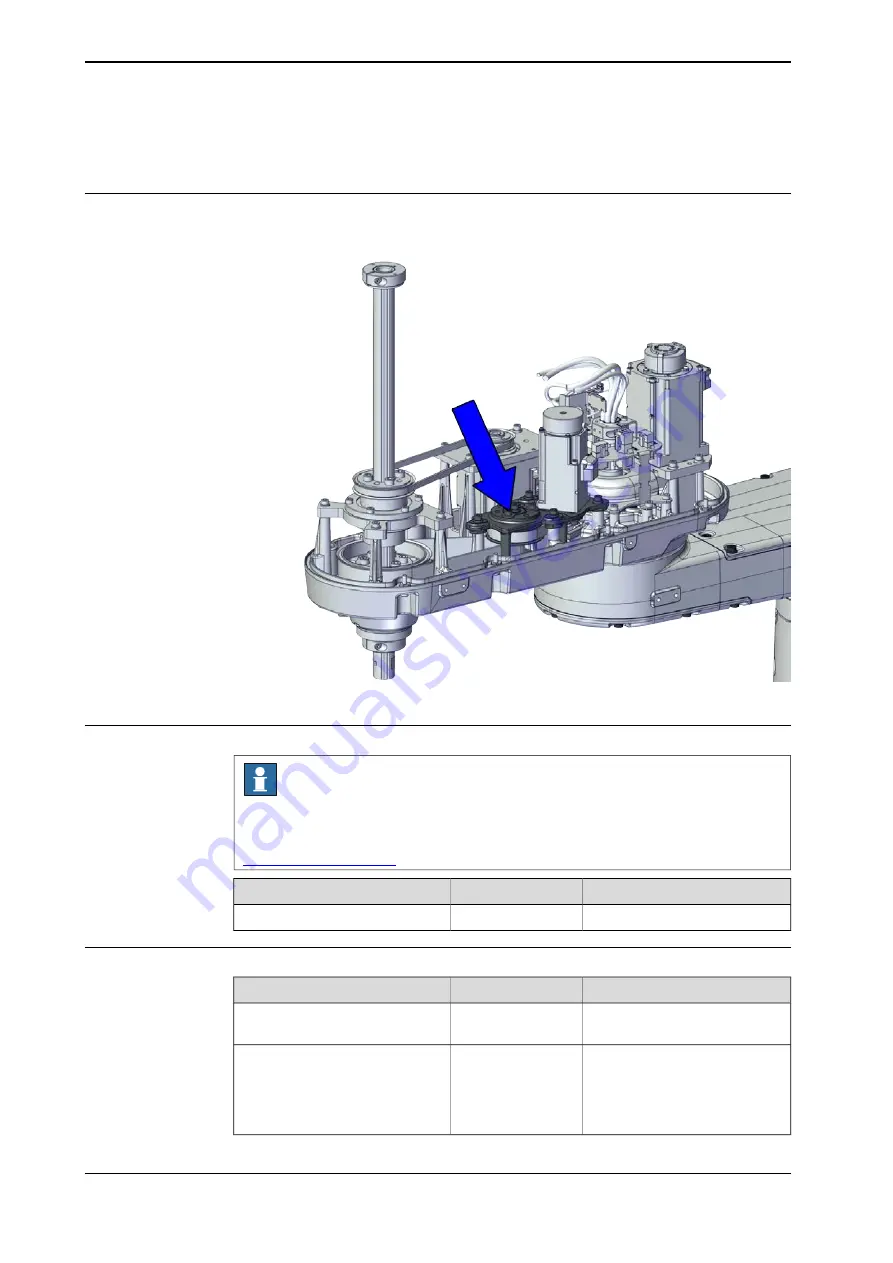
Location of the transmission module

The transmission module is located as shown in the figure.

xx2100001018

Required spare parts

Note

The spare part numbers that are listed in the table can be out of date. See the
latest spare parts of the IRB 920 via myABB Business Portal,

www.abb.com/myABB

.

Note

Article number

Spare part

3HAC076579-001

Transmission module

Required tools and equipment

Note

Article number

Equipment

Content is defined in section

Standard toolkit on page 996

.

-

Standard toolkit

Delivered as a set of calibration
tools.
Required if Axis Calibration is the
valid calibration method for the
robot.

3HAC055412-001

Calibration toolbox, Axis Calibra-
tion

Continues on next page

626

Product manual - IRB 920

3HAC075721-001 Revision: C

© Copyright 2022 ABB. All rights reserved.

5 Repair

5.6.10 Replacing the transmission module

Содержание IRB 920

Страница 1: ...ROBOTICS Product manual IRB 920 ...

Страница 2: ...Trace back information Workspace 22A version a22 Checked in 2022 03 21 Skribenta version 5 5 019 ...

Страница 3: ...Product manual IRB 920T 6 0 45 IRB 920T 6 0 55 IRB 920T 6 0 65 OmniCore Document ID 3HAC075721 001 Revision C Copyright 2022 ABB All rights reserved Specifications subject to change without notice ...

Страница 4: ...ranty by ABB for losses damage to persons or property fitness for a specific purpose or the like In no event shall ABB be liable for incidental or consequential damages arising from use of this manual and products described herein This manual and parts thereof must not be reproduced or copied without ABB s written permission Keep for future reference Additional copies of this manual may be obtaine...

Страница 5: ...and commissioning 51 3 1 Introduction to installation and commissioning 52 3 2 Unpacking 52 3 2 1 Pre installation procedure 53 3 2 2 Risk of tipping stability 54 3 2 3 Transportation bracket 55 3 3 On site installation 55 3 3 1 Brief installation procedure 56 3 3 2 Test run after installation maintenance or repair 57 3 3 3 Lifting the robot 57 3 3 3 1 Lifting the robot by two people 59 3 3 3 2 Li...

Страница 6: ... 3 2 Replacing the process hub 193 5 3 3 Replacing the SMB unit and battery unit 203 5 4 Base 203 5 4 1 Replacing the base 266 5 4 2 Replacing the axis 1 timing belt 325 5 5 Inner arm 325 5 5 1 Replacing the inner arm 398 5 6 Outer arm 398 5 6 1 Replacing the mechanical stopper 421 5 6 2 Replacing the bellows 436 5 6 3 Replacing the pulley on the ball screw upper position 454 5 6 4 Replacing the p...

Страница 7: ...968 6 5 1 Calibration position 969 6 5 2 Calibrating axis 1 and axis 2 970 6 5 3 Calibrating axis 3 and axis 4 975 6 6 Verifying the calibration 976 6 7 Checking the synchronization position 977 7 Troubleshooting 977 7 1 Introduction to troubleshooting 979 7 2 Oil and grease stains on motors and gearboxes 980 7 3 Mechanical noise or dissonance 982 7 4 Manipulator collapses on power down 983 7 5 Mo...

Страница 8: ...This page is intentionally left blank ...

Страница 9: ... to the foundation to making it ready for operation maintenance work repair work decommissioning work Note It is the responsibility of the integrator to conduct a risk assessment of the final application It is the responsibility of the integrator to provide safety and user guides for the robot system Who should read this manual This manual is intended for installation personnel maintenance personn...

Страница 10: ...AC065041 001 Technical reference manual System parameters i This manual contains all safety instructions from the product manuals for the manipulators and the controllers Revisions Description Revision First edition A Published in release 21D The following updates are done in this revision Updated signal lamp information see Installation of signal lamp option on page 70 Supported controller OmniCo...

Страница 11: ...missioning Reference information safety standards unit conversions screw joints lists of tools Spare parts list with corresponding figures or references to separate spare parts lists References to circuit diagrams Technical reference manuals The technical reference manuals describe reference information for robotics products for example lubrication the RAPID language and system parameters Applicat...

Страница 12: ...ucts The manuals are aimed at those having first hand operational contact with the product that is production cell operators programmers and troubleshooters 12 Product manual IRB 920 3HAC075721 001 Revision C Copyright 2022 ABB All rights reserved Product documentation Continued ...

Страница 13: ...lso include specific safety information when dangerous steps are to be performed Read more in the chapter Safety on page 15 Illustrations The product is illustrated with general figures that does not take painting or protection type in consideration Likewise certain work methods or general information that is valid for several product models can be illustrated with illustrations that show a differ...

Страница 14: ...This page is intentionally left blank ...

Страница 15: ...Operation of the robot when the safety devices are defective not in their intended location or in any other way not working When instructions for operation and maintenance are not followed Non authorized design modifications of the robot Repairs on the robot and its spare parts carried out by in experienced or non qualified personnel Foreign objects Force majeure Spare parts and equipment ABB supp...

Страница 16: ...nfluence of alcohol drugs or any other intoxicating substances are not allowed to install maintain service repair or use the robot The plant liable must make sure that the personnel is trained on the robot and on responding to emergency or abnormal situations Personal protective equipment Use personal protective equipment as stated in the instructions 16 Product manual IRB 920 3HAC075721 001 Revis...

Страница 17: ...ided will result in ser ious injury DANGER Signal word used to indicate a potentially hazardous situation which if not avoided could result in serious injury WARNING Signal word used to indicate a potentially hazardous situation related to electrical hazards which if not avoided could result in serious injury ELECTRICAL SHOCK Signal word used to indicate a potentially hazardous situation which if ...

Страница 18: ...used to indicate where to find additional information or how to do an operation in an easier way TIP 18 Product manual IRB 920 3HAC075721 001 Revision C Copyright 2022 ABB All rights reserved 1 Safety 1 2 1 Safety signals in the manual Continued ...

Страница 19: ...escription Symbol Warning xx0900000812 Warns that an accident may occur if the instructions are not followed that can lead to serious injury possibly fatal and or great damage to the product It applies to warnings that apply to danger with for example contact with high voltage electrical units explosion or fire risk risk of poisonous gases risk of crushing impact fall from height etc Caution xx090...

Страница 20: ...0000815 Disassembling this part can cause injury Extended rotation xx0900000814 This axis has extended rotation working area compared to standard Brake release xx0900000808 Pressing this button will release the brakes This means that the robot arm can fall down Continues on next page 20 Product manual IRB 920 3HAC075721 001 Revision C Copyright 2022 ABB All rights reserved 1 Safety 1 2 2 Safety sy...

Страница 21: ...tip over if the bolts are not securely fastened xx1500002402 Crush xx0900000817 Risk of crush injuries Continues on next page Product manual IRB 920 21 3HAC075721 001 Revision C Copyright 2022 ABB All rights reserved 1 Safety 1 2 2 Safety symbols on manipulator labels Continued ...

Страница 22: ...31 1 06 xx1300001087 Moving robot 1 2 3 4 5 6 xx0900000819 The robot can move unexpectedly xx1000001141 1 2 3 4 xx1500002616 Continues on next page 22 Product manual IRB 920 3HAC075721 001 Revision C Copyright 2022 ABB All rights reserved 1 Safety 1 2 2 Safety symbols on manipulator labels Continued ...

Страница 23: ...00001242 Lifting of robot xx0900000822 Oil xx0900000823 Can be used in combination with prohibition if oil is not allowed Mechanical stop xx0900000824 Continues on next page Product manual IRB 920 23 3HAC075721 001 Revision C Copyright 2022 ABB All rights reserved 1 Safety 1 2 2 Safety symbols on manipulator labels Continued ...

Страница 24: ...that this part is pressurized Usually contains additional text with the pressure level Shut off with handle xx0900000827 Use the power switch on the controller Do not step xx1400002648 Warns that stepping on these parts can cause damage to the parts 24 Product manual IRB 920 3HAC075721 001 Revision C Copyright 2022 ABB All rights reserved 1 Safety 1 2 2 Safety symbols on manipulator labels Continu...

Страница 25: ...stops are described in the product manual for the controller For more information see Product manual OmniCore C30 Product manual OmniCore C90XT Product manual OmniCore E10 Product manual IRB 920 25 3HAC075721 001 Revision C Copyright 2022 ABB All rights reserved 1 Safety 1 3 Robot stopping functions ...

Страница 26: ...le impact caused by a breaking or malfunctioning rotating tool or other device fitted to the robot The maximum TCP speed and the maximum velocity of the robot axes are detailed in the section Robot motion in the product specification for the respective manipulator Consider exposure to hazards such as slipping tripping and falling Hazards due to the working position and posture for a person working...

Страница 27: ...o protect people working with the robot system are designed and installed correctly When integrating the robot with external devices to a robot system The integrator of the robot system must ensure that emergency stop functions are interlocked in accordance with applicable standards The integrator of the robot system must ensure that safety functions are interlocked in accordance with applicable s...

Страница 28: ...rop Dump valves should be used in case of emergency Shot bolts should be used to prevent tools etc from falling due to gravity All pipes hoses and connections have to be inspected regularly for leaks and damage Damage must be repaired immediately Verify the safety functions Before the robot system is put into operation verify that the safety functions are working as intended and that any remaining...

Страница 29: ...ment of robot arm WARNING Hazards due to the use of brake release devices and or gravity beneath the manipulator shall be considered A robot may perform unexpected limited movement WARNING Manipulator movements can cause serious injuries on users and may damage equipment Product manual IRB 920 29 3HAC075721 001 Revision C Copyright 2022 ABB All rights reserved 1 Safety 1 5 Safety during operation ...

Страница 30: ...ns are working as intended Hot surfaces Surfaces can be hot after running the robot and touching these may result in burns Allow the surfaces to cool down before maintenance or repair Allergic reaction Elimination Action Description Warning Make sure that protective gear like goggles and gloves are al ways worn When working with lubricants there is a risk of an allergic reac tion Allergic reaction...

Страница 31: ... been drained from the gearbox Specified amount de pends on drained volume For lifetime reasons always drain as much oil as possible from the gearbox The magnetic oil plugs will gather residual metal chips Contaminated oil in gearboxes Hazards related to batteries Under rated conditions the electrode materials and liquid electrolyte in the batteries are sealed and not exposed to the outside There ...

Страница 32: ...orm unexpected limited movement WARNING Manipulator movements can cause serious injuries on users and may damage equipment Related information See also the safety information related to installation and operation 32 Product manual IRB 920 3HAC075721 001 Revision C Copyright 2022 ABB All rights reserved 1 Safety 1 6 1 Safety during maintenance and repair Continued ...

Страница 33: ...equire using an overhead crane or similar equipment Increased injury Before releasing the brakes make sure that the weight of the manipulator does not result in additional hazards for example even more severe injuries on a trapped person DANGER When releasing the holding brakes the robot axes may move very quickly and sometimes in unexpected ways Make sure no personnel is near or beneath the robot...

Страница 34: ...d 2 Switch the motor to the MOTORS OFF 3 Inspect and verify that the axis maintains its position If the manipulator does not change position as the motors are switched off then the brake function is adequate Note It is recommended to run the service routine BrakeCheck as part of the regular maintenance see the operating manual for the robot controller For robots with the option SafeMove the Cyclic...

Страница 35: ...ld engineers A risk assessment must be done to address both robot and robot system specific hazards WARNING Hazards due to the use of brake release devices and or gravity beneath the manipulator shall be considered A robot may perform unexpected limited movement WARNING Manipulator movements can cause serious injuries on users and may damage equipment Related information See also the safety inform...

Страница 36: ...rake release devices and or gravity beneath the manipulator shall be considered A robot may perform unexpected limited movement WARNING Manipulator movements can cause serious injuries on users and may damage equipment 36 Product manual IRB 920 3HAC075721 001 Revision C Copyright 2022 ABB All rights reserved 1 Safety 1 8 Safety during decommissioning ...

Страница 37: ...ructure that is especially adapted for flexible use and can communicate extensively with external systems The IRB 920 contains the following variants IRB 920T 6 0 45 IRB 920T 6 0 55 IRB 920T 6 0 65 Note Without any specific statement IRB 920 represents all variants under this product Product manual IRB 920 37 3HAC075721 001 Revision C Copyright 2022 ABB All rights reserved 2 Manipulator descriptio...

Страница 38: ...g Note The weight does not include additional options tools and other equipment fitted on the robot Loads on foundation robot Tz Fxy Fz Txy xx2000001168 Force in any direction in Plane XY Fxy Force along Axis Z Fz Continues on next page 38 Product manual IRB 920 3HAC075721 001 Revision C Copyright 2022 ABB All rights reserved 2 Manipulator description 2 2 Technical data ...

Страница 39: ... repeatability of the resolver calibration compared to original settings on delivery from ABB 0 1 500 mm Flatness of foundation surface The value for levelness aims at the circumstance of the anchoring points in the robot base In order to compensate for an uneven surface the robot can be recalibrated during installation If resolver encoder calibration is changed this will influence the absolute ac...

Страница 40: ...mum ambient temperature 70 C Maximum ambient temperature less than 24 hrs 95 at constant temperature gaseous only Maximum ambient humidity Operating conditions robot The table shows the allowed operating conditions for the robot Value Parameter 5ºC i Minimum ambient temperature 45ºC Maximum ambient temperature 5 95 non condensing accord ing to IEC61131 2 Maximum ambient humidity i At low environme...

Страница 41: ...390 mm 290 mm 290 mm 190 mm 190 mm X 716 5 mm 596 5 mm 716 5 mm 596 5 mm 716 5 mm 596 5 mm Z Robots with protection class IP54 option 3350 540 or with protection type Clean Room option 3351 5 303 Z 193 X 260 164 73 170 149 164 xx2100002391 For Clean Room only Continues on next page Product manual IRB 920 41 3HAC075721 001 Revision C Copyright 2022 ABB All rights reserved 2 Manipulator description ...

Страница 42: ...able version Robots with protection class IP30 3350 300 136 8 108 3 X 260 116 73 170 149 164 Z 201 5 193 53 xx2000001146 0 65_0 3 0 65_0 18 0 55_0 3 0 55_0 18 0 45_0 3 0 45_0 18 390 mm 390 mm 290 mm 290 mm 190 mm 190 mm X 716 5 mm 596 5 mm 716 5 mm 596 5 mm 716 5 mm 596 5 mm Z Continues on next page 42 Product manual IRB 920 3HAC075721 001 Revision C Copyright 2022 ABB All rights reserved 2 Manipu...

Страница 43: ...ean Room only 0 65_0 3 0 65_0 18 0 55_0 3 0 55_0 18 0 45_0 3 0 45_0 18 390 mm 390 mm 290 mm 290 mm 190 mm 190 mm X 728 7 mm 610 8 mm 728 7 mm 610 8 mm 728 7 mm 610 8 mm Z 150 7 mm 165 7 mm 150 7 mm 165 7 mm 150 7 mm 165 7 mm W Product manual IRB 920 43 3HAC075721 001 Revision C Copyright 2022 ABB All rights reserved 2 Manipulator description 2 3 Robot dimensions Continued ...

Страница 44: ... 150 F 145 G D C B E P Axis 4 rotation center 400 H A P xx2000001137 0 65_0 3 0 65_0 18 0 55_0 3 0 55_0 18 0 45_0 3 0 45_0 18 300 mm 180 mm 300 mm 180 mm 300 mm 180 mm A Axis3 650 mm 550 mm 450 mm B Continues on next page 44 Product manual IRB 920 3HAC075721 001 Revision C Copyright 2022 ABB All rights reserved 2 Manipulator description 2 4 Working range ...

Страница 45: ... mm 290 mm 190 mm C 260 mm D 231 5 mm 167 8 mm 150 9 mm E 150 F Axis1 145 G Axis2 400 H Axis4 Continues on next page Product manual IRB 920 45 3HAC075721 001 Revision C Copyright 2022 ABB All rights reserved 2 Manipulator description 2 4 Working range Continued ...

Страница 46: ...B E P A Axis 3 Stroke xx2100002430 0 65_0 3 0 65_0 18 0 55_0 3 0 55_0 18 0 45_0 3 0 45_0 18 250 mm 145 mm 250 mm 145 mm 250 mm 145 mm A Axis3 650 mm 550 mm 450 mm B 390 mm 290 mm 190 mm C Continues on next page 46 Product manual IRB 920 3HAC075721 001 Revision C Copyright 2022 ABB All rights reserved 2 Manipulator description 2 4 Working range Continued ...

Страница 47: ...icted working range Robots with protection class IP30 option 3350 300 Axis 3 180 mm 300 mm Value for restricted working range Robots with protection class IP54 option 3350 540 or with protection type Clean Room option 3351 5 145 mm 250 mm Default value 400 Axis 4 Product manual IRB 920 47 3HAC075721 001 Revision C Copyright 2022 ABB All rights reserved 2 Manipulator description 2 4 Working range C...

Страница 48: ... F D A B E G A xx2000001143 ABB logo Big size A ABB logo Small size B Rating label C Calibration label D UL label E WEEE label F Read manual and caution G Clean Room labeli H i Only for robots with protection type Clean Room 48 Product manual IRB 920 3HAC075721 001 Revision C Copyright 2022 ABB All rights reserved 2 Manipulator description 2 5 Information labels ...

Страница 49: ...estroy sensitive electronics Safe handling Use one of the following alternatives Use a wrist strap Wrist straps must be tested frequently to ensure that they are not damaged and are operating correctly Use an ESD protective floor mat The mat must be grounded through a current limiting resistor Use a dissipative table mat The mat should provide a controlled discharge of static voltages and must be ...

Страница 50: ...This page is intentionally left blank ...

Страница 51: ...tion must be observed There are general safety aspects that must be read through as well as more specific safety information that describes the danger and safety risks when performing the procedures Read the chapter Safety on page15 before performing any installation work Note Always connect the IRB 920 and the robot to protective earth and residual current device RCD before connecting to power an...

Страница 52: ... lifting accessory used if required is suitable to handle the weight of the robot as specified in Weight robot on page 38 5 If the robot is not installed directly it must be stored as described in Storage condi tions robot on page 40 6 Make sure that the expected operating environment of the robot conforms to the specifications as described in Operating conditions robot on page 40 7 Before taking ...

Страница 53: ...bot in its shipping position and transportation position xx2000001152 Transportation bracket At delivery the robot is locked in the correct position with a transportation bracket for securing the position during shipping and transport The bracket must be removed before conducting any service work How to use the transportation bracket is described further in Transportation bracket on page 54 WARNIN...

Страница 54: ...e robot for further use 2 1 xx2000001151 Base inner arm fixture 1 Inner arm outer arm fixture 2 Removing the transportation bracket Note Action CAUTION For robots with protection type Clean Room Always cut the paint with a knife and grind the paint edge when disassembling parts of the robot See Cut the paint or surface on the robot before replacing parts on page 118 1 Remove the screws 2 Remove th...

Страница 55: ... bot on page 65 See Product manual OmniCore C30 Product manual OmniCore C90XT Product manual OmniCore E10 Connect the manipulator to the controller 4 See Product manual OmniCore C30 Product manual OmniCore C90XT Product manual OmniCore E10 Configure the safety settings 5 See Product manual OmniCore C30 Product manual OmniCore C90XT Product manual OmniCore E10 How to start and run the robot is desc...

Страница 56: ...rict the robot motion during service activity is removed 3 Verify that the fixture and work piece are well secured if applicable 4 Verify that all safety equipment is installed as designed for the application 5 Verify that no personnel are inside the safeguarded space 6 If maintenance or repair has been done verify the function of the part that was main tained 7 Verify the application in the opera...

Страница 57: ...ets cannot be removed until the robot is secured to the foundation Grasping location Grasp the robot with one hand supporting at the housing and the other hand holding the base xx2000001156 Continues on next page Product manual IRB 920 57 3HAC075721 001 Revision C Copyright 2022 ABB All rights reserved 3 Installation and commissioning 3 3 3 1 Lifting the robot by two people ...

Страница 58: ...ng location on page 57 2 Lift the robot 3 Move the robot to desired position CAUTION Be careful so that the robot does not bump into something while lifting and transporting It could damage the robot 4 Secure the robot on a workbench according to section Orienting and securing the robot on page 65 5 58 Product manual IRB 920 3HAC075721 001 Revision C Copyright 2022 ABB All rights reserved 3 Instal...

Страница 59: ... than the recommended lifting position may result in the robot tipping over causing severe damage or injury Required tools and equipment Note Article number Equipment Overhead crane Length 2 m Lifting capacity 100 kg Roundsling 2 m Length 2 5 m Lifting capacity 2 000 kg Roundsling 2 5 m Continues on next page Product manual IRB 920 59 3HAC075721 001 Revision C Copyright 2022 ABB All rights reserve...

Страница 60: ...oom robots it is important not to rub against the paint of the robot while perform ing any service work on the robot 2 CAUTION The weight of the IRB 920 robot is 22 kg All lifting accessories used must be sized ac cordingly 3 WARNING Personnel must not under any circumstances be present under the suspended load 4 Continues on next page 60 Product manual IRB 920 3HAC075721 001 Revision C Copyright ...

Страница 61: ...e lifting roundslings to the robot 5 Valid for IRB 920T 6 0 55 xx2000001144 Valid for IRB 920T 6 0 65 xx2000001153 Continues on next page Product manual IRB 920 61 3HAC075721 001 Revision C Copyright 2022 ABB All rights reserved 3 Installation and commissioning 3 3 3 2 Lifting robot with lifting accessories Continued ...

Страница 62: ... because there is a risk of the robot being damaged Screw M12x35 robot installation dir ectly on foundation 4 pcs Remove the robot attachment screws if the robot is fastened 7 Raise the overhead crane to lift the robot 8 62 Product manual IRB 920 3HAC075721 001 Revision C Copyright 2022 ABB All rights reserved 3 Installation and commissioning 3 3 3 2 Lifting robot with lifting accessories Continue...

Страница 63: ...uipped with a brake release unit Note Action Note If the robot is not connected to the controller power must be supplied to the connector R1 MP according to the section Supplying power to connector R1 MP on page 64 1 DANGER When releasing the holding brakes the robot axes may move very quickly and sometimes in unexpec ted ways Make sure no personnel is near or beneath the ro bot 2 Continues on nex...

Страница 64: ...er to enable the brake release buttons Note Action DANGER Incorrect connections such as supplying power to the wrong pin may cause all brakes to be released simultaneously and instantly 1 xx2000001136 Supply 0V on pin 12 24V on pin 11 Note Do not interchange the 24V and 0V pins If they are mixed up damage can be caused to internal electrical components 2 Use the brake releasing button as described...

Страница 65: ...ot floor mounted Note Action Make sure the installation site for the robot con forms to the specifications in section Technical data on page 38 1 The hole configuration of the base is shown in the figure in Hole con figuration base on page 66 Prepare the installation site with attachment holes The foundation surface must be clean and un painted 2 CAUTION The weight of the IRB 920 robot is IRB 920T...

Страница 66: ... 5 steel hard ness class 200HV Tightening torque 56 Nm 5 6 Nm Tighten the bolts in a crosswise pattern to ensure that the base is not distorted 9 Hole configuration base This illustration shows the hole configuration used when securing the robot Illustration for rear outlet cable version 4x 13 5 140 140 6H7 2 6H7 59 77 76 2 5 2 5 xx2000001147 Continues on next page 66 Product manual IRB 920 3HAC07...

Страница 67: ... A 53 136 8 A 108 3 5 2 5 76 2 59 4x 6H7 2 140 140 13 5 6H7 77 xx2000001148 Product manual IRB 920 67 3HAC075721 001 Revision C Copyright 2022 ABB All rights reserved 3 Installation and commissioning 3 3 5 Orienting and securing the robot Continued ...

Страница 68: ...stops or major damage to the robot Load diagrams permitted extra loads equipment and their positions are specified in the product specification The loads must be defined in the software Stopping time and braking distances The performance of the motor brake depends on if there are any loads attached to the robot See Product specification Robot stopping distances according to ISO 10218 1 68 Product ...

Страница 69: ...TORS ON mode Note This function is NOT valid when connecting to OmniCore E10 Further information Further information about the MOTORS ON MOTORS OFF mode may be found in the product manual for the controller Product manual IRB 920 69 3HAC075721 001 Revision C Copyright 2022 ABB All rights reserved 3 Installation and commissioning 3 3 7 1 Lamp on the robot ...

Страница 70: ...or to the I O connector on the controller Note The I O connectors provides 8 digital output signals for use Configure the lamp by adding a System Output type signal with status set to Motors On State 4 The lamp is now ready for use and is lit in MOTORS ON mode 5 Installation of signal lamp from MON_LAMP signal Action DANGER Make sure that all supplies for electrical power hydraulic pressure and ai...

Страница 71: ... is now ready for use and is lit in MOTORS ON mode 4 Further information Further information about the MOTORS ON MOTORS OFF mode may be found in the product manual for the controller Further information about how to set up I O system may be found in Technical reference manual System parameters Product manual IRB 920 71 3HAC075721 001 Revision C Copyright 2022 ABB All rights reserved 3 Installation...

Страница 72: ...xM4 8 xx2000001149 0 65_0 3 0 65_0 18 0 55_0 3 0 55_0 18 0 45_0 3 0 45_0 18 390 mm 390 mm 290 mm 290 mm 190 mm 190 mm X 360 mm 360 mm 260 mm 260 mm 160 mm 160 mm Y Fitting of end effector to the ball screw spline shaft An end effector can be attached to the lower end of the shaft of the ball screw spline unit The dimensions for fitting the end effector is shown in the following figure Note Mountin...

Страница 73: ...on 3350 540 or with protection type Clean Room option 3351 5 B B 20 14 15 38 5 30 40 2 V C C 9 120 E E 10 10 C C xx2100002394 For Clean Room only Continues on next page Product manual IRB 920 73 3HAC075721 001 Revision C Copyright 2022 ABB All rights reserved 3 Installation and commissioning 3 3 8 Fitting equipment on the robot robot dimensions Continued ...

Страница 74: ...ting tools on the tool flange only use screws with quality 12 9 For other equipment use suitable screws and tightening torque for your application 74 Product manual IRB 920 3HAC075721 001 Revision C Copyright 2022 ABB All rights reserved 3 Installation and commissioning 3 3 8 Fitting equipment on the robot robot dimensions Continued ...

Страница 75: ...pecified in Working range on page 44 Mechanical stops on the manipulator Mechanical stops are and can be installed on the manipulator as limiting devices to ensure that the manipulator axis does not exceed the working range values set in the software parameters Note The mechanical stops are only installed as safety precaution to physically stop the robot from exceeding the working range set A coll...

Страница 76: ...te See the latest spare parts of the IRB 920 via myABB Business Portal www abb com myABB Note Article number Spare part 3HAC075320 001 Block Replacement of the axis 1 mechanical stop For more details about replacing the axis 1 mechanical stop see Removing the block from the base on page 231 Continues on next page 76 Product manual IRB 920 3HAC075721 001 Revision C Copyright 2022 ABB All rights res...

Страница 77: ...quired spare parts Note The spare part numbers that are listed in the table can be out of date See the latest spare parts of the IRB 920 via myABB Business Portal www abb com myABB Note Article number Spare part With bolt 3HAC073068 001 Mechanical Stop top D20 With bolt 3HAC073069 001 Mechanical Stop bottom D20 Replacement of the axis 3 mechanical stop For more details about replacing the axis 3 m...

Страница 78: ...age signals and high voltage power supply protective ground Customer cables The customer cables also handle databus communication The customer cables also include the air hose See the product manual for the controller see document number in References on page 10 The hose for compressed air is integrated with the manipu lator cable harness Air hoses Robot cables These cables are included in the sta...

Страница 79: ...nals Article number Signal cable length 3HAC067446 001 Signal cable shielded 3 m 3HAC067446 002 Signal cable shielded 7 m 3HAC067446 003 Signal cable shielded 15 m Bending radius for static floor cables The minimum bending radius is 10 times the cable diameter for static floor cables A B xx1600002016 Diameter A Diameter x10 B Continues on next page Product manual IRB 920 79 3HAC075721 001 Revision...

Страница 80: ...female type It is the responsibility of the users to guarantee the safety of the system when self prepared cables and connectors are used Customer cables Ethernet floor cable Article numberi Ethernet floor cable length 3HAC067447 002 7 m 3HAC067447 003 15 m i It is recommended to always use the Ethernet floor cable provided by ABB If users still require to do wiring by their own make sure to use R...

Страница 81: ...he outer arm Corresponding connector R1 C1 R1 C2 are located at the base Hose for compressed air is also integrated into the manipulator There are 4 inlets at the base R1 8 and 4 outlets M5 on the outer arm B B C C A A xx2000001161 D xx2100002441 Continues on next page Product manual IRB 920 81 3HAC075721 001 Revision C Copyright 2022 ABB All rights reserved 3 Installation and commissioning 3 5 2 ...

Страница 82: ... CP CS cable and Ethernet floor cable respectively For details about the robot cabling see Robot cabling and connection points on page 78 Connector kits outer arm The table describes the CP CS and Ethernet if any connector kits for the outer arm Art no Description Position 3HAC066098 001 M12 CPCS Male straight connect or kits CP CS Connector kits 3HAC066099 001 M12 CPCS Male angled connector kits ...

Страница 83: ...em D C C B A xx2000001162 E xx2100002442 Protection covers for air hose connector on the base A Protection covers for air hose connector on the process hub B Protection covers for C2 SMB connector on the base and C1 C2 connector on the process hub C Protection cover for C1 connector on the base D Continues on next page Product manual IRB 920 83 3HAC075721 001 Revision C Copyright 2022 ABB All righ...

Страница 84: ... connector on the basei E i Only available for protection type Clean Room 84 Product manual IRB 920 3HAC075721 001 Revision C Copyright 2022 ABB All rights reserved 3 Installation and commissioning 3 5 2 Customer connections Continued ...

Страница 85: ...eneral safety aspects that must be read through as well as more specific safety information that describes the danger and safety risks when performing the procedures Read the chapter Safety on page 15 before performing any service work The maintenance must be done by qualified personnel in accordance with the safety requirements set forth in the applicable national and regional standards and regul...

Страница 86: ...ailable for estimating the service interval remaining lifetime of the gearboxes of a robot Such information of the ball screw spline unit of the IRB 920 is reported as axis 3 in the SIS system When a service message is reported for axis 3 of the IRB 920 an inspection on the ball screw spline unit is required For more information about the SIS function see Operating manual Service Information Syste...

Страница 87: ... running means more frequent maintenance activities SIS specified by the robot s SIS Service Information System A typical value is given for a typical work cycle but the value will differ depending on how hard each part is run The SIS used in OmniCore is further described in the Operating manual OmniCore Robots with the functionality Service Information System activated can show active counters in...

Страница 88: ... robot harness Inspecting the information labels on page 91 x Inspecting the information labels Inspecting the ball screw spline unit on page 94 x Inspecting the ball screw spline unit Inspecting axis 3 mechanical stops on page 97 x Inspecting the mechanical stop Inspecting timing belts on page 100 x Inspecting the timing belt Lubricating the ball screw spline unit on page 106 x Lubricating the ba...

Страница 89: ...battery is to be replaced at given maintenance interval or at battery low alert iv Not needed separately if already included in the application v Recommended test interval is within the range 8 48 hours Product manual IRB 920 89 3HAC075721 001 Revision C Copyright 2022 ABB All rights reserved 4 Maintenance 4 3 2 Maintenance schedule Continued ...

Страница 90: ... of normal usage in regard to movement most material handling applications and limited use of bending backwards mode of axis 3 ii Severe chemical or thermal environments or similar environments can result in shortened life expectancy iii Examples of extreme usage in regard to movement press tending very severe palletizing applications major use of axis 1 movement and major use of bending backwards...

Страница 91: ...01143 ABB logo Big size A ABB logo Small size B Rating label C Calibration label D UL label E WEEE label F Read manual and caution G Required tools and equipment Visual inspection no tools are required Inspecting labels Note Action DANGER Turn off all electric power supply hydraulic pressure supply air pressure supply to the robot before entering the safeguarded space 1 Inspect the labels located ...

Страница 92: ...d plate set is specified in Spare parts on page 1001 Replace any missing or damaged labels 3 92 Product manual IRB 920 3HAC075721 001 Revision C Copyright 2022 ABB All rights reserved 4 Maintenance 4 4 1 Inspecting the information labels Continued ...

Страница 93: ... the replacement procedure Inspection robot cabling Use this procedure to inspect the robot cabling Note Action DANGER Turn off all electric power supply to the robot hydraulic pressure supply to the robot air pressure supply to the robot Before entering the robot working area 1 Visually inspect the control cabling between the robot and control cabinet the cabling to motors 1 and 2 Look for abrasi...

Страница 94: ...all screw spline unit is inside the bellows If needed remove the bellows to inspect the ball screw spline unit For details about how to remove the bellows see Replacing the bellows Required spare parts Note The spare part numbers that are listed in the table can be out of date See the latest spare parts of the IRB 920 via myABB Business Portal www abb com myABB Note Article number Spare part Used ...

Страница 95: ...ith protection class IP54 First remove the upper bellow and lower bellow according to Replacing the bellows on page 421 Then use this procedure to inspect the ball screw spline unit Note Action Turn on the electric power supply to the robot If the robot is not connected to the controller power must be supplied to the connector R1 MP according to the section Supplying power to connector R1 MP on pa...

Страница 96: ...blocks on the ball screw spline unit the shaft of the ball screw spline unit Look for abrasions cuts or crush damages on the spline and grease amount on the shaft 6 See Lubricating the ball screw spline unit on page 106 Apply grease to the shaft if it is not enough 7 See Replacing the ball screw on page 488 Replace the ball screw spline unit if wear or dam age is detected 8 96 Product manual IRB 9...

Страница 97: ...ss IP54 the mechanical stops are inside the bellows If needed remove the bellows to inspect the ball screw spline unit For the details on removing the bellows refer to Replacing the bellows Required spare parts Note The spare part numbers that are listed in the table can be out of date See the latest spare parts of the IRB 920 via myABB Business Portal www abb com myABB Note Article number Spare p...

Страница 98: ... ball screw spline unit Use this procedure to inspect mechanical stops on axes 1 and 2 Information Action DANGER Turn off all electric power supply hydraulic pressure supply air pressure supply to the robot before entering the robot working area 1 CAUTION For robots with protection type Clean Room Always cut the paint with a knife and grind the paint edge when disassembling parts of the robot See ...

Страница 99: ...l stop is bent loose damaged Note The expected life of gearboxes can be reduced as a result of collisions with the mechanical stop 4 Product manual IRB 920 99 3HAC075721 001 Revision C Copyright 2022 ABB All rights reserved 4 Maintenance 4 4 4 Inspecting axis 3 mechanical stops Continued ...

Страница 100: ...eneral procedures before doing any repair work Cut the paint or surface on the robot before replacing parts on page 118 Continues on next page 100 Product manual IRB 920 3HAC075721 001 Revision C Copyright 2022 ABB All rights reserved 4 Maintenance 4 4 5 Inspecting timing belts ...

Страница 101: ... located as shown in the figures Location Axis xx2100001015 1 xx2100001024 2 3 Continues on next page Product manual IRB 920 101 3HAC075721 001 Revision C Copyright 2022 ABB All rights reserved 4 Maintenance 4 4 5 Inspecting timing belts Continued ...

Страница 102: ...on Axis xx2100001020 xx2100001022 4 4 2 Continues on next page 102 Product manual IRB 920 3HAC075721 001 Revision C Copyright 2022 ABB All rights reserved 4 Maintenance 4 4 5 Inspecting timing belts Continued ...

Страница 103: ...the replacement procedure Timing belt tension The table describes the timing belt tension Frequency Force Axis New timing belt Used timing belt New timing belt Used timing belt 250 308 90 51 1 Axis 1 260 315 70 64 7 Axis 2 110 139 40 36 6 Axis 3 245 312 35 36 3 Axis 4 180 202 240 100 Axis 4 2 Continues on next page Product manual IRB 920 103 3HAC075721 001 Revision C Copyright 2022 ABB All rights ...

Страница 104: ...belt by removing the cover 2 Check the timing belts for damage or wear 3 Check the timing belt pulleys for damage 4 If any damage or wear is detected the part must be replaced 5 See Timing belt tension on page 103 Use a sonic tension meter to measure the timing belt tension 6 Adjust the belt tension if needed 104 Product manual IRB 920 3HAC075721 001 Revision C Copyright 2022 ABB All rights reserv...

Страница 105: ...cing the battery pack is accessible after removing the SMB from the base see Replacing the SMB unit and battery unit on page 193 Product manual IRB 920 105 3HAC075721 001 Revision C Copyright 2022 ABB All rights reserved 4 Maintenance 4 5 Replacement changing activities ...

Страница 106: ...ine unit is inside the bellows If needed remove the bellows to inspect the ball screw spline unit For details about how to remove the bellows see Replacing the bellows Required tools and equipment Note Article number Equipment Used to release the motor brakes 24 VDC power supply Required consumables Note Article number Consumable THK AFA Grease Continues on next page 106 Product manual IRB 920 3HA...

Страница 107: ...s disassembled or tooling is properly supported otherwise fast downward movements of axis 3 may cause severe hits 2 Release the holding brake by pressing the button on the internal brake release unit 3 Move the outer arm to a position where the axis 3 can be moved in full stroke 4 Move the shaft manually to its upper limit while pressing the brake release button 5 Wipe off old grease from the shaf...

Страница 108: ...life of the robot Always check that all protective covers are fitted to the robot before cleaning Do not point the water jet at connectors joints sealings or gaskets Do not use compressed air to clean the robot Do not use solvents that are not approved by ABB to clean the robot Do not spray from a distance closer than 0 4 m Do not remove any covers or other protective devices before cleaning the r...

Страница 109: ...ndry Prime can be cleaned by rinsing with water water cleaner 1 The following list defines the prerequisites Maximum water pressure at the nozzle 700 kN m2 7 bar I Fan jet nozzle should be used min 45 spread Minimum distance from nozzle to encapsulation 0 4 meters Maximum flow 20 liters minI I Typical tap water pressure and flow Cables Movable cables need to be able to move freely Remove waste mat...

Страница 110: ...This page is intentionally left blank ...

Страница 111: ... This is particularly important for safety equipment to maintain the safety integrity of the installation Safety information Make sure to read through the chapter Safety on page 15 before commencing any service work Note The robot should be secured with the transportation brackets during removing from refitting to the foundation Note If the IRB 920 is connected to power always make sure that the I...

Страница 112: ...N The pressure must under no circumstance be higher than 0 25 bar 20 25 kPa Also during the time when the pressure is raised 3 0 2 0 25 bar 20 25 kPa Disconnect the compressed air supply 4 If the compressed air is signific antly colder or warmer than the gearbox to be tested a slight pressure increase or decrease may occur This is quite normal Wait for approximately 8 10 minutes and make sure that...

Страница 113: ...be exposed to any stresses during the assembly work 3 Assembly of tapered bearings Follow the preceding instructions for the assembly of the bearings when mounting a tapered bearing on the robot In addition to those instructions the following procedure must be carried out to enable the roller elements to adjust to the correct position against the race flange Note Action Tension the bearing gradual...

Страница 114: ... started During operation the bearing should be filled to 70 80 of the available volume Ensure that grease is handled and stored properly to avoid contamination Grease the different types of bearings as following description Grooved ball bearings must be filled with grease from both sides Tapered roller bearings and axial needle bearings must be greased in the split condition 114 Product manual IR...

Страница 115: ...e Action Check the sealing to ensure that The sealing is of the correct type There is no damage on the main lip 1 Inspect the shaft surface before mounting If scratches or damage are found the shaft must be replaced since it may result in future leakage Do not try to grind or polish the shaft surface to get rid of the defect 2 Article number is specified in Equipment on page 115 A B C xx2000000071...

Страница 116: ...ective the parts may not be used because leakage could occur Clean the surfaces properly in accordance with the recommendations of ABB 2 Distribute the sealing compound evenly over the surface preferably with a brush 3 Tighten the screws evenly when fastening the flange joint 4 O rings The following procedure describes how to fit o rings Note Action Ensure that the correct o ring size is used 1 De...

Страница 117: ...e o ring with grease 4 Tighten the screws evenly while assembling 5 Check that the o ring is not squashed outside the o ring groove 6 Make sure that no grease is left on the robot surface 7 Product manual IRB 920 117 3HAC075721 001 Revision C Copyright 2022 ABB All rights reserved 5 Repair 5 2 3 Mounting instructions for sealings Continued ...

Страница 118: ...ol Cleaning agent Knife Lint free cloth White 3HAC036639 001 Touch up paint Clean Room Hy gienic Graphite White 3HAC067974 001 Touch up paint Standard Foundry Plus Removing Description Action xx0900000121 Cut the paint with a knife in the joint between the part that will be removed and the struc ture to avoid that the paint cracks 1 Carefully grind the paint edge that is left on the structure to a...

Страница 119: ...ry time 10 minutes 3HAC036639 001 Use Touch up paint Clean Room Hygienic white to paint any damaged surfaces Note Always read the instruction in the product data sheet in the paint repair kit for Clean Room Hygienic 6 Note After all repair work wipe the robot free from particles with spirit on a lint free cloth Product manual IRB 920 119 3HAC075721 001 Revision C Copyright 2022 ABB All rights rese...

Страница 120: ...yABB Note Article number Spare part 3HAC076580 001 Main harness MS Basic 3HAC076581 001 Main harness MS Basic C1 Air 3HAC076582 001 Main harness MS Ba sic C1 C2 Air 3HAC079759 001 Main harness ML Basic 3HAC079760 001 Main harness ML Basic C1 Air 3HAC079761 001 Main harness ML Ba sic C1 C2 Air Base bottom cover rear cable 3HAC067865 001 Base plate rear outlet cable Continues on next page 120 Produc...

Страница 121: ...r to beginning the repair work of the robot see the table Note Action Decide which calibration routine to use for calibrating the robot Reference calibration External cable packages DressPack and tools can stay fitted on the robot Fine calibration All external cable packages DressPack and tools must be removed from the robot 1 Follow the instructions given in the refer ence calibration routine on ...

Страница 122: ...own the robot during the transporta tion always keep it straight If the robot lay down in any situation the grease may come out from gearbox 2 xx2100000930 Jog all axes to zero position 3 DANGER Turn off all electric power supply hydraulic pressure supply air pressure supply to the robot before entering the safeguarded space 4 CAUTION For robots with protection type Clean Room Always cut the paint...

Страница 123: ... IP30 xx2100000932 Remove the screws on the process hub Note For robots with protection class IP54 option 3350 540 For robots with protection type Clean Room op tion 3351 1 Remove the screws on the process hub and take out the gasket Tip Check the gasket and replace it if needed 3 For robots with protection class IP54 option 3350 540 For robots with protection type Clean Room option 3351 1 xx21000...

Страница 124: ...the paint or surface on the robot before replacing parts on page 118 2 xx2100002398 For robots with protection class IP54 option 3350 540 For robots with protection type Clean Room op tion 3351 1 Loose the locking screws 3 xx2100002399 For robots with protection class IP54 option 3350 540 For robots with protection type Clean Room op tion 3351 1 Remove the top cover from the ball screw 4 Continues...

Страница 125: ...oving the cover of the outer arm Note Action DANGER Make sure that all supplies for electrical power hydraulic pressure and air pressure are turned off 1 CAUTION For robots with protection type Clean Room Always cut the paint with a knife and grind the paint edge when disassembling parts of the robot See Cut the paint or surface on the robot before replacing parts on page 118 2 Continues on next p...

Страница 126: ...For robots with protection type Clean Room option 3351 1 xx2100002427 Disconnecting the air hoses C1 cabling and C2 cabling if equipped Note Action DANGER Make sure that all supplies for electrical power hydraulic pressure and air pressure are turned off 1 CAUTION For robots with protection type Clean Room Always cut the paint with a knife and grind the paint edge when disassembling parts of the r...

Страница 127: ...aps for the R1 C2 at the same time Tip Take photos of the connector and cable position before disconnecting them to have as a reference when reconnecting 5 Tip The connector clip has to be pressed 1 and pushed forward 2 to separate the R1 C2 for C2 cabling xx1800002943 Continues on next page Product manual IRB 920 127 3HAC075721 001 Revision C Copyright 2022 ABB All rights reserved 5 Repair 5 3 1 ...

Страница 128: ...hat all supplies for electrical power hydraulic pressure and air pressure are turned off 1 CAUTION For robots with protection type Clean Room Always cut the paint with a knife and grind the paint edge when disassembling parts of the robot See Cut the paint or surface on the robot before replacing parts on page 118 2 xx2100000934 Disconnect the connectors R2 MP2 R2 FB2 3 Continues on next page 128 ...

Страница 129: ...hat all supplies for electrical power hydraulic pressure and air pressure are turned off 1 CAUTION For robots with protection type Clean Room Always cut the paint with a knife and grind the paint edge when disassembling parts of the robot See Cut the paint or surface on the robot before replacing parts on page 118 2 xx2100000936 Disconnect the connectors R2 MP3 R2 FB3 3 Continues on next page Prod...

Страница 130: ...e See Cut the paint or surface on the robot before replacing parts on page 118 Note After all repair work wipe the Clean Room robot free from particles with spirit on a lint free cloth xx2100000938 Disconnect the axis 4 motor connectors R2 MP4 R2 FB4 2 xx2100000939 Snap loose and remove the female head of the connectors from the bracket Note The harness are not visible due to the cleanness require...

Страница 131: ...sconnect the connector R2 PB R2 LAMP 3 xx2100001031 Snap loose and remove the female head of the connector from the bracket Note The harness are not visible due to the cleanness requirements of the illustration They are still ex isting inside the cable ferrule in the actual situ ation 4 Pull out the process hub Note Action DANGER Make sure that all supplies for electrical power hydraulic pressure ...

Страница 132: ...m option 3351 1 xx2100002438 CAUTION Be aware of the cabling that is attached to the cover The cover can not be removed completely until the connectors are disconnected as shown in following steps Removing the cable ferrule and bracket Note Action DANGER Make sure that all supplies for electrical power hydraulic pressure and air pressure are turned off 1 CAUTION For robots with protection type Cle...

Страница 133: ...ot visible due to the cleanness requirements of the illustration They are still ex isting inside the cable ferrule in the actual situ ation 4 xx1800002842 Remove the screws on the cable ferrule and take the cable ferrule out 5 xx1800002849 Removing the axis 1 cover Note Action DANGER Make sure that all supplies for electrical power hydraulic pressure and air pressure are turned off 1 Continues on ...

Страница 134: ...Tip Replace the gasket if needed 4 For robots with protection class IP54 option 3350 540 For robots with protection type Clean Room option 3351 1 xx2100002428 Removing the axis 2 cover Note Action DANGER Make sure that all supplies for electrical power hydraulic pressure and air pressure are turned off 1 CAUTION For robots with protection type Clean Room Always cut the paint with a knife and grind...

Страница 135: ...3350 540 For robots with protection type Clean Room option 3351 1 xx2100002451 Removing the SMB cover Note Action DANGER Make sure that all supplies for electrical power hydraulic pressure and air pressure are turned off 1 ELECTROSTATIC DISCHARGE ESD The unit is sensitive to ESD Before handling the unit read the safety information in section The unit is sensitive to ESD on page 49 2 Continues on n...

Страница 136: ...the SMB cover with the SMB unit assembly out together Note For robots with protection class IP54 option 3350 540 For robots with protection type Clean Room op tion 3351 1 Check the gasket for the SMB cover Tip Replace the gasket if needed 5 For robots with protection class IP54 option 3350 540 For robots with protection type Clean Room option 3351 1 xx2100002433 Disconnecting the SMB cabling Note ...

Страница 137: ...ctor and cable position before disconnecting them to have as a reference when reconnecting 5 Removing the base plate rear plate Note Action DANGER Make sure that all supplies for electrical power hydraulic pressure and air pressure are turned off 1 CAUTION For robots with protection type Clean Room Always cut the paint with a knife and grind the paint edge when disassembling parts of the robot See...

Страница 138: ...lass IP54 option 3350 540 For robots with protection type Clean Room op tion 3351 1 Check the gasket for the base plate Tip Replace the gasket if needed 6 For robots with protection class IP54 option 3350 540 For robots with protection type Clean Room option 3351 1 xx2100002434 Continues on next page 138 Product manual IRB 920 3HAC075721 001 Revision C Copyright 2022 ABB All rights reserved 5 Repa...

Страница 139: ... option 3350 540 For robots with protection type Clean Room option 3351 1 xx2100002435 Disconnecting the grounding cable connectors Note Action DANGER Make sure that all supplies for electrical power hydraulic pressure and air pressure are turned off 1 CAUTION For robots with protection type Clean Room Always cut the paint with a knife and grind the paint edge when disassembling parts of the robot...

Страница 140: ... grind the paint edge when disassembling parts of the robot See Cut the paint or surface on the robot before replacing parts on page 118 2 xx2100000948 Remove the screws on the base bracket to the base 3 Disconnecting the connectors for axis 1 motor Note Action DANGER Make sure that all supplies for electrical power hydraulic pressure and air pressure are turned off 1 Continues on next page 140 Pr...

Страница 141: ...rements of the illustration They are still ex isting inside the cable ferrule in the actual situ ation 4 Removing the bracket Note Action DANGER Make sure that all supplies for electrical power hydraulic pressure and air pressure are turned off 1 CAUTION For robots with protection type Clean Room Always cut the paint with a knife and grind the paint edge when disassembling parts of the robot See C...

Страница 142: ...ic pressure and air pressure are turned off 1 CAUTION For robots with protection type Clean Room Always cut the paint with a knife and grind the paint edge when disassembling parts of the robot See Cut the paint or surface on the robot before replacing parts on page 118 2 Continues on next page 142 Product manual IRB 920 3HAC075721 001 Revision C Copyright 2022 ABB All rights reserved 5 Repair 5 3...

Страница 143: ... the main harness from the axis 1 gearbox position Note Action DANGER Make sure that all supplies for electrical power hydraulic pressure and air pressure are turned off 1 CAUTION For robots with protection type Clean Room Always cut the paint with a knife and grind the paint edge when disassembling parts of the robot See Cut the paint or surface on the robot before replacing parts on page 118 2 C...

Страница 144: ...ure that all supplies for electrical power hydraulic pressure and air pressure are turned off 1 CAUTION For robots with protection type Clean Room Always cut the paint with a knife and grind the paint edge when disassembling parts of the robot See Cut the paint or surface on the robot before replacing parts on page 118 2 Continues on next page 144 Product manual IRB 920 3HAC075721 001 Revision C C...

Страница 145: ...ction class IP54 option 3350 540 For robots with protection type Clean Room op tion 3351 1 Check the gasket for the main harness Tip Replace the gasket if needed 4 For robots with protection class IP54 option 3350 540 For robots with protection type Clean Room option 3351 1 xx2100002436 Continues on next page Product manual IRB 920 145 3HAC075721 001 Revision C Copyright 2022 ABB All rights reserv...

Страница 146: ...351 1 Check the gasket for the main harness assembly Tip Replace the gasket if needed 6 For robots with protection class IP54 option 3350 540 Note Remove the bottom plate from the main harness if needed For robots with protection type Clean Room option 3351 1 xx2100002437 xx2200000281 For robots with protection type Clean Room op tion 3351 1 Remove the one way valve by unscrewing it 7 Continues on...

Страница 147: ...rticles with spirit on a lint free cloth xx2100000930 Make sure that the robot is at zero position 2 For rear outlet cable version xx2100000955 Insert the internal harness into the inner arm through the sleeve of the axis 1 gearbox from the base Tip Wrap the connectors with the masking tape Tip The air hoses should face the axis 1 motor 3 For undeneath outlet cable version xx2100001206 CAUTION Mak...

Страница 148: ...nd the centre of the axis 2 gearbox Tip Wrap the connectors with the masking tape 2 For undeneath outlet cable version xx2100001206 Secure the R2 MP3 and R2 MP4 with cable straps 3 Reconnecting the connectors for axis 1 motor Note Action For robots with protection type Clean Room 1 Clean the joints that have been opened and wipe the parts free from particles with spirit on a lint free See Cut the ...

Страница 149: ... 3 Route the cabling behind the axis 1 motor CAUTION Correct cable routing is highly important If the cables are routed and secured incorrectly the cables can be damaged 4 Reconnecting the grounding cable connectors Note Action For robots with protection type Clean Room 1 Clean the joints that have been opened and wipe the parts free from particles with spirit on a lint free See Cut the paint or s...

Страница 150: ...se bracket Note Action DANGER Make sure that all supplies for electrical power hydraulic pressure and air pressure are turned off 1 CAUTION For robots with protection type Clean Room Always cut the paint with a knife and grind the paint edge when disassembling parts of the robot See Cut the paint or surface on the robot before replacing parts on page 118 2 Lay the main harness in a natural state w...

Страница 151: ...9 Lafre 2C2B FC6 9 4 pcs Refit the base bracket to the base and secure with the screws 4 Tightening torque 1 2 Nm 10 xx2100000948 Refitting the SMB cover Note Action For robots with protection type Clean Room 1 Clean the joints that have been opened and wipe the parts free from particles with spirit on a lint free See Cut the paint or surface on the robot before replacing parts on page 118 Note Af...

Страница 152: ...e photos of the connector and cable position before disconnecting them to have as a reference when reconnecting 2 Continues on next page 152 Product manual IRB 920 3HAC075721 001 Revision C Copyright 2022 ABB All rights reserved 5 Repair 5 3 1 Replacing the main harness Continued ...

Страница 153: ... 6 Nm xx2100000944 Secure the SMB cover to the base with the screws 4 For robots with protection type Clean Room option 3351 1 Screws Stainless Screw Hexagon Socket Head Cap Clean Room 3HAC075438 001 6 pcs Tightening torque 2 6 Nm xx2100002433 For robots with protection class IP54 option 3350 540 Screws Hex socket head cap screw M4x10 12 9 Lafre 2C2B FC6 9 6 pcs Tightening torque 2 6 Nm xx21000024...

Страница 154: ...placing parts on page 118 Note After all repair work wipe the Clean Room robot free from particles with spirit on a lint free cloth xx2200000281 For robots with protection type Clean Room op tion 3351 1 Refit the one way valve by screwing it into the main harness assembly 2 Continues on next page 154 Product manual IRB 920 3HAC075721 001 Revision C Copyright 2022 ABB All rights reserved 5 Repair 5...

Страница 155: ...C2B FC6 9 6 pcs Tightening torque 1 2 Nm 10 xx2100000953 For robots with protection class IP54 option 3350 540 For robots with protection type Clean Room option 3351 1 Screws Hex socket head cap screw M3x30 12 9 Lafre 2C2B FC6 9 6 pcs Tightening torque 1 2 Nm 10 xx2100002436 Continues on next page Product manual IRB 920 155 3HAC075721 001 Revision C Copyright 2022 ABB All rights reserved 5 Repair ...

Страница 156: ... option 3351 1 Screws Hex socket head cap screw M3x30 12 9 Lafre 2C2B FC6 9 8 pcs Tightening torque 1 2 Nm 10 xx2100002437 Refitting the base plate rear plate Note Action For robots with protection type Clean Room 1 Clean the joints that have been opened and wipe the parts free from particles with spirit on a lint free See Cut the paint or surface on the robot before replacing parts on page 118 No...

Страница 157: ...o the internal harness cover all moving area of the harness 2 Continues on next page Product manual IRB 920 157 3HAC075721 001 Revision C Copyright 2022 ABB All rights reserved 5 Repair 5 3 1 Replacing the main harness Continued ...

Страница 158: ... version refit the rear plate to the base Note For robots with protection class IP54 option 3350 540 For robots with protection type Clean Room op tion 3351 1 Check the gasket for the rear plate before refitting the rear plate Tip Replace the gasket if needed For robots with protection class IP54 option 3350 540 For robots with protection type Clean Room option 3351 1 xx2100002434 Secure the base ...

Страница 159: ...e outer arm Note Action For robots with protection type Clean Room 1 Clean the joints that have been opened and wipe the parts free from particles with spirit on a lint free See Cut the paint or surface on the robot before replacing parts on page 118 Note After all repair work wipe the Clean Room robot free from particles with spirit on a lint free cloth Lay the internal harness in a natural state...

Страница 160: ... cable ferrules so that the cable is in a natural bending position to avoid twisting 4 Tightening torque 1 2 Nm 10 xx2100000940 Note The harness are not visible due to the cleanness requirements of the illustration They are still ex isting inside the cable ferrule in the actual situ ation Refit the bracket without securing Tip Do not secure it with the screws before the cable ferrule installed wel...

Страница 161: ...ied to the connectors the connectors may be dam aged if excessive force is used Note The harness are not visible due to the cleanness requirements of the illustration They are still ex isting inside the cable ferrule in the actual situ ation xx2100000938 Reconnect the connectors R2 MP4 R2 FB4 Tip See the number markings on the connectors for help to find the corresponding connector 2 Route the cab...

Страница 162: ...ed to the connectors the connectors may be dam aged if excessive force is used Note The harness are not visible due to the cleanness requirements of the illustration They are still ex isting inside the cable ferrule in the actual situ ation 2 xx2100000936 Reconnect the connectors R2 MP3 R2 FB3 Tip See the number markings on the connectors for help to find the corresponding connector 3 Route the ca...

Страница 163: ... to the connectors the connectors may be dam aged if excessive force is used Note The harness are not visible due to the cleanness requirements of the illustration They are still ex isting inside the cable ferrule in the actual situ ation 2 xx2100000934 Reconnect the connectors R2 MP2 R2 FB2 Tip See the number markings on the connectors for help to find the corresponding connector 3 Route the cabl...

Страница 164: ...he connectors the connectors may be dam aged if excessive force is used Note The harness are not visible due to the cleanness requirements of the illustration They are still ex isting inside the cable ferrule in the actual situ ation 2 xx2100001030 Reconnect the connector R2 PB R2 LAMP Tip See the number markings on the connectors for help to find the corresponding connector 3 Route and secure the...

Страница 165: ... replacing parts on page 118 Note After all repair work wipe the Clean Room robot free from particles with spirit on a lint free cloth Route the air hoses on the process hub behind the bracket CAUTION Correct cable routing is highly important If the cables are routed and secured incorrectly the cables can be damaged 2 Continues on next page Product manual IRB 920 165 3HAC075721 001 Revision C Copy...

Страница 166: ... with the same number connect to the same L shaped connector 4 For robots with C2 cabling 5 Reconnect the connector R1 C2 Tip See the number markings on the air hoses for help to find the corresponding air hoses The air hoses with the same number connect to the same L shaped connector Secure the C2 cabling to the C2 bracket with the cable straps 6 xx2100001032 Reconnect the air hoses in a cross pa...

Страница 167: ...Refit the bracket Tip Do not secure it with the screws before the cable ferrule installed well 2 Tightening torque 1 2 Nm 10 xx2100000941 Note The harness are not visible due to the cleanness requirements of the illustration They are still ex isting inside the cable ferrule in the actual situ ation Refitting the cover of the outer arm Note Action For robots with protection type Clean Room 1 Clean ...

Страница 168: ...ion class IP54 option 3350 540 For robots with protection type Clean Room option 3351 1 xx2100002427 For Clean Room IP54 robots Refitting the top cover and the flange with bearing Note Action For robots with protection type Clean Room 1 Clean the joints that have been opened and wipe the parts free from particles with spirit on a lint free See Cut the paint or surface on the robot before replacing...

Страница 169: ...ction type Clean Room op tion 3351 1 3 Tightening torque 0 8 Nm 10 xx2100002401 Refit the screws to the flange with bearing xx2100002399 For robots with protection class IP54 option 3350 540 For robots with protection type Clean Room op tion 3351 1 Refit the top cover to the ball screw Tip The top surface of the cover should be flush with the top end of the ball screw 4 Continues on next page Prod...

Страница 170: ...ots with protection type Clean Room 1 Clean the joints that have been opened and wipe the parts free from particles with spirit on a lint free See Cut the paint or surface on the robot before replacing parts on page 118 Note After all repair work wipe the Clean Room robot free from particles with spirit on a lint free cloth Insert the process hub from the outer arm cover 2 Continues on next page 1...

Страница 171: ...until the connectors are disconnected as shown in following steps For robots with protection class IP54 option 3350 540 For robots with protection type Clean Room option 3351 1 xx2100002438 Refitting the axis 1 cover Note Action For robots with protection type Clean Room 1 Clean the joints that have been opened and wipe the parts free from particles with spirit on a lint free See Cut the paint or ...

Страница 172: ... IRB 920T 6 0 65 Screw Hex socket head cap flange screw M5x16 12 9 Lafre 2C2B FC6 9 PrO COat111 16 pcs Tightening torque 5 4 Nm 3 For robots with protection class IP30 option 3350 300 xx2100000942 Refit the screws 3 For robots with protection class IP54 option 3350 540 For robots with protection type Clean Room option 3351 1 xx2100002428 Refitting the axis 2 cover Note Action DANGER Make sure that...

Страница 173: ...s IP54 option 3350 540 For robots with protection type Clean Room op tion 3351 1 Check the gasket for the cover before refitting the cover Tip Replace the gasket if needed 3 Tightening torque 1 2 Nm 10 For robots with protection class IP30 option 3350 300 xx2100000943 Refit the screws 4 For robots with protection class IP54 option 3350 540 For robots with protection type Clean Room option 3351 1 x...

Страница 174: ...ter all repair work wipe the Clean Room robot free from particles with spirit on a lint free cloth Calibration is detailed in section Calibration on page 945 Recalibrate the robot 2 DANGER Make sure all safety requirements are met when performing the first test run 3 174 Product manual IRB 920 3HAC075721 001 Revision C Copyright 2022 ABB All rights reserved 5 Repair 5 3 1 Replacing the main harnes...

Страница 175: ...B Note Article number Spare part 3HAC076583 001 Process hub M Basic 3HAC076584 001 Process hub M Basic C1 A 3HAC076585 001 Process hub M Basic C1 C2 A 3HAC076611 001 Outer arm cover 3HAC073940 001 Gasket Process hub Required tools and equipment Note Article number Equipment Content is defined in section Standard toolkit on page 996 Standard toolkit Continues on next page Product manual IRB 920 175...

Страница 176: ...nt to create reference values If the robot is to be calibrated with refer ence calibration Find previous reference values for the axis or create new reference values These val ues are to be used after the repair proced ure is completed for calibration of the ro bot Creating new values requires possibility to move the robot Read more about reference calibration for Axis Calibration in Reference cal...

Страница 177: ...bot before replacing parts on page 118 4 Removing the process hub screws Note Action DANGER Make sure that all supplies for electrical power hydraulic pressure and air pressure are turned off 1 CAUTION For robots with protection type Clean Room Always cut the paint with a knife and grind the paint edge when disassembling parts of the robot See Cut the paint or surface on the robot before replacing...

Страница 178: ...00000932 Insert the process hub to the outer arm 4 For Clean Room IP54 robots Removing the top cover and the flange with bearing Note Action DANGER Make sure that all supplies for electrical power hydraulic pressure and air pressure are turned off 1 CAUTION For robots with protection type Clean Room Always cut the paint with a knife and grind the paint edge when disassembling parts of the robot Se...

Страница 179: ...m the ball screw 4 xx2100002401 For robots with protection class IP54 option 3350 540 For robots with protection type Clean Room op tion 3351 1 Remove the screws on the flange with bearing 5 xx2100002402 For robots with protection class IP54 option 3350 540 For robots with protection type Clean Room op tion 3351 1 Remove the flange with bearing 6 Continues on next page Product manual IRB 920 179 3...

Страница 180: ...0000933 Remove the screws on the cover of the outer arm and remove the cover Note For robots with protection class IP54 option 3350 540 For robots with protection type Clean Room op tion 3351 1 Remove the cover with bellow and housing Note The bellow does not need to be removed separ ately Tip Check the gasket and replace it if needed 3 For robots with protection class IP54 option 3350 540 For rob...

Страница 181: ... the air hoses C1 cabling and C2 cabling if equipped Note Action DANGER Make sure that all supplies for electrical power hydraulic pressure and air pressure are turned off 1 CAUTION For robots with protection type Clean Room Always cut the paint with a knife and grind the paint edge when disassembling parts of the robot See Cut the paint or surface on the robot before replacing parts on page 118 2...

Страница 182: ...The connector clip has to be pressed 1 and pushed forward 2 to separate the R1 C2 for C2 cabling xx1800002943 xx2100001034 Snap loose and remove the female head of the connectors from the bracket Note The harness are not visible due to the cleanness requirements of the illustration They are still ex isting inside the cable ferrule in the actual situ ation 6 Continues on next page 182 Product manua...

Страница 183: ...sconnect the connector R2 PB R2 LAMP 3 xx2100001031 Snap loose and remove the female head of the connector from the bracket Note The harness are not visible due to the cleanness requirements of the illustration They are still ex isting inside the cable ferrule in the actual situ ation 4 Pull out the process hub Note Action DANGER Make sure that all supplies for electrical power hydraulic pressure ...

Страница 184: ...nectors are disconnected as shown in following steps Refitting the process hub Use these procedures to refit the process hub Reconnecting the air hoses CP CS cabling and Ethernet cabling if equipped Note Action For robots with protection type Clean Room 1 Clean the joints that have been opened and wipe the parts free from particles with spirit on a lint free See Cut the paint or surface on the rob...

Страница 185: ...s with the same number connect to the same L shaped connector 4 For robots with C2 cabling 5 Reconnect the connector R1 C2 Tip See the number markings on the air hoses for help to find the corresponding air hoses The air hoses with the same number connect to the same L shaped connector Secure the C2 cabling to the C2 bracket with the cable straps 6 xx2100001032 Reconnect the air hoses in a cross p...

Страница 186: ...rom particles with spirit on a lint free cloth xx2100001031 Insert the female head of the PB connector to the bracket accordingly Tip The mistake proofing measure has been applied to the connectors the connectors may be dam aged if excessive force is used Note The harness are not visible due to the cleanness requirements of the illustration They are still ex isting inside the cable ferrule in the ...

Страница 187: ...Clean Room 1 Clean the joints that have been opened and wipe the parts free from particles with spirit on a lint free See Cut the paint or surface on the robot before replacing parts on page 118 Note After all repair work wipe the Clean Room robot free from particles with spirit on a lint free cloth Continues on next page Product manual IRB 920 187 3HAC075721 001 Revision C Copyright 2022 ABB All ...

Страница 188: ...ion class IP54 option 3350 540 For robots with protection type Clean Room option 3351 1 xx2100002427 For Clean Room IP54 robots Refitting the top cover and the flange with bearing Note Action For robots with protection type Clean Room 1 Clean the joints that have been opened and wipe the parts free from particles with spirit on a lint free See Cut the paint or surface on the robot before replacing...

Страница 189: ...ction type Clean Room op tion 3351 1 3 Tightening torque 0 8 Nm 10 xx2100002401 Refit the screws to the flange with bearing xx2100002399 For robots with protection class IP54 option 3350 540 For robots with protection type Clean Room op tion 3351 1 Refit the top cover to the ball screw Tip The top surface of the cover should be flush with the top end of the ball screw 4 Continues on next page Prod...

Страница 190: ...ots with protection type Clean Room 1 Clean the joints that have been opened and wipe the parts free from particles with spirit on a lint free See Cut the paint or surface on the robot before replacing parts on page 118 Note After all repair work wipe the Clean Room robot free from particles with spirit on a lint free cloth Insert the process hub from the outer arm cover 2 Continues on next page 1...

Страница 191: ... connectors are disconnected as shown in following steps For robots with protection class IP54 option 3350 540 For robots with protection type Clean Room option 3351 1 xx2100002438 Concluding procedure Note Action For robots with protection type Clean Room 1 Seal and paint the joints that have been opened See Cut the paint or surface on the robot before replacing parts on page 118 Note After all r...

Страница 192: ...Make sure all safety requirements are met when performing the first test run 3 192 Product manual IRB 920 3HAC075721 001 Revision C Copyright 2022 ABB All rights reserved 5 Repair 5 3 2 Replacing the process hub Continued ...

Страница 193: ...Article number Spare part 3HAC063968 001 SMB unit Battery includes protection cir cuits Only replace with a spe cified spare part or an ABB ap proved equivalent 3HAC044075 001 Battery unit 3HAC076603 001 SMB cover Used with protection type Clean Room 3HAC075438 001 Stainless Screw Hexagon Socket Head Cap Clean Room Used with protection type Clean Room 3HAC073938 001 Gasket SMB cover Continues on n...

Страница 194: ... FlexPendant to create reference values If the robot is to be calibrated with refer ence calibration Find previous reference values for the axis or create new reference values These val ues are to be used after the repair proced ure is completed for calibration of the ro bot Creating new values requires possibility to move the robot Read more about reference calibration for Axis Calibration in Ref...

Страница 195: ...ake sure that all supplies for electrical power hydraulic pressure and air pressure are turned off 1 ELECTROSTATIC DISCHARGE ESD The unit is sensitive to ESD Before handling the unit read the safety information in section The unit is sensitive to ESD on page 49 2 CAUTION For robots with protection type Clean Room Always cut the paint with a knife and grind the paint edge when disassembling parts o...

Страница 196: ...ver Tip Replace the gasket if needed 5 For robots with protection class IP54 option 3350 540 For robots with protection type Clean Room option 3351 1 xx2100002433 Disconnecting the SMB cabling Note Action DANGER Make sure that all supplies for electrical power hydraulic pressure and air pressure are turned off 1 ELECTROSTATIC DISCHARGE ESD The unit is sensitive to ESD Before handling the unit read...

Страница 197: ...GER Make sure that all supplies for electrical power hydraulic pressure and air pressure are turned off 1 ELECTROSTATIC DISCHARGE ESD The unit is sensitive to ESD Before handling the unit read the safety information in section The unit is sensitive to ESD on page 49 2 CAUTION For robots with protection type Clean Room Always cut the paint with a knife and grind the paint edge when disassembling pa...

Страница 198: ...safety information in section The unit is sensitive to ESD on page 49 2 CAUTION For robots with protection type Clean Room Always cut the paint with a knife and grind the paint edge when disassembling parts of the robot See Cut the paint or surface on the robot before replacing parts on page 118 3 xx2100001035 Separate the battery unit from the SMB assembly by cutting the cable straps 4 Continues ...

Страница 199: ...rticles with spirit on a lint free See Cut the paint or surface on the robot before replacing parts on page 118 Note After all repair work wipe the Clean Room robot free from particles with spirit on a lint free cloth xx2100001035 Bind the SMB unit to the battery unit with the cable strap 3 Screws Hex socket head cap screw M3x5 12 9 Lafre 2C2B FC6 9 4 pcs Refit the SMB package to the SMB cover wit...

Страница 200: ...pirit on a lint free See Cut the paint or surface on the robot before replacing parts on page 118 Note After all repair work wipe the Clean Room robot free from particles with spirit on a lint free cloth xx2100000945 Reconnect the connectors SMB P7 SMB J1 SMB J2 Tip Take photos of the connector and cable position before disconnecting them to have as a reference when reconnecting 2 Continues on nex...

Страница 201: ...xx2100000944 Secure the SMB cover to the base with the screws 4 For robots with protection type Clean Room option 3351 1 Screws Stainless Screw Hexagon Socket Head Cap Clean Room 3HAC075438 001 6 pcs Tightening torque 2 6 Nm xx2100002433 For robots with protection class IP54 option 3350 540 Screws Hex socket head cap screw M4x10 12 9 Lafre 2C2B FC6 9 6 pcs Tightening torque 2 6 Nm xx2100002433 Con...

Страница 202: ...l repair work wipe the Clean Room robot free from particles with spirit on a lint free cloth Calibration is detailed in section Calibration on page 945 Recalibrate the robot 2 DANGER Make sure all safety requirements are met when performing the first test run 3 202 Product manual IRB 920 3HAC075721 001 Revision C Copyright 2022 ABB All rights reserved 5 Repair 5 3 3 Replacing the SMB unit and batt...

Страница 203: ...B Note Article number Spare part 3HAC076568 001 Base Base bottom cover rear cable 3HAC067865 001 Base plate rear outlet cable Base rear cover bottom cable 3HAC070312 001 Rear plate Base bottom cover bottom cable 3HAC067864 001 Base plate undeneath outlet cable 3HAC075320 001 Block Base rear cover bottom cable 3HAC073939 001 Gasket bottom plate Continues on next page Product manual IRB 920 203 3HAC...

Страница 204: ... to beginning the repair work of the robot see the table Note Action Decide which calibration routine to use for calibrating the robot Reference calibration External cable packages DressPack and tools can stay fitted on the robot Fine calibration All external cable packages DressPack and tools must be removed from the robot 1 Follow the instructions given in the refer ence calibration routine on t...

Страница 205: ...e robot during the transporta tion always keep it straight If the robot lay down in any situation the grease may come out from gearbox 2 xx2100000930 Jog all axes to zero position 3 DANGER Turn off all electric power supply hydraulic pressure supply air pressure supply to the robot before entering the safeguarded space 4 CAUTION For robots with protection type Clean Room Always cut the paint with ...

Страница 206: ...lass IP30 xx2100000932 Remove the screws on the process hub Note For robots with protection class IP54 option 3350 540 For robots with protection type Clean Room op tion 3351 1 Remove the screws on the process hub and take out the gasket Tip Check the gasket and replace it if needed 3 For robots with protection class IP54 option 3350 540 For robots with protection type Clean Room option 3351 1 xx2...

Страница 207: ...Cut the paint or surface on the robot before replacing parts on page 118 2 xx2100002398 For robots with protection class IP54 option 3350 540 For robots with protection type Clean Room op tion 3351 1 Loose the locking screws 3 xx2100002399 For robots with protection class IP54 option 3350 540 For robots with protection type Clean Room op tion 3351 1 Remove the top cover from the ball screw 4 Conti...

Страница 208: ... Removing the cover of the outer arm Note Action DANGER Make sure that all supplies for electrical power hydraulic pressure and air pressure are turned off 1 CAUTION For robots with protection type Clean Room Always cut the paint with a knife and grind the paint edge when disassembling parts of the robot See Cut the paint or surface on the robot before replacing parts on page 118 2 Continues on ne...

Страница 209: ...540 For robots with protection type Clean Room option 3351 1 xx2100002427 Disconnecting the air hoses C1 cabling and C2 cabling if equipped Note Action DANGER Make sure that all supplies for electrical power hydraulic pressure and air pressure are turned off 1 CAUTION For robots with protection type Clean Room Always cut the paint with a knife and grind the paint edge when disassembling parts of t...

Страница 210: ... straps for the R1 C2 at the same time Tip Take photos of the connector and cable position before disconnecting them to have as a reference when reconnecting 5 Tip The connector clip has to be pressed 1 and pushed forward 2 to separate the R1 C2 for C2 cabling xx1800002943 Continues on next page 210 Product manual IRB 920 3HAC075721 001 Revision C Copyright 2022 ABB All rights reserved 5 Repair 5 ...

Страница 211: ...re that all supplies for electrical power hydraulic pressure and air pressure are turned off 1 CAUTION For robots with protection type Clean Room Always cut the paint with a knife and grind the paint edge when disassembling parts of the robot See Cut the paint or surface on the robot before replacing parts on page 118 2 xx2100000934 Disconnect the connectors R2 MP2 R2 FB2 3 Continues on next page ...

Страница 212: ...re that all supplies for electrical power hydraulic pressure and air pressure are turned off 1 CAUTION For robots with protection type Clean Room Always cut the paint with a knife and grind the paint edge when disassembling parts of the robot See Cut the paint or surface on the robot before replacing parts on page 118 2 xx2100000936 Disconnect the connectors R2 MP3 R2 FB3 3 Continues on next page ...

Страница 213: ... free See Cut the paint or surface on the robot before replacing parts on page 118 Note After all repair work wipe the Clean Room robot free from particles with spirit on a lint free cloth xx2100000938 Disconnect the axis 4 motor connectors R2 MP4 R2 FB4 2 xx2100000939 Snap loose and remove the female head of the connectors from the bracket Note The harness are not visible due to the cleanness req...

Страница 214: ...0 Disconnect the connector R2 PB R2 LAMP 3 xx2100001031 Snap loose and remove the female head of the connector from the bracket Note The harness are not visible due to the cleanness requirements of the illustration They are still ex isting inside the cable ferrule in the actual situ ation 4 Pull out the process hub Note Action DANGER Make sure that all supplies for electrical power hydraulic press...

Страница 215: ... Room option 3351 1 xx2100002438 CAUTION Be aware of the cabling that is attached to the cover The cover can not be removed completely until the connectors are disconnected as shown in following steps Removing the cable ferrule and bracket Note Action DANGER Make sure that all supplies for electrical power hydraulic pressure and air pressure are turned off 1 CAUTION For robots with protection type...

Страница 216: ...re not visible due to the cleanness requirements of the illustration They are still ex isting inside the cable ferrule in the actual situ ation 4 xx1800002842 Remove the screws on the cable ferrule and take the cable ferrule out 5 xx1800002849 Removing the axis 1 cover Note Action DANGER Make sure that all supplies for electrical power hydraulic pressure and air pressure are turned off 1 Continues...

Страница 217: ...ket Tip Replace the gasket if needed 4 For robots with protection class IP54 option 3350 540 For robots with protection type Clean Room option 3351 1 xx2100002428 Removing the axis 2 cover Note Action DANGER Make sure that all supplies for electrical power hydraulic pressure and air pressure are turned off 1 CAUTION For robots with protection type Clean Room Always cut the paint with a knife and g...

Страница 218: ...ion 3350 540 For robots with protection type Clean Room option 3351 1 xx2100002451 Removing the SMB cover Note Action DANGER Make sure that all supplies for electrical power hydraulic pressure and air pressure are turned off 1 ELECTROSTATIC DISCHARGE ESD The unit is sensitive to ESD Before handling the unit read the safety information in section The unit is sensitive to ESD on page 49 2 Continues ...

Страница 219: ...ull the SMB cover with the SMB unit assembly out together Note For robots with protection class IP54 option 3350 540 For robots with protection type Clean Room op tion 3351 1 Check the gasket for the SMB cover Tip Replace the gasket if needed 5 For robots with protection class IP54 option 3350 540 For robots with protection type Clean Room option 3351 1 xx2100002433 Disconnecting the SMB cabling N...

Страница 220: ...onnector and cable position before disconnecting them to have as a reference when reconnecting 5 Removing the base plate rear plate Note Action DANGER Make sure that all supplies for electrical power hydraulic pressure and air pressure are turned off 1 CAUTION For robots with protection type Clean Room Always cut the paint with a knife and grind the paint edge when disassembling parts of the robot...

Страница 221: ...on class IP54 option 3350 540 For robots with protection type Clean Room op tion 3351 1 Check the gasket for the base plate Tip Replace the gasket if needed 6 For robots with protection class IP54 option 3350 540 For robots with protection type Clean Room option 3351 1 xx2100002434 Continues on next page Product manual IRB 920 221 3HAC075721 001 Revision C Copyright 2022 ABB All rights reserved 5 ...

Страница 222: ...IP54 option 3350 540 For robots with protection type Clean Room option 3351 1 xx2100002435 Disconnecting the grounding cable connectors Note Action DANGER Make sure that all supplies for electrical power hydraulic pressure and air pressure are turned off 1 CAUTION For robots with protection type Clean Room Always cut the paint with a knife and grind the paint edge when disassembling parts of the r...

Страница 223: ... and grind the paint edge when disassembling parts of the robot See Cut the paint or surface on the robot before replacing parts on page 118 2 xx2100000948 Remove the screws on the base bracket to the base 3 Disconnecting the connectors for axis 1 motor Note Action DANGER Make sure that all supplies for electrical power hydraulic pressure and air pressure are turned off 1 Continues on next page Pr...

Страница 224: ...equirements of the illustration They are still ex isting inside the cable ferrule in the actual situ ation 4 Removing the bracket Note Action DANGER Make sure that all supplies for electrical power hydraulic pressure and air pressure are turned off 1 CAUTION For robots with protection type Clean Room Always cut the paint with a knife and grind the paint edge when disassembling parts of the robot S...

Страница 225: ...raulic pressure and air pressure are turned off 1 CAUTION For robots with protection type Clean Room Always cut the paint with a knife and grind the paint edge when disassembling parts of the robot See Cut the paint or surface on the robot before replacing parts on page 118 2 Continues on next page Product manual IRB 920 225 3HAC075721 001 Revision C Copyright 2022 ABB All rights reserved 5 Repair...

Страница 226: ...ving the main harness from the axis 1 gearbox position Note Action DANGER Make sure that all supplies for electrical power hydraulic pressure and air pressure are turned off 1 CAUTION For robots with protection type Clean Room Always cut the paint with a knife and grind the paint edge when disassembling parts of the robot See Cut the paint or surface on the robot before replacing parts on page 118...

Страница 227: ...ke sure that all supplies for electrical power hydraulic pressure and air pressure are turned off 1 CAUTION For robots with protection type Clean Room Always cut the paint with a knife and grind the paint edge when disassembling parts of the robot See Cut the paint or surface on the robot before replacing parts on page 118 2 Continues on next page Product manual IRB 920 227 3HAC075721 001 Revision...

Страница 228: ...rotection class IP54 option 3350 540 For robots with protection type Clean Room op tion 3351 1 Check the gasket for the main harness Tip Replace the gasket if needed 4 For robots with protection class IP54 option 3350 540 For robots with protection type Clean Room option 3351 1 xx2100002436 Continues on next page 228 Product manual IRB 920 3HAC075721 001 Revision C Copyright 2022 ABB All rights re...

Страница 229: ... if needed 6 For robots with protection class IP54 option 3350 540 Note Remove the bottom plate from the main harness if needed For robots with protection type Clean Room option 3351 1 xx2100002437 xx2200000281 For robots with protection type Clean Room op tion 3351 1 Remove the one way valve by unscrewing it 7 Removing the pulley protection cover Note Action DANGER Make sure that all supplies for...

Страница 230: ...b assembly Note Action DANGER Make sure that all supplies for electrical power hydraulic pressure and air pressure are turned off 1 CAUTION For robots with protection type Clean Room Always cut the paint with a knife and grind the paint edge when disassembling parts of the robot See Cut the paint or surface on the robot before replacing parts on page 118 2 xx2100001038 Remove the screws and washer...

Страница 231: ...ove the screws and washers on the base to the axis 1 gear unit 3 Remove the base 4 Removing the block from the base Note Action DANGER Make sure that all supplies for electrical power hydraulic pressure and air pressure are turned off 1 CAUTION For robots with protection type Clean Room Always cut the paint with a knife and grind the paint edge when disassembling parts of the robot See Cut the pai...

Страница 232: ...on type Clean Room Always cut the paint with a knife and grind the paint edge when disassembling parts of the robot See Cut the paint or surface on the robot before replacing parts on page 118 2 xx2200000280 For robots with protection type Clean Room op tion 3351 1 Remove the air exhaust by unscrewing the locking nut 3 Continues on next page 232 Product manual IRB 920 3HAC075721 001 Revision C Cop...

Страница 233: ...on a lint free cloth xx2200000280 Refit the air exhaust back to the base 2 Secure with the nut 3 Refitting the block to the base Note Action For robots with protection type Clean Room 1 Clean the joints that have been opened and wipe the parts free from particles with spirit on a lint free See Cut the paint or surface on the robot before replacing parts on page 118 Note After all repair work wipe ...

Страница 234: ...ith spirit on a lint free See Cut the paint or surface on the robot before replacing parts on page 118 Note After all repair work wipe the Clean Room robot free from particles with spirit on a lint free cloth Screws Hex socket head cap screw M5x16 12 9 Lafre 2C2B FC6 9 16 pcs Refit the base to the axis 1 gearbox as the illustra tion 2 Refit the screws 3 Washers Plain washer 11x5 3x1 2 Steel 16 pcs...

Страница 235: ... timing belt into the pulley on the gear 2 Screws Hex socket head cap screw M4x16 12 9 Lafre 2C2B FC6 9 3 pcs Refit the motor and refit the timing belt to the motor Ensure that the belt runs correctly in the grooves 3 Washers Plain washer machining 4 2x9x2 steel 3 pcs Refit the screws and washers without fully tightened 4 Tightening torque 2 8 Nm 10 xx2100001038 Timing belt A1 3HAC070449 001 Hang ...

Страница 236: ...01044 Fasten the screws to the recommended tightening torque 7 Used belt 308 Use a sonic tension meter to measure the timing belt tension 8 New belt 250 If the timing belt tension does not meet the require ment loosen the motor screws and readjust 9 Refitting the pulley protection cover Note Action DANGER Make sure that all supplies for electrical power hydraulic pressure and air pressure are turn...

Страница 237: ... Tightening torque 0 8 Nm xx2100001037 Inserting the main harness through the axis 1 gearbox position Note Action For robots with protection type Clean Room 1 Clean the joints that have been opened and wipe the parts free from particles with spirit on a lint free See Cut the paint or surface on the robot before replacing parts on page 118 Note After all repair work wipe the Clean Room robot free f...

Страница 238: ...twisted or strained Reroute if necessary Inserting the main harness through the axis 2 gearbox position Note Action For robots with protection type Clean Room 1 Clean the joints that have been opened and wipe the parts free from particles with spirit on a lint free See Cut the paint or surface on the robot before replacing parts on page 118 Note After all repair work wipe the Clean Room robot free...

Страница 239: ...nt free See Cut the paint or surface on the robot before replacing parts on page 118 Note After all repair work wipe the Clean Room robot free from particles with spirit on a lint free cloth xx2100000950 Insert the female head of the connectors to the bracket accordingly Tip The mistake proofing measure has been applied to the connectors the connectors may be dam aged if excessive force is used No...

Страница 240: ...om 1 Clean the joints that have been opened and wipe the parts free from particles with spirit on a lint free See Cut the paint or surface on the robot before replacing parts on page 118 Note After all repair work wipe the Clean Room robot free from particles with spirit on a lint free cloth Screws Hex socket head cap screw M3x5 12 9 Lafre 2C2B FC6 9 3 pcs Secure the three grounding cables to the ...

Страница 241: ...the paint or surface on the robot before replacing parts on page 118 2 Lay the main harness in a natural state without distortion 3 Screws Hex socket head cap screw M3x8 12 9 Lafre 2C2B FC6 9 2 pcs Secure the cable ferrule to the bracket Tip Align all the cable ferrules so that the cable is in a natural bending position to avoid twisting Tightening torque 1 2 Nm 10 xx2100000951 Note The harness ar...

Страница 242: ...th spirit on a lint free See Cut the paint or surface on the robot before replacing parts on page 118 Note After all repair work wipe the Clean Room robot free from particles with spirit on a lint free cloth xx2100000945 Reconnect the connectors SMB P7 SMB J1 SMB J2 Tip Take photos of the connector and cable position before disconnecting them to have as a reference when reconnecting 2 Continues on...

Страница 243: ...ue 2 6 Nm xx2100000944 Secure the SMB cover to the base with the screws 4 For robots with protection type Clean Room option 3351 1 Screws Stainless Screw Hexagon Socket Head Cap Clean Room 3HAC075438 001 6 pcs Tightening torque 2 6 Nm xx2100002433 For robots with protection class IP54 option 3350 540 Screws Hex socket head cap screw M4x10 12 9 Lafre 2C2B FC6 9 6 pcs Tightening torque 2 6 Nm xx2100...

Страница 244: ...e replacing parts on page 118 Note After all repair work wipe the Clean Room robot free from particles with spirit on a lint free cloth xx2200000281 For robots with protection type Clean Room op tion 3351 1 Refit the one way valve by screwing it into the main harness assembly 2 Continues on next page 244 Product manual IRB 920 3HAC075721 001 Revision C Copyright 2022 ABB All rights reserved 5 Repa...

Страница 245: ...re 2C2B FC6 9 6 pcs Tightening torque 1 2 Nm 10 xx2100000953 For robots with protection class IP54 option 3350 540 For robots with protection type Clean Room option 3351 1 Screws Hex socket head cap screw M3x30 12 9 Lafre 2C2B FC6 9 6 pcs Tightening torque 1 2 Nm 10 xx2100002436 Continues on next page Product manual IRB 920 245 3HAC075721 001 Revision C Copyright 2022 ABB All rights reserved 5 Rep...

Страница 246: ...Room option 3351 1 Screws Hex socket head cap screw M3x30 12 9 Lafre 2C2B FC6 9 8 pcs Tightening torque 1 2 Nm 10 xx2100002437 Refitting the base plate rear plate Note Action For robots with protection type Clean Room 1 Clean the joints that have been opened and wipe the parts free from particles with spirit on a lint free See Cut the paint or surface on the robot before replacing parts on page 11...

Страница 247: ...se to the internal harness cover all moving area of the harness 2 Continues on next page Product manual IRB 920 247 3HAC075721 001 Revision C Copyright 2022 ABB All rights reserved 5 Repair 5 4 1 Replacing the base Continued ...

Страница 248: ...able version refit the rear plate to the base Note For robots with protection class IP54 option 3350 540 For robots with protection type Clean Room op tion 3351 1 Check the gasket for the rear plate before refitting the rear plate Tip Replace the gasket if needed For robots with protection class IP54 option 3350 540 For robots with protection type Clean Room option 3351 1 xx2100002434 Secure the b...

Страница 249: ...n the outer arm Note Action For robots with protection type Clean Room 1 Clean the joints that have been opened and wipe the parts free from particles with spirit on a lint free See Cut the paint or surface on the robot before replacing parts on page 118 Note After all repair work wipe the Clean Room robot free from particles with spirit on a lint free cloth Lay the internal harness in a natural s...

Страница 250: ... the cable ferrules so that the cable is in a natural bending position to avoid twisting 4 Tightening torque 1 2 Nm 10 xx2100000940 Note The harness are not visible due to the cleanness requirements of the illustration They are still ex isting inside the cable ferrule in the actual situ ation Refit the bracket without securing Tip Do not secure it with the screws before the cable ferrule installed...

Страница 251: ...applied to the connectors the connectors may be dam aged if excessive force is used Note The harness are not visible due to the cleanness requirements of the illustration They are still ex isting inside the cable ferrule in the actual situ ation xx2100000938 Reconnect the connectors R2 MP4 R2 FB4 Tip See the number markings on the connectors for help to find the corresponding connector 2 Route the...

Страница 252: ...pplied to the connectors the connectors may be dam aged if excessive force is used Note The harness are not visible due to the cleanness requirements of the illustration They are still ex isting inside the cable ferrule in the actual situ ation 2 xx2100000936 Reconnect the connectors R2 MP3 R2 FB3 Tip See the number markings on the connectors for help to find the corresponding connector 3 Route th...

Страница 253: ...lied to the connectors the connectors may be dam aged if excessive force is used Note The harness are not visible due to the cleanness requirements of the illustration They are still ex isting inside the cable ferrule in the actual situ ation 2 xx2100000934 Reconnect the connectors R2 MP2 R2 FB2 Tip See the number markings on the connectors for help to find the corresponding connector 3 Route the ...

Страница 254: ...to the connectors the connectors may be dam aged if excessive force is used Note The harness are not visible due to the cleanness requirements of the illustration They are still ex isting inside the cable ferrule in the actual situ ation 2 xx2100001030 Reconnect the connector R2 PB R2 LAMP Tip See the number markings on the connectors for help to find the corresponding connector 3 Route and secure...

Страница 255: ...fore replacing parts on page 118 Note After all repair work wipe the Clean Room robot free from particles with spirit on a lint free cloth Route the air hoses on the process hub behind the bracket CAUTION Correct cable routing is highly important If the cables are routed and secured incorrectly the cables can be damaged 2 Continues on next page Product manual IRB 920 255 3HAC075721 001 Revision C ...

Страница 256: ...oses with the same number connect to the same L shaped connector 4 For robots with C2 cabling 5 Reconnect the connector R1 C2 Tip See the number markings on the air hoses for help to find the corresponding air hoses The air hoses with the same number connect to the same L shaped connector Secure the C2 cabling to the C2 bracket with the cable straps 6 xx2100001032 Reconnect the air hoses in a cros...

Страница 257: ...pcs Refit the bracket Tip Do not secure it with the screws before the cable ferrule installed well 2 Tightening torque 1 2 Nm 10 xx2100000941 Note The harness are not visible due to the cleanness requirements of the illustration They are still ex isting inside the cable ferrule in the actual situ ation Refitting the cover of the outer arm Note Action For robots with protection type Clean Room 1 Cl...

Страница 258: ...tection class IP54 option 3350 540 For robots with protection type Clean Room option 3351 1 xx2100002427 For Clean Room IP54 robots Refitting the top cover and the flange with bearing Note Action For robots with protection type Clean Room 1 Clean the joints that have been opened and wipe the parts free from particles with spirit on a lint free See Cut the paint or surface on the robot before repla...

Страница 259: ...rotection type Clean Room op tion 3351 1 3 Tightening torque 0 8 Nm 10 xx2100002401 Refit the screws to the flange with bearing xx2100002399 For robots with protection class IP54 option 3350 540 For robots with protection type Clean Room op tion 3351 1 Refit the top cover to the ball screw Tip The top surface of the cover should be flush with the top end of the ball screw 4 Continues on next page ...

Страница 260: ... robots with protection type Clean Room 1 Clean the joints that have been opened and wipe the parts free from particles with spirit on a lint free See Cut the paint or surface on the robot before replacing parts on page 118 Note After all repair work wipe the Clean Room robot free from particles with spirit on a lint free cloth Insert the process hub from the outer arm cover 2 Continues on next pa...

Страница 261: ...ely until the connectors are disconnected as shown in following steps For robots with protection class IP54 option 3350 540 For robots with protection type Clean Room option 3351 1 xx2100002438 Refitting the axis 1 cover Note Action For robots with protection type Clean Room 1 Clean the joints that have been opened and wipe the parts free from particles with spirit on a lint free See Cut the paint...

Страница 262: ... For IRB 920T 6 0 65 Screw Hex socket head cap flange screw M5x16 12 9 Lafre 2C2B FC6 9 PrO COat111 16 pcs Tightening torque 5 4 Nm 3 For robots with protection class IP30 option 3350 300 xx2100000942 Refit the screws 3 For robots with protection class IP54 option 3350 540 For robots with protection type Clean Room option 3351 1 xx2100002428 Refitting the axis 2 cover Note Action DANGER Make sure ...

Страница 263: ...nd grind the paint edge when disassembling parts of the robot See Cut the paint or surface on the robot before replacing parts on page 118 2 Continues on next page Product manual IRB 920 263 3HAC075721 001 Revision C Copyright 2022 ABB All rights reserved 5 Repair 5 4 1 Replacing the base Continued ...

Страница 264: ...rotection class IP54 option 3350 540 For robots with protection type Clean Room option 3351 1 xx2100002451 Concluding procedure Note Action For robots with protection type Clean Room 1 Seal and paint the joints that have been opened See Cut the paint or surface on the robot before replacing parts on page 118 Note After all repair work wipe the Clean Room robot free from particles with spirit on a ...

Страница 265: ...ER Make sure all safety requirements are met when performing the first test run 3 Product manual IRB 920 265 3HAC075721 001 Revision C Copyright 2022 ABB All rights reserved 5 Repair 5 4 1 Replacing the base Continued ...

Страница 266: ... Note Article number Spare part 3HAC070449 001 Timing belt A1 Required tools and equipment Note Article number Equipment Content is defined in section Standard toolkit on page 996 Standard toolkit Delivered as a set of calibration tools Required if Axis Calibration is the valid calibration method for the robot 3HAC055412 001 Calibration toolbox Axis Calibra tion Continues on next page 266 Product ...

Страница 267: ...ated with refer ence calibration Find previous reference values for the axis or create new reference values These val ues are to be used after the repair proced ure is completed for calibration of the ro bot Creating new values requires possibility to move the robot Read more about reference calibration for Axis Calibration in Reference calibration routine on page 957 If no previous reference valu...

Страница 268: ...essure supply to the robot before entering the safeguarded space 4 CAUTION For robots with protection type Clean Room Always cut the paint with a knife and grind the paint edge when disassembling parts of the robot See Cut the paint or surface on the robot before replacing parts on page 118 5 Removing the process hub screws Note Action DANGER Make sure that all supplies for electrical power hydrau...

Страница 269: ...Remove the screws on the process hub and take out the gasket Tip Check the gasket and replace it if needed 3 For robots with protection class IP54 option 3350 540 For robots with protection type Clean Room option 3351 1 xx2100000932 Insert the process hub to the outer arm 4 For Clean Room IP54 robots Removing the top cover and the flange with bearing Note Action DANGER Make sure that all supplies ...

Страница 270: ... tion 3351 1 Loose the locking screws 3 xx2100002399 For robots with protection class IP54 option 3350 540 For robots with protection type Clean Room op tion 3351 1 Remove the top cover from the ball screw 4 xx2100002401 For robots with protection class IP54 option 3350 540 For robots with protection type Clean Room op tion 3351 1 Remove the screws on the flange with bearing 5 Continues on next pa...

Страница 271: ...rical power hydraulic pressure and air pressure are turned off 1 CAUTION For robots with protection type Clean Room Always cut the paint with a knife and grind the paint edge when disassembling parts of the robot See Cut the paint or surface on the robot before replacing parts on page 118 2 Continues on next page Product manual IRB 920 271 3HAC075721 001 Revision C Copyright 2022 ABB All rights re...

Страница 272: ... robots with protection type Clean Room option 3351 1 xx2100002427 Disconnecting the air hoses C1 cabling and C2 cabling if equipped Note Action DANGER Make sure that all supplies for electrical power hydraulic pressure and air pressure are turned off 1 CAUTION For robots with protection type Clean Room Always cut the paint with a knife and grind the paint edge when disassembling parts of the robo...

Страница 273: ... for the R1 C2 at the same time Tip Take photos of the connector and cable position before disconnecting them to have as a reference when reconnecting 5 Tip The connector clip has to be pressed 1 and pushed forward 2 to separate the R1 C2 for C2 cabling xx1800002943 Continues on next page Product manual IRB 920 273 3HAC075721 001 Revision C Copyright 2022 ABB All rights reserved 5 Repair 5 4 2 Rep...

Страница 274: ... all supplies for electrical power hydraulic pressure and air pressure are turned off 1 CAUTION For robots with protection type Clean Room Always cut the paint with a knife and grind the paint edge when disassembling parts of the robot See Cut the paint or surface on the robot before replacing parts on page 118 2 xx2100000934 Disconnect the connectors R2 MP2 R2 FB2 3 Continues on next page 274 Pro...

Страница 275: ... all supplies for electrical power hydraulic pressure and air pressure are turned off 1 CAUTION For robots with protection type Clean Room Always cut the paint with a knife and grind the paint edge when disassembling parts of the robot See Cut the paint or surface on the robot before replacing parts on page 118 2 xx2100000936 Disconnect the connectors R2 MP3 R2 FB3 3 Continues on next page Product...

Страница 276: ...ee Cut the paint or surface on the robot before replacing parts on page 118 Note After all repair work wipe the Clean Room robot free from particles with spirit on a lint free cloth xx2100000938 Disconnect the axis 4 motor connectors R2 MP4 R2 FB4 2 xx2100000939 Snap loose and remove the female head of the connectors from the bracket Note The harness are not visible due to the cleanness requiremen...

Страница 277: ...nnect the connector R2 PB R2 LAMP 3 xx2100001031 Snap loose and remove the female head of the connector from the bracket Note The harness are not visible due to the cleanness requirements of the illustration They are still ex isting inside the cable ferrule in the actual situ ation 4 Pull out the process hub Note Action DANGER Make sure that all supplies for electrical power hydraulic pressure and...

Страница 278: ...ption 3351 1 xx2100002438 CAUTION Be aware of the cabling that is attached to the cover The cover can not be removed completely until the connectors are disconnected as shown in following steps Removing the cable ferrule and bracket Note Action DANGER Make sure that all supplies for electrical power hydraulic pressure and air pressure are turned off 1 CAUTION For robots with protection type Clean ...

Страница 279: ...visible due to the cleanness requirements of the illustration They are still ex isting inside the cable ferrule in the actual situ ation 4 xx1800002842 Remove the screws on the cable ferrule and take the cable ferrule out 5 xx1800002849 Removing the axis 1 cover Note Action DANGER Make sure that all supplies for electrical power hydraulic pressure and air pressure are turned off 1 Continues on nex...

Страница 280: ... Replace the gasket if needed 4 For robots with protection class IP54 option 3350 540 For robots with protection type Clean Room option 3351 1 xx2100002428 Removing the axis 2 cover Note Action DANGER Make sure that all supplies for electrical power hydraulic pressure and air pressure are turned off 1 CAUTION For robots with protection type Clean Room Always cut the paint with a knife and grind th...

Страница 281: ...0 540 For robots with protection type Clean Room option 3351 1 xx2100002451 Removing the SMB cover Note Action DANGER Make sure that all supplies for electrical power hydraulic pressure and air pressure are turned off 1 ELECTROSTATIC DISCHARGE ESD The unit is sensitive to ESD Before handling the unit read the safety information in section The unit is sensitive to ESD on page 49 2 Continues on next...

Страница 282: ... SMB cover with the SMB unit assembly out together Note For robots with protection class IP54 option 3350 540 For robots with protection type Clean Room op tion 3351 1 Check the gasket for the SMB cover Tip Replace the gasket if needed 5 For robots with protection class IP54 option 3350 540 For robots with protection type Clean Room option 3351 1 xx2100002433 Disconnecting the SMB cabling Note Act...

Страница 283: ...r and cable position before disconnecting them to have as a reference when reconnecting 5 Removing the base plate rear plate Note Action DANGER Make sure that all supplies for electrical power hydraulic pressure and air pressure are turned off 1 CAUTION For robots with protection type Clean Room Always cut the paint with a knife and grind the paint edge when disassembling parts of the robot See Cu...

Страница 284: ...s IP54 option 3350 540 For robots with protection type Clean Room op tion 3351 1 Check the gasket for the base plate Tip Replace the gasket if needed 6 For robots with protection class IP54 option 3350 540 For robots with protection type Clean Room option 3351 1 xx2100002434 Continues on next page 284 Product manual IRB 920 3HAC075721 001 Revision C Copyright 2022 ABB All rights reserved 5 Repair ...

Страница 285: ...s IP54 option 3350 540 For robots with protection type Clean Room option 3351 1 xx2100002435 Releasing the base bracket Note Action DANGER Make sure that all supplies for electrical power hydraulic pressure and air pressure are turned off 1 CAUTION For robots with protection type Clean Room Always cut the paint with a knife and grind the paint edge when disassembling parts of the robot See Cut the...

Страница 286: ...edge when disassembling parts of the robot See Cut the paint or surface on the robot before replacing parts on page 118 2 xx2100000947 Remove the three grounding cables from the bracket by unscrew the screws 3 Disconnecting the connectors for axis 1 motor Note Action DANGER Make sure that all supplies for electrical power hydraulic pressure and air pressure are turned off 1 Continues on next page ...

Страница 287: ...ents of the illustration They are still ex isting inside the cable ferrule in the actual situ ation 4 Removing the bracket Note Action DANGER Make sure that all supplies for electrical power hydraulic pressure and air pressure are turned off 1 CAUTION For robots with protection type Clean Room Always cut the paint with a knife and grind the paint edge when disassembling parts of the robot See Cut ...

Страница 288: ...pressure and air pressure are turned off 1 CAUTION For robots with protection type Clean Room Always cut the paint with a knife and grind the paint edge when disassembling parts of the robot See Cut the paint or surface on the robot before replacing parts on page 118 2 Continues on next page 288 Product manual IRB 920 3HAC075721 001 Revision C Copyright 2022 ABB All rights reserved 5 Repair 5 4 2 ...

Страница 289: ...e main harness from the axis 1 gearbox position Note Action DANGER Make sure that all supplies for electrical power hydraulic pressure and air pressure are turned off 1 CAUTION For robots with protection type Clean Room Always cut the paint with a knife and grind the paint edge when disassembling parts of the robot See Cut the paint or surface on the robot before replacing parts on page 118 2 Cont...

Страница 290: ... that all supplies for electrical power hydraulic pressure and air pressure are turned off 1 CAUTION For robots with protection type Clean Room Always cut the paint with a knife and grind the paint edge when disassembling parts of the robot See Cut the paint or surface on the robot before replacing parts on page 118 2 Continues on next page 290 Product manual IRB 920 3HAC075721 001 Revision C Copy...

Страница 291: ...on class IP54 option 3350 540 For robots with protection type Clean Room op tion 3351 1 Check the gasket for the main harness Tip Replace the gasket if needed 4 For robots with protection class IP54 option 3350 540 For robots with protection type Clean Room option 3351 1 xx2100002436 Continues on next page Product manual IRB 920 291 3HAC075721 001 Revision C Copyright 2022 ABB All rights reserved ...

Страница 292: ...ded 6 For robots with protection class IP54 option 3350 540 Note Remove the bottom plate from the main harness if needed For robots with protection type Clean Room option 3351 1 xx2100002437 xx2200000281 For robots with protection type Clean Room op tion 3351 1 Remove the one way valve by unscrewing it 7 Removing the pulley protection cover Note Action DANGER Make sure that all supplies for electr...

Страница 293: ...bly Note Action DANGER Make sure that all supplies for electrical power hydraulic pressure and air pressure are turned off 1 CAUTION For robots with protection type Clean Room Always cut the paint with a knife and grind the paint edge when disassembling parts of the robot See Cut the paint or surface on the robot before replacing parts on page 118 2 xx2100001038 Remove the screws and washers 3 Rem...

Страница 294: ...t Use these procedures to refit the axis 1 timing belt Refitting the axis 1 motor sub assembly Note Action For robots with protection type Clean Room 1 Clean the joints that have been opened and wipe the parts free from particles with spirit on a lint free See Cut the paint or surface on the robot before replacing parts on page 118 Note After all repair work wipe the Clean Room robot free from par...

Страница 295: ...1 3HAC070449 001 Hang a strap to the hook on the motor 5 Used belt 51 1 Use a handheld dynamometer hooking to the strap and pull the dynamometer to make the tension falling in the allowed force range Note During the measurement make sure that all inter ferences that may affect the force are removed Pay attention to the force application direction 6 New belt 90 xx2100001043 Continues on next page P...

Страница 296: ... pressure are turned off 1 CAUTION For robots with protection type Clean Room Always cut the paint with a knife and grind the paint edge when disassembling parts of the robot See Cut the paint or surface on the robot before replacing parts on page 118 2 Screws Hex socket head cap screw M4x10 12 9 Lafre 2C2B FC6 9 8 pcs Refit the pulley protection cover 3 Secure the screws on the pulley protection ...

Страница 297: ... xx2100000930 Make sure that the robot is at zero position 2 For rear outlet cable version xx2100000955 Insert the internal harness into the inner arm through the sleeve of the axis 1 gearbox from the base Tip Wrap the connectors with the masking tape Tip The air hoses should face the axis 1 motor 3 For undeneath outlet cable version xx2100001206 CAUTION Make sure that no cables or hoses are twist...

Страница 298: ...the centre of the axis 2 gearbox Tip Wrap the connectors with the masking tape 2 For undeneath outlet cable version xx2100001206 Secure the R2 MP3 and R2 MP4 with cable straps 3 Reconnecting the connectors for axis 1 motor Note Action For robots with protection type Clean Room 1 Clean the joints that have been opened and wipe the parts free from particles with spirit on a lint free See Cut the pai...

Страница 299: ...Route the cabling behind the axis 1 motor CAUTION Correct cable routing is highly important If the cables are routed and secured incorrectly the cables can be damaged 4 Reconnecting the grounding cable connectors Note Action For robots with protection type Clean Room 1 Clean the joints that have been opened and wipe the parts free from particles with spirit on a lint free See Cut the paint or surf...

Страница 300: ...bracket Note Action DANGER Make sure that all supplies for electrical power hydraulic pressure and air pressure are turned off 1 CAUTION For robots with protection type Clean Room Always cut the paint with a knife and grind the paint edge when disassembling parts of the robot See Cut the paint or surface on the robot before replacing parts on page 118 2 Lay the main harness in a natural state with...

Страница 301: ...afre 2C2B FC6 9 4 pcs Refit the base bracket to the base and secure with the screws 4 Tightening torque 1 2 Nm 10 xx2100000948 Refitting the SMB cover Note Action For robots with protection type Clean Room 1 Clean the joints that have been opened and wipe the parts free from particles with spirit on a lint free See Cut the paint or surface on the robot before replacing parts on page 118 Note After...

Страница 302: ...hotos of the connector and cable position before disconnecting them to have as a reference when reconnecting 2 Continues on next page 302 Product manual IRB 920 3HAC075721 001 Revision C Copyright 2022 ABB All rights reserved 5 Repair 5 4 2 Replacing the axis 1 timing belt Continued ...

Страница 303: ...Nm xx2100000944 Secure the SMB cover to the base with the screws 4 For robots with protection type Clean Room option 3351 1 Screws Stainless Screw Hexagon Socket Head Cap Clean Room 3HAC075438 001 6 pcs Tightening torque 2 6 Nm xx2100002433 For robots with protection class IP54 option 3350 540 Screws Hex socket head cap screw M4x10 12 9 Lafre 2C2B FC6 9 6 pcs Tightening torque 2 6 Nm xx2100002433 ...

Страница 304: ...cing parts on page 118 Note After all repair work wipe the Clean Room robot free from particles with spirit on a lint free cloth xx2200000281 For robots with protection type Clean Room op tion 3351 1 Refit the one way valve by screwing it into the main harness assembly 2 Continues on next page 304 Product manual IRB 920 3HAC075721 001 Revision C Copyright 2022 ABB All rights reserved 5 Repair 5 4 ...

Страница 305: ... FC6 9 6 pcs Tightening torque 1 2 Nm 10 xx2100000953 For robots with protection class IP54 option 3350 540 For robots with protection type Clean Room option 3351 1 Screws Hex socket head cap screw M3x30 12 9 Lafre 2C2B FC6 9 6 pcs Tightening torque 1 2 Nm 10 xx2100002436 Continues on next page Product manual IRB 920 305 3HAC075721 001 Revision C Copyright 2022 ABB All rights reserved 5 Repair 5 4...

Страница 306: ...tion 3351 1 Screws Hex socket head cap screw M3x30 12 9 Lafre 2C2B FC6 9 8 pcs Tightening torque 1 2 Nm 10 xx2100002437 Refitting the base plate rear plate Note Action For robots with protection type Clean Room 1 Clean the joints that have been opened and wipe the parts free from particles with spirit on a lint free See Cut the paint or surface on the robot before replacing parts on page 118 Note ...

Страница 307: ...he internal harness cover all moving area of the harness 2 Continues on next page Product manual IRB 920 307 3HAC075721 001 Revision C Copyright 2022 ABB All rights reserved 5 Repair 5 4 2 Replacing the axis 1 timing belt Continued ...

Страница 308: ...rsion refit the rear plate to the base Note For robots with protection class IP54 option 3350 540 For robots with protection type Clean Room op tion 3351 1 Check the gasket for the rear plate before refitting the rear plate Tip Replace the gasket if needed For robots with protection class IP54 option 3350 540 For robots with protection type Clean Room option 3351 1 xx2100002434 Secure the base pla...

Страница 309: ...uter arm Note Action For robots with protection type Clean Room 1 Clean the joints that have been opened and wipe the parts free from particles with spirit on a lint free See Cut the paint or surface on the robot before replacing parts on page 118 Note After all repair work wipe the Clean Room robot free from particles with spirit on a lint free cloth Lay the internal harness in a natural state wi...

Страница 310: ...ble ferrules so that the cable is in a natural bending position to avoid twisting 4 Tightening torque 1 2 Nm 10 xx2100000940 Note The harness are not visible due to the cleanness requirements of the illustration They are still ex isting inside the cable ferrule in the actual situ ation Refit the bracket without securing Tip Do not secure it with the screws before the cable ferrule installed well 5...

Страница 311: ... to the connectors the connectors may be dam aged if excessive force is used Note The harness are not visible due to the cleanness requirements of the illustration They are still ex isting inside the cable ferrule in the actual situ ation xx2100000938 Reconnect the connectors R2 MP4 R2 FB4 Tip See the number markings on the connectors for help to find the corresponding connector 2 Route the cablin...

Страница 312: ...to the connectors the connectors may be dam aged if excessive force is used Note The harness are not visible due to the cleanness requirements of the illustration They are still ex isting inside the cable ferrule in the actual situ ation 2 xx2100000936 Reconnect the connectors R2 MP3 R2 FB3 Tip See the number markings on the connectors for help to find the corresponding connector 3 Route the cabli...

Страница 313: ... the connectors the connectors may be dam aged if excessive force is used Note The harness are not visible due to the cleanness requirements of the illustration They are still ex isting inside the cable ferrule in the actual situ ation 2 xx2100000934 Reconnect the connectors R2 MP2 R2 FB2 Tip See the number markings on the connectors for help to find the corresponding connector 3 Route the cabling...

Страница 314: ...connectors the connectors may be dam aged if excessive force is used Note The harness are not visible due to the cleanness requirements of the illustration They are still ex isting inside the cable ferrule in the actual situ ation 2 xx2100001030 Reconnect the connector R2 PB R2 LAMP Tip See the number markings on the connectors for help to find the corresponding connector 3 Route and secure the ca...

Страница 315: ...placing parts on page 118 Note After all repair work wipe the Clean Room robot free from particles with spirit on a lint free cloth Route the air hoses on the process hub behind the bracket CAUTION Correct cable routing is highly important If the cables are routed and secured incorrectly the cables can be damaged 2 Continues on next page Product manual IRB 920 315 3HAC075721 001 Revision C Copyrig...

Страница 316: ...th the same number connect to the same L shaped connector 4 For robots with C2 cabling 5 Reconnect the connector R1 C2 Tip See the number markings on the air hoses for help to find the corresponding air hoses The air hoses with the same number connect to the same L shaped connector Secure the C2 cabling to the C2 bracket with the cable straps 6 xx2100001032 Reconnect the air hoses in a cross patte...

Страница 317: ...it the bracket Tip Do not secure it with the screws before the cable ferrule installed well 2 Tightening torque 1 2 Nm 10 xx2100000941 Note The harness are not visible due to the cleanness requirements of the illustration They are still ex isting inside the cable ferrule in the actual situ ation Refitting the cover of the outer arm Note Action For robots with protection type Clean Room 1 Clean the...

Страница 318: ... class IP54 option 3350 540 For robots with protection type Clean Room option 3351 1 xx2100002427 For Clean Room IP54 robots Refitting the top cover and the flange with bearing Note Action For robots with protection type Clean Room 1 Clean the joints that have been opened and wipe the parts free from particles with spirit on a lint free See Cut the paint or surface on the robot before replacing pa...

Страница 319: ...on type Clean Room op tion 3351 1 3 Tightening torque 0 8 Nm 10 xx2100002401 Refit the screws to the flange with bearing xx2100002399 For robots with protection class IP54 option 3350 540 For robots with protection type Clean Room op tion 3351 1 Refit the top cover to the ball screw Tip The top surface of the cover should be flush with the top end of the ball screw 4 Continues on next page Product...

Страница 320: ... with protection type Clean Room 1 Clean the joints that have been opened and wipe the parts free from particles with spirit on a lint free See Cut the paint or surface on the robot before replacing parts on page 118 Note After all repair work wipe the Clean Room robot free from particles with spirit on a lint free cloth Insert the process hub from the outer arm cover 2 Continues on next page 320 ...

Страница 321: ...il the connectors are disconnected as shown in following steps For robots with protection class IP54 option 3350 540 For robots with protection type Clean Room option 3351 1 xx2100002438 Refitting the axis 1 cover Note Action For robots with protection type Clean Room 1 Clean the joints that have been opened and wipe the parts free from particles with spirit on a lint free See Cut the paint or sur...

Страница 322: ...B 920T 6 0 65 Screw Hex socket head cap flange screw M5x16 12 9 Lafre 2C2B FC6 9 PrO COat111 16 pcs Tightening torque 5 4 Nm 3 For robots with protection class IP30 option 3350 300 xx2100000942 Refit the screws 3 For robots with protection class IP54 option 3350 540 For robots with protection type Clean Room option 3351 1 xx2100002428 Refitting the axis 2 cover Note Action DANGER Make sure that al...

Страница 323: ...P54 option 3350 540 For robots with protection type Clean Room op tion 3351 1 Check the gasket for the cover before refitting the cover Tip Replace the gasket if needed 3 Tightening torque 1 2 Nm 10 For robots with protection class IP30 option 3350 300 xx2100000943 Refit the screws 4 For robots with protection class IP54 option 3350 540 For robots with protection type Clean Room option 3351 1 xx21...

Страница 324: ... all repair work wipe the Clean Room robot free from particles with spirit on a lint free cloth Calibration is detailed in section Calibration on page 945 Recalibrate the robot 2 DANGER Make sure all safety requirements are met when performing the first test run 3 324 Product manual IRB 920 3HAC075721 001 Revision C Copyright 2022 ABB All rights reserved 5 Repair 5 4 2 Replacing the axis 1 timing ...

Страница 325: ...abb com myABB Note Article number Spare part Used for IRB 920T 6 0 45 3HAC076570 001 Inner arm 450 mm Used for IRB 920T 6 0 55 3HAC076571 001 Inner arm 550 mm Used for IRB 920T 6 0 65 3HAC076572 001 Inner arm 650 mm 3HAC076607 001 Axis 1 Cover 450 mm 3HAC076608 001 Axis 1 Cover 550 mm 3HAC076609 001 Axis 1 Cover 650 mm 3HAC076610 001 Axis 2 Cover Continues on next page Product manual IRB 920 325 3...

Страница 326: ...d equipment Note Article number Equipment Content is defined in section Standard toolkit on page 996 Standard toolkit Delivered as a set of calibration tools Required if Axis Calibration is the valid calibration method for the robot 3HAC055412 001 Calibration toolbox Axis Calibra tion Used for measuring the timing belt tension Sonic tension meter Used for measuring the timing belt tension Handheld...

Страница 327: ... requires possibility to move the robot Read more about reference calibration for Axis Calibration in Reference calibration routine on page 957 If no previous reference values exist and no new reference values can be created then reference calibration is not possible If the robot is to be calibrated with fine calibration Remove all external cable packages DressPack and tools from the robot Removin...

Страница 328: ...obot before replacing parts on page 118 5 Removing the process hub screws Note Action DANGER Make sure that all supplies for electrical power hydraulic pressure and air pressure are turned off 1 CAUTION For robots with protection type Clean Room Always cut the paint with a knife and grind the paint edge when disassembling parts of the robot See Cut the paint or surface on the robot before replacin...

Страница 329: ...100000932 Insert the process hub to the outer arm 4 For Clean Room IP54 robots Removing the top cover and the flange with bearing Note Action DANGER Make sure that all supplies for electrical power hydraulic pressure and air pressure are turned off 1 CAUTION For robots with protection type Clean Room Always cut the paint with a knife and grind the paint edge when disassembling parts of the robot S...

Страница 330: ...om the ball screw 4 xx2100002401 For robots with protection class IP54 option 3350 540 For robots with protection type Clean Room op tion 3351 1 Remove the screws on the flange with bearing 5 xx2100002402 For robots with protection class IP54 option 3350 540 For robots with protection type Clean Room op tion 3351 1 Remove the flange with bearing 6 Continues on next page 330 Product manual IRB 920 ...

Страница 331: ...00000933 Remove the screws on the cover of the outer arm and remove the cover Note For robots with protection class IP54 option 3350 540 For robots with protection type Clean Room op tion 3351 1 Remove the cover with bellow and housing Note The bellow does not need to be removed separ ately Tip Check the gasket and replace it if needed 3 For robots with protection class IP54 option 3350 540 For ro...

Страница 332: ...ype Clean Room Always cut the paint with a knife and grind the paint edge when disassembling parts of the robot See Cut the paint or surface on the robot before replacing parts on page 118 2 xx2100001032 Disconnect the air hoses from the L shaped con nectors 3 Continues on next page 332 Product manual IRB 920 3HAC075721 001 Revision C Copyright 2022 ABB All rights reserved 5 Repair 5 5 1 Replacing...

Страница 333: ... The connector clip has to be pressed 1 and pushed forward 2 to separate the R1 C2 for C2 cabling xx1800002943 xx2100001034 Snap loose and remove the female head of the connectors from the bracket Note The harness are not visible due to the cleanness requirements of the illustration They are still ex isting inside the cable ferrule in the actual situ ation 6 Continues on next page Product manual I...

Страница 334: ...ect the connectors R2 MP2 R2 FB2 3 xx2100000935 Snap loose and remove the female head of the connectors from the bracket Note The harness are not visible due to the cleanness requirements of the illustration They are still ex isting inside the cable ferrule in the actual situ ation 4 Disconnecting the connectors for axis 3 motor Note Action DANGER Make sure that all supplies for electrical power h...

Страница 335: ...f the illustration They are still ex isting inside the cable ferrule in the actual situ ation 4 Disconnecting the connectors for axis 4 motor Note Action For robots with protection type Clean Room 1 Clean the joints that have been opened and wipe the parts free from particles with spirit on a lint free See Cut the paint or surface on the robot before replacing parts on page 118 Note After all repa...

Страница 336: ...ecting the connector for PB Note Action DANGER Make sure that all supplies for electrical power hydraulic pressure and air pressure are turned off 1 CAUTION For robots with protection type Clean Room Always cut the paint with a knife and grind the paint edge when disassembling parts of the robot See Cut the paint or surface on the robot before replacing parts on page 118 2 Continues on next page 3...

Страница 337: ...he process hub Note Action DANGER Make sure that all supplies for electrical power hydraulic pressure and air pressure are turned off 1 CAUTION For robots with protection type Clean Room Always cut the paint with a knife and grind the paint edge when disassembling parts of the robot See Cut the paint or surface on the robot before replacing parts on page 118 2 Continues on next page Product manual...

Страница 338: ...DANGER Make sure that all supplies for electrical power hydraulic pressure and air pressure are turned off 1 CAUTION For robots with protection type Clean Room Always cut the paint with a knife and grind the paint edge when disassembling parts of the robot See Cut the paint or surface on the robot before replacing parts on page 118 2 xx2100000940 Remove the screws on the bracket to the cable ferru...

Страница 339: ... 2 pulley protection cover Note Action DANGER Make sure that all supplies for electrical power hydraulic pressure and air pressure are turned off 1 CAUTION For robots with protection type Clean Room Always cut the paint with a knife and grind the paint edge when disassembling parts of the robot See Cut the paint or surface on the robot before replacing parts on page 118 2 Continues on next page Pr...

Страница 340: ... grind the paint edge when disassembling parts of the robot See Cut the paint or surface on the robot before replacing parts on page 118 2 xx2100001046 Remove the screws and washers 3 Remove the motor Tip Move the internal harness out of the way 4 Removing the axis 2 timing belt Note Action DANGER Make sure that all supplies for electrical power hydraulic pressure and air pressure are turned off 1...

Страница 341: ...e that all supplies for electrical power hydraulic pressure and air pressure are turned off 1 CAUTION For robots with protection type Clean Room Always cut the paint with a knife and grind the paint edge when disassembling parts of the robot See Cut the paint or surface on the robot before replacing parts on page 118 2 xx2100001049 Remove the screws on the axis 2 gear inside the outer arm 3 Contin...

Страница 342: ...urned off 1 CAUTION For robots with protection type Clean Room Always cut the paint with a knife and grind the paint edge when disassembling parts of the robot See Cut the paint or surface on the robot before replacing parts on page 118 2 Continues on next page 342 Product manual IRB 920 3HAC075721 001 Revision C Copyright 2022 ABB All rights reserved 5 Repair 5 5 1 Replacing the inner arm Continu...

Страница 343: ...ion type Clean Room option 3351 1 xx2100002428 Removing the axis 2 cover Note Action DANGER Make sure that all supplies for electrical power hydraulic pressure and air pressure are turned off 1 CAUTION For robots with protection type Clean Room Always cut the paint with a knife and grind the paint edge when disassembling parts of the robot See Cut the paint or surface on the robot before replacing...

Страница 344: ...n 3350 540 For robots with protection type Clean Room option 3351 1 xx2100002451 Removing the SMB cover Note Action DANGER Make sure that all supplies for electrical power hydraulic pressure and air pressure are turned off 1 ELECTROSTATIC DISCHARGE ESD The unit is sensitive to ESD Before handling the unit read the safety information in section The unit is sensitive to ESD on page 49 2 Continues on...

Страница 345: ... the SMB cover with the SMB unit assembly out together Note For robots with protection class IP54 option 3350 540 For robots with protection type Clean Room op tion 3351 1 Check the gasket for the SMB cover Tip Replace the gasket if needed 5 For robots with protection class IP54 option 3350 540 For robots with protection type Clean Room option 3351 1 xx2100002433 Disconnecting the SMB cabling Note...

Страница 346: ...ector and cable position before disconnecting them to have as a reference when reconnecting 5 Removing the base plate rear plate Note Action DANGER Make sure that all supplies for electrical power hydraulic pressure and air pressure are turned off 1 CAUTION For robots with protection type Clean Room Always cut the paint with a knife and grind the paint edge when disassembling parts of the robot Se...

Страница 347: ...class IP54 option 3350 540 For robots with protection type Clean Room op tion 3351 1 Check the gasket for the base plate Tip Replace the gasket if needed 6 For robots with protection class IP54 option 3350 540 For robots with protection type Clean Room option 3351 1 xx2100002434 Continues on next page Product manual IRB 920 347 3HAC075721 001 Revision C Copyright 2022 ABB All rights reserved 5 Rep...

Страница 348: ... class IP54 option 3350 540 For robots with protection type Clean Room option 3351 1 xx2100002435 Releasing the base bracket Note Action DANGER Make sure that all supplies for electrical power hydraulic pressure and air pressure are turned off 1 CAUTION For robots with protection type Clean Room Always cut the paint with a knife and grind the paint edge when disassembling parts of the robot See Cu...

Страница 349: ...aint edge when disassembling parts of the robot See Cut the paint or surface on the robot before replacing parts on page 118 2 xx2100000947 Remove the three grounding cables from the bracket by unscrew the screws 3 Disconnecting the connectors for axis 1 motor Note Action DANGER Make sure that all supplies for electrical power hydraulic pressure and air pressure are turned off 1 Continues on next ...

Страница 350: ...uirements of the illustration They are still ex isting inside the cable ferrule in the actual situ ation 4 Removing the bracket Note Action DANGER Make sure that all supplies for electrical power hydraulic pressure and air pressure are turned off 1 CAUTION For robots with protection type Clean Room Always cut the paint with a knife and grind the paint edge when disassembling parts of the robot See...

Страница 351: ...ulic pressure and air pressure are turned off 1 CAUTION For robots with protection type Clean Room Always cut the paint with a knife and grind the paint edge when disassembling parts of the robot See Cut the paint or surface on the robot before replacing parts on page 118 2 Continues on next page Product manual IRB 920 351 3HAC075721 001 Revision C Copyright 2022 ABB All rights reserved 5 Repair 5...

Страница 352: ...g the main harness from the axis 1 gearbox position Note Action DANGER Make sure that all supplies for electrical power hydraulic pressure and air pressure are turned off 1 CAUTION For robots with protection type Clean Room Always cut the paint with a knife and grind the paint edge when disassembling parts of the robot See Cut the paint or surface on the robot before replacing parts on page 118 2 ...

Страница 353: ...sure that all supplies for electrical power hydraulic pressure and air pressure are turned off 1 CAUTION For robots with protection type Clean Room Always cut the paint with a knife and grind the paint edge when disassembling parts of the robot See Cut the paint or surface on the robot before replacing parts on page 118 2 Continues on next page Product manual IRB 920 353 3HAC075721 001 Revision C ...

Страница 354: ...ection class IP54 option 3350 540 For robots with protection type Clean Room op tion 3351 1 Check the gasket for the main harness Tip Replace the gasket if needed 4 For robots with protection class IP54 option 3350 540 For robots with protection type Clean Room option 3351 1 xx2100002436 Continues on next page 354 Product manual IRB 920 3HAC075721 001 Revision C Copyright 2022 ABB All rights reser...

Страница 355: ...f needed 6 For robots with protection class IP54 option 3350 540 Note Remove the bottom plate from the main harness if needed For robots with protection type Clean Room option 3351 1 xx2100002437 xx2200000281 For robots with protection type Clean Room op tion 3351 1 Remove the one way valve by unscrewing it 7 Removing the pulley protection cover Note Action DANGER Make sure that all supplies for e...

Страница 356: ...assembly Note Action DANGER Make sure that all supplies for electrical power hydraulic pressure and air pressure are turned off 1 CAUTION For robots with protection type Clean Room Always cut the paint with a knife and grind the paint edge when disassembling parts of the robot See Cut the paint or surface on the robot before replacing parts on page 118 2 xx2100001038 Remove the screws and washers ...

Страница 357: ... screws and washers on the base to the axis 1 gear unit 3 Remove the base 4 Removing the axis 2 gear unit sub assembly Note Action DANGER Make sure that all supplies for electrical power hydraulic pressure and air pressure are turned off 1 CAUTION For robots with protection type Clean Room Always cut the paint with a knife and grind the paint edge when disassembling parts of the robot See Cut the ...

Страница 358: ...tors with the masking tape For robots with protection type Clean Room option 3351 1 xx2100002439 Removing the axis 1 gear unit sub assembly Note Action DANGER Make sure that all supplies for electrical power hydraulic pressure and air pressure are turned off 1 CAUTION For robots with protection type Clean Room Always cut the paint with a knife and grind the paint edge when disassembling parts of t...

Страница 359: ...440 Refitting the inner arm Use these procedures to refit the inner arm Refitting the axis 2 gear unit sub assembly to the inner arm Note Action For robots with protection type Clean Room 1 Clean the joints that have been opened and wipe the parts free from particles with spirit on a lint free See Cut the paint or surface on the robot before replacing parts on page 118 Note After all repair work w...

Страница 360: ...an Room op tion 3351 1 Refit the gear unit and the O ring according to the location pin Tip Check the O ring and replace it if needed 3 Tip When the gear unit is in the right position you can hear a clear Click Continues on next page 360 Product manual IRB 920 3HAC075721 001 Revision C Copyright 2022 ABB All rights reserved 5 Repair 5 5 1 Replacing the inner arm Continued ...

Страница 361: ...fitting the axis 1 gear unit sub assembly to the inner arm Note Action For robots with protection type Clean Room 1 Clean the joints that have been opened and wipe the parts free from particles with spirit on a lint free See Cut the paint or surface on the robot before replacing parts on page 118 Note After all repair work wipe the Clean Room robot free from particles with spirit on a lint free cl...

Страница 362: ...bots with protection type Clean Room op tion 3351 1 Refit the gear unit and the O ring according to the location pin through the cable Tip Check the O ring and replace it if needed 3 Tip When the gear unit is in the right position you can hear a clear Click Tip Wrap the connectors with the masking tape Continues on next page 362 Product manual IRB 920 3HAC075721 001 Revision C Copyright 2022 ABB A...

Страница 363: ...tting the base Note Action For robots with protection type Clean Room 1 Clean the joints that have been opened and wipe the parts free from particles with spirit on a lint free See Cut the paint or surface on the robot before replacing parts on page 118 Note After all repair work wipe the Clean Room robot free from particles with spirit on a lint free cloth Continues on next page Product manual IR...

Страница 364: ...on type Clean Room 1 Clean the joints that have been opened and wipe the parts free from particles with spirit on a lint free See Cut the paint or surface on the robot before replacing parts on page 118 Note After all repair work wipe the Clean Room robot free from particles with spirit on a lint free cloth Put the timing belt into the pulley on the gear 2 Continues on next page 364 Product manual...

Страница 365: ...elt A1 3HAC070449 001 Hang a strap to the hook on the motor 5 Used belt 51 1 Use a handheld dynamometer hooking to the strap and pull the dynamometer to make the tension falling in the allowed force range Note During the measurement make sure that all inter ferences that may affect the force are removed Pay attention to the force application direction 6 New belt 90 xx2100001043 Continues on next p...

Страница 366: ...d air pressure are turned off 1 CAUTION For robots with protection type Clean Room Always cut the paint with a knife and grind the paint edge when disassembling parts of the robot See Cut the paint or surface on the robot before replacing parts on page 118 2 Screws Hex socket head cap screw M4x10 12 9 Lafre 2C2B FC6 9 8 pcs Refit the pulley protection cover 3 Secure the screws on the pulley protec...

Страница 367: ...cloth xx2100000930 Make sure that the robot is at zero position 2 For rear outlet cable version xx2100000955 Insert the internal harness into the inner arm through the sleeve of the axis 1 gearbox from the base Tip Wrap the connectors with the masking tape Tip The air hoses should face the axis 1 motor 3 For undeneath outlet cable version xx2100001206 CAUTION Make sure that no cables or hoses are ...

Страница 368: ...ed to the connectors the connectors may be dam aged if excessive force is used Note The harness are not visible due to the cleanness requirements of the illustration They are still ex isting inside the cable ferrule in the actual situ ation 2 xx2100000949 Reconnect the connectors R2 MP1 R2 FB1 Tip See the number markings on the connectors for help to find the corresponding connector 3 Route the ca...

Страница 369: ...10 xx2100000947 Route and secure the cabling with cable straps if needed CAUTION Correct cable routing is highly important If the cables are routed and secured incorrectly the cables can be damaged 3 Refitting the cable ferrule in the base Note Action For robots with protection type Clean Room 1 Clean the joints that have been opened and wipe the parts free from particles with spirit on a lint fre...

Страница 370: ...t with a knife and grind the paint edge when disassembling parts of the robot See Cut the paint or surface on the robot before replacing parts on page 118 2 Lay the main harness in a natural state without distortion 3 Screws Hex socket head cap screw M3x8 12 9 Lafre 2C2B FC6 9 2 pcs Secure the cable ferrule to the bracket Tip Align all the cable ferrules so that the cable is in a natural bending p...

Страница 371: ...spirit on a lint free See Cut the paint or surface on the robot before replacing parts on page 118 Note After all repair work wipe the Clean Room robot free from particles with spirit on a lint free cloth xx2100000945 Reconnect the connectors SMB P7 SMB J1 SMB J2 Tip Take photos of the connector and cable position before disconnecting them to have as a reference when reconnecting 2 Continues on ne...

Страница 372: ... 2 6 Nm xx2100000944 Secure the SMB cover to the base with the screws 4 For robots with protection type Clean Room option 3351 1 Screws Stainless Screw Hexagon Socket Head Cap Clean Room 3HAC075438 001 6 pcs Tightening torque 2 6 Nm xx2100002433 For robots with protection class IP54 option 3350 540 Screws Hex socket head cap screw M4x10 12 9 Lafre 2C2B FC6 9 6 pcs Tightening torque 2 6 Nm xx210000...

Страница 373: ...replacing parts on page 118 Note After all repair work wipe the Clean Room robot free from particles with spirit on a lint free cloth xx2200000281 For robots with protection type Clean Room op tion 3351 1 Refit the one way valve by screwing it into the main harness assembly 2 Continues on next page Product manual IRB 920 373 3HAC075721 001 Revision C Copyright 2022 ABB All rights reserved 5 Repair...

Страница 374: ...2C2B FC6 9 6 pcs Tightening torque 1 2 Nm 10 xx2100000953 For robots with protection class IP54 option 3350 540 For robots with protection type Clean Room option 3351 1 Screws Hex socket head cap screw M3x30 12 9 Lafre 2C2B FC6 9 6 pcs Tightening torque 1 2 Nm 10 xx2100002436 Continues on next page 374 Product manual IRB 920 3HAC075721 001 Revision C Copyright 2022 ABB All rights reserved 5 Repair...

Страница 375: ...om option 3351 1 Screws Hex socket head cap screw M3x30 12 9 Lafre 2C2B FC6 9 8 pcs Tightening torque 1 2 Nm 10 xx2100002437 Refitting the base plate rear plate Note Action For robots with protection type Clean Room 1 Clean the joints that have been opened and wipe the parts free from particles with spirit on a lint free See Cut the paint or surface on the robot before replacing parts on page 118 ...

Страница 376: ...to the internal harness cover all moving area of the harness 2 Continues on next page 376 Product manual IRB 920 3HAC075721 001 Revision C Copyright 2022 ABB All rights reserved 5 Repair 5 5 1 Replacing the inner arm Continued ...

Страница 377: ...e version refit the rear plate to the base Note For robots with protection class IP54 option 3350 540 For robots with protection type Clean Room op tion 3351 1 Check the gasket for the rear plate before refitting the rear plate Tip Replace the gasket if needed For robots with protection class IP54 option 3350 540 For robots with protection type Clean Room option 3351 1 xx2100002434 Secure the base...

Страница 378: ...r robots with protection type Clean Room 1 Clean the joints that have been opened and wipe the parts free from particles with spirit on a lint free See Cut the paint or surface on the robot before replacing parts on page 118 Note After all repair work wipe the Clean Room robot free from particles with spirit on a lint free cloth CAUTION Whenever parting mating motor and gearbox the gears may be da...

Страница 379: ...ening torque 3 5 Nm 10 xx2100001049 Refitting the axis 2 motor sub assembly Note Action For robots with protection type Clean Room 1 Clean the joints that have been opened and wipe the parts free from particles with spirit on a lint free See Cut the paint or surface on the robot before replacing parts on page 118 Note After all repair work wipe the Clean Room robot free from particles with spirit ...

Страница 380: ...t A2 3HAC061861 001 Hang a strap to the motor 5 Used belt 64 7 Use a handheld dynamometer hooking to the strap and pull the dynamometer to make the tension falling in the allowed force range Note During the measurement make sure that all inter ferences that may affect the force are removed Pay attention to the force application direction 6 New belt 70 xx2100001125 Tip If the ball screw will interf...

Страница 381: ...rews 10 Tightening torque 0 8 Nm xx2100001047 Inserting the main harness through the axis 2 gearbox position Note Action For robots with protection type Clean Room 1 Clean the joints that have been opened and wipe the parts free from particles with spirit on a lint free See Cut the paint or surface on the robot before replacing parts on page 118 Note After all repair work wipe the Clean Room robot...

Страница 382: ...rm Note Action For robots with protection type Clean Room 1 Clean the joints that have been opened and wipe the parts free from particles with spirit on a lint free See Cut the paint or surface on the robot before replacing parts on page 118 Note After all repair work wipe the Clean Room robot free from particles with spirit on a lint free cloth Lay the internal harness in a natural state without ...

Страница 383: ...he cable ferrules so that the cable is in a natural bending position to avoid twisting 4 Tightening torque 1 2 Nm 10 xx2100000940 Note The harness are not visible due to the cleanness requirements of the illustration They are still ex isting inside the cable ferrule in the actual situ ation Refit the bracket without securing Tip Do not secure it with the screws before the cable ferrule installed w...

Страница 384: ...plied to the connectors the connectors may be dam aged if excessive force is used Note The harness are not visible due to the cleanness requirements of the illustration They are still ex isting inside the cable ferrule in the actual situ ation xx2100000938 Reconnect the connectors R2 MP4 R2 FB4 Tip See the number markings on the connectors for help to find the corresponding connector 2 Route the c...

Страница 385: ...lied to the connectors the connectors may be dam aged if excessive force is used Note The harness are not visible due to the cleanness requirements of the illustration They are still ex isting inside the cable ferrule in the actual situ ation 2 xx2100000936 Reconnect the connectors R2 MP3 R2 FB3 Tip See the number markings on the connectors for help to find the corresponding connector 3 Route the ...

Страница 386: ...ed to the connectors the connectors may be dam aged if excessive force is used Note The harness are not visible due to the cleanness requirements of the illustration They are still ex isting inside the cable ferrule in the actual situ ation 2 xx2100000934 Reconnect the connectors R2 MP2 R2 FB2 Tip See the number markings on the connectors for help to find the corresponding connector 3 Route the ca...

Страница 387: ...the connectors the connectors may be dam aged if excessive force is used Note The harness are not visible due to the cleanness requirements of the illustration They are still ex isting inside the cable ferrule in the actual situ ation 2 xx2100001030 Reconnect the connector R2 PB R2 LAMP Tip See the number markings on the connectors for help to find the corresponding connector 3 Route and secure th...

Страница 388: ...e replacing parts on page 118 Note After all repair work wipe the Clean Room robot free from particles with spirit on a lint free cloth Route the air hoses on the process hub behind the bracket CAUTION Correct cable routing is highly important If the cables are routed and secured incorrectly the cables can be damaged 2 Continues on next page 388 Product manual IRB 920 3HAC075721 001 Revision C Cop...

Страница 389: ...es with the same number connect to the same L shaped connector 4 For robots with C2 cabling 5 Reconnect the connector R1 C2 Tip See the number markings on the air hoses for help to find the corresponding air hoses The air hoses with the same number connect to the same L shaped connector Secure the C2 cabling to the C2 bracket with the cable straps 6 xx2100001032 Reconnect the air hoses in a cross ...

Страница 390: ... Refit the bracket Tip Do not secure it with the screws before the cable ferrule installed well 2 Tightening torque 1 2 Nm 10 xx2100000941 Note The harness are not visible due to the cleanness requirements of the illustration They are still ex isting inside the cable ferrule in the actual situ ation Refitting the cover of the outer arm Note Action For robots with protection type Clean Room 1 Clean...

Страница 391: ...tion class IP54 option 3350 540 For robots with protection type Clean Room option 3351 1 xx2100002427 For Clean Room IP54 robots Refitting the top cover and the flange with bearing Note Action For robots with protection type Clean Room 1 Clean the joints that have been opened and wipe the parts free from particles with spirit on a lint free See Cut the paint or surface on the robot before replacin...

Страница 392: ...ection type Clean Room op tion 3351 1 3 Tightening torque 0 8 Nm 10 xx2100002401 Refit the screws to the flange with bearing xx2100002399 For robots with protection class IP54 option 3350 540 For robots with protection type Clean Room op tion 3351 1 Refit the top cover to the ball screw Tip The top surface of the cover should be flush with the top end of the ball screw 4 Continues on next page 392...

Страница 393: ...bots with protection type Clean Room 1 Clean the joints that have been opened and wipe the parts free from particles with spirit on a lint free See Cut the paint or surface on the robot before replacing parts on page 118 Note After all repair work wipe the Clean Room robot free from particles with spirit on a lint free cloth Insert the process hub from the outer arm cover 2 Continues on next page ...

Страница 394: ...y until the connectors are disconnected as shown in following steps For robots with protection class IP54 option 3350 540 For robots with protection type Clean Room option 3351 1 xx2100002438 Refitting the axis 1 cover Note Action For robots with protection type Clean Room 1 Clean the joints that have been opened and wipe the parts free from particles with spirit on a lint free See Cut the paint o...

Страница 395: ...or IRB 920T 6 0 65 Screw Hex socket head cap flange screw M5x16 12 9 Lafre 2C2B FC6 9 PrO COat111 16 pcs Tightening torque 5 4 Nm 3 For robots with protection class IP30 option 3350 300 xx2100000942 Refit the screws 3 For robots with protection class IP54 option 3350 540 For robots with protection type Clean Room option 3351 1 xx2100002428 Refitting the axis 2 cover Note Action DANGER Make sure th...

Страница 396: ...ass IP54 option 3350 540 For robots with protection type Clean Room op tion 3351 1 Check the gasket for the cover before refitting the cover Tip Replace the gasket if needed 3 Tightening torque 1 2 Nm 10 For robots with protection class IP30 option 3350 300 xx2100000943 Refit the screws 4 For robots with protection class IP54 option 3350 540 For robots with protection type Clean Room option 3351 1...

Страница 397: ...After all repair work wipe the Clean Room robot free from particles with spirit on a lint free cloth Calibration is detailed in section Calibration on page 945 Recalibrate the robot 2 DANGER Make sure all safety requirements are met when performing the first test run 3 Product manual IRB 920 397 3HAC075721 001 Revision C Copyright 2022 ABB All rights reserved 5 Repair 5 5 1 Replacing the inner arm...

Страница 398: ...o Replacing the bellows Required spare parts Note The spare part numbers that are listed in the table can be out of date See the latest spare parts of the IRB 920 via myABB Business Portal www abb com myABB Note Article number Spare part With bolt 3HAC073068 001 Mechanical Stop top D20 With bolt 3HAC073069 001 Mechanical Stop bottom D20 Required tools and equipment Note Article number Equipment Co...

Страница 399: ...to create reference values If the robot is to be calibrated with refer ence calibration Find previous reference values for the axis or create new reference values These val ues are to be used after the repair proced ure is completed for calibration of the ro bot Creating new values requires possibility to move the robot Read more about reference calibration for Axis Calibration in Reference calibr...

Страница 400: ...ake sure that all supplies for electrical power hydraulic pressure and air pressure are turned off 1 CAUTION For robots with protection type Clean Room Always cut the paint with a knife and grind the paint edge when disassembling parts of the robot See Cut the paint or surface on the robot before replacing parts on page 118 2 xx2100002398 For robots with protection class IP54 option 3350 540 For r...

Страница 401: ... flange with bearing 5 xx2100002402 For robots with protection class IP54 option 3350 540 For robots with protection type Clean Room op tion 3351 1 Remove the flange with bearing 6 Removing the extension shaft for Clean Room IP54 robots Note Action DANGER Make sure that all supplies for electrical power hydraulic pressure and air pressure are turned off 1 Continues on next page Product manual IRB ...

Страница 402: ...obots with protection type Clean Room op tion 3351 1 Loose the attachment screws Note For robots with protection class IP54 option 3350 540 Clean the upper housing from the glue if it will be reused 4 xx2100002421 For robots with protection class IP54 option 3350 540 For robots with protection type Clean Room op tion 3351 1 Remove the extension shaft from the mechanical stopper Note For robots wit...

Страница 403: ...e robot before replacing parts on page 118 2 xx1800002858 Remove the screw 3 xx1800002859 Remove the mechanical stopper Tip Hold the ball screw to prevent it from dropping Or the ball screw may be destroyed CAUTION If the ball screw nut or ball screw spline nut go out of the screw shaft the ball screw is destroyed Be careful when you do any work that may cause this 4 Continues on next page Product...

Страница 404: ...opened and wipe the parts free from particles with spirit on a lint free See Cut the paint or surface on the robot before replacing parts on page 118 Note After all repair work wipe the Clean Room robot free from particles with spirit on a lint free cloth Continues on next page 404 Product manual IRB 920 3HAC075721 001 Revision C Copyright 2022 ABB All rights reserved 5 Repair 5 6 1 Replacing the ...

Страница 405: ...om dropping Or the ball screw may be destroyed CAUTION If the ball screw nut or ball screw spline nut go out of the screw shaft the ball screw is destroyed Be careful when you do any work that may cause this 2 For robots with protection class IP30 option 3350 300 xx1900002012 For robots with protection class IP54 option 3350 540 For robots with protection type Clean Room option 3351 1 xx1900002011...

Страница 406: ...e 118 Note After all repair work wipe the Clean Room robot free from particles with spirit on a lint free cloth xx2100002421 For robots with protection class IP54 option 3350 540 For robots with protection type Clean Room op tion 3351 1 Install the extension shaft to the ball screw on the upper side of the mechanical stopper Note For robots with protection class IP54 option 3350 540 Check the gask...

Страница 407: ...he O ring to the extension shaft Note Replace the o ring if needed 4 Refitting the top cover and the flange with bearing Note Action For robots with protection type Clean Room 1 Clean the joints that have been opened and wipe the parts free from particles with spirit on a lint free See Cut the paint or surface on the robot before replacing parts on page 118 Note After all repair work wipe the Clea...

Страница 408: ...on type Clean Room op tion 3351 1 3 Tightening torque 0 8 Nm 10 xx2100002401 Refit the screws to the flange with bearing xx2100002399 For robots with protection class IP54 option 3350 540 For robots with protection type Clean Room op tion 3351 1 Refit the top cover to the ball screw Tip The top surface of the cover should be flush with the top end of the ball screw 4 Continues on next page 408 Pro...

Страница 409: ...ote After all repair work wipe the Clean Room robot free from particles with spirit on a lint free cloth DANGER Make sure all safety requirements are met when performing the first test run 2 Removing the lower mechanical stopper Use these procedures to remove the lower mechanical stopper Preparations before removing the lower mechanical stopper Note Action Decide which calibration routine to use a...

Страница 410: ...Make sure that all supplies for electrical power hydraulic pressure and air pressure are turned off 1 CAUTION For robots with protection type Clean Room Always cut the paint with a knife and grind the paint edge when disassembling parts of the robot See Cut the paint or surface on the robot before replacing parts on page 118 2 xx2100002404 For robots with protection class IP54 option 3350 540 For ...

Страница 411: ...on the flange with bearing 5 xx2100002407 For robots with protection class IP54 option 3350 540 For robots with protection type Clean Room op tion 3351 1 Remove the flange with bearing 6 Removing the shaft for Clean Room IP54 robots Note Action DANGER Make sure that all supplies for electrical power hydraulic pressure and air pressure are turned off 1 Continues on next page Product manual IRB 920 ...

Страница 412: ...40 For robots with protection type Clean Room op tion 3351 1 Loose the attachment screws 4 For robots with protection class IP54 option 3350 540 For robots with protection type Clean Room op tion 3351 1 Remove the shaft from the mechanical stopper Note The shaft is glued to the ball screw Be careful with the glue when removing the shaft 5 Removing the lower mechanical stopper Note Action DANGER Ma...

Страница 413: ...the screw 3 For robots with protection class IP54 option 3350 540 For robots with protection type Clean Room option 3351 1 xx1900001642 xx1800002861 Remove the mechanical stopper CAUTION If the ball screw nut or ball screw spline nut go out of the screw shaft the ball screw is destroyed Be careful when you do any work that may cause this 4 Continues on next page Product manual IRB 920 413 3HAC0757...

Страница 414: ...ned and wipe the parts free from particles with spirit on a lint free See Cut the paint or surface on the robot before replacing parts on page 118 Note After all repair work wipe the Clean Room robot free from particles with spirit on a lint free cloth Continues on next page 414 Product manual IRB 920 3HAC075721 001 Revision C Copyright 2022 ABB All rights reserved 5 Repair 5 6 1 Replacing the mec...

Страница 415: ...on 3350 300 30 30 30 5 xx1900000144 Tip Make sure that the limit block opening gap is aligned with the ball screw origin point CAUTION If the ball screw nut or ball screw spline nut go out of the screw shaft the ball screw is destroyed Be careful when you do any work that may cause this Note Be careful with the orientation of the mechanical stopper The flat side is on the upper side For robots wit...

Страница 416: ...th protection class IP30 option 3350 300 xx1800002860 For robots with protection class IP54 option 3350 540 For robots with protection type Clean Room option 3351 1 xx1900001642 Continues on next page 416 Product manual IRB 920 3HAC075721 001 Revision C Copyright 2022 ABB All rights reserved 5 Repair 5 6 1 Replacing the mechanical stopper Continued ...

Страница 417: ...ass IP54 option 3350 540 For robots with protection type Clean Room op tion 3351 1 Install the shaft to the ball screw at 40 2 mm pos ition to the lower of the ball screw 2 Screws Hexagon socket set screws with flat point ISO 4026 stainless steel M3x8 2 pcs For robots with protection class IP54 option 3350 540 For robots with protection type Clean Room op tion 3351 1 3 Tightening torque 0 4 Nm 10 ...

Страница 418: ...ring Note Action For robots with protection type Clean Room 1 Clean the joints that have been opened and wipe the parts free from particles with spirit on a lint free See Cut the paint or surface on the robot before replacing parts on page 118 Note After all repair work wipe the Clean Room robot free from particles with spirit on a lint free cloth xx2100002407 For robots with protection class IP54...

Страница 419: ... 540 For robots with protection type Clean Room op tion 3351 1 Refit the lower cover to the ball screw 4 Screws Hexagon socket set screws with flat point ISO 4026 stainless steel M3x8 2 pcs For robots with protection class IP54 option 3350 540 For robots with protection type Clean Room op tion 3351 1 5 Tightening torque 0 4 Nm 10 xx2100002404 Refit the locking screws Continues on next page Product...

Страница 420: ...ore replacing parts on page 118 Note After all repair work wipe the Clean Room robot free from particles with spirit on a lint free cloth DANGER Make sure all safety requirements are met when performing the first test run 2 420 Product manual IRB 920 3HAC075721 001 Revision C Copyright 2022 ABB All rights reserved 5 Repair 5 6 1 Replacing the mechanical stopper Continued ...

Страница 421: ...1 Bellow 140 Used with protection type Clean Room 3HAC073495 001 Below Long stroke Replace if damaged 3HAC071547 001 Bellow Gasket Replace if damaged 3HAC073487 001 Top Cover Replace if damaged 3HAC073491 001 Lower Cover Replace if damaged 3HAC073489 001 Extension shaft Replace if damaged 3HAC073492 001 Extension shaft Long stroke Used with protection class IP54 3HAC066658 001 Gasket Replace if da...

Страница 422: ...rior to beginning the repair work of the robot see the table Note Action Decide which calibration routine to use for calibrating the robot Reference calibration External cable packages DressPack and tools can stay fitted on the robot Fine calibration All external cable packages DressPack and tools must be removed from the robot 1 Follow the instructions given in the refer ence calibration routine ...

Страница 423: ... protection type Clean Room Always cut the paint with a knife and grind the paint edge when disassembling parts of the robot See Cut the paint or surface on the robot before replacing parts on page 118 3 Removing the top cover and the flange with bearing Note Action DANGER Make sure that all supplies for electrical power hydraulic pressure and air pressure are turned off 1 CAUTION For robots with ...

Страница 424: ...rom the ball screw 4 xx2100002401 For robots with protection class IP54 option 3350 540 For robots with protection type Clean Room op tion 3351 1 Remove the screws on the flange with bearing 5 xx2100002402 For robots with protection class IP54 option 3350 540 For robots with protection type Clean Room op tion 3351 1 Remove the flange with bearing 6 Continues on next page 424 Product manual IRB 920...

Страница 425: ... screw and pull the clamp apart slightly 3 For robots with protection class IP54 option 3350 540 4 For robots with protection type Clean Room op tion 3351 1 Remove the bellow from the outer arm cover Note For robots with protection class IP54 option 3350 540 Clean the outer arm casting cover from the glue if it will be reused For robots with protection class IP54 option 3350 540 5 For robots with ...

Страница 426: ...ng parts on page 118 Note After all repair work wipe the Clean Room robot free from particles with spirit on a lint free cloth xx2100002403 For robots with protection class IP54 option 3350 540 Apply the glue to the outer arm 2 For robots with protection class IP54 option 3350 540 3 For robots with protection type Clean Room op tion 3351 1 Install the bellow to the extension shaft Continues on nex...

Страница 427: ...ap on the bellow gasket Refitting the top cover and the flange with bearing Note Action For robots with protection type Clean Room 1 Clean the joints that have been opened and wipe the parts free from particles with spirit on a lint free See Cut the paint or surface on the robot before replacing parts on page 118 Note After all repair work wipe the Clean Room robot free from particles with spirit ...

Страница 428: ...e Clean Room op tion 3351 1 Refit the top cover to the ball screw Tip The top surface of the cover should be flush with the top end of the ball screw 4 Screws Hexagon socket set screws with flat point ISO 4026 stainless steel M3x8 2 pcs For robots with protection class IP54 option 3350 540 For robots with protection type Clean Room op tion 3351 1 5 Tightening torque 0 4 Nm 10 xx2100002398 Refit th...

Страница 429: ...o use and take actions accordingly prior to beginning the repair procedure 1 DANGER Turn off all electric power supply hydraulic pressure supply air pressure supply to the robot before entering the safeguarded space 2 CAUTION For robots with protection type Clean Room Always cut the paint with a knife and grind the paint edge when disassembling parts of the robot See Cut the paint or surface on th...

Страница 430: ...om op tion 3351 1 Loose the locking screws 3 xx2100002405 For robots with protection class IP54 option 3350 540 For robots with protection type Clean Room op tion 3351 1 Remove the lower cover from the ball screw 4 xx2100002406 For robots with protection class IP54 option 3350 540 For robots with protection type Clean Room op tion 3351 1 Remove the screws on the flange with bearing 5 Continues on ...

Страница 431: ...ace on the robot before replacing parts on page 118 2 xx2100002408 For robots with protection class IP54 option 3350 540 For robots with protection type Clean Room op tion 3351 1 Loosen the upper bellow clamp by loosening the screw and pull the clamp apart slightly 3 For robots with protection class IP54 option 3350 540 For robots with protection type Clean Room op tion 3351 1 Remove the bellow fr...

Страница 432: ...opened and wipe the parts free from particles with spirit on a lint free See Cut the paint or surface on the robot before replacing parts on page 118 Note After all repair work wipe the Clean Room robot free from particles with spirit on a lint free cloth xx2100002409 For robots with protection class IP54 option 3350 540 Apply the glue to the outer arm 2 For robots with protection class IP54 optio...

Страница 433: ... class IP54 option 3350 540 6 For robots with protection type Clean Room op tion 3351 1 Secure them with the clamp Tip The opening part of the clamp should be in the opposite position to the gap on the bellow gasket Refitting the lower cover and the flange with bearing Note Action For robots with protection type Clean Room 1 Clean the joints that have been opened and wipe the parts free from parti...

Страница 434: ... option 3350 540 For robots with protection type Clean Room op tion 3351 1 3 Tightening torque 0 8 Nm 10 xx2100002406 Refit the screws to the flange with bearing xx2100002405 For robots with protection class IP54 option 3350 540 For robots with protection type Clean Room op tion 3351 1 Refit the lower cover to the ball screw 4 Continues on next page 434 Product manual IRB 920 3HAC075721 001 Revisi...

Страница 435: ...ction For robots with protection type Clean Room 1 Seal and paint the joints that have been opened See Cut the paint or surface on the robot before replacing parts on page 118 Note After all repair work wipe the Clean Room robot free from particles with spirit on a lint free cloth DANGER Make sure all safety requirements are met when performing the first test run 2 Product manual IRB 920 435 3HAC0...

Страница 436: ...Business Portal www abb com myABB Note Article number Spare part 3HAC070480 001 Ax3 pulley Z2 With bolt 3HAC073068 001 Mechanical Stop top D20 3HAC070464 001 Timing belt A3 Required tools and equipment Note Article number Equipment Content is defined in section Standard toolkit on page 996 Standard toolkit Continues on next page 436 Product manual IRB 920 3HAC075721 001 Revision C Copyright 2022 A...

Страница 437: ...ion routine on the FlexPendant to create reference values If the robot is to be calibrated with refer ence calibration Find previous reference values for the axis or create new reference values These val ues are to be used after the repair proced ure is completed for calibration of the ro bot Creating new values requires possibility to move the robot Read more about reference calibration for Axis ...

Страница 438: ...knife and grind the paint edge when disassembling parts of the robot See Cut the paint or surface on the robot before replacing parts on page 118 4 Removing the process hub screws Note Action DANGER Make sure that all supplies for electrical power hydraulic pressure and air pressure are turned off 1 CAUTION For robots with protection type Clean Room Always cut the paint with a knife and grind the ...

Страница 439: ...t the process hub to the outer arm 4 For Clean Room IP54 robots Removing the top cover and the flange with bearing Note Action DANGER Make sure that all supplies for electrical power hydraulic pressure and air pressure are turned off 1 CAUTION For robots with protection type Clean Room Always cut the paint with a knife and grind the paint edge when disassembling parts of the robot See Cut the pain...

Страница 440: ...ew 4 xx2100002401 For robots with protection class IP54 option 3350 540 For robots with protection type Clean Room op tion 3351 1 Remove the screws on the flange with bearing 5 xx2100002402 For robots with protection class IP54 option 3350 540 For robots with protection type Clean Room op tion 3351 1 Remove the flange with bearing 6 Continues on next page 440 Product manual IRB 920 3HAC075721 001 ...

Страница 441: ... the screws on the cover of the outer arm and remove the cover Note For robots with protection class IP54 option 3350 540 For robots with protection type Clean Room op tion 3351 1 Remove the cover with bellow and housing Note The bellow does not need to be removed separ ately Tip Check the gasket and replace it if needed 3 For robots with protection class IP54 option 3350 540 For robots with prote...

Страница 442: ...n the robot before replacing parts on page 118 2 DANGER Make sure that the ball screw is supported with something The sudden drop of the ball screw due the lost of the axis 3 motor may cause danger 3 xx2100001078 Loosen the screws of the axis 3 motor sub as sembly to let the axis 3 timing belt free 4 xx2100001079 Remove the timing belt 5 Continues on next page 442 Product manual IRB 920 3HAC075721...

Страница 443: ...fore replacing parts on page 118 2 xx1800002858 Remove the screw 3 xx1800002859 Remove the mechanical stopper Tip Hold the ball screw to prevent it from dropping Or the ball screw may be destroyed CAUTION If the ball screw nut or ball screw spline nut go out of the screw shaft the ball screw is destroyed Be careful when you do any work that may cause this 4 Continues on next page Product manual IR...

Страница 444: ...4 Remove the pulley carefully Tip Hold the ball screw to prevent it from dropping Or the ball screw may be destroyed CAUTION If the ball screw nut or ball screw spline nut go out of the screw shaft the ball screw is destroyed Be careful when you do any work that may cause this 5 Refitting the pulley on the ball screw upper position Use these procedures to refit the pulley Refitting the pulley on t...

Страница 445: ... screw nut or ball screw spline nut go out of the screw shaft the ball screw is destroyed Be careful when you do any work that may cause this Refit the screws Tip Secure with the stopping tool to prevent the pulley from rotating 4 Refitting the upper mechanical stopper Note Action For robots with protection type Clean Room 1 Clean the joints that have been opened and wipe the parts free from parti...

Страница 446: ...g Or the ball screw may be destroyed CAUTION If the ball screw nut or ball screw spline nut go out of the screw shaft the ball screw is destroyed Be careful when you do any work that may cause this 2 For robots with protection class IP30 option 3350 300 xx1900002012 For robots with protection class IP54 option 3350 540 For robots with protection type Clean Room option 3351 1 xx1900002011 Continues...

Страница 447: ...Cut the paint or surface on the robot before replacing parts on page 118 Note After all repair work wipe the Clean Room robot free from particles with spirit on a lint free cloth Timing belt A3 Refit the timing belt to the pulley on the ball screw and the motor Ensure that the belt runs correctly in the grooves 2 3HAC070464 001 xx2100001079 Continues on next page Product manual IRB 920 447 3HAC075...

Страница 448: ...xx2100001126 Used belt 139 Use a sonic tension meter to measure the timing belt tension 6 New belt 110 If the timing belt tension does not meet the require ment loosen the motor screws and readjust 7 Refitting the cover of the outer arm Note Action For robots with protection type Clean Room 1 Clean the joints that have been opened and wipe the parts free from particles with spirit on a lint free S...

Страница 449: ... option 3350 540 For robots with protection type Clean Room option 3351 1 xx2100002427 For Clean Room IP54 robots Refitting the top cover and the flange with bearing Note Action For robots with protection type Clean Room 1 Clean the joints that have been opened and wipe the parts free from particles with spirit on a lint free See Cut the paint or surface on the robot before replacing parts on page...

Страница 450: ...an Room op tion 3351 1 3 Tightening torque 0 8 Nm 10 xx2100002401 Refit the screws to the flange with bearing xx2100002399 For robots with protection class IP54 option 3350 540 For robots with protection type Clean Room op tion 3351 1 Refit the top cover to the ball screw Tip The top surface of the cover should be flush with the top end of the ball screw 4 Continues on next page 450 Product manual...

Страница 451: ...ction type Clean Room 1 Clean the joints that have been opened and wipe the parts free from particles with spirit on a lint free See Cut the paint or surface on the robot before replacing parts on page 118 Note After all repair work wipe the Clean Room robot free from particles with spirit on a lint free cloth Insert the process hub from the outer arm cover 2 Continues on next page Product manual ...

Страница 452: ...e disconnected as shown in following steps For robots with protection class IP54 option 3350 540 For robots with protection type Clean Room option 3351 1 xx2100002438 Concluding procedure Note Action For robots with protection type Clean Room 1 Seal and paint the joints that have been opened See Cut the paint or surface on the robot before replacing parts on page 118 Note After all repair work wip...

Страница 453: ...safety requirements are met when performing the first test run 3 Product manual IRB 920 453 3HAC075721 001 Revision C Copyright 2022 ABB All rights reserved 5 Repair 5 6 3 Replacing the pulley on the ball screw upper position Continued ...

Страница 454: ...er Spare part 3HAC070481 001 Ax4 2 pulley Z2 2020A With bolt 3HAC073069 001 Mechanical Stop bottom D20 3HAC076611 001 Outer arm cover Required tools and equipment Note Article number Equipment Content is defined in section Standard toolkit on page 996 Standard toolkit Used to install the ball screw nut Special tool for L2 3HAC077249 001 IRB 920 special tool Continues on next page 454 Product manua...

Страница 455: ... robot Fine calibration All external cable packages DressPack and tools must be removed from the robot 1 Follow the instructions given in the refer ence calibration routine on the FlexPendant to create reference values If the robot is to be calibrated with refer ence calibration Find previous reference values for the axis or create new reference values These val ues are to be used after the repair...

Страница 456: ...traight If the robot lay down in any situation the grease may come out from gearbox 2 xx2100000930 Jog all axes to zero position 3 DANGER Turn off all electric power supply hydraulic pressure supply air pressure supply to the robot before entering the safeguarded space 4 CAUTION For robots with protection type Clean Room Always cut the paint with a knife and grind the paint edge when disassembling...

Страница 457: ...0932 Remove the screws on the process hub Note For robots with protection class IP54 option 3350 540 For robots with protection type Clean Room op tion 3351 1 Remove the screws on the process hub and take out the gasket Tip Check the gasket and replace it if needed 3 For robots with protection class IP54 option 3350 540 For robots with protection type Clean Room option 3351 1 xx2100000932 Insert t...

Страница 458: ...urface on the robot before replacing parts on page 118 2 xx2100002398 For robots with protection class IP54 option 3350 540 For robots with protection type Clean Room op tion 3351 1 Loose the locking screws 3 xx2100002399 For robots with protection class IP54 option 3350 540 For robots with protection type Clean Room op tion 3351 1 Remove the top cover from the ball screw 4 Continues on next page ...

Страница 459: ...r of the outer arm Note Action DANGER Make sure that all supplies for electrical power hydraulic pressure and air pressure are turned off 1 CAUTION For robots with protection type Clean Room Always cut the paint with a knife and grind the paint edge when disassembling parts of the robot See Cut the paint or surface on the robot before replacing parts on page 118 2 Continues on next page Product ma...

Страница 460: ...ction type Clean Room option 3351 1 xx2100002427 For Clean Room IP54 robots Removing the lower cover and the flange with bearing Note Action DANGER Make sure that all supplies for electrical power hydraulic pressure and air pressure are turned off 1 CAUTION For robots with protection type Clean Room Always cut the paint with a knife and grind the paint edge when disassembling parts of the robot Se...

Страница 461: ...rew 4 xx2100002406 For robots with protection class IP54 option 3350 540 For robots with protection type Clean Room op tion 3351 1 Remove the screws on the flange with bearing 5 xx2100002407 For robots with protection class IP54 option 3350 540 For robots with protection type Clean Room op tion 3351 1 Remove the flange with bearing 6 Continues on next page Product manual IRB 920 461 3HAC075721 001...

Страница 462: ...ing the screw and pull the clamp apart slightly 3 For robots with protection class IP54 option 3350 540 For robots with protection type Clean Room op tion 3351 1 Remove the bellow from the outer arm Note For robots with protection class IP54 option 3350 540 Clean the bellow from the glue if it will be reused 4 For robots with protection class IP54 option 3350 540 5 Remove the bellow gasket from th...

Страница 463: ...otection type Clean Room op tion 3351 1 Remove the O ring from the lower housing 3 xx1900001616 For robots with protection class IP54 option 3350 540 For robots with protection type Clean Room op tion 3351 1 Loose the attachment screws 4 For robots with protection class IP54 option 3350 540 For robots with protection type Clean Room op tion 3351 1 Remove the shaft from the mechanical stopper Note ...

Страница 464: ...n the robot before replacing parts on page 118 2 DANGER Make sure that the ball screw is supported with something The sudden drop of the ball screw due the lost of the axis 3 motor may cause danger 3 xx2100001078 Loosen the screws of the axis 3 motor sub as sembly to let the axis 3 timing belt free 4 xx2100001079 Remove the timing belt 5 Continues on next page 464 Product manual IRB 920 3HAC075721...

Страница 465: ...of the robot See Cut the paint or surface on the robot before replacing parts on page 118 2 For robots with protection class IP30 option 3350 300 xx1800002860 Remove the screw 3 For robots with protection class IP54 option 3350 540 For robots with protection type Clean Room option 3351 1 xx1900001642 Continues on next page Product manual IRB 920 465 3HAC075721 001 Revision C Copyright 2022 ABB All...

Страница 466: ... is sensitive to ESD Before handling the unit read the safety information in section The unit is sensitive to ESD on page 49 2 CAUTION For robots with protection type Clean Room Always cut the paint with a knife and grind the paint edge when disassembling parts of the robot See Cut the paint or surface on the robot before replacing parts on page 118 3 xx2100001082 Remove the screws and washers on ...

Страница 467: ...all screw and keep the status When the special tool is totally inserted to the lower nut of the ball screw support the special tool with some thing Or the ball screw lower nut will be destroyed 7 xx2100001084 Lay down the ball screw assembly CAUTION If the ball screw nut or ball screw spline nut go out of the screw shaft the ball screw is destroyed Be careful when you do any work that may cause th...

Страница 468: ...crew due the lost of the axis 3 motor may cause danger 3 xx2100001081 Loosen the screws of the transmission module to let the axis 4 2 timing belt free 4 Removing the pulley on the ball screw lower position Note Action DANGER Make sure that all supplies for electrical power hydraulic pressure and air pressure are turned off 1 ELECTROSTATIC DISCHARGE ESD The unit is sensitive to ESD Before handling...

Страница 469: ... pulley Refitting the pulley on the ball screw lower position Note Action ELECTROSTATIC DISCHARGE ESD The unit is sensitive to ESD Before handling the unit read the safety information in section The unit is sensitive to ESD on page 49 1 For robots with protection type Clean Room 2 Clean the joints that have been opened and wipe the parts free from particles with spirit on a lint free See Cut the p...

Страница 470: ...iming belt to the pulley Note Action For robots with protection type Clean Room 1 Clean the joints that have been opened and wipe the parts free from particles with spirit on a lint free See Cut the paint or surface on the robot before replacing parts on page 118 Note After all repair work wipe the Clean Room robot free from particles with spirit on a lint free cloth Timing belt A4 2 Refit the bel...

Страница 471: ...ligned with the ball screw shaft grooves CAUTION With the inserting of the ball screw shaft remove the special tool along with the ball screw shaft carefully 2 Screws Hex socket head cap screw M4x20 12 9 Lafre 2C2B FC6 9 4 pcs Refit the screws and washers to the secure the ball screw flange to the outer arm Tip Pre tighten the screws at 0 5Nm and slide the ball screw up and down for five times The...

Страница 472: ...lint free See Cut the paint or surface on the robot before replacing parts on page 118 Note After all repair work wipe the Clean Room robot free from particles with spirit on a lint free cloth Continues on next page 472 Product manual IRB 920 3HAC075721 001 Revision C Copyright 2022 ABB All rights reserved 5 Repair 5 6 4 Replacing the pulley on the ball screw lower position Continued ...

Страница 473: ... 30 30 30 5 xx1900000144 Tip Make sure that the limit block opening gap is aligned with the ball screw origin point CAUTION If the ball screw nut or ball screw spline nut go out of the screw shaft the ball screw is destroyed Be careful when you do any work that may cause this Note Be careful with the orientation of the mechanical stopper The flat side is on the upper side For robots with protectio...

Страница 474: ...on class IP30 option 3350 300 xx1800002860 For robots with protection class IP54 option 3350 540 For robots with protection type Clean Room option 3351 1 xx1900001642 Continues on next page 474 Product manual IRB 920 3HAC075721 001 Revision C Copyright 2022 ABB All rights reserved 5 Repair 5 6 4 Replacing the pulley on the ball screw lower position Continued ...

Страница 475: ...efit the timing belt to the pulley on the ball screw and the motor Ensure that the belt runs correctly in the grooves 2 3HAC070464 001 xx2100001079 Screws Hex socket head cap screw M4x16 12 9 Lafre 2C2B FC6 9 4 pcs Secure the screws and washers without fully tightened 3 Washers Plain washer machining 4 2x9x2 steel 4 pcs Tightening torque 2 6 Nm 10 xx2100001078 Hang a strap to the hook on the motor...

Страница 476: ...ion module screws and tension axis 4 2 timing belt Note Action DANGER Make sure that all supplies for electrical power hydraulic pressure and air pressure are turned off 1 CAUTION For robots with protection type Clean Room Always cut the paint with a knife and grind the paint edge when disassembling parts of the robot See Cut the paint or surface on the robot before replacing parts on page 118 2 D...

Страница 477: ...asurement make sure that all inter ferences that may affect the force are removed Pay attention to the force application direction 6 New belt 240 xx2100001127 Tightening torque 2 6 Nm 10 xx2100001087 Fasten the screws to the recommended tightening torque 7 Used belt 202 Use a sonic tension meter to measure the timing belt tension 8 New belt 180 If the timing belt tension does not meet the require ...

Страница 478: ... class IP54 option 3350 540 For robots with protection type Clean Room op tion 3351 1 Install the shaft to the ball screw at 40 2 mm pos ition to the lower of the ball screw 2 Screws Hexagon socket set screws with flat point ISO 4026 stainless steel M3x8 2 pcs For robots with protection class IP54 option 3350 540 For robots with protection type Clean Room op tion 3351 1 3 Tightening torque 0 4 Nm ...

Страница 479: ...er bellow to outer arm Note Action For robots with protection type Clean Room 1 Clean the joints that have been opened and wipe the parts free from particles with spirit on a lint free See Cut the paint or surface on the robot before replacing parts on page 118 Note After all repair work wipe the Clean Room robot free from particles with spirit on a lint free cloth xx2100002409 For robots with pro...

Страница 480: ...ow gasket should be 90 degrees For robots with protection class IP54 option 3350 540 6 For robots with protection type Clean Room op tion 3351 1 Secure them with the clamp Tip The opening part of the clamp should be in the opposite position to the gap on the bellow gasket Refitting the lower cover and the flange with bearing Note Action For robots with protection type Clean Room 1 Clean the joints...

Страница 481: ... For robots with protection type Clean Room op tion 3351 1 3 Tightening torque 0 8 Nm 10 xx2100002406 Refit the screws to the flange with bearing xx2100002405 For robots with protection class IP54 option 3350 540 For robots with protection type Clean Room op tion 3351 1 Refit the lower cover to the ball screw 4 Continues on next page Product manual IRB 920 481 3HAC075721 001 Revision C Copyright 2...

Страница 482: ... For robots with protection type Clean Room 1 Clean the joints that have been opened and wipe the parts free from particles with spirit on a lint free See Cut the paint or surface on the robot before replacing parts on page 118 Note After all repair work wipe the Clean Room robot free from particles with spirit on a lint free cloth Continues on next page 482 Product manual IRB 920 3HAC075721 001 R...

Страница 483: ... option 3350 540 For robots with protection type Clean Room option 3351 1 xx2100002427 For Clean Room IP54 robots Refitting the top cover and the flange with bearing Note Action For robots with protection type Clean Room 1 Clean the joints that have been opened and wipe the parts free from particles with spirit on a lint free See Cut the paint or surface on the robot before replacing parts on page...

Страница 484: ...an Room op tion 3351 1 3 Tightening torque 0 8 Nm 10 xx2100002401 Refit the screws to the flange with bearing xx2100002399 For robots with protection class IP54 option 3350 540 For robots with protection type Clean Room op tion 3351 1 Refit the top cover to the ball screw Tip The top surface of the cover should be flush with the top end of the ball screw 4 Continues on next page 484 Product manual...

Страница 485: ...ction type Clean Room 1 Clean the joints that have been opened and wipe the parts free from particles with spirit on a lint free See Cut the paint or surface on the robot before replacing parts on page 118 Note After all repair work wipe the Clean Room robot free from particles with spirit on a lint free cloth Insert the process hub from the outer arm cover 2 Continues on next page Product manual ...

Страница 486: ...e disconnected as shown in following steps For robots with protection class IP54 option 3350 540 For robots with protection type Clean Room option 3351 1 xx2100002438 Concluding procedure Note Action For robots with protection type Clean Room 1 Seal and paint the joints that have been opened See Cut the paint or surface on the robot before replacing parts on page 118 Note After all repair work wip...

Страница 487: ...safety requirements are met when performing the first test run 3 Product manual IRB 920 487 3HAC075721 001 Revision C Copyright 2022 ABB All rights reserved 5 Repair 5 6 4 Replacing the pulley on the ball screw lower position Continued ...

Страница 488: ...e ball screw is located as shown in the figure xx2100001019 Clean Room IP54 IP30 xx2100002431 xx2100001019 Continues on next page 488 Product manual IRB 920 3HAC075721 001 Revision C Copyright 2022 ABB All rights reserved 5 Repair 5 6 5 Replacing the ball screw ...

Страница 489: ...T 6 0 45_0 18 IRB 920T 6 0 55_0 18 and IRB 920T 6 0 65_0 18 3HAC070479 001 Ball Screw Flange With bolt 3HAC073068 001 Mechanical Stop top D20 With bolt 3HAC073069 001 Mechanical Stop bottom D20 Required tools and equipment Note Article number Equipment Content is defined in section Standard toolkit on page 996 Standard toolkit Used to install the ball screw nut Special tool for L2 3HAC077249 001 I...

Страница 490: ...tion of the ro bot Creating new values requires possibility to move the robot Read more about reference calibration for Axis Calibration in Reference calibration routine on page 957 If no previous reference values exist and no new reference values can be created then reference calibration is not possible If the robot is to be calibrated with fine calibration Remove all external cable packages Dres...

Страница 491: ...arts on page 118 4 Removing the process hub screws Note Action DANGER Make sure that all supplies for electrical power hydraulic pressure and air pressure are turned off 1 CAUTION For robots with protection type Clean Room Always cut the paint with a knife and grind the paint edge when disassembling parts of the robot See Cut the paint or surface on the robot before replacing parts on page 118 2 C...

Страница 492: ...100000932 Insert the process hub to the outer arm 4 For Clean Room IP54 robots Removing the top cover and the flange with bearing Note Action DANGER Make sure that all supplies for electrical power hydraulic pressure and air pressure are turned off 1 CAUTION For robots with protection type Clean Room Always cut the paint with a knife and grind the paint edge when disassembling parts of the robot S...

Страница 493: ...om the ball screw 4 xx2100002401 For robots with protection class IP54 option 3350 540 For robots with protection type Clean Room op tion 3351 1 Remove the screws on the flange with bearing 5 xx2100002402 For robots with protection class IP54 option 3350 540 For robots with protection type Clean Room op tion 3351 1 Remove the flange with bearing 6 Continues on next page Product manual IRB 920 493 ...

Страница 494: ...per housing 3 xx2100002420 For robots with protection class IP54 option 3350 540 For robots with protection type Clean Room op tion 3351 1 Loose the attachment screws Note For robots with protection class IP54 option 3350 540 Clean the upper housing from the glue if it will be reused 4 xx2100002421 For robots with protection class IP54 option 3350 540 For robots with protection type Clean Room op ...

Страница 495: ...00000933 Remove the screws on the cover of the outer arm and remove the cover Note For robots with protection class IP54 option 3350 540 For robots with protection type Clean Room op tion 3351 1 Remove the cover with bellow and housing Note The bellow does not need to be removed separ ately Tip Check the gasket and replace it if needed 3 For robots with protection class IP54 option 3350 540 For ro...

Страница 496: ... the paint or surface on the robot before replacing parts on page 118 2 xx2100002404 For robots with protection class IP54 option 3350 540 For robots with protection type Clean Room op tion 3351 1 Loose the locking screws 3 xx2100002405 For robots with protection class IP54 option 3350 540 For robots with protection type Clean Room op tion 3351 1 Remove the lower cover from the ball screw 4 Contin...

Страница 497: ... 6 Removing the lower bellow Note Action DANGER Make sure that all supplies for electrical power hydraulic pressure and air pressure are turned off 1 CAUTION For robots with protection type Clean Room Always cut the paint with a knife and grind the paint edge when disassembling parts of the robot See Cut the paint or surface on the robot before replacing parts on page 118 2 Continues on next page ...

Страница 498: ...0 5 Remove the bellow gasket from the bellow Note Clean the bellow gasket from the glue if it will be reused Note Be careful when removing the bellow gaskets If any broken replace it Removing the shaft for Clean Room IP54 robots Note Action DANGER Make sure that all supplies for electrical power hydraulic pressure and air pressure are turned off 1 CAUTION For robots with protection type Clean Room...

Страница 499: ...from the mechanical stopper Note The shaft is glued to the ball screw Be careful with the glue when removing the shaft 5 Removing the axis 3 timing belt Note Action DANGER Make sure that all supplies for electrical power hydraulic pressure and air pressure are turned off 1 CAUTION For robots with protection type Clean Room Always cut the paint with a knife and grind the paint edge when disassembli...

Страница 500: ...anical stopper Note Action DANGER Make sure that all supplies for electrical power hydraulic pressure and air pressure are turned off 1 CAUTION For robots with protection type Clean Room Always cut the paint with a knife and grind the paint edge when disassembling parts of the robot See Cut the paint or surface on the robot before replacing parts on page 118 2 Continues on next page 500 Product ma...

Страница 501: ...the ball screw nut or ball screw spline nut go out of the screw shaft the ball screw is destroyed Be careful when you do any work that may cause this 4 Removing the ball screw with the flange Note Action DANGER Make sure that all supplies for electrical power hydraulic pressure and air pressure are turned off 1 Continues on next page Product manual IRB 920 501 3HAC075721 001 Revision C Copyright 2...

Страница 502: ...d the paint edge when disassembling parts of the robot See Cut the paint or surface on the robot before replacing parts on page 118 3 xx2100001082 Remove the screws and washers on the ball screw flange 4 IRB 920 special tool 3HAC077249 001 xx2100001129 Insert the special tool into the ball screw shaft 5 Continues on next page 502 Product manual IRB 920 3HAC075721 001 Revision C Copyright 2022 ABB ...

Страница 503: ...e special tool with some thing Or the ball screw lower nut will be destroyed 7 xx2100001084 Lay down the ball screw assembly CAUTION If the ball screw nut or ball screw spline nut go out of the screw shaft the ball screw is destroyed Be careful when you do any work that may cause this 8 Loosening the transmission module screws Note Action DANGER Make sure that all supplies for electrical power hyd...

Страница 504: ...on the ball screw lower position Note Action DANGER Make sure that all supplies for electrical power hydraulic pressure and air pressure are turned off 1 ELECTROSTATIC DISCHARGE ESD The unit is sensitive to ESD Before handling the unit read the safety information in section The unit is sensitive to ESD on page 49 2 CAUTION For robots with protection type Clean Room Always cut the paint with a knif...

Страница 505: ...NGER Make sure that all supplies for electrical power hydraulic pressure and air pressure are turned off 1 CAUTION For robots with protection type Clean Room Always cut the paint with a knife and grind the paint edge when disassembling parts of the robot See Cut the paint or surface on the robot before replacing parts on page 118 2 Continues on next page Product manual IRB 920 505 3HAC075721 001 R...

Страница 506: ... screw shaft the ball screw is destroyed Be careful when you do any work that may cause this Removing the upper mechanical stopper Note Action DANGER Make sure that all supplies for electrical power hydraulic pressure and air pressure are turned off 1 CAUTION For robots with protection type Clean Room Always cut the paint with a knife and grind the paint edge when disassembling parts of the robot ...

Страница 507: ... to ESD Before handling the unit read the safety information in section The unit is sensitive to ESD on page 49 2 CAUTION For robots with protection type Clean Room Always cut the paint with a knife and grind the paint edge when disassembling parts of the robot See Cut the paint or surface on the robot before replacing parts on page 118 3 xx2100001089 Remove the screws 4 Remove the pulley carefull...

Страница 508: ...nut go out of the screw shaft the ball screw is destroyed Be careful when you do any work that may cause this 4 Refitting the ball screw Use these procedures to refit the ball screw Preparing the new ball screw Note Action For robots with protection type Clean Room 1 Clean the joints that have been opened and wipe the parts free from particles with spirit on a lint free See Cut the paint or surfac...

Страница 509: ... xx2100001186 Move the ball screw nut from the ball screw shaft to the special tool 4 Refitting the ball screw lower nut Note Action DANGER Make sure that all supplies for electrical power hydraulic pressure and air pressure are turned off 1 Continues on next page Product manual IRB 920 509 3HAC075721 001 Revision C Copyright 2022 ABB All rights reserved 5 Repair 5 6 5 Replacing the ball screw Con...

Страница 510: ...ng the pulley on the ball screw lower position Note Action ELECTROSTATIC DISCHARGE ESD The unit is sensitive to ESD Before handling the unit read the safety information in section The unit is sensitive to ESD on page 49 1 For robots with protection type Clean Room 2 Clean the joints that have been opened and wipe the parts free from particles with spirit on a lint free See Cut the paint or surface...

Страница 511: ... that have been opened and wipe the parts free from particles with spirit on a lint free See Cut the paint or surface on the robot before replacing parts on page 118 Note After all repair work wipe the Clean Room robot free from particles with spirit on a lint free cloth Screws Hex socket head cap screw M4x16 12 9 Lafre 2C2B FC6 9 6 pcs Refit the ball screw flange to the ball screw shaft CAUTION I...

Страница 512: ... screw carefully CAUTION If the ball screw nut or ball screw spline nut go out of the screw shaft the ball screw is destroyed Be careful when you do any work that may cause this 3 Tightening torque 4 4 Nm 10 xx2100001089 Refit the screws Tip Secure with the stopping tool to prevent the pulley from rotating 4 Refitting the upper mechanical stopper Note Action For robots with protection type Clean R...

Страница 513: ...t from dropping Or the ball screw may be destroyed CAUTION If the ball screw nut or ball screw spline nut go out of the screw shaft the ball screw is destroyed Be careful when you do any work that may cause this 2 For robots with protection class IP30 option 3350 300 xx1900002012 For robots with protection class IP54 option 3350 540 For robots with protection type Clean Room option 3351 1 xx190000...

Страница 514: ...placing parts on page 118 Note After all repair work wipe the Clean Room robot free from particles with spirit on a lint free cloth IRB 920 special tool 3HAC077249 001 xx2100001083 Refit the ball screw assembly to the outer arm Tip Make sure the marked location is aligned with the ball screw shaft grooves CAUTION With the inserting of the ball screw shaft remove the special tool along with the bal...

Страница 515: ... Nm 10 xx2100001082 Refitting the mechanical stopper Note Action For robots with protection type Clean Room 1 Clean the joints that have been opened and wipe the parts free from particles with spirit on a lint free See Cut the paint or surface on the robot before replacing parts on page 118 Note After all repair work wipe the Clean Room robot free from particles with spirit on a lint free cloth Co...

Страница 516: ...option 3350 300 30 30 30 5 xx1900000144 Tip Make sure that the limit block opening gap is aligned with the ball screw origin point CAUTION If the ball screw nut or ball screw spline nut go out of the screw shaft the ball screw is destroyed Be careful when you do any work that may cause this Note Be careful with the orientation of the mechanical stopper The flat side is on the upper side For robots...

Страница 517: ...s with protection class IP30 option 3350 300 xx1800002860 For robots with protection class IP54 option 3350 540 For robots with protection type Clean Room option 3351 1 xx1900001642 Continues on next page Product manual IRB 920 517 3HAC075721 001 Revision C Copyright 2022 ABB All rights reserved 5 Repair 5 6 5 Replacing the ball screw Continued ...

Страница 518: ... in the grooves Fastening the ball screw flange Note Action DANGER Make sure that all supplies for electrical power hydraulic pressure and air pressure are turned off 1 CAUTION For robots with protection type Clean Room Always cut the paint with a knife and grind the paint edge when disassembling parts of the robot See Cut the paint or surface on the robot before replacing parts on page 118 2 DANG...

Страница 519: ...pe Clean Room Always cut the paint with a knife and grind the paint edge when disassembling parts of the robot See Cut the paint or surface on the robot before replacing parts on page 118 2 DANGER Make sure that the ball screw is supported with something The sudden drop of the ball screw due the lost of the axis 3 motor may cause danger 3 Continues on next page Product manual IRB 920 519 3HAC07572...

Страница 520: ...e During the measurement make sure that all inter ferences that may affect the force are removed Pay attention to the force application direction 6 New belt 240 xx2100001127 Tightening torque 2 6 Nm 10 xx2100001087 Fasten the screws to the recommended tightening torque 7 Used belt 202 Use a sonic tension meter to measure the timing belt tension 8 New belt 180 If the timing belt tension does not me...

Страница 521: ...ming belt A3 Refit the timing belt to the pulley on the ball screw and the motor Ensure that the belt runs correctly in the grooves 2 3HAC070464 001 xx2100001079 Screws Hex socket head cap screw M4x16 12 9 Lafre 2C2B FC6 9 4 pcs Secure the screws and washers without fully tightened 3 Washers Plain washer machining 4 2x9x2 steel 4 pcs Tightening torque 2 6 Nm 10 xx2100001078 Hang a strap to the hoo...

Страница 522: ...e shaft for Clean Room IP54 robots Note Action For robots with protection type Clean Room 1 Clean the joints that have been opened and wipe the parts free from particles with spirit on a lint free See Cut the paint or surface on the robot before replacing parts on page 118 Note After all repair work wipe the Clean Room robot free from particles with spirit on a lint free cloth xx1900001617 For rob...

Страница 523: ...IP54 option 3350 540 Apply the glue to the upper contacted zone between the shaft and the ball screw Note Fulfill the gaps on the ball screw in this contacted zone to make a sealing structure 4 xx1900001615 For robots with protection class IP54 option 3350 540 For robots with protection type Clean Room op tion 3351 1 Insert the O ring to the shaft Note Replace the o ring if needed 5 Continues on n...

Страница 524: ...air work wipe the Clean Room robot free from particles with spirit on a lint free cloth xx2100002409 For robots with protection class IP54 option 3350 540 Apply the glue to the outer arm 2 For robots with protection class IP54 option 3350 540 3 For robots with protection type Clean Room op tion 3351 1 Install the bellow to the shaft Continues on next page 524 Product manual IRB 920 3HAC075721 001 ...

Страница 525: ...class IP54 option 3350 540 6 For robots with protection type Clean Room op tion 3351 1 Secure them with the clamp Tip The opening part of the clamp should be in the opposite position to the gap on the bellow gasket Refitting the lower cover and the flange with bearing Note Action For robots with protection type Clean Room 1 Clean the joints that have been opened and wipe the parts free from partic...

Страница 526: ...option 3350 540 For robots with protection type Clean Room op tion 3351 1 3 Tightening torque 0 8 Nm 10 xx2100002406 Refit the screws to the flange with bearing xx2100002405 For robots with protection class IP54 option 3350 540 For robots with protection type Clean Room op tion 3351 1 Refit the lower cover to the ball screw 4 Continues on next page 526 Product manual IRB 920 3HAC075721 001 Revisio...

Страница 527: ...rm Note Action For robots with protection type Clean Room 1 Clean the joints that have been opened and wipe the parts free from particles with spirit on a lint free See Cut the paint or surface on the robot before replacing parts on page 118 Note After all repair work wipe the Clean Room robot free from particles with spirit on a lint free cloth Continues on next page Product manual IRB 920 527 3H...

Страница 528: ...n class IP54 option 3350 540 For robots with protection type Clean Room option 3351 1 xx2100002427 For Clean Room IP54 robots Refitting the extension shaft for Clean Room IP54 robots Note Action For robots with protection type Clean Room 1 Clean the joints that have been opened and wipe the parts free from particles with spirit on a lint free See Cut the paint or surface on the robot before replac...

Страница 529: ...2C2B FC6 9 2 pcs For robots with protection class IP54 option 3350 540 For robots with protection type Clean Room op tion 3351 1 3 Tightening torque 1 2 Nm 10 xx2100002420 Secure the extension shaft to the mechanical stopper with the screws xx2100002419 For robots with protection class IP54 option 3350 540 For robots with protection type Clean Room op tion 3351 1 Insert the O ring to the extension...

Страница 530: ... the flange with bearing to the extension shaft 2 Screws Hex socket head cap screw M2 5x6 12 9 Lafre 2C2B FC6 9 8 pcs For robots with protection class IP54 option 3350 540 For robots with protection type Clean Room op tion 3351 1 3 Tightening torque 0 8 Nm 10 xx2100002401 Refit the screws to the flange with bearing xx2100002399 For robots with protection class IP54 option 3350 540 For robots with ...

Страница 531: ...bots with protection type Clean Room 1 Clean the joints that have been opened and wipe the parts free from particles with spirit on a lint free See Cut the paint or surface on the robot before replacing parts on page 118 Note After all repair work wipe the Clean Room robot free from particles with spirit on a lint free cloth Insert the process hub from the outer arm cover 2 Continues on next page ...

Страница 532: ... connectors are disconnected as shown in following steps For robots with protection class IP54 option 3350 540 For robots with protection type Clean Room option 3351 1 xx2100002438 Concluding procedure Note Action For robots with protection type Clean Room 1 Seal and paint the joints that have been opened See Cut the paint or surface on the robot before replacing parts on page 118 Note After all r...

Страница 533: ...Make sure all safety requirements are met when performing the first test run 3 Product manual IRB 920 533 3HAC075721 001 Revision C Copyright 2022 ABB All rights reserved 5 Repair 5 6 5 Replacing the ball screw Continued ...

Страница 534: ... Note Article number Spare part 3HAC061861 001 Timing belt A2 Required tools and equipment Note Article number Equipment Content is defined in section Standard toolkit on page 996 Standard toolkit Delivered as a set of calibration tools Required if Axis Calibration is the valid calibration method for the robot 3HAC055412 001 Calibration toolbox Axis Calibra tion Continues on next page 534 Product ...

Страница 535: ...he robot is to be calibrated with refer ence calibration Find previous reference values for the axis or create new reference values These val ues are to be used after the repair proced ure is completed for calibration of the ro bot Creating new values requires possibility to move the robot Read more about reference calibration for Axis Calibration in Reference calibration routine on page 957 If no...

Страница 536: ...essure supply to the robot before entering the safeguarded space 4 CAUTION For robots with protection type Clean Room Always cut the paint with a knife and grind the paint edge when disassembling parts of the robot See Cut the paint or surface on the robot before replacing parts on page 118 5 Removing the process hub screws Note Action DANGER Make sure that all supplies for electrical power hydrau...

Страница 537: ...Remove the screws on the process hub and take out the gasket Tip Check the gasket and replace it if needed 3 For robots with protection class IP54 option 3350 540 For robots with protection type Clean Room option 3351 1 xx2100000932 Insert the process hub to the outer arm 4 For Clean Room IP54 robots Removing the top cover and the flange with bearing Note Action DANGER Make sure that all supplies ...

Страница 538: ... tion 3351 1 Loose the locking screws 3 xx2100002399 For robots with protection class IP54 option 3350 540 For robots with protection type Clean Room op tion 3351 1 Remove the top cover from the ball screw 4 xx2100002401 For robots with protection class IP54 option 3350 540 For robots with protection type Clean Room op tion 3351 1 Remove the screws on the flange with bearing 5 Continues on next pa...

Страница 539: ...rical power hydraulic pressure and air pressure are turned off 1 CAUTION For robots with protection type Clean Room Always cut the paint with a knife and grind the paint edge when disassembling parts of the robot See Cut the paint or surface on the robot before replacing parts on page 118 2 Continues on next page Product manual IRB 920 539 3HAC075721 001 Revision C Copyright 2022 ABB All rights re...

Страница 540: ... robots with protection type Clean Room option 3351 1 xx2100002427 Disconnecting the air hoses C1 cabling and C2 cabling if equipped Note Action DANGER Make sure that all supplies for electrical power hydraulic pressure and air pressure are turned off 1 CAUTION For robots with protection type Clean Room Always cut the paint with a knife and grind the paint edge when disassembling parts of the robo...

Страница 541: ... for the R1 C2 at the same time Tip Take photos of the connector and cable position before disconnecting them to have as a reference when reconnecting 5 Tip The connector clip has to be pressed 1 and pushed forward 2 to separate the R1 C2 for C2 cabling xx1800002943 Continues on next page Product manual IRB 920 541 3HAC075721 001 Revision C Copyright 2022 ABB All rights reserved 5 Repair 5 6 6 Rep...

Страница 542: ... all supplies for electrical power hydraulic pressure and air pressure are turned off 1 CAUTION For robots with protection type Clean Room Always cut the paint with a knife and grind the paint edge when disassembling parts of the robot See Cut the paint or surface on the robot before replacing parts on page 118 2 xx2100000934 Disconnect the connectors R2 MP2 R2 FB2 3 Continues on next page 542 Pro...

Страница 543: ... all supplies for electrical power hydraulic pressure and air pressure are turned off 1 CAUTION For robots with protection type Clean Room Always cut the paint with a knife and grind the paint edge when disassembling parts of the robot See Cut the paint or surface on the robot before replacing parts on page 118 2 xx2100000936 Disconnect the connectors R2 MP3 R2 FB3 3 Continues on next page Product...

Страница 544: ...ee Cut the paint or surface on the robot before replacing parts on page 118 Note After all repair work wipe the Clean Room robot free from particles with spirit on a lint free cloth xx2100000938 Disconnect the axis 4 motor connectors R2 MP4 R2 FB4 2 xx2100000939 Snap loose and remove the female head of the connectors from the bracket Note The harness are not visible due to the cleanness requiremen...

Страница 545: ...nnect the connector R2 PB R2 LAMP 3 xx2100001031 Snap loose and remove the female head of the connector from the bracket Note The harness are not visible due to the cleanness requirements of the illustration They are still ex isting inside the cable ferrule in the actual situ ation 4 Pull out the process hub Note Action DANGER Make sure that all supplies for electrical power hydraulic pressure and...

Страница 546: ...ption 3351 1 xx2100002438 CAUTION Be aware of the cabling that is attached to the cover The cover can not be removed completely until the connectors are disconnected as shown in following steps Removing the cable ferrule and bracket Note Action DANGER Make sure that all supplies for electrical power hydraulic pressure and air pressure are turned off 1 CAUTION For robots with protection type Clean ...

Страница 547: ...ue to the cleanness requirements of the illustration They are still ex isting inside the cable ferrule in the actual situ ation 4 xx1800002842 Remove the screws on the cable ferrule and take the cable ferrule out 5 xx1800002849 Removing the gear 2 pulley protection cover Note Action DANGER Make sure that all supplies for electrical power hydraulic pressure and air pressure are turned off 1 Continu...

Страница 548: ... sure that all supplies for electrical power hydraulic pressure and air pressure are turned off 1 CAUTION For robots with protection type Clean Room Always cut the paint with a knife and grind the paint edge when disassembling parts of the robot See Cut the paint or surface on the robot before replacing parts on page 118 2 xx2100001046 Remove the screws and washers 3 Remove the motor Tip Move the ...

Страница 549: ...fitting the axis 2 timing belt Use these procedures to refit the axis 2 timing belt Refitting the axis 2 motor sub assembly Note Action For robots with protection type Clean Room 1 Clean the joints that have been opened and wipe the parts free from particles with spirit on a lint free See Cut the paint or surface on the robot before replacing parts on page 118 Note After all repair work wipe the C...

Страница 550: ...3HAC061861 001 Hang a strap to the motor 5 Used belt 64 7 Use a handheld dynamometer hooking to the strap and pull the dynamometer to make the tension falling in the allowed force range Note During the measurement make sure that all inter ferences that may affect the force are removed Pay attention to the force application direction 6 New belt 70 xx2100001125 Tip If the ball screw will interfere w...

Страница 551: ...x2100001047 Refitting the cable ferrule and bracket in the outer arm Note Action For robots with protection type Clean Room 1 Clean the joints that have been opened and wipe the parts free from particles with spirit on a lint free See Cut the paint or surface on the robot before replacing parts on page 118 Note After all repair work wipe the Clean Room robot free from particles with spirit on a li...

Страница 552: ...ble ferrules so that the cable is in a natural bending position to avoid twisting 4 Tightening torque 1 2 Nm 10 xx2100000940 Note The harness are not visible due to the cleanness requirements of the illustration They are still ex isting inside the cable ferrule in the actual situ ation Refit the bracket without securing Tip Do not secure it with the screws before the cable ferrule installed well 5...

Страница 553: ...connectors the connectors may be dam aged if excessive force is used Note The harness are not visible due to the cleanness requirements of the illustration They are still ex isting inside the cable ferrule in the actual situ ation 2 xx2100001030 Reconnect the connector R2 PB R2 LAMP Tip See the number markings on the connectors for help to find the corresponding connector 3 Route and secure the ca...

Страница 554: ... to the connectors the connectors may be dam aged if excessive force is used Note The harness are not visible due to the cleanness requirements of the illustration They are still ex isting inside the cable ferrule in the actual situ ation xx2100000938 Reconnect the connectors R2 MP4 R2 FB4 Tip See the number markings on the connectors for help to find the corresponding connector 2 Route the cablin...

Страница 555: ...to the connectors the connectors may be dam aged if excessive force is used Note The harness are not visible due to the cleanness requirements of the illustration They are still ex isting inside the cable ferrule in the actual situ ation 2 xx2100000936 Reconnect the connectors R2 MP3 R2 FB3 Tip See the number markings on the connectors for help to find the corresponding connector 3 Route the cabli...

Страница 556: ... the connectors the connectors may be dam aged if excessive force is used Note The harness are not visible due to the cleanness requirements of the illustration They are still ex isting inside the cable ferrule in the actual situ ation 2 xx2100000934 Reconnect the connectors R2 MP2 R2 FB2 Tip See the number markings on the connectors for help to find the corresponding connector 3 Route the cabling...

Страница 557: ...placing parts on page 118 Note After all repair work wipe the Clean Room robot free from particles with spirit on a lint free cloth Route the air hoses on the process hub behind the bracket CAUTION Correct cable routing is highly important If the cables are routed and secured incorrectly the cables can be damaged 2 Continues on next page Product manual IRB 920 557 3HAC075721 001 Revision C Copyrig...

Страница 558: ...th the same number connect to the same L shaped connector 4 For robots with C2 cabling 5 Reconnect the connector R1 C2 Tip See the number markings on the air hoses for help to find the corresponding air hoses The air hoses with the same number connect to the same L shaped connector Secure the C2 cabling to the C2 bracket with the cable straps 6 xx2100001032 Reconnect the air hoses in a cross patte...

Страница 559: ...it the bracket Tip Do not secure it with the screws before the cable ferrule installed well 2 Tightening torque 1 2 Nm 10 xx2100000941 Note The harness are not visible due to the cleanness requirements of the illustration They are still ex isting inside the cable ferrule in the actual situ ation Refitting the cover of the outer arm Note Action For robots with protection type Clean Room 1 Clean the...

Страница 560: ... class IP54 option 3350 540 For robots with protection type Clean Room option 3351 1 xx2100002427 For Clean Room IP54 robots Refitting the top cover and the flange with bearing Note Action For robots with protection type Clean Room 1 Clean the joints that have been opened and wipe the parts free from particles with spirit on a lint free See Cut the paint or surface on the robot before replacing pa...

Страница 561: ...on type Clean Room op tion 3351 1 3 Tightening torque 0 8 Nm 10 xx2100002401 Refit the screws to the flange with bearing xx2100002399 For robots with protection class IP54 option 3350 540 For robots with protection type Clean Room op tion 3351 1 Refit the top cover to the ball screw Tip The top surface of the cover should be flush with the top end of the ball screw 4 Continues on next page Product...

Страница 562: ... with protection type Clean Room 1 Clean the joints that have been opened and wipe the parts free from particles with spirit on a lint free See Cut the paint or surface on the robot before replacing parts on page 118 Note After all repair work wipe the Clean Room robot free from particles with spirit on a lint free cloth Insert the process hub from the outer arm cover 2 Continues on next page 562 ...

Страница 563: ...nectors are disconnected as shown in following steps For robots with protection class IP54 option 3350 540 For robots with protection type Clean Room option 3351 1 xx2100002438 Concluding procedure Note Action For robots with protection type Clean Room 1 Seal and paint the joints that have been opened See Cut the paint or surface on the robot before replacing parts on page 118 Note After all repai...

Страница 564: ... sure all safety requirements are met when performing the first test run 3 564 Product manual IRB 920 3HAC075721 001 Revision C Copyright 2022 ABB All rights reserved 5 Repair 5 6 6 Replacing the axis 2 timing belt Continued ...

Страница 565: ... Note Article number Spare part 3HAC070464 001 Timing belt A3 Required tools and equipment Note Article number Equipment Content is defined in section Standard toolkit on page 996 Standard toolkit Delivered as a set of calibration tools Required if Axis Calibration is the valid calibration method for the robot 3HAC055412 001 Calibration toolbox Axis Calibra tion Continues on next page Product manu...

Страница 566: ...librated with refer ence calibration Find previous reference values for the axis or create new reference values These val ues are to be used after the repair proced ure is completed for calibration of the ro bot Creating new values requires possibility to move the robot Read more about reference calibration for Axis Calibration in Reference calibration routine on page 957 If no previous reference ...

Страница 567: ...nt with a knife and grind the paint edge when disassembling parts of the robot See Cut the paint or surface on the robot before replacing parts on page 118 4 Removing the process hub screws Note Action DANGER Make sure that all supplies for electrical power hydraulic pressure and air pressure are turned off 1 CAUTION For robots with protection type Clean Room Always cut the paint with a knife and ...

Страница 568: ...00932 Insert the process hub to the outer arm 4 For Clean Room IP54 robots Removing the top cover and the flange with bearing Note Action DANGER Make sure that all supplies for electrical power hydraulic pressure and air pressure are turned off 1 CAUTION For robots with protection type Clean Room Always cut the paint with a knife and grind the paint edge when disassembling parts of the robot See C...

Страница 569: ...he ball screw 4 xx2100002401 For robots with protection class IP54 option 3350 540 For robots with protection type Clean Room op tion 3351 1 Remove the screws on the flange with bearing 5 xx2100002402 For robots with protection class IP54 option 3350 540 For robots with protection type Clean Room op tion 3351 1 Remove the flange with bearing 6 Continues on next page Product manual IRB 920 569 3HAC...

Страница 570: ...0933 Remove the screws on the cover of the outer arm and remove the cover Note For robots with protection class IP54 option 3350 540 For robots with protection type Clean Room op tion 3351 1 Remove the cover with bellow and housing Note The bellow does not need to be removed separ ately Tip Check the gasket and replace it if needed 3 For robots with protection class IP54 option 3350 540 For robots...

Страница 571: ... surface on the robot before replacing parts on page 118 2 DANGER Make sure that the ball screw is supported with something The sudden drop of the ball screw due the lost of the axis 3 motor may cause danger 3 xx2100001078 Loosen the screws of the axis 3 motor sub as sembly to let the axis 3 timing belt free 4 xx2100001079 Remove the timing belt 5 Continues on next page Product manual IRB 920 571 ...

Страница 572: ...les with spirit on a lint free cloth Timing belt A3 Refit the timing belt to the pulley on the ball screw and the motor Ensure that the belt runs correctly in the grooves 2 3HAC070464 001 xx2100001079 Screws Hex socket head cap screw M4x16 12 9 Lafre 2C2B FC6 9 4 pcs Secure the screws and washers without fully tightened 3 Washers Plain washer machining 4 2x9x2 steel 4 pcs Tightening torque 2 6 Nm ...

Страница 573: ...belt tension does not meet the require ment loosen the motor screws and readjust 7 Refitting the cover of the outer arm Note Action For robots with protection type Clean Room 1 Clean the joints that have been opened and wipe the parts free from particles with spirit on a lint free See Cut the paint or surface on the robot before replacing parts on page 118 Note After all repair work wipe the Clean...

Страница 574: ... class IP54 option 3350 540 For robots with protection type Clean Room option 3351 1 xx2100002427 For Clean Room IP54 robots Refitting the top cover and the flange with bearing Note Action For robots with protection type Clean Room 1 Clean the joints that have been opened and wipe the parts free from particles with spirit on a lint free See Cut the paint or surface on the robot before replacing pa...

Страница 575: ...on type Clean Room op tion 3351 1 3 Tightening torque 0 8 Nm 10 xx2100002401 Refit the screws to the flange with bearing xx2100002399 For robots with protection class IP54 option 3350 540 For robots with protection type Clean Room op tion 3351 1 Refit the top cover to the ball screw Tip The top surface of the cover should be flush with the top end of the ball screw 4 Continues on next page Product...

Страница 576: ... with protection type Clean Room 1 Clean the joints that have been opened and wipe the parts free from particles with spirit on a lint free See Cut the paint or surface on the robot before replacing parts on page 118 Note After all repair work wipe the Clean Room robot free from particles with spirit on a lint free cloth Insert the process hub from the outer arm cover 2 Continues on next page 576 ...

Страница 577: ...nectors are disconnected as shown in following steps For robots with protection class IP54 option 3350 540 For robots with protection type Clean Room option 3351 1 xx2100002438 Concluding procedure Note Action For robots with protection type Clean Room 1 Seal and paint the joints that have been opened See Cut the paint or surface on the robot before replacing parts on page 118 Note After all repai...

Страница 578: ... sure all safety requirements are met when performing the first test run 3 578 Product manual IRB 920 3HAC075721 001 Revision C Copyright 2022 ABB All rights reserved 5 Repair 5 6 7 Replacing the axis 3 timing belt Continued ...

Страница 579: ... myABB Note Article number Spare part 3HAC070471 001 Timing belt A4 2 Required tools and equipment Note Article number Equipment Content is defined in section Standard toolkit on page 996 Standard toolkit Delivered as a set of calibration tools Required if Axis Calibration is the valid calibration method for the robot 3HAC055412 001 Calibration toolbox Axis Calibra tion Continues on next page Prod...

Страница 580: ... robot is to be calibrated with refer ence calibration Find previous reference values for the axis or create new reference values These val ues are to be used after the repair proced ure is completed for calibration of the ro bot Creating new values requires possibility to move the robot Read more about reference calibration for Axis Calibration in Reference calibration routine on page 957 If no p...

Страница 581: ...ure supply to the robot before entering the safeguarded space 4 CAUTION For robots with protection type Clean Room Always cut the paint with a knife and grind the paint edge when disassembling parts of the robot See Cut the paint or surface on the robot before replacing parts on page 118 5 Removing the process hub screws Note Action DANGER Make sure that all supplies for electrical power hydraulic...

Страница 582: ...ve the screws on the process hub and take out the gasket Tip Check the gasket and replace it if needed 3 For robots with protection class IP54 option 3350 540 For robots with protection type Clean Room option 3351 1 xx2100000932 Insert the process hub to the outer arm 4 For Clean Room IP54 robots Removing the top cover and the flange with bearing Note Action DANGER Make sure that all supplies for ...

Страница 583: ...on 3351 1 Loose the locking screws 3 xx2100002399 For robots with protection class IP54 option 3350 540 For robots with protection type Clean Room op tion 3351 1 Remove the top cover from the ball screw 4 xx2100002401 For robots with protection class IP54 option 3350 540 For robots with protection type Clean Room op tion 3351 1 Remove the screws on the flange with bearing 5 Continues on next page ...

Страница 584: ...l power hydraulic pressure and air pressure are turned off 1 CAUTION For robots with protection type Clean Room Always cut the paint with a knife and grind the paint edge when disassembling parts of the robot See Cut the paint or surface on the robot before replacing parts on page 118 2 Continues on next page 584 Product manual IRB 920 3HAC075721 001 Revision C Copyright 2022 ABB All rights reserv...

Страница 585: ... 540 For robots with protection type Clean Room option 3351 1 xx2100002427 Disconnecting the connectors for axis 4 motor Note Action For robots with protection type Clean Room 1 Clean the joints that have been opened and wipe the parts free from particles with spirit on a lint free See Cut the paint or surface on the robot before replacing parts on page 118 Note After all repair work wipe the Clea...

Страница 586: ...ical power hydraulic pressure and air pressure are turned off 1 CAUTION For robots with protection type Clean Room Always cut the paint with a knife and grind the paint edge when disassembling parts of the robot See Cut the paint or surface on the robot before replacing parts on page 118 2 DANGER Make sure that the ball screw is supported with something The sudden drop of the ball screw due the lo...

Страница 587: ...robots with protection type Clean Room Always cut the paint with a knife and grind the paint edge when disassembling parts of the robot See Cut the paint or surface on the robot before replacing parts on page 118 2 xx2100001082 Removing the screws of the ball screw flange to make enough space for removing the axis 4 second timing belt 3 Continues on next page Product manual IRB 920 587 3HAC075721 ...

Страница 588: ...assembly 3 Take out the transmission module assembly with the axis 4 2 timing belt 4 Removing the axis 4 second timing belt Note Action DANGER Make sure that all supplies for electrical power hydraulic pressure and air pressure are turned off 1 CAUTION For robots with protection type Clean Room Always cut the paint with a knife and grind the paint edge when disassembling parts of the robot See Cut...

Страница 589: ... type Clean Room 1 Clean the joints that have been opened and wipe the parts free from particles with spirit on a lint free See Cut the paint or surface on the robot before replacing parts on page 118 Note After all repair work wipe the Clean Room robot free from particles with spirit on a lint free cloth xx2100001093 Refit the timing belt to the transmission module 2 Timing belt A4 2 3HAC070471 0...

Страница 590: ... or surface on the robot before replacing parts on page 118 Note After all repair work wipe the Clean Room robot free from particles with spirit on a lint free cloth Screws Hex socket head cap screw M4x20 12 9 Lafre 2C2B FC6 9 4 pcs Refit the transmission module assembly to the outer arm Tip Place the axis 4 second timing belt through the ball screw flange 2 Washers Plain washer machining 4 2x9x2 ...

Страница 591: ... grooves Fastening the ball screw flange Note Action DANGER Make sure that all supplies for electrical power hydraulic pressure and air pressure are turned off 1 CAUTION For robots with protection type Clean Room Always cut the paint with a knife and grind the paint edge when disassembling parts of the robot See Cut the paint or surface on the robot before replacing parts on page 118 2 DANGER Make...

Страница 592: ...h a knife and grind the paint edge when disassembling parts of the robot See Cut the paint or surface on the robot before replacing parts on page 118 2 DANGER Make sure that the ball screw is supported with something The sudden drop of the ball screw due the lost of the axis 3 motor may cause danger 3 Hang a strong strap to the motor 4 Continues on next page 592 Product manual IRB 920 3HAC075721 0...

Страница 593: ...e the timing belt tension 7 New belt 180 If the timing belt tension does not meet the require ment loosen the motor screws and readjust 8 Reconnecting the connectors for axis 4 motor Note Action For robots with protection type Clean Room 1 Clean the joints that have been opened and wipe the parts free from particles with spirit on a lint free See Cut the paint or surface on the robot before replac...

Страница 594: ... 2 Route the cabling on the axis 4 motor CAUTION Correct cable routing is highly important If the cables are routed and secured incorrectly the cables can be damaged 3 Refitting the axis 3 timing belt Note Action For robots with protection type Clean Room 1 Clean the joints that have been opened and wipe the parts free from particles with spirit on a lint free See Cut the paint or surface on the r...

Страница 595: ...eld dynamometer hooking to the strap and pull the dynamometer to make the tension falling in the allowed force range Note During the measurement make sure that all inter ferences that may affect the force are removed Pay attention to the force application direction 5 New belt 40 xx2100001126 Used belt 139 Use a sonic tension meter to measure the timing belt tension 6 New belt 110 If the timing bel...

Страница 596: ...For robots with protection class IP54 option 3350 540 For robots with protection type Clean Room op tion 3351 1 Refit the cover with bellow Check the gasket for the outer arm cover Tip Replace the gasket if needed CAUTION The gasket is in the outer arm 2 Tightening torque 2 Nm 10 For robots with protection class IP30 option 3350 300 xx2100000933 Refit the screws 3 For robots with protection class ...

Страница 597: ...x2100002402 For robots with protection class IP54 option 3350 540 For robots with protection type Clean Room op tion 3351 1 Install the flange with bearing to the extension shaft 2 Screws Hex socket head cap screw M2 5x6 12 9 Lafre 2C2B FC6 9 8 pcs For robots with protection class IP54 option 3350 540 For robots with protection type Clean Room op tion 3351 1 3 Tightening torque 0 8 Nm 10 xx2100002...

Страница 598: ...torque 0 4 Nm 10 xx2100002398 Refit the locking screws Securing the process hub to outer arm cover Note Action For robots with protection type Clean Room 1 Clean the joints that have been opened and wipe the parts free from particles with spirit on a lint free See Cut the paint or surface on the robot before replacing parts on page 118 Note After all repair work wipe the Clean Room robot free from...

Страница 599: ...tors are disconnected as shown in following steps For robots with protection class IP54 option 3350 540 For robots with protection type Clean Room option 3351 1 xx2100002438 Concluding procedure Note Action For robots with protection type Clean Room 1 Seal and paint the joints that have been opened See Cut the paint or surface on the robot before replacing parts on page 118 Note After all repair w...

Страница 600: ...re all safety requirements are met when performing the first test run 3 600 Product manual IRB 920 3HAC075721 001 Revision C Copyright 2022 ABB All rights reserved 5 Repair 5 6 8 Replacing the axis 4 second timing belt Continued ...

Страница 601: ...Note Article number Spare part 3HAC070470 001 Timing belt A4 1 Required tools and equipment Note Article number Equipment Content is defined in section Standard toolkit on page 996 Standard toolkit Delivered as a set of calibration tools Required if Axis Calibration is the valid calibration method for the robot 3HAC055412 001 Calibration toolbox Axis Calibra tion Continues on next page Product man...

Страница 602: ...librated with refer ence calibration Find previous reference values for the axis or create new reference values These val ues are to be used after the repair proced ure is completed for calibration of the ro bot Creating new values requires possibility to move the robot Read more about reference calibration for Axis Calibration in Reference calibration routine on page 957 If no previous reference ...

Страница 603: ...essure supply to the robot before entering the safeguarded space 4 CAUTION For robots with protection type Clean Room Always cut the paint with a knife and grind the paint edge when disassembling parts of the robot See Cut the paint or surface on the robot before replacing parts on page 118 5 Removing the process hub screws Note Action DANGER Make sure that all supplies for electrical power hydrau...

Страница 604: ...Remove the screws on the process hub and take out the gasket Tip Check the gasket and replace it if needed 3 For robots with protection class IP54 option 3350 540 For robots with protection type Clean Room option 3351 1 xx2100000932 Insert the process hub to the outer arm 4 For Clean Room IP54 robots Removing the top cover and the flange with bearing Note Action DANGER Make sure that all supplies ...

Страница 605: ... tion 3351 1 Loose the locking screws 3 xx2100002399 For robots with protection class IP54 option 3350 540 For robots with protection type Clean Room op tion 3351 1 Remove the top cover from the ball screw 4 xx2100002401 For robots with protection class IP54 option 3350 540 For robots with protection type Clean Room op tion 3351 1 Remove the screws on the flange with bearing 5 Continues on next pa...

Страница 606: ...rical power hydraulic pressure and air pressure are turned off 1 CAUTION For robots with protection type Clean Room Always cut the paint with a knife and grind the paint edge when disassembling parts of the robot See Cut the paint or surface on the robot before replacing parts on page 118 2 Continues on next page 606 Product manual IRB 920 3HAC075721 001 Revision C Copyright 2022 ABB All rights re...

Страница 607: ...tion 3350 540 For robots with protection type Clean Room option 3351 1 xx2100002427 Removing the axis 3 timing belt Note Action DANGER Make sure that all supplies for electrical power hydraulic pressure and air pressure are turned off 1 CAUTION For robots with protection type Clean Room Always cut the paint with a knife and grind the paint edge when disassembling parts of the robot See Cut the pai...

Страница 608: ... flange Note Action DANGER Make sure that all supplies for electrical power hydraulic pressure and air pressure are turned off 1 CAUTION For robots with protection type Clean Room Always cut the paint with a knife and grind the paint edge when disassembling parts of the robot See Cut the paint or surface on the robot before replacing parts on page 118 2 Continues on next page 608 Product manual IR...

Страница 609: ...h protection type Clean Room Always cut the paint with a knife and grind the paint edge when disassembling parts of the robot See Cut the paint or surface on the robot before replacing parts on page 118 2 xx2100001091 Removing the screws of the transmission module assembly 3 Take out the transmission module assembly with the axis 4 2 timing belt 4 Continues on next page Product manual IRB 920 609 ...

Страница 610: ...on the robot before replacing parts on page 118 2 xx2100001092 Remove the screws and washers on the transmis sion module flange to let the axis 4 second timing belt be free 3 xx2100001093 Remove the timing belt 4 Removing the axis 4 timing belt Note Action DANGER Make sure that all supplies for electrical power hydraulic pressure and air pressure are turned off 1 Continues on next page 610 Product...

Страница 611: ...g belt Use these procedures to refit the axis 4 timing belt Refitting the axis 4 timing belt Note Action For robots with protection type Clean Room 1 Clean the joints that have been opened and wipe the parts free from particles with spirit on a lint free See Cut the paint or surface on the robot before replacing parts on page 118 Note After all repair work wipe the Clean Room robot free from parti...

Страница 612: ...afre 2C2B FC6 9 2 pcs Refit the screws and washers without fully tightened 4 Washers Plain washer machining 4 2x9x2 steel 2 pcs Tightening torque 2 6 Nm 10 xx2100001095 Hang a strap to the motor and hold the transmis sion module Note Just tighten the tool 5 Continues on next page 612 Product manual IRB 920 3HAC075721 001 Revision C Copyright 2022 ABB All rights reserved 5 Repair 5 6 9 Replacing th...

Страница 613: ... belt 245 If the timing belt tension does not meet the require ment loosen the motor screws and readjust 9 Remove the axis 4 belt tension adjustment tool 10 Refitting the axis 4 second timing belt to the transmission module Note Action For robots with protection type Clean Room 1 Clean the joints that have been opened and wipe the parts free from particles with spirit on a lint free See Cut the pa...

Страница 614: ...ission module assembly to the outer arm Note Action For robots with protection type Clean Room 1 Clean the joints that have been opened and wipe the parts free from particles with spirit on a lint free See Cut the paint or surface on the robot before replacing parts on page 118 Note After all repair work wipe the Clean Room robot free from particles with spirit on a lint free cloth Continues on ne...

Страница 615: ...ts with protection type Clean Room 1 Clean the joints that have been opened and wipe the parts free from particles with spirit on a lint free See Cut the paint or surface on the robot before replacing parts on page 118 Note After all repair work wipe the Clean Room robot free from particles with spirit on a lint free cloth Timing belt A4 2 Refit the belt to the pulley 2 3HAC070471 001 xx2100001086...

Страница 616: ... on page 118 2 DANGER Make sure that the ball screw is supported with something The sudden drop of the ball screw due the lost of the axis 3 motor may cause danger 3 xx2100001082 Tighten the screws of the ball screw flange 4 Adjusting the axis 4 second timing belt tension Note Action DANGER Make sure that all supplies for electrical power hydraulic pressure and air pressure are turned off 1 Contin...

Страница 617: ...o make the tension falling in the allowed force range Note During the measurement make sure that all inter ferences that may affect the force are removed Pay attention to the force application direction 5 New belt 240 xx2100001127 Tightening torque 2 6 Nm 10 xx2100001087 Fasten the screws on the transmission module to the recommended tightening torque 6 Used belt 202 Use a sonic tension meter to m...

Страница 618: ... to the connectors the connectors may be dam aged if excessive force is used Note The harness are not visible due to the cleanness requirements of the illustration They are still ex isting inside the cable ferrule in the actual situ ation xx2100000938 Reconnect the connectors R2 MP4 R2 FB4 Tip See the number markings on the connectors for help to find the corresponding connector 2 Route the cablin...

Страница 619: ... belt A3 Refit the timing belt to the pulley on the ball screw and the motor Ensure that the belt runs correctly in the grooves 2 3HAC070464 001 xx2100001079 Screws Hex socket head cap screw M4x16 12 9 Lafre 2C2B FC6 9 4 pcs Secure the screws and washers without fully tightened 3 Washers Plain washer machining 4 2x9x2 steel 4 pcs Tightening torque 2 6 Nm 10 xx2100001078 Hang a strap to the hook on...

Страница 620: ...belt tension does not meet the require ment loosen the motor screws and readjust 7 Refitting the cover of the outer arm Note Action For robots with protection type Clean Room 1 Clean the joints that have been opened and wipe the parts free from particles with spirit on a lint free See Cut the paint or surface on the robot before replacing parts on page 118 Note After all repair work wipe the Clean...

Страница 621: ... class IP54 option 3350 540 For robots with protection type Clean Room option 3351 1 xx2100002427 For Clean Room IP54 robots Refitting the top cover and the flange with bearing Note Action For robots with protection type Clean Room 1 Clean the joints that have been opened and wipe the parts free from particles with spirit on a lint free See Cut the paint or surface on the robot before replacing pa...

Страница 622: ...on type Clean Room op tion 3351 1 3 Tightening torque 0 8 Nm 10 xx2100002401 Refit the screws to the flange with bearing xx2100002399 For robots with protection class IP54 option 3350 540 For robots with protection type Clean Room op tion 3351 1 Refit the top cover to the ball screw Tip The top surface of the cover should be flush with the top end of the ball screw 4 Continues on next page 622 Pro...

Страница 623: ... with protection type Clean Room 1 Clean the joints that have been opened and wipe the parts free from particles with spirit on a lint free See Cut the paint or surface on the robot before replacing parts on page 118 Note After all repair work wipe the Clean Room robot free from particles with spirit on a lint free cloth Insert the process hub from the outer arm cover 2 Continues on next page Prod...

Страница 624: ...nectors are disconnected as shown in following steps For robots with protection class IP54 option 3350 540 For robots with protection type Clean Room option 3351 1 xx2100002438 Concluding procedure Note Action For robots with protection type Clean Room 1 Seal and paint the joints that have been opened See Cut the paint or surface on the robot before replacing parts on page 118 Note After all repai...

Страница 625: ... sure all safety requirements are met when performing the first test run 3 Product manual IRB 920 625 3HAC075721 001 Revision C Copyright 2022 ABB All rights reserved 5 Repair 5 6 9 Replacing the axis 4 timing belt Continued ...

Страница 626: ...Note Article number Spare part 3HAC076579 001 Transmission module Required tools and equipment Note Article number Equipment Content is defined in section Standard toolkit on page 996 Standard toolkit Delivered as a set of calibration tools Required if Axis Calibration is the valid calibration method for the robot 3HAC055412 001 Calibration toolbox Axis Calibra tion Continues on next page 626 Prod...

Страница 627: ...lues If the robot is to be calibrated with refer ence calibration Find previous reference values for the axis or create new reference values These val ues are to be used after the repair proced ure is completed for calibration of the ro bot Creating new values requires possibility to move the robot Read more about reference calibration for Axis Calibration in Reference calibration routine on page ...

Страница 628: ...ssure supply to the robot before entering the safeguarded space 4 CAUTION For robots with protection type Clean Room Always cut the paint with a knife and grind the paint edge when disassembling parts of the robot See Cut the paint or surface on the robot before replacing parts on page 118 5 Removing the process hub screws Note Action DANGER Make sure that all supplies for electrical power hydraul...

Страница 629: ...emove the screws on the process hub and take out the gasket Tip Check the gasket and replace it if needed 3 For robots with protection class IP54 option 3350 540 For robots with protection type Clean Room option 3351 1 xx2100000932 Insert the process hub to the outer arm 4 For Clean Room IP54 robots Removing the top cover and the flange with bearing Note Action DANGER Make sure that all supplies f...

Страница 630: ...tion 3351 1 Loose the locking screws 3 xx2100002399 For robots with protection class IP54 option 3350 540 For robots with protection type Clean Room op tion 3351 1 Remove the top cover from the ball screw 4 xx2100002401 For robots with protection class IP54 option 3350 540 For robots with protection type Clean Room op tion 3351 1 Remove the screws on the flange with bearing 5 Continues on next pag...

Страница 631: ...ical power hydraulic pressure and air pressure are turned off 1 CAUTION For robots with protection type Clean Room Always cut the paint with a knife and grind the paint edge when disassembling parts of the robot See Cut the paint or surface on the robot before replacing parts on page 118 2 Continues on next page Product manual IRB 920 631 3HAC075721 001 Revision C Copyright 2022 ABB All rights res...

Страница 632: ...ion 3350 540 For robots with protection type Clean Room option 3351 1 xx2100002427 Removing the axis 3 timing belt Note Action DANGER Make sure that all supplies for electrical power hydraulic pressure and air pressure are turned off 1 CAUTION For robots with protection type Clean Room Always cut the paint with a knife and grind the paint edge when disassembling parts of the robot See Cut the pain...

Страница 633: ...flange Note Action DANGER Make sure that all supplies for electrical power hydraulic pressure and air pressure are turned off 1 CAUTION For robots with protection type Clean Room Always cut the paint with a knife and grind the paint edge when disassembling parts of the robot See Cut the paint or surface on the robot before replacing parts on page 118 2 Continues on next page Product manual IRB 920...

Страница 634: ... protection type Clean Room Always cut the paint with a knife and grind the paint edge when disassembling parts of the robot See Cut the paint or surface on the robot before replacing parts on page 118 2 xx2100001091 Removing the screws of the transmission module assembly 3 Take out the transmission module assembly with the axis 4 2 timing belt 4 Continues on next page 634 Product manual IRB 920 3...

Страница 635: ...he robot before replacing parts on page 118 2 xx2100001092 Remove the screws and washers on the transmis sion module flange to let the axis 4 second timing belt be free 3 xx2100001093 Remove the timing belt 4 Removing the axis 4 motor sub assembly Note Action DANGER Make sure that all supplies for electrical power hydraulic pressure and air pressure are turned off 1 Continues on next page Product ...

Страница 636: ...ssion module Use these procedures to refit the transmission module Refitting the axis 4 motor sub assembly to the transmission module Note Action For robots with protection type Clean Room 1 Clean the joints that have been opened and wipe the parts free from particles with spirit on a lint free See Cut the paint or surface on the robot before replacing parts on page 118 Note After all repair work ...

Страница 637: ...opened and wipe the parts free from particles with spirit on a lint free See Cut the paint or surface on the robot before replacing parts on page 118 Note After all repair work wipe the Clean Room robot free from particles with spirit on a lint free cloth Timing belt A4 1 Refit the timing belt to the pulley 2 3HAC070470 001 xx2100001097 Refit the timing belt to the motor Ensure that the belt runs ...

Страница 638: ...ain washer machining 4 2x9x2 steel 2 pcs Tightening torque 2 6 Nm 10 xx2100001095 Hang a strap to the motor and hold the transmis sion module Note Just tighten the tool 5 Continues on next page 638 Product manual IRB 920 3HAC075721 001 Revision C Copyright 2022 ABB All rights reserved 5 Repair 5 6 10 Replacing the transmission module Continued ...

Страница 639: ...belt 245 If the timing belt tension does not meet the require ment loosen the motor screws and readjust 9 Remove the axis 4 belt tension adjustment tool 10 Refitting the axis 4 second timing belt to the transmission module Note Action For robots with protection type Clean Room 1 Clean the joints that have been opened and wipe the parts free from particles with spirit on a lint free See Cut the pai...

Страница 640: ...ssion module assembly to the outer arm Note Action For robots with protection type Clean Room 1 Clean the joints that have been opened and wipe the parts free from particles with spirit on a lint free See Cut the paint or surface on the robot before replacing parts on page 118 Note After all repair work wipe the Clean Room robot free from particles with spirit on a lint free cloth Continues on nex...

Страница 641: ...s with protection type Clean Room 1 Clean the joints that have been opened and wipe the parts free from particles with spirit on a lint free See Cut the paint or surface on the robot before replacing parts on page 118 Note After all repair work wipe the Clean Room robot free from particles with spirit on a lint free cloth Timing belt A4 2 Refit the belt to the pulley 2 3HAC070471 001 xx2100001086 ...

Страница 642: ...on page 118 2 DANGER Make sure that the ball screw is supported with something The sudden drop of the ball screw due the lost of the axis 3 motor may cause danger 3 xx2100001082 Tighten the screws of the ball screw flange 4 Adjusting the axis 4 second timing belt tension Note Action DANGER Make sure that all supplies for electrical power hydraulic pressure and air pressure are turned off 1 Continu...

Страница 643: ... make the tension falling in the allowed force range Note During the measurement make sure that all inter ferences that may affect the force are removed Pay attention to the force application direction 5 New belt 240 xx2100001127 Tightening torque 2 6 Nm 10 xx2100001087 Fasten the screws on the transmission module to the recommended tightening torque 6 Used belt 202 Use a sonic tension meter to me...

Страница 644: ...to the connectors the connectors may be dam aged if excessive force is used Note The harness are not visible due to the cleanness requirements of the illustration They are still ex isting inside the cable ferrule in the actual situ ation xx2100000938 Reconnect the connectors R2 MP4 R2 FB4 Tip See the number markings on the connectors for help to find the corresponding connector 2 Route the cabling...

Страница 645: ...belt A3 Refit the timing belt to the pulley on the ball screw and the motor Ensure that the belt runs correctly in the grooves 2 3HAC070464 001 xx2100001079 Screws Hex socket head cap screw M4x16 12 9 Lafre 2C2B FC6 9 4 pcs Secure the screws and washers without fully tightened 3 Washers Plain washer machining 4 2x9x2 steel 4 pcs Tightening torque 2 6 Nm 10 xx2100001078 Hang a strap to the hook on ...

Страница 646: ...elt tension does not meet the require ment loosen the motor screws and readjust 7 Refitting the cover of the outer arm Note Action For robots with protection type Clean Room 1 Clean the joints that have been opened and wipe the parts free from particles with spirit on a lint free See Cut the paint or surface on the robot before replacing parts on page 118 Note After all repair work wipe the Clean ...

Страница 647: ...class IP54 option 3350 540 For robots with protection type Clean Room option 3351 1 xx2100002427 For Clean Room IP54 robots Refitting the top cover and the flange with bearing Note Action For robots with protection type Clean Room 1 Clean the joints that have been opened and wipe the parts free from particles with spirit on a lint free See Cut the paint or surface on the robot before replacing par...

Страница 648: ...n type Clean Room op tion 3351 1 3 Tightening torque 0 8 Nm 10 xx2100002401 Refit the screws to the flange with bearing xx2100002399 For robots with protection class IP54 option 3350 540 For robots with protection type Clean Room op tion 3351 1 Refit the top cover to the ball screw Tip The top surface of the cover should be flush with the top end of the ball screw 4 Continues on next page 648 Prod...

Страница 649: ...with protection type Clean Room 1 Clean the joints that have been opened and wipe the parts free from particles with spirit on a lint free See Cut the paint or surface on the robot before replacing parts on page 118 Note After all repair work wipe the Clean Room robot free from particles with spirit on a lint free cloth Insert the process hub from the outer arm cover 2 Continues on next page Produ...

Страница 650: ...ectors are disconnected as shown in following steps For robots with protection class IP54 option 3350 540 For robots with protection type Clean Room option 3351 1 xx2100002438 Concluding procedure Note Action For robots with protection type Clean Room 1 Seal and paint the joints that have been opened See Cut the paint or surface on the robot before replacing parts on page 118 Note After all repair...

Страница 651: ...sure all safety requirements are met when performing the first test run 3 Product manual IRB 920 651 3HAC075721 001 Revision C Copyright 2022 ABB All rights reserved 5 Repair 5 6 10 Replacing the transmission module Continued ...

Страница 652: ...ortal www abb com myABB Note Article number Spare part 3HAC076575 001 Outer arm 3HAC076611 001 Outer arm cover 3HAC081478 001 Outer arm 3HAC081494 001 Outer arm cover 3HAC073493 001 Gasket Required tools and equipment Note Article number Equipment Content is defined in section Standard toolkit on page 996 Standard toolkit Continues on next page 652 Product manual IRB 920 3HAC075721 001 Revision C ...

Страница 653: ... External cable packages DressPack and tools can stay fitted on the robot Fine calibration All external cable packages DressPack and tools must be removed from the robot 1 Follow the instructions given in the refer ence calibration routine on the FlexPendant to create reference values If the robot is to be calibrated with refer ence calibration Find previous reference values for the axis or create...

Страница 654: ...on the grease may come out from gearbox 2 DANGER Turn off all electric power supply hydraulic pressure supply air pressure supply to the robot before entering the safeguarded space 3 CAUTION For robots with protection type Clean Room Always cut the paint with a knife and grind the paint edge when disassembling parts of the robot See Cut the paint or surface on the robot before replacing parts on p...

Страница 655: ...1 1 Remove the screws on the process hub and take out the gasket Tip Check the gasket and replace it if needed 3 For robots with protection class IP54 option 3350 540 For robots with protection type Clean Room option 3351 1 xx2100000932 Insert the process hub to the outer arm 4 For Clean Room IP54 robots Removing the top cover and the flange with bearing Note Action DANGER Make sure that all suppl...

Страница 656: ...m op tion 3351 1 Loose the locking screws 3 xx2100002399 For robots with protection class IP54 option 3350 540 For robots with protection type Clean Room op tion 3351 1 Remove the top cover from the ball screw 4 xx2100002401 For robots with protection class IP54 option 3350 540 For robots with protection type Clean Room op tion 3351 1 Remove the screws on the flange with bearing 5 Continues on nex...

Страница 657: ...lectrical power hydraulic pressure and air pressure are turned off 1 CAUTION For robots with protection type Clean Room Always cut the paint with a knife and grind the paint edge when disassembling parts of the robot See Cut the paint or surface on the robot before replacing parts on page 118 2 Continues on next page Product manual IRB 920 657 3HAC075721 001 Revision C Copyright 2022 ABB All right...

Страница 658: ...bots with protection type Clean Room option 3351 1 xx2100002427 For Clean Room IP54 robots Removing the lower cover and the flange with bearing Note Action DANGER Make sure that all supplies for electrical power hydraulic pressure and air pressure are turned off 1 CAUTION For robots with protection type Clean Room Always cut the paint with a knife and grind the paint edge when disassembling parts ...

Страница 659: ...rom the ball screw 4 xx2100002406 For robots with protection class IP54 option 3350 540 For robots with protection type Clean Room op tion 3351 1 Remove the screws on the flange with bearing 5 xx2100002407 For robots with protection class IP54 option 3350 540 For robots with protection type Clean Room op tion 3351 1 Remove the flange with bearing 6 Continues on next page Product manual IRB 920 659...

Страница 660: ...lamp by loosening the screw and pull the clamp apart slightly 3 For robots with protection class IP54 option 3350 540 For robots with protection type Clean Room op tion 3351 1 Remove the bellow from the outer arm Note For robots with protection class IP54 option 3350 540 Clean the bellow from the glue if it will be reused 4 For robots with protection class IP54 option 3350 540 5 Remove the bellow ...

Страница 661: ...robots with protection type Clean Room op tion 3351 1 Remove the O ring from the lower housing 3 xx1900001616 For robots with protection class IP54 option 3350 540 For robots with protection type Clean Room op tion 3351 1 Loose the attachment screws 4 For robots with protection class IP54 option 3350 540 For robots with protection type Clean Room op tion 3351 1 Remove the shaft from the mechanical...

Страница 662: ...ype Clean Room Always cut the paint with a knife and grind the paint edge when disassembling parts of the robot See Cut the paint or surface on the robot before replacing parts on page 118 2 xx2100001032 Disconnect the air hoses from the L shaped con nectors 3 Continues on next page 662 Product manual IRB 920 3HAC075721 001 Revision C Copyright 2022 ABB All rights reserved 5 Repair 5 6 11 Replacin...

Страница 663: ... The connector clip has to be pressed 1 and pushed forward 2 to separate the R1 C2 for C2 cabling xx1800002943 xx2100001034 Snap loose and remove the female head of the connectors from the bracket Note The harness are not visible due to the cleanness requirements of the illustration They are still ex isting inside the cable ferrule in the actual situ ation 6 Continues on next page Product manual I...

Страница 664: ...ect the connectors R2 MP2 R2 FB2 3 xx2100000935 Snap loose and remove the female head of the connectors from the bracket Note The harness are not visible due to the cleanness requirements of the illustration They are still ex isting inside the cable ferrule in the actual situ ation 4 Disconnecting the connectors for axis 3 motor Note Action DANGER Make sure that all supplies for electrical power h...

Страница 665: ... the illustration They are still ex isting inside the cable ferrule in the actual situ ation 4 Disconnecting the connectors for axis 4 motor Note Action For robots with protection type Clean Room 1 Clean the joints that have been opened and wipe the parts free from particles with spirit on a lint free See Cut the paint or surface on the robot before replacing parts on page 118 Note After all repai...

Страница 666: ...cting the connector for PB Note Action DANGER Make sure that all supplies for electrical power hydraulic pressure and air pressure are turned off 1 CAUTION For robots with protection type Clean Room Always cut the paint with a knife and grind the paint edge when disassembling parts of the robot See Cut the paint or surface on the robot before replacing parts on page 118 2 Continues on next page 66...

Страница 667: ...he process hub Note Action DANGER Make sure that all supplies for electrical power hydraulic pressure and air pressure are turned off 1 CAUTION For robots with protection type Clean Room Always cut the paint with a knife and grind the paint edge when disassembling parts of the robot See Cut the paint or surface on the robot before replacing parts on page 118 2 Continues on next page Product manual...

Страница 668: ...DANGER Make sure that all supplies for electrical power hydraulic pressure and air pressure are turned off 1 CAUTION For robots with protection type Clean Room Always cut the paint with a knife and grind the paint edge when disassembling parts of the robot See Cut the paint or surface on the robot before replacing parts on page 118 2 xx2100000940 Remove the screws on the bracket to the cable ferru...

Страница 669: ... 2 pulley protection cover Note Action DANGER Make sure that all supplies for electrical power hydraulic pressure and air pressure are turned off 1 CAUTION For robots with protection type Clean Room Always cut the paint with a knife and grind the paint edge when disassembling parts of the robot See Cut the paint or surface on the robot before replacing parts on page 118 2 Continues on next page Pr...

Страница 670: ... grind the paint edge when disassembling parts of the robot See Cut the paint or surface on the robot before replacing parts on page 118 2 xx2100001046 Remove the screws and washers 3 Remove the motor Tip Move the internal harness out of the way 4 Removing the axis 2 timing belt Note Action DANGER Make sure that all supplies for electrical power hydraulic pressure and air pressure are turned off 1...

Страница 671: ...ower hydraulic pressure and air pressure are turned off 1 CAUTION For robots with protection type Clean Room Always cut the paint with a knife and grind the paint edge when disassembling parts of the robot See Cut the paint or surface on the robot before replacing parts on page 118 2 DANGER Make sure that the ball screw is supported with something The sudden drop of the ball screw due the lost of ...

Страница 672: ...pressure and air pressure are turned off 1 CAUTION For robots with protection type Clean Room Always cut the paint with a knife and grind the paint edge when disassembling parts of the robot See Cut the paint or surface on the robot before replacing parts on page 118 2 Continues on next page 672 Product manual IRB 920 3HAC075721 001 Revision C Copyright 2022 ABB All rights reserved 5 Repair 5 6 11...

Страница 673: ...the ball screw nut or ball screw spline nut go out of the screw shaft the ball screw is destroyed Be careful when you do any work that may cause this 4 Removing the ball screw with the flange Note Action DANGER Make sure that all supplies for electrical power hydraulic pressure and air pressure are turned off 1 Continues on next page Product manual IRB 920 673 3HAC075721 001 Revision C Copyright 2...

Страница 674: ...d the paint edge when disassembling parts of the robot See Cut the paint or surface on the robot before replacing parts on page 118 3 xx2100001082 Remove the screws and washers on the ball screw flange 4 IRB 920 special tool 3HAC077249 001 xx2100001129 Insert the special tool into the ball screw shaft 5 Continues on next page 674 Product manual IRB 920 3HAC075721 001 Revision C Copyright 2022 ABB ...

Страница 675: ... special tool with some thing Or the ball screw lower nut will be destroyed 7 xx2100001084 Lay down the ball screw assembly CAUTION If the ball screw nut or ball screw spline nut go out of the screw shaft the ball screw is destroyed Be careful when you do any work that may cause this 8 Removing the transmission module assembly Note Action DANGER Make sure that all supplies for electrical power hyd...

Страница 676: ... Make sure that all supplies for electrical power hydraulic pressure and air pressure are turned off 1 ELECTROSTATIC DISCHARGE ESD The unit is sensitive to ESD Before handling the unit read the safety information in section The unit is sensitive to ESD on page 49 2 CAUTION For robots with protection type Clean Room Always cut the paint with a knife and grind the paint edge when disassembling parts...

Страница 677: ...NGER Make sure that all supplies for electrical power hydraulic pressure and air pressure are turned off 1 CAUTION For robots with protection type Clean Room Always cut the paint with a knife and grind the paint edge when disassembling parts of the robot See Cut the paint or surface on the robot before replacing parts on page 118 2 Continues on next page Product manual IRB 920 677 3HAC075721 001 R...

Страница 678: ...spline nut go out of the screw shaft the ball screw is destroyed Be careful when you do any work that may cause this Removing the outer arm Note Action DANGER Make sure that all supplies for electrical power hydraulic pressure and air pressure are turned off 1 CAUTION For robots with protection type Clean Room Always cut the paint with a knife and grind the paint edge when disassembling parts of t...

Страница 679: ...hydraulic pressure and air pressure are turned off 1 CAUTION For robots with protection type Clean Room Always cut the paint with a knife and grind the paint edge when disassembling parts of the robot See Cut the paint or surface on the robot before replacing parts on page 118 2 Insert the main harness through the outer arm 3 Continues on next page Product manual IRB 920 679 3HAC075721 001 Revisio...

Страница 680: ...ing the ball screw lower nut Note Action DANGER Make sure that all supplies for electrical power hydraulic pressure and air pressure are turned off 1 CAUTION For robots with protection type Clean Room Always cut the paint with a knife and grind the paint edge when disassembling parts of the robot See Cut the paint or surface on the robot before replacing parts on page 118 2 Continues on next page ...

Страница 681: ...SD Before handling the unit read the safety information in section The unit is sensitive to ESD on page 49 1 For robots with protection type Clean Room 2 Clean the joints that have been opened and wipe the parts free from particles with spirit on a lint free See Cut the paint or surface on the robot before replacing parts on page 118 Note After all repair work wipe the Clean Room robot free from p...

Страница 682: ...oom 1 Clean the joints that have been opened and wipe the parts free from particles with spirit on a lint free See Cut the paint or surface on the robot before replacing parts on page 118 Note After all repair work wipe the Clean Room robot free from particles with spirit on a lint free cloth IRB 920 special tool 3HAC077249 001 xx2100001083 Refit the ball screw assembly to the outer arm Tip Make s...

Страница 683: ... Nm 10 xx2100001082 Refitting the mechanical stopper Note Action For robots with protection type Clean Room 1 Clean the joints that have been opened and wipe the parts free from particles with spirit on a lint free See Cut the paint or surface on the robot before replacing parts on page 118 Note After all repair work wipe the Clean Room robot free from particles with spirit on a lint free cloth Co...

Страница 684: ...option 3350 300 30 30 30 5 xx1900000144 Tip Make sure that the limit block opening gap is aligned with the ball screw origin point CAUTION If the ball screw nut or ball screw spline nut go out of the screw shaft the ball screw is destroyed Be careful when you do any work that may cause this Note Be careful with the orientation of the mechanical stopper The flat side is on the upper side For robots...

Страница 685: ...s with protection class IP30 option 3350 300 xx1800002860 For robots with protection class IP54 option 3350 540 For robots with protection type Clean Room option 3351 1 xx1900001642 Continues on next page Product manual IRB 920 685 3HAC075721 001 Revision C Copyright 2022 ABB All rights reserved 5 Repair 5 6 11 Replacing the outer arm Continued ...

Страница 686: ...cond timing belt through the ball screw flange 2 Washers Plain washer machining 4 2x9x2 steel 4 pcs Tightening torque 2 6 Nm 10 xx2100001091 Secure with the screws without fully tightened 3 Refitting the axis 4 second timing belt to the pulley Note Action For robots with protection type Clean Room 1 Clean the joints that have been opened and wipe the parts free from particles with spirit on a lint...

Страница 687: ...ays cut the paint with a knife and grind the paint edge when disassembling parts of the robot See Cut the paint or surface on the robot before replacing parts on page 118 2 DANGER Make sure that the ball screw is supported with something The sudden drop of the ball screw due the lost of the axis 3 motor may cause danger 3 xx2100001082 Tighten the screws of the ball screw flange 4 Continues on next...

Страница 688: ... due the lost of the axis 3 motor may cause danger 3 Hang a strong strap to the motor 4 Used belt 100 Use a handheld dynamometer hooking to the strap and pull the dynamometer to make the tension falling in the allowed force range Note During the measurement make sure that all inter ferences that may affect the force are removed Pay attention to the force application direction 5 New belt 240 xx2100...

Страница 689: ... free See Cut the paint or surface on the robot before replacing parts on page 118 Note After all repair work wipe the Clean Room robot free from particles with spirit on a lint free cloth xx2100001181 Refit the motor to the outer arm Tip Move the internal harness out of the way 2 Timing belt A3 Refit the timing belt to the pulley on the ball screw and the motor Ensure that the belt runs correctly...

Страница 690: ...ange Note During the measurement make sure that all inter ferences that may affect the force are removed Pay attention to the force application direction 6 Fasten the screws to the recommended tightening torque 7 Used belt 139 Use a sonic tension meter to measure the timing belt tension 8 New belt 110 xx1800002887 If the timing belt tension does not meet the require ment loosen the motor screws an...

Страница 691: ... spirit on a lint free cloth Timing belt A3 Refit the timing belt to the pulley on the ball screw and the motor Ensure that the belt runs correctly in the grooves 2 3HAC070464 001 xx2100001079 Screws Hex socket head cap screw M4x16 12 9 Lafre 2C2B FC6 9 4 pcs Secure the screws and washers without fully tightened 3 Washers Plain washer machining 4 2x9x2 steel 4 pcs Tightening torque 2 6 Nm 10 xx210...

Страница 692: ...ment loosen the motor screws and readjust 7 Refitting the axis 2 motor sub assembly Note Action For robots with protection type Clean Room 1 Clean the joints that have been opened and wipe the parts free from particles with spirit on a lint free See Cut the paint or surface on the robot before replacing parts on page 118 Note After all repair work wipe the Clean Room robot free from particles with...

Страница 693: ...ooking to the strap and pull the dynamometer to make the tension falling in the allowed force range Note During the measurement make sure that all inter ferences that may affect the force are removed Pay attention to the force application direction 6 New belt 70 xx2100001125 Tip If the ball screw will interfere with the handheld dynamometer adjust the ball screw manually Tightening torque 2 3 Nm 1...

Страница 694: ...paint or surface on the robot before replacing parts on page 118 Note After all repair work wipe the Clean Room robot free from particles with spirit on a lint free cloth Lay the internal harness in a natural state without distortion 2 Screws Hex socket head cap screw M3x8 12 9 Lafre 2C2B FC6 9 2 pcs Refit the cable ferrule and secure it with the screws Tip The air hoses should face the process hu...

Страница 695: ... installed well 5 Note The harness are not visible due to the cleanness requirements of the illustration They are still ex isting inside the cable ferrule in the actual situ ation Reconnecting the connector for PB Note Action For robots with protection type Clean Room 1 Clean the joints that have been opened and wipe the parts free from particles with spirit on a lint free See Cut the paint or sur...

Страница 696: ...3 Route and secure the cabling with cable straps if needed CAUTION Correct cable routing is highly important If the cables are routed incorrectly the cables can be damaged 4 Reconnecting the connectors for axis 4 motor Note Action For robots with protection type Clean Room 1 Clean the joints that have been opened and wipe the parts free from particles with spirit on a lint free See Cut the paint o...

Страница 697: ...r 2 Route the cabling on the axis 4 motor CAUTION Correct cable routing is highly important If the cables are routed and secured incorrectly the cables can be damaged 3 Reconnecting the connectors for axis 3 motor Note Action For robots with protection type Clean Room 1 Clean the joints that have been opened and wipe the parts free from particles with spirit on a lint free See Cut the paint or sur...

Страница 698: ...or 3 Route the cabling on the axis 3 motor CAUTION Correct cable routing is highly important If the cables are routed and secured incorrectly the cables can be damaged 4 Reconnecting the connectors for axis 2 motor Note Action For robots with protection type Clean Room 1 Clean the joints that have been opened and wipe the parts free from particles with spirit on a lint free See Cut the paint or su...

Страница 699: ...s are routed and secured incorrectly the cables can be damaged 4 Reconnecting the air hoses CP CS cabling and Ethernet cabling if equipped Note Action For robots with protection type Clean Room 1 Clean the joints that have been opened and wipe the parts free from particles with spirit on a lint free See Cut the paint or surface on the robot before replacing parts on page 118 Note After all repair ...

Страница 700: ...s with the same number connect to the same L shaped connector 4 For robots with C2 cabling 5 Reconnect the connector R1 C2 Tip See the number markings on the air hoses for help to find the corresponding air hoses The air hoses with the same number connect to the same L shaped connector Secure the C2 cabling to the C2 bracket with the cable straps 6 xx2100001032 Reconnect the air hoses in a cross p...

Страница 701: ...Tip Do not secure it with the screws before the cable ferrule installed well 2 Tightening torque 1 2 Nm 10 xx2100000941 Note The harness are not visible due to the cleanness requirements of the illustration They are still ex isting inside the cable ferrule in the actual situ ation For Clean Room IP54 robots Refitting the shaft for Clean Room IP54 robots Note Action For robots with protection type ...

Страница 702: ...0 540 For robots with protection type Clean Room op tion 3351 1 3 Tightening torque 0 4 Nm 10 xx1900001616 Secure the shaft to the ball screw with the screws xx1900001805 For robots with protection class IP54 option 3350 540 Apply the glue to the upper contacted zone between the shaft and the ball screw Note Fulfill the gaps on the ball screw in this contacted zone to make a sealing structure 4 Co...

Страница 703: ...t free See Cut the paint or surface on the robot before replacing parts on page 118 Note After all repair work wipe the Clean Room robot free from particles with spirit on a lint free cloth xx2100002409 For robots with protection class IP54 option 3350 540 Apply the glue to the outer arm 2 For robots with protection class IP54 option 3350 540 3 For robots with protection type Clean Room op tion 33...

Страница 704: ...class IP54 option 3350 540 6 For robots with protection type Clean Room op tion 3351 1 Secure them with the clamp Tip The opening part of the clamp should be in the opposite position to the gap on the bellow gasket Refitting the lower cover and the flange with bearing Note Action For robots with protection type Clean Room 1 Clean the joints that have been opened and wipe the parts free from partic...

Страница 705: ...option 3350 540 For robots with protection type Clean Room op tion 3351 1 3 Tightening torque 0 8 Nm 10 xx2100002406 Refit the screws to the flange with bearing xx2100002405 For robots with protection class IP54 option 3350 540 For robots with protection type Clean Room op tion 3351 1 Refit the lower cover to the ball screw 4 Continues on next page Product manual IRB 920 705 3HAC075721 001 Revisio...

Страница 706: ...rm Note Action For robots with protection type Clean Room 1 Clean the joints that have been opened and wipe the parts free from particles with spirit on a lint free See Cut the paint or surface on the robot before replacing parts on page 118 Note After all repair work wipe the Clean Room robot free from particles with spirit on a lint free cloth Continues on next page 706 Product manual IRB 920 3H...

Страница 707: ...tion class IP54 option 3350 540 For robots with protection type Clean Room option 3351 1 xx2100002427 For Clean Room IP54 robots Refitting the top cover and the flange with bearing Note Action For robots with protection type Clean Room 1 Clean the joints that have been opened and wipe the parts free from particles with spirit on a lint free See Cut the paint or surface on the robot before replacin...

Страница 708: ...ection type Clean Room op tion 3351 1 3 Tightening torque 0 8 Nm 10 xx2100002401 Refit the screws to the flange with bearing xx2100002399 For robots with protection class IP54 option 3350 540 For robots with protection type Clean Room op tion 3351 1 Refit the top cover to the ball screw Tip The top surface of the cover should be flush with the top end of the ball screw 4 Continues on next page 708...

Страница 709: ...bots with protection type Clean Room 1 Clean the joints that have been opened and wipe the parts free from particles with spirit on a lint free See Cut the paint or surface on the robot before replacing parts on page 118 Note After all repair work wipe the Clean Room robot free from particles with spirit on a lint free cloth Insert the process hub from the outer arm cover 2 Continues on next page ...

Страница 710: ... connectors are disconnected as shown in following steps For robots with protection class IP54 option 3350 540 For robots with protection type Clean Room option 3351 1 xx2100002438 Concluding procedure Note Action For robots with protection type Clean Room 1 Seal and paint the joints that have been opened See Cut the paint or surface on the robot before replacing parts on page 118 Note After all r...

Страница 711: ...Make sure all safety requirements are met when performing the first test run 3 Product manual IRB 920 711 3HAC075721 001 Revision C Copyright 2022 ABB All rights reserved 5 Repair 5 6 11 Replacing the outer arm Continued ...

Страница 712: ...e latest spare parts of the IRB 920 via myABB Business Portal www abb com myABB Note Article number Spare part 3HAC076569 001 Motor with pulley A1 3HAC070449 001 Timing belt A1 Required tools and equipment Note Article number Equipment Content is defined in section Standard toolkit on page 996 Standard toolkit Continues on next page 712 Product manual IRB 920 3HAC075721 001 Revision C Copyright 20...

Страница 713: ...calibration All external cable packages DressPack and tools must be removed from the robot 1 Follow the instructions given in the refer ence calibration routine on the FlexPendant to create reference values If the robot is to be calibrated with refer ence calibration Find previous reference values for the axis or create new reference values These val ues are to be used after the repair proced ure ...

Страница 714: ...t straight If the robot lay down in any situation the grease may come out from gearbox 2 xx2100000930 Jog all axes to zero position 3 DANGER Turn off all electric power supply hydraulic pressure supply air pressure supply to the robot before entering the safeguarded space 4 CAUTION For robots with protection type Clean Room Always cut the paint with a knife and grind the paint edge when disassembl...

Страница 715: ...x2100000932 Remove the screws on the process hub Note For robots with protection class IP54 option 3350 540 For robots with protection type Clean Room op tion 3351 1 Remove the screws on the process hub and take out the gasket Tip Check the gasket and replace it if needed 3 For robots with protection class IP54 option 3350 540 For robots with protection type Clean Room option 3351 1 xx2100000932 I...

Страница 716: ...nt or surface on the robot before replacing parts on page 118 2 xx2100002398 For robots with protection class IP54 option 3350 540 For robots with protection type Clean Room op tion 3351 1 Loose the locking screws 3 xx2100002399 For robots with protection class IP54 option 3350 540 For robots with protection type Clean Room op tion 3351 1 Remove the top cover from the ball screw 4 Continues on nex...

Страница 717: ...he cover of the outer arm Note Action DANGER Make sure that all supplies for electrical power hydraulic pressure and air pressure are turned off 1 CAUTION For robots with protection type Clean Room Always cut the paint with a knife and grind the paint edge when disassembling parts of the robot See Cut the paint or surface on the robot before replacing parts on page 118 2 Continues on next page Pro...

Страница 718: ...ots with protection type Clean Room option 3351 1 xx2100002427 Disconnecting the air hoses C1 cabling and C2 cabling if equipped Note Action DANGER Make sure that all supplies for electrical power hydraulic pressure and air pressure are turned off 1 CAUTION For robots with protection type Clean Room Always cut the paint with a knife and grind the paint edge when disassembling parts of the robot Se...

Страница 719: ... the R1 C2 at the same time Tip Take photos of the connector and cable position before disconnecting them to have as a reference when reconnecting 5 Tip The connector clip has to be pressed 1 and pushed forward 2 to separate the R1 C2 for C2 cabling xx1800002943 Continues on next page Product manual IRB 920 719 3HAC075721 001 Revision C Copyright 2022 ABB All rights reserved 5 Repair 5 7 1 Replaci...

Страница 720: ...l supplies for electrical power hydraulic pressure and air pressure are turned off 1 CAUTION For robots with protection type Clean Room Always cut the paint with a knife and grind the paint edge when disassembling parts of the robot See Cut the paint or surface on the robot before replacing parts on page 118 2 xx2100000934 Disconnect the connectors R2 MP2 R2 FB2 3 Continues on next page 720 Produc...

Страница 721: ...l supplies for electrical power hydraulic pressure and air pressure are turned off 1 CAUTION For robots with protection type Clean Room Always cut the paint with a knife and grind the paint edge when disassembling parts of the robot See Cut the paint or surface on the robot before replacing parts on page 118 2 xx2100000936 Disconnect the connectors R2 MP3 R2 FB3 3 Continues on next page Product ma...

Страница 722: ...Cut the paint or surface on the robot before replacing parts on page 118 Note After all repair work wipe the Clean Room robot free from particles with spirit on a lint free cloth xx2100000938 Disconnect the axis 4 motor connectors R2 MP4 R2 FB4 2 xx2100000939 Snap loose and remove the female head of the connectors from the bracket Note The harness are not visible due to the cleanness requirements ...

Страница 723: ...t the connector R2 PB R2 LAMP 3 xx2100001031 Snap loose and remove the female head of the connector from the bracket Note The harness are not visible due to the cleanness requirements of the illustration They are still ex isting inside the cable ferrule in the actual situ ation 4 Pull out the process hub Note Action DANGER Make sure that all supplies for electrical power hydraulic pressure and air...

Страница 724: ...n 3351 1 xx2100002438 CAUTION Be aware of the cabling that is attached to the cover The cover can not be removed completely until the connectors are disconnected as shown in following steps Removing the cable ferrule and bracket Note Action DANGER Make sure that all supplies for electrical power hydraulic pressure and air pressure are turned off 1 CAUTION For robots with protection type Clean Room...

Страница 725: ...ble due to the cleanness requirements of the illustration They are still ex isting inside the cable ferrule in the actual situ ation 4 xx1800002842 Remove the screws on the cable ferrule and take the cable ferrule out 5 xx1800002849 Removing the axis 1 cover Note Action DANGER Make sure that all supplies for electrical power hydraulic pressure and air pressure are turned off 1 Continues on next pa...

Страница 726: ...place the gasket if needed 4 For robots with protection class IP54 option 3350 540 For robots with protection type Clean Room option 3351 1 xx2100002428 Removing the axis 2 cover Note Action DANGER Make sure that all supplies for electrical power hydraulic pressure and air pressure are turned off 1 CAUTION For robots with protection type Clean Room Always cut the paint with a knife and grind the p...

Страница 727: ...40 For robots with protection type Clean Room option 3351 1 xx2100002451 Removing the SMB cover Note Action DANGER Make sure that all supplies for electrical power hydraulic pressure and air pressure are turned off 1 ELECTROSTATIC DISCHARGE ESD The unit is sensitive to ESD Before handling the unit read the safety information in section The unit is sensitive to ESD on page 49 2 Continues on next pa...

Страница 728: ... cover with the SMB unit assembly out together Note For robots with protection class IP54 option 3350 540 For robots with protection type Clean Room op tion 3351 1 Check the gasket for the SMB cover Tip Replace the gasket if needed 5 For robots with protection class IP54 option 3350 540 For robots with protection type Clean Room option 3351 1 xx2100002433 Disconnecting the SMB cabling Note Action ...

Страница 729: ...d cable position before disconnecting them to have as a reference when reconnecting 5 Removing the base plate rear plate Note Action DANGER Make sure that all supplies for electrical power hydraulic pressure and air pressure are turned off 1 CAUTION For robots with protection type Clean Room Always cut the paint with a knife and grind the paint edge when disassembling parts of the robot See Cut th...

Страница 730: ...54 option 3350 540 For robots with protection type Clean Room op tion 3351 1 Check the gasket for the base plate Tip Replace the gasket if needed 6 For robots with protection class IP54 option 3350 540 For robots with protection type Clean Room option 3351 1 xx2100002434 Continues on next page 730 Product manual IRB 920 3HAC075721 001 Revision C Copyright 2022 ABB All rights reserved 5 Repair 5 7 ...

Страница 731: ...P54 option 3350 540 For robots with protection type Clean Room option 3351 1 xx2100002435 Releasing the base bracket Note Action DANGER Make sure that all supplies for electrical power hydraulic pressure and air pressure are turned off 1 CAUTION For robots with protection type Clean Room Always cut the paint with a knife and grind the paint edge when disassembling parts of the robot See Cut the pa...

Страница 732: ...e when disassembling parts of the robot See Cut the paint or surface on the robot before replacing parts on page 118 2 xx2100000947 Remove the three grounding cables from the bracket by unscrew the screws 3 Disconnecting the connectors for axis 1 motor Note Action DANGER Make sure that all supplies for electrical power hydraulic pressure and air pressure are turned off 1 Continues on next page 732...

Страница 733: ...s of the illustration They are still ex isting inside the cable ferrule in the actual situ ation 4 Removing the bracket Note Action DANGER Make sure that all supplies for electrical power hydraulic pressure and air pressure are turned off 1 CAUTION For robots with protection type Clean Room Always cut the paint with a knife and grind the paint edge when disassembling parts of the robot See Cut the...

Страница 734: ...ssure and air pressure are turned off 1 CAUTION For robots with protection type Clean Room Always cut the paint with a knife and grind the paint edge when disassembling parts of the robot See Cut the paint or surface on the robot before replacing parts on page 118 2 Continues on next page 734 Product manual IRB 920 3HAC075721 001 Revision C Copyright 2022 ABB All rights reserved 5 Repair 5 7 1 Rep...

Страница 735: ...in harness from the axis 1 gearbox position Note Action DANGER Make sure that all supplies for electrical power hydraulic pressure and air pressure are turned off 1 CAUTION For robots with protection type Clean Room Always cut the paint with a knife and grind the paint edge when disassembling parts of the robot See Cut the paint or surface on the robot before replacing parts on page 118 2 Continue...

Страница 736: ...t all supplies for electrical power hydraulic pressure and air pressure are turned off 1 CAUTION For robots with protection type Clean Room Always cut the paint with a knife and grind the paint edge when disassembling parts of the robot See Cut the paint or surface on the robot before replacing parts on page 118 2 Continues on next page 736 Product manual IRB 920 3HAC075721 001 Revision C Copyrigh...

Страница 737: ...lass IP54 option 3350 540 For robots with protection type Clean Room op tion 3351 1 Check the gasket for the main harness Tip Replace the gasket if needed 4 For robots with protection class IP54 option 3350 540 For robots with protection type Clean Room option 3351 1 xx2100002436 Continues on next page Product manual IRB 920 737 3HAC075721 001 Revision C Copyright 2022 ABB All rights reserved 5 Re...

Страница 738: ... 6 For robots with protection class IP54 option 3350 540 Note Remove the bottom plate from the main harness if needed For robots with protection type Clean Room option 3351 1 xx2100002437 xx2200000281 For robots with protection type Clean Room op tion 3351 1 Remove the one way valve by unscrewing it 7 Removing the pulley protection cover Note Action DANGER Make sure that all supplies for electrica...

Страница 739: ... Note Action DANGER Make sure that all supplies for electrical power hydraulic pressure and air pressure are turned off 1 CAUTION For robots with protection type Clean Room Always cut the paint with a knife and grind the paint edge when disassembling parts of the robot See Cut the paint or surface on the robot before replacing parts on page 118 2 xx2100001038 Remove the screws and washers 3 Remove...

Страница 740: ... 4 Refitting the axis 1 motor sub assembly Use these procedures to refit the axis 1 motor sub assembly Refitting the flange to the axis 1 motor sub assembly Note Action For robots with protection type Clean Room 1 Clean the joints that have been opened and wipe the parts free from particles with spirit on a lint free See Cut the paint or surface on the robot before replacing parts on page 118 Note...

Страница 741: ... robot free from particles with spirit on a lint free cloth Put the timing belt into the pulley on the gear 2 Screws Hex socket head cap screw M4x16 12 9 Lafre 2C2B FC6 9 3 pcs Refit the motor and refit the timing belt to the motor Ensure that the belt runs correctly in the grooves 3 Washers Plain washer machining 4 2x9x2 steel 3 pcs Refit the screws and washers without fully tightened 4 Tightenin...

Страница 742: ...en the screws to the recommended tightening torque 7 Used belt 308 Use a sonic tension meter to measure the timing belt tension 8 New belt 250 If the timing belt tension does not meet the require ment loosen the motor screws and readjust 9 Refitting the pulley protection cover Note Action DANGER Make sure that all supplies for electrical power hydraulic pressure and air pressure are turned off 1 C...

Страница 743: ...g torque 0 8 Nm xx2100001037 Inserting the main harness through the axis 1 gearbox position Note Action For robots with protection type Clean Room 1 Clean the joints that have been opened and wipe the parts free from particles with spirit on a lint free See Cut the paint or surface on the robot before replacing parts on page 118 Note After all repair work wipe the Clean Room robot free from partic...

Страница 744: ... strained Reroute if necessary Inserting the main harness through the axis 2 gearbox position Note Action For robots with protection type Clean Room 1 Clean the joints that have been opened and wipe the parts free from particles with spirit on a lint free See Cut the paint or surface on the robot before replacing parts on page 118 Note After all repair work wipe the Clean Room robot free from part...

Страница 745: ...e Cut the paint or surface on the robot before replacing parts on page 118 Note After all repair work wipe the Clean Room robot free from particles with spirit on a lint free cloth xx2100000950 Insert the female head of the connectors to the bracket accordingly Tip The mistake proofing measure has been applied to the connectors the connectors may be dam aged if excessive force is used Note The har...

Страница 746: ...the joints that have been opened and wipe the parts free from particles with spirit on a lint free See Cut the paint or surface on the robot before replacing parts on page 118 Note After all repair work wipe the Clean Room robot free from particles with spirit on a lint free cloth Screws Hex socket head cap screw M3x5 12 9 Lafre 2C2B FC6 9 3 pcs Secure the three grounding cables to the bracket wit...

Страница 747: ...or surface on the robot before replacing parts on page 118 2 Lay the main harness in a natural state without distortion 3 Screws Hex socket head cap screw M3x8 12 9 Lafre 2C2B FC6 9 2 pcs Secure the cable ferrule to the bracket Tip Align all the cable ferrules so that the cable is in a natural bending position to avoid twisting Tightening torque 1 2 Nm 10 xx2100000951 Note The harness are not visi...

Страница 748: ...n a lint free See Cut the paint or surface on the robot before replacing parts on page 118 Note After all repair work wipe the Clean Room robot free from particles with spirit on a lint free cloth xx2100000945 Reconnect the connectors SMB P7 SMB J1 SMB J2 Tip Take photos of the connector and cable position before disconnecting them to have as a reference when reconnecting 2 Continues on next page ...

Страница 749: ...xx2100000944 Secure the SMB cover to the base with the screws 4 For robots with protection type Clean Room option 3351 1 Screws Stainless Screw Hexagon Socket Head Cap Clean Room 3HAC075438 001 6 pcs Tightening torque 2 6 Nm xx2100002433 For robots with protection class IP54 option 3350 540 Screws Hex socket head cap screw M4x10 12 9 Lafre 2C2B FC6 9 6 pcs Tightening torque 2 6 Nm xx2100002433 Con...

Страница 750: ...g parts on page 118 Note After all repair work wipe the Clean Room robot free from particles with spirit on a lint free cloth xx2200000281 For robots with protection type Clean Room op tion 3351 1 Refit the one way valve by screwing it into the main harness assembly 2 Continues on next page 750 Product manual IRB 920 3HAC075721 001 Revision C Copyright 2022 ABB All rights reserved 5 Repair 5 7 1 R...

Страница 751: ... 9 6 pcs Tightening torque 1 2 Nm 10 xx2100000953 For robots with protection class IP54 option 3350 540 For robots with protection type Clean Room option 3351 1 Screws Hex socket head cap screw M3x30 12 9 Lafre 2C2B FC6 9 6 pcs Tightening torque 1 2 Nm 10 xx2100002436 Continues on next page Product manual IRB 920 751 3HAC075721 001 Revision C Copyright 2022 ABB All rights reserved 5 Repair 5 7 1 R...

Страница 752: ...n 3351 1 Screws Hex socket head cap screw M3x30 12 9 Lafre 2C2B FC6 9 8 pcs Tightening torque 1 2 Nm 10 xx2100002437 Refitting the base plate rear plate Note Action For robots with protection type Clean Room 1 Clean the joints that have been opened and wipe the parts free from particles with spirit on a lint free See Cut the paint or surface on the robot before replacing parts on page 118 Note Aft...

Страница 753: ...nternal harness cover all moving area of the harness 2 Continues on next page Product manual IRB 920 753 3HAC075721 001 Revision C Copyright 2022 ABB All rights reserved 5 Repair 5 7 1 Replacing the axis 1 motor sub assembly Continued ...

Страница 754: ...n refit the rear plate to the base Note For robots with protection class IP54 option 3350 540 For robots with protection type Clean Room op tion 3351 1 Check the gasket for the rear plate before refitting the rear plate Tip Replace the gasket if needed For robots with protection class IP54 option 3350 540 For robots with protection type Clean Room option 3351 1 xx2100002434 Secure the base plate r...

Страница 755: ...r arm Note Action For robots with protection type Clean Room 1 Clean the joints that have been opened and wipe the parts free from particles with spirit on a lint free See Cut the paint or surface on the robot before replacing parts on page 118 Note After all repair work wipe the Clean Room robot free from particles with spirit on a lint free cloth Lay the internal harness in a natural state witho...

Страница 756: ... ferrules so that the cable is in a natural bending position to avoid twisting 4 Tightening torque 1 2 Nm 10 xx2100000940 Note The harness are not visible due to the cleanness requirements of the illustration They are still ex isting inside the cable ferrule in the actual situ ation Refit the bracket without securing Tip Do not secure it with the screws before the cable ferrule installed well 5 No...

Страница 757: ... the connectors the connectors may be dam aged if excessive force is used Note The harness are not visible due to the cleanness requirements of the illustration They are still ex isting inside the cable ferrule in the actual situ ation xx2100000938 Reconnect the connectors R2 MP4 R2 FB4 Tip See the number markings on the connectors for help to find the corresponding connector 2 Route the cabling o...

Страница 758: ...the connectors the connectors may be dam aged if excessive force is used Note The harness are not visible due to the cleanness requirements of the illustration They are still ex isting inside the cable ferrule in the actual situ ation 2 xx2100000936 Reconnect the connectors R2 MP3 R2 FB3 Tip See the number markings on the connectors for help to find the corresponding connector 3 Route the cabling ...

Страница 759: ...e connectors the connectors may be dam aged if excessive force is used Note The harness are not visible due to the cleanness requirements of the illustration They are still ex isting inside the cable ferrule in the actual situ ation 2 xx2100000934 Reconnect the connectors R2 MP2 R2 FB2 Tip See the number markings on the connectors for help to find the corresponding connector 3 Route the cabling be...

Страница 760: ...ectors the connectors may be dam aged if excessive force is used Note The harness are not visible due to the cleanness requirements of the illustration They are still ex isting inside the cable ferrule in the actual situ ation 2 xx2100001030 Reconnect the connector R2 PB R2 LAMP Tip See the number markings on the connectors for help to find the corresponding connector 3 Route and secure the cablin...

Страница 761: ...ing parts on page 118 Note After all repair work wipe the Clean Room robot free from particles with spirit on a lint free cloth Route the air hoses on the process hub behind the bracket CAUTION Correct cable routing is highly important If the cables are routed and secured incorrectly the cables can be damaged 2 Continues on next page Product manual IRB 920 761 3HAC075721 001 Revision C Copyright 2...

Страница 762: ...the same number connect to the same L shaped connector 4 For robots with C2 cabling 5 Reconnect the connector R1 C2 Tip See the number markings on the air hoses for help to find the corresponding air hoses The air hoses with the same number connect to the same L shaped connector Secure the C2 cabling to the C2 bracket with the cable straps 6 xx2100001032 Reconnect the air hoses in a cross pattern ...

Страница 763: ...he bracket Tip Do not secure it with the screws before the cable ferrule installed well 2 Tightening torque 1 2 Nm 10 xx2100000941 Note The harness are not visible due to the cleanness requirements of the illustration They are still ex isting inside the cable ferrule in the actual situ ation Refitting the cover of the outer arm Note Action For robots with protection type Clean Room 1 Clean the joi...

Страница 764: ...ss IP54 option 3350 540 For robots with protection type Clean Room option 3351 1 xx2100002427 For Clean Room IP54 robots Refitting the top cover and the flange with bearing Note Action For robots with protection type Clean Room 1 Clean the joints that have been opened and wipe the parts free from particles with spirit on a lint free See Cut the paint or surface on the robot before replacing parts ...

Страница 765: ...ype Clean Room op tion 3351 1 3 Tightening torque 0 8 Nm 10 xx2100002401 Refit the screws to the flange with bearing xx2100002399 For robots with protection class IP54 option 3350 540 For robots with protection type Clean Room op tion 3351 1 Refit the top cover to the ball screw Tip The top surface of the cover should be flush with the top end of the ball screw 4 Continues on next page Product man...

Страница 766: ...h protection type Clean Room 1 Clean the joints that have been opened and wipe the parts free from particles with spirit on a lint free See Cut the paint or surface on the robot before replacing parts on page 118 Note After all repair work wipe the Clean Room robot free from particles with spirit on a lint free cloth Insert the process hub from the outer arm cover 2 Continues on next page 766 Prod...

Страница 767: ...the connectors are disconnected as shown in following steps For robots with protection class IP54 option 3350 540 For robots with protection type Clean Room option 3351 1 xx2100002438 Refitting the axis 1 cover Note Action For robots with protection type Clean Room 1 Clean the joints that have been opened and wipe the parts free from particles with spirit on a lint free See Cut the paint or surfac...

Страница 768: ...20T 6 0 65 Screw Hex socket head cap flange screw M5x16 12 9 Lafre 2C2B FC6 9 PrO COat111 16 pcs Tightening torque 5 4 Nm 3 For robots with protection class IP30 option 3350 300 xx2100000942 Refit the screws 3 For robots with protection class IP54 option 3350 540 For robots with protection type Clean Room option 3351 1 xx2100002428 Refitting the axis 2 cover Note Action DANGER Make sure that all s...

Страница 769: ... option 3350 540 For robots with protection type Clean Room op tion 3351 1 Check the gasket for the cover before refitting the cover Tip Replace the gasket if needed 3 Tightening torque 1 2 Nm 10 For robots with protection class IP30 option 3350 300 xx2100000943 Refit the screws 4 For robots with protection class IP54 option 3350 540 For robots with protection type Clean Room option 3351 1 xx21000...

Страница 770: ...l repair work wipe the Clean Room robot free from particles with spirit on a lint free cloth Calibration is detailed in section Calibration on page 945 Recalibrate the robot 2 DANGER Make sure all safety requirements are met when performing the first test run 3 770 Product manual IRB 920 3HAC075721 001 Revision C Copyright 2022 ABB All rights reserved 5 Repair 5 7 1 Replacing the axis 1 motor sub ...

Страница 771: ...st spare parts of the IRB 920 via myABB Business Portal www abb com myABB Note Article number Spare part 3HAC076576 001 Motor with pulley A2 3HAC061861 001 Timing belt A2 Required tools and equipment Note Article number Equipment Content is defined in section Standard toolkit on page 996 Standard toolkit Continues on next page Product manual IRB 920 771 3HAC075721 001 Revision C Copyright 2022 ABB...

Страница 772: ...calibration All external cable packages DressPack and tools must be removed from the robot 1 Follow the instructions given in the refer ence calibration routine on the FlexPendant to create reference values If the robot is to be calibrated with refer ence calibration Find previous reference values for the axis or create new reference values These val ues are to be used after the repair proced ure ...

Страница 773: ...t straight If the robot lay down in any situation the grease may come out from gearbox 2 xx2100000930 Jog all axes to zero position 3 DANGER Turn off all electric power supply hydraulic pressure supply air pressure supply to the robot before entering the safeguarded space 4 CAUTION For robots with protection type Clean Room Always cut the paint with a knife and grind the paint edge when disassembl...

Страница 774: ...x2100000932 Remove the screws on the process hub Note For robots with protection class IP54 option 3350 540 For robots with protection type Clean Room op tion 3351 1 Remove the screws on the process hub and take out the gasket Tip Check the gasket and replace it if needed 3 For robots with protection class IP54 option 3350 540 For robots with protection type Clean Room option 3351 1 xx2100000932 I...

Страница 775: ...nt or surface on the robot before replacing parts on page 118 2 xx2100002398 For robots with protection class IP54 option 3350 540 For robots with protection type Clean Room op tion 3351 1 Loose the locking screws 3 xx2100002399 For robots with protection class IP54 option 3350 540 For robots with protection type Clean Room op tion 3351 1 Remove the top cover from the ball screw 4 Continues on nex...

Страница 776: ...he cover of the outer arm Note Action DANGER Make sure that all supplies for electrical power hydraulic pressure and air pressure are turned off 1 CAUTION For robots with protection type Clean Room Always cut the paint with a knife and grind the paint edge when disassembling parts of the robot See Cut the paint or surface on the robot before replacing parts on page 118 2 Continues on next page 776...

Страница 777: ...ots with protection type Clean Room option 3351 1 xx2100002427 Disconnecting the air hoses C1 cabling and C2 cabling if equipped Note Action DANGER Make sure that all supplies for electrical power hydraulic pressure and air pressure are turned off 1 CAUTION For robots with protection type Clean Room Always cut the paint with a knife and grind the paint edge when disassembling parts of the robot Se...

Страница 778: ... the R1 C2 at the same time Tip Take photos of the connector and cable position before disconnecting them to have as a reference when reconnecting 5 Tip The connector clip has to be pressed 1 and pushed forward 2 to separate the R1 C2 for C2 cabling xx1800002943 Continues on next page 778 Product manual IRB 920 3HAC075721 001 Revision C Copyright 2022 ABB All rights reserved 5 Repair 5 7 2 Replaci...

Страница 779: ...l supplies for electrical power hydraulic pressure and air pressure are turned off 1 CAUTION For robots with protection type Clean Room Always cut the paint with a knife and grind the paint edge when disassembling parts of the robot See Cut the paint or surface on the robot before replacing parts on page 118 2 xx2100000934 Disconnect the connectors R2 MP2 R2 FB2 3 Continues on next page Product ma...

Страница 780: ...l supplies for electrical power hydraulic pressure and air pressure are turned off 1 CAUTION For robots with protection type Clean Room Always cut the paint with a knife and grind the paint edge when disassembling parts of the robot See Cut the paint or surface on the robot before replacing parts on page 118 2 xx2100000936 Disconnect the connectors R2 MP3 R2 FB3 3 Continues on next page 780 Produc...

Страница 781: ...Cut the paint or surface on the robot before replacing parts on page 118 Note After all repair work wipe the Clean Room robot free from particles with spirit on a lint free cloth xx2100000938 Disconnect the axis 4 motor connectors R2 MP4 R2 FB4 2 xx2100000939 Snap loose and remove the female head of the connectors from the bracket Note The harness are not visible due to the cleanness requirements ...

Страница 782: ...t the connector R2 PB R2 LAMP 3 xx2100001031 Snap loose and remove the female head of the connector from the bracket Note The harness are not visible due to the cleanness requirements of the illustration They are still ex isting inside the cable ferrule in the actual situ ation 4 Pull out the process hub Note Action DANGER Make sure that all supplies for electrical power hydraulic pressure and air...

Страница 783: ...n 3351 1 xx2100002438 CAUTION Be aware of the cabling that is attached to the cover The cover can not be removed completely until the connectors are disconnected as shown in following steps Removing the cable ferrule and bracket Note Action DANGER Make sure that all supplies for electrical power hydraulic pressure and air pressure are turned off 1 CAUTION For robots with protection type Clean Room...

Страница 784: ...o the cleanness requirements of the illustration They are still ex isting inside the cable ferrule in the actual situ ation 4 xx1800002842 Remove the screws on the cable ferrule and take the cable ferrule out 5 xx1800002849 Removing the gear 2 pulley protection cover Note Action DANGER Make sure that all supplies for electrical power hydraulic pressure and air pressure are turned off 1 Continues o...

Страница 785: ...e that all supplies for electrical power hydraulic pressure and air pressure are turned off 1 CAUTION For robots with protection type Clean Room Always cut the paint with a knife and grind the paint edge when disassembling parts of the robot See Cut the paint or surface on the robot before replacing parts on page 118 2 xx2100001046 Remove the screws and washers 3 Remove the motor Tip Move the inte...

Страница 786: ...ing the axis 2 motor sub assembly Use these procedures to refit the axis 2 motor sub assembly Refitting the flange to the axis 2 motor sub assembly Note Action For robots with protection type Clean Room 1 Clean the joints that have been opened and wipe the parts free from particles with spirit on a lint free See Cut the paint or surface on the robot before replacing parts on page 118 Note After al...

Страница 787: ...s that have been opened and wipe the parts free from particles with spirit on a lint free See Cut the paint or surface on the robot before replacing parts on page 118 Note After all repair work wipe the Clean Room robot free from particles with spirit on a lint free cloth xx2100001048 Refit the axis 2 timing belt onto the pulley on the axis 2 gearbox 2 Continues on next page Product manual IRB 920...

Страница 788: ...to the strap and pull the dynamometer to make the tension falling in the allowed force range Note During the measurement make sure that all inter ferences that may affect the force are removed Pay attention to the force application direction 6 New belt 70 xx2100001125 Tip If the ball screw will interfere with the handheld dynamometer adjust the ball screw manually Tightening torque 2 3 Nm 10 xx210...

Страница 789: ...r surface on the robot before replacing parts on page 118 Note After all repair work wipe the Clean Room robot free from particles with spirit on a lint free cloth Lay the internal harness in a natural state without distortion 2 Screws Hex socket head cap screw M3x8 12 9 Lafre 2C2B FC6 9 2 pcs Refit the cable ferrule and secure it with the screws Tip The air hoses should face the process hub side ...

Страница 790: ...ed well 5 Note The harness are not visible due to the cleanness requirements of the illustration They are still ex isting inside the cable ferrule in the actual situ ation Reconnecting the connector for PB Note Action For robots with protection type Clean Room 1 Clean the joints that have been opened and wipe the parts free from particles with spirit on a lint free See Cut the paint or surface on ...

Страница 791: ... and secure the cabling with cable straps if needed CAUTION Correct cable routing is highly important If the cables are routed incorrectly the cables can be damaged 4 Reconnecting the connectors for axis 4 motor Note Action For robots with protection type Clean Room 1 Clean the joints that have been opened and wipe the parts free from particles with spirit on a lint free See Cut the paint or surfa...

Страница 792: ...te the cabling on the axis 4 motor CAUTION Correct cable routing is highly important If the cables are routed and secured incorrectly the cables can be damaged 3 Reconnecting the connectors for axis 3 motor Note Action For robots with protection type Clean Room 1 Clean the joints that have been opened and wipe the parts free from particles with spirit on a lint free See Cut the paint or surface on...

Страница 793: ...ute the cabling on the axis 3 motor CAUTION Correct cable routing is highly important If the cables are routed and secured incorrectly the cables can be damaged 4 Reconnecting the connectors for axis 2 motor Note Action For robots with protection type Clean Room 1 Clean the joints that have been opened and wipe the parts free from particles with spirit on a lint free See Cut the paint or surface o...

Страница 794: ...outed and secured incorrectly the cables can be damaged 4 Reconnecting the air hoses CP CS cabling and Ethernet cabling if equipped Note Action For robots with protection type Clean Room 1 Clean the joints that have been opened and wipe the parts free from particles with spirit on a lint free See Cut the paint or surface on the robot before replacing parts on page 118 Note After all repair work wi...

Страница 795: ...the same number connect to the same L shaped connector 4 For robots with C2 cabling 5 Reconnect the connector R1 C2 Tip See the number markings on the air hoses for help to find the corresponding air hoses The air hoses with the same number connect to the same L shaped connector Secure the C2 cabling to the C2 bracket with the cable straps 6 xx2100001032 Reconnect the air hoses in a cross pattern ...

Страница 796: ...he bracket Tip Do not secure it with the screws before the cable ferrule installed well 2 Tightening torque 1 2 Nm 10 xx2100000941 Note The harness are not visible due to the cleanness requirements of the illustration They are still ex isting inside the cable ferrule in the actual situ ation Refitting the cover of the outer arm Note Action For robots with protection type Clean Room 1 Clean the joi...

Страница 797: ...ss IP54 option 3350 540 For robots with protection type Clean Room option 3351 1 xx2100002427 For Clean Room IP54 robots Refitting the top cover and the flange with bearing Note Action For robots with protection type Clean Room 1 Clean the joints that have been opened and wipe the parts free from particles with spirit on a lint free See Cut the paint or surface on the robot before replacing parts ...

Страница 798: ...ype Clean Room op tion 3351 1 3 Tightening torque 0 8 Nm 10 xx2100002401 Refit the screws to the flange with bearing xx2100002399 For robots with protection class IP54 option 3350 540 For robots with protection type Clean Room op tion 3351 1 Refit the top cover to the ball screw Tip The top surface of the cover should be flush with the top end of the ball screw 4 Continues on next page 798 Product...

Страница 799: ...h protection type Clean Room 1 Clean the joints that have been opened and wipe the parts free from particles with spirit on a lint free See Cut the paint or surface on the robot before replacing parts on page 118 Note After all repair work wipe the Clean Room robot free from particles with spirit on a lint free cloth Insert the process hub from the outer arm cover 2 Continues on next page Product ...

Страница 800: ...tors are disconnected as shown in following steps For robots with protection class IP54 option 3350 540 For robots with protection type Clean Room option 3351 1 xx2100002438 Concluding procedure Note Action For robots with protection type Clean Room 1 Seal and paint the joints that have been opened See Cut the paint or surface on the robot before replacing parts on page 118 Note After all repair w...

Страница 801: ...re all safety requirements are met when performing the first test run 3 Product manual IRB 920 801 3HAC075721 001 Revision C Copyright 2022 ABB All rights reserved 5 Repair 5 7 2 Replacing the axis 2 motor sub assembly Continued ...

Страница 802: ...st spare parts of the IRB 920 via myABB Business Portal www abb com myABB Note Article number Spare part 3HAC076577 001 Motor with pulley A3 3HAC070464 001 Timing belt A3 Required tools and equipment Note Article number Equipment Content is defined in section Standard toolkit on page 996 Standard toolkit Continues on next page 802 Product manual IRB 920 3HAC075721 001 Revision C Copyright 2022 ABB...

Страница 803: ... fitted on the robot Fine calibration All external cable packages DressPack and tools must be removed from the robot 1 Follow the instructions given in the refer ence calibration routine on the FlexPendant to create reference values If the robot is to be calibrated with refer ence calibration Find previous reference values for the axis or create new reference values These val ues are to be used af...

Страница 804: ...re supply to the robot before entering the safeguarded space 3 CAUTION For robots with protection type Clean Room Always cut the paint with a knife and grind the paint edge when disassembling parts of the robot See Cut the paint or surface on the robot before replacing parts on page 118 4 Removing the process hub screws Note Action DANGER Make sure that all supplies for electrical power hydraulic ...

Страница 805: ...2 Insert the process hub to the outer arm 4 For Clean Room IP54 robots Removing the top cover and the flange with bearing Note Action DANGER Make sure that all supplies for electrical power hydraulic pressure and air pressure are turned off 1 CAUTION For robots with protection type Clean Room Always cut the paint with a knife and grind the paint edge when disassembling parts of the robot See Cut t...

Страница 806: ...all screw 4 xx2100002401 For robots with protection class IP54 option 3350 540 For robots with protection type Clean Room op tion 3351 1 Remove the screws on the flange with bearing 5 xx2100002402 For robots with protection class IP54 option 3350 540 For robots with protection type Clean Room op tion 3351 1 Remove the flange with bearing 6 Continues on next page 806 Product manual IRB 920 3HAC0757...

Страница 807: ... Remove the screws on the cover of the outer arm and remove the cover Note For robots with protection class IP54 option 3350 540 For robots with protection type Clean Room op tion 3351 1 Remove the cover with bellow and housing Note The bellow does not need to be removed separ ately Tip Check the gasket and replace it if needed 3 For robots with protection class IP54 option 3350 540 For robots wit...

Страница 808: ...the connectors R2 MP3 R2 FB3 3 xx2100000937 Snap loose and remove the female head of the connectors from the bracket Note The harness are not visible due to the cleanness requirements of the illustration They are still ex isting inside the cable ferrule in the actual situ ation 4 Removing the axis 3 motor sub assembly Note Action DANGER Make sure that all supplies for electrical power hydraulic pr...

Страница 809: ...the ball screw due the lost of the axis 3 motor may cause danger 3 xx2100001178 Remove the screws 4 xx2100001181 Remove the axis 3 motor sub assembly and the timing belt 5 Separating the flange from axis 3 motor sub assembly Note Action DANGER Make sure that all supplies for electrical power hydraulic pressure and air pressure are turned off 1 Continues on next page Product manual IRB 920 809 3HAC...

Страница 810: ...sub assembly Refitting the flange to the axis 3 motor sub assembly Note Action For robots with protection type Clean Room 1 Clean the joints that have been opened and wipe the parts free from particles with spirit on a lint free See Cut the paint or surface on the robot before replacing parts on page 118 Note After all repair work wipe the Clean Room robot free from particles with spirit on a lint...

Страница 811: ... on a lint free See Cut the paint or surface on the robot before replacing parts on page 118 Note After all repair work wipe the Clean Room robot free from particles with spirit on a lint free cloth xx2100001181 Refit the motor to the outer arm Tip Move the internal harness out of the way 2 Timing belt A3 Refit the timing belt to the pulley on the ball screw and the motor Ensure that the belt runs...

Страница 812: ...e During the measurement make sure that all inter ferences that may affect the force are removed Pay attention to the force application direction 6 Fasten the screws to the recommended tightening torque 7 Used belt 139 Use a sonic tension meter to measure the timing belt tension 8 New belt 110 xx1800002887 If the timing belt tension does not meet the require ment loosen the motor screws and readju...

Страница 813: ...ng measure has been applied to the connectors the connectors may be dam aged if excessive force is used Note The harness are not visible due to the cleanness requirements of the illustration They are still ex isting inside the cable ferrule in the actual situ ation 2 xx2100000936 Reconnect the connectors R2 MP3 R2 FB3 Tip See the number markings on the connectors for help to find the corresponding...

Страница 814: ...For robots with protection class IP54 option 3350 540 For robots with protection type Clean Room op tion 3351 1 Refit the cover with bellow Check the gasket for the outer arm cover Tip Replace the gasket if needed CAUTION The gasket is in the outer arm 2 Tightening torque 2 Nm 10 For robots with protection class IP30 option 3350 300 xx2100000933 Refit the screws 3 For robots with protection class ...

Страница 815: ...x2100002402 For robots with protection class IP54 option 3350 540 For robots with protection type Clean Room op tion 3351 1 Install the flange with bearing to the extension shaft 2 Screws Hex socket head cap screw M2 5x6 12 9 Lafre 2C2B FC6 9 8 pcs For robots with protection class IP54 option 3350 540 For robots with protection type Clean Room op tion 3351 1 3 Tightening torque 0 8 Nm 10 xx2100002...

Страница 816: ...torque 0 4 Nm 10 xx2100002398 Refit the locking screws Securing the process hub to outer arm cover Note Action For robots with protection type Clean Room 1 Clean the joints that have been opened and wipe the parts free from particles with spirit on a lint free See Cut the paint or surface on the robot before replacing parts on page 118 Note After all repair work wipe the Clean Room robot free from...

Страница 817: ...tors are disconnected as shown in following steps For robots with protection class IP54 option 3350 540 For robots with protection type Clean Room option 3351 1 xx2100002438 Concluding procedure Note Action For robots with protection type Clean Room 1 Seal and paint the joints that have been opened See Cut the paint or surface on the robot before replacing parts on page 118 Note After all repair w...

Страница 818: ...re all safety requirements are met when performing the first test run 3 818 Product manual IRB 920 3HAC075721 001 Revision C Copyright 2022 ABB All rights reserved 5 Repair 5 7 3 Replacing the axis 3 motor sub assembly Continued ...

Страница 819: ...myABB Business Portal www abb com myABB Note Article number Spare part 3HAC076578 001 Motor with pulley A4 3HAC070470 001 Timing belt A4 1 3HAC070471 001 Timing belt A4 2 3HAC076579 001 Transmission module Required tools and equipment Note Article number Equipment Content is defined in section Standard toolkit on page 996 Standard toolkit Continues on next page Product manual IRB 920 819 3HAC07572...

Страница 820: ... fitted on the robot Fine calibration All external cable packages DressPack and tools must be removed from the robot 1 Follow the instructions given in the refer ence calibration routine on the FlexPendant to create reference values If the robot is to be calibrated with refer ence calibration Find previous reference values for the axis or create new reference values These val ues are to be used af...

Страница 821: ...t straight If the robot lay down in any situation the grease may come out from gearbox 2 xx2100000930 Jog all axes to zero position 3 DANGER Turn off all electric power supply hydraulic pressure supply air pressure supply to the robot before entering the safeguarded space 4 CAUTION For robots with protection type Clean Room Always cut the paint with a knife and grind the paint edge when disassembl...

Страница 822: ...x2100000932 Remove the screws on the process hub Note For robots with protection class IP54 option 3350 540 For robots with protection type Clean Room op tion 3351 1 Remove the screws on the process hub and take out the gasket Tip Check the gasket and replace it if needed 3 For robots with protection class IP54 option 3350 540 For robots with protection type Clean Room option 3351 1 xx2100000932 I...

Страница 823: ...nt or surface on the robot before replacing parts on page 118 2 xx2100002398 For robots with protection class IP54 option 3350 540 For robots with protection type Clean Room op tion 3351 1 Loose the locking screws 3 xx2100002399 For robots with protection class IP54 option 3350 540 For robots with protection type Clean Room op tion 3351 1 Remove the top cover from the ball screw 4 Continues on nex...

Страница 824: ...he cover of the outer arm Note Action DANGER Make sure that all supplies for electrical power hydraulic pressure and air pressure are turned off 1 CAUTION For robots with protection type Clean Room Always cut the paint with a knife and grind the paint edge when disassembling parts of the robot See Cut the paint or surface on the robot before replacing parts on page 118 2 Continues on next page 824...

Страница 825: ... 540 For robots with protection type Clean Room option 3351 1 xx2100002427 Disconnecting the connectors for axis 4 motor Note Action For robots with protection type Clean Room 1 Clean the joints that have been opened and wipe the parts free from particles with spirit on a lint free See Cut the paint or surface on the robot before replacing parts on page 118 Note After all repair work wipe the Clea...

Страница 826: ...ical power hydraulic pressure and air pressure are turned off 1 CAUTION For robots with protection type Clean Room Always cut the paint with a knife and grind the paint edge when disassembling parts of the robot See Cut the paint or surface on the robot before replacing parts on page 118 2 DANGER Make sure that the ball screw is supported with something The sudden drop of the ball screw due the lo...

Страница 827: ...robots with protection type Clean Room Always cut the paint with a knife and grind the paint edge when disassembling parts of the robot See Cut the paint or surface on the robot before replacing parts on page 118 2 xx2100001082 Removing the screws of the ball screw flange to make enough space for removing the axis 4 second timing belt 3 Continues on next page Product manual IRB 920 827 3HAC075721 ...

Страница 828: ...assembly 3 Take out the transmission module assembly with the axis 4 2 timing belt 4 Removing the axis 4 motor sub assembly Note Action DANGER Make sure that all supplies for electrical power hydraulic pressure and air pressure are turned off 1 CAUTION For robots with protection type Clean Room Always cut the paint with a knife and grind the paint edge when disassembling parts of the robot See Cut...

Страница 829: ... parts free from particles with spirit on a lint free See Cut the paint or surface on the robot before replacing parts on page 118 Note After all repair work wipe the Clean Room robot free from particles with spirit on a lint free cloth Screws Hex socket head cap screw M4x16 12 9 Lafre 2C2B FC6 9 2 pcs Refit the motor to the transmission module Tip Move the internal harness out of the way 2 Washer...

Страница 830: ...t to the pulley 2 3HAC070470 001 xx2100001097 Refit the timing belt to the motor Ensure that the belt runs correctly in the grooves 3 Screws Hex socket head cap screw M4x16 12 9 Lafre 2C2B FC6 9 2 pcs Refit the screws and washers without fully tightened 4 Washers Plain washer machining 4 2x9x2 steel 2 pcs Tightening torque 2 6 Nm 10 xx2100001095 Hang a strap to the motor and hold the transmis sion...

Страница 831: ... belt 245 If the timing belt tension does not meet the require ment loosen the motor screws and readjust 9 Remove the axis 4 belt tension adjustment tool 10 Refitting the transmission module assembly to the outer arm Note Action For robots with protection type Clean Room 1 Clean the joints that have been opened and wipe the parts free from particles with spirit on a lint free See Cut the paint or ...

Страница 832: ...ith protection type Clean Room 1 Clean the joints that have been opened and wipe the parts free from particles with spirit on a lint free See Cut the paint or surface on the robot before replacing parts on page 118 Note After all repair work wipe the Clean Room robot free from particles with spirit on a lint free cloth Timing belt A4 2 Refit the belt to the pulley 2 3HAC070471 001 xx2100001086 Ens...

Страница 833: ... page 118 2 DANGER Make sure that the ball screw is supported with something The sudden drop of the ball screw due the lost of the axis 3 motor may cause danger 3 xx2100001082 Tighten the screws of the ball screw flange 4 Adjusting the axis 4 second timing belt tension Note Action DANGER Make sure that all supplies for electrical power hydraulic pressure and air pressure are turned off 1 Continues...

Страница 834: ...ke the tension falling in the allowed force range Note During the measurement make sure that all inter ferences that may affect the force are removed Pay attention to the force application direction 5 New belt 240 xx2100001127 Tightening torque 2 6 Nm 10 xx2100001087 Fasten the screws on the transmission module to the recommended tightening torque 6 Used belt 202 Use a sonic tension meter to measu...

Страница 835: ... the connectors the connectors may be dam aged if excessive force is used Note The harness are not visible due to the cleanness requirements of the illustration They are still ex isting inside the cable ferrule in the actual situ ation xx2100000938 Reconnect the connectors R2 MP4 R2 FB4 Tip See the number markings on the connectors for help to find the corresponding connector 2 Route the cabling o...

Страница 836: ...lt A3 Refit the timing belt to the pulley on the ball screw and the motor Ensure that the belt runs correctly in the grooves 2 3HAC070464 001 xx2100001079 Screws Hex socket head cap screw M4x16 12 9 Lafre 2C2B FC6 9 4 pcs Secure the screws and washers without fully tightened 3 Washers Plain washer machining 4 2x9x2 steel 4 pcs Tightening torque 2 6 Nm 10 xx2100001078 Hang a strap to the hook on th...

Страница 837: ... tension does not meet the require ment loosen the motor screws and readjust 7 Refitting the cover of the outer arm Note Action For robots with protection type Clean Room 1 Clean the joints that have been opened and wipe the parts free from particles with spirit on a lint free See Cut the paint or surface on the robot before replacing parts on page 118 Note After all repair work wipe the Clean Roo...

Страница 838: ...ss IP54 option 3350 540 For robots with protection type Clean Room option 3351 1 xx2100002427 For Clean Room IP54 robots Refitting the top cover and the flange with bearing Note Action For robots with protection type Clean Room 1 Clean the joints that have been opened and wipe the parts free from particles with spirit on a lint free See Cut the paint or surface on the robot before replacing parts ...

Страница 839: ...ype Clean Room op tion 3351 1 3 Tightening torque 0 8 Nm 10 xx2100002401 Refit the screws to the flange with bearing xx2100002399 For robots with protection class IP54 option 3350 540 For robots with protection type Clean Room op tion 3351 1 Refit the top cover to the ball screw Tip The top surface of the cover should be flush with the top end of the ball screw 4 Continues on next page Product man...

Страница 840: ...h protection type Clean Room 1 Clean the joints that have been opened and wipe the parts free from particles with spirit on a lint free See Cut the paint or surface on the robot before replacing parts on page 118 Note After all repair work wipe the Clean Room robot free from particles with spirit on a lint free cloth Insert the process hub from the outer arm cover 2 Continues on next page 840 Prod...

Страница 841: ...tors are disconnected as shown in following steps For robots with protection class IP54 option 3350 540 For robots with protection type Clean Room option 3351 1 xx2100002438 Concluding procedure Note Action For robots with protection type Clean Room 1 Seal and paint the joints that have been opened See Cut the paint or surface on the robot before replacing parts on page 118 Note After all repair w...

Страница 842: ...re all safety requirements are met when performing the first test run 3 842 Product manual IRB 920 3HAC075721 001 Revision C Copyright 2022 ABB All rights reserved 5 Repair 5 7 4 Replacing the axis 4 motor sub assembly Continued ...

Страница 843: ... latest spare parts of the IRB 920 via myABB Business Portal www abb com myABB Note Article number Spare part Without tube bolt flange screw 3HAC076573 001 Axis 1 gear unit sub assembly Replace if damaged 3HAC079523 001 Pulley cover Replace if damaged 3HAC079524 001 Oil absorbing pad Replace if damaged 3HAB3772 115 O ring Continues on next page Product manual IRB 920 843 3HAC075721 001 Revision C ...

Страница 844: ... use for calibrating the robot Reference calibration External cable packages DressPack and tools can stay fitted on the robot Fine calibration All external cable packages DressPack and tools must be removed from the robot 1 Follow the instructions given in the refer ence calibration routine on the FlexPendant to create reference values If the robot is to be calibrated with refer ence calibration F...

Страница 845: ...ep it straight If the robot lay down in any situation the grease may come out from gearbox 2 xx2100000930 Jog all axes to zero position 3 DANGER Turn off all electric power supply hydraulic pressure supply air pressure supply to the robot before entering the safeguarded space 4 CAUTION For robots with protection type Clean Room Always cut the paint with a knife and grind the paint edge when disass...

Страница 846: ...100000932 Remove the screws on the process hub Note For robots with protection class IP54 option 3350 540 For robots with protection type Clean Room op tion 3351 1 Remove the screws on the process hub and take out the gasket Tip Check the gasket and replace it if needed 3 For robots with protection class IP54 option 3350 540 For robots with protection type Clean Room option 3351 1 xx2100000932 Ins...

Страница 847: ... or surface on the robot before replacing parts on page 118 2 xx2100002398 For robots with protection class IP54 option 3350 540 For robots with protection type Clean Room op tion 3351 1 Loose the locking screws 3 xx2100002399 For robots with protection class IP54 option 3350 540 For robots with protection type Clean Room op tion 3351 1 Remove the top cover from the ball screw 4 Continues on next ...

Страница 848: ... cover of the outer arm Note Action DANGER Make sure that all supplies for electrical power hydraulic pressure and air pressure are turned off 1 CAUTION For robots with protection type Clean Room Always cut the paint with a knife and grind the paint edge when disassembling parts of the robot See Cut the paint or surface on the robot before replacing parts on page 118 2 Continues on next page 848 P...

Страница 849: ...s with protection type Clean Room option 3351 1 xx2100002427 Disconnecting the air hoses C1 cabling and C2 cabling if equipped Note Action DANGER Make sure that all supplies for electrical power hydraulic pressure and air pressure are turned off 1 CAUTION For robots with protection type Clean Room Always cut the paint with a knife and grind the paint edge when disassembling parts of the robot See ...

Страница 850: ...he R1 C2 at the same time Tip Take photos of the connector and cable position before disconnecting them to have as a reference when reconnecting 5 Tip The connector clip has to be pressed 1 and pushed forward 2 to separate the R1 C2 for C2 cabling xx1800002943 Continues on next page 850 Product manual IRB 920 3HAC075721 001 Revision C Copyright 2022 ABB All rights reserved 5 Repair 5 8 1 Replacing...

Страница 851: ...supplies for electrical power hydraulic pressure and air pressure are turned off 1 CAUTION For robots with protection type Clean Room Always cut the paint with a knife and grind the paint edge when disassembling parts of the robot See Cut the paint or surface on the robot before replacing parts on page 118 2 xx2100000934 Disconnect the connectors R2 MP2 R2 FB2 3 Continues on next page Product manu...

Страница 852: ...supplies for electrical power hydraulic pressure and air pressure are turned off 1 CAUTION For robots with protection type Clean Room Always cut the paint with a knife and grind the paint edge when disassembling parts of the robot See Cut the paint or surface on the robot before replacing parts on page 118 2 xx2100000936 Disconnect the connectors R2 MP3 R2 FB3 3 Continues on next page 852 Product ...

Страница 853: ...t the paint or surface on the robot before replacing parts on page 118 Note After all repair work wipe the Clean Room robot free from particles with spirit on a lint free cloth xx2100000938 Disconnect the axis 4 motor connectors R2 MP4 R2 FB4 2 xx2100000939 Snap loose and remove the female head of the connectors from the bracket Note The harness are not visible due to the cleanness requirements of...

Страница 854: ...the connector R2 PB R2 LAMP 3 xx2100001031 Snap loose and remove the female head of the connector from the bracket Note The harness are not visible due to the cleanness requirements of the illustration They are still ex isting inside the cable ferrule in the actual situ ation 4 Pull out the process hub Note Action DANGER Make sure that all supplies for electrical power hydraulic pressure and air p...

Страница 855: ...3351 1 xx2100002438 CAUTION Be aware of the cabling that is attached to the cover The cover can not be removed completely until the connectors are disconnected as shown in following steps Removing the cable ferrule and bracket Note Action DANGER Make sure that all supplies for electrical power hydraulic pressure and air pressure are turned off 1 CAUTION For robots with protection type Clean Room A...

Страница 856: ...e due to the cleanness requirements of the illustration They are still ex isting inside the cable ferrule in the actual situ ation 4 xx1800002842 Remove the screws on the cable ferrule and take the cable ferrule out 5 xx1800002849 Removing the axis 1 cover Note Action DANGER Make sure that all supplies for electrical power hydraulic pressure and air pressure are turned off 1 Continues on next page...

Страница 857: ...ace the gasket if needed 4 For robots with protection class IP54 option 3350 540 For robots with protection type Clean Room option 3351 1 xx2100002428 Removing the axis 2 cover Note Action DANGER Make sure that all supplies for electrical power hydraulic pressure and air pressure are turned off 1 CAUTION For robots with protection type Clean Room Always cut the paint with a knife and grind the pai...

Страница 858: ... For robots with protection type Clean Room option 3351 1 xx2100002451 Removing the SMB cover Note Action DANGER Make sure that all supplies for electrical power hydraulic pressure and air pressure are turned off 1 ELECTROSTATIC DISCHARGE ESD The unit is sensitive to ESD Before handling the unit read the safety information in section The unit is sensitive to ESD on page 49 2 Continues on next page...

Страница 859: ...over with the SMB unit assembly out together Note For robots with protection class IP54 option 3350 540 For robots with protection type Clean Room op tion 3351 1 Check the gasket for the SMB cover Tip Replace the gasket if needed 5 For robots with protection class IP54 option 3350 540 For robots with protection type Clean Room option 3351 1 xx2100002433 Disconnecting the SMB cabling Note Action DA...

Страница 860: ...cable position before disconnecting them to have as a reference when reconnecting 5 Removing the base plate rear plate Note Action DANGER Make sure that all supplies for electrical power hydraulic pressure and air pressure are turned off 1 CAUTION For robots with protection type Clean Room Always cut the paint with a knife and grind the paint edge when disassembling parts of the robot See Cut the ...

Страница 861: ... option 3350 540 For robots with protection type Clean Room op tion 3351 1 Check the gasket for the base plate Tip Replace the gasket if needed 6 For robots with protection class IP54 option 3350 540 For robots with protection type Clean Room option 3351 1 xx2100002434 Continues on next page Product manual IRB 920 861 3HAC075721 001 Revision C Copyright 2022 ABB All rights reserved 5 Repair 5 8 1 ...

Страница 862: ...4 option 3350 540 For robots with protection type Clean Room option 3351 1 xx2100002435 Releasing the base bracket Note Action DANGER Make sure that all supplies for electrical power hydraulic pressure and air pressure are turned off 1 CAUTION For robots with protection type Clean Room Always cut the paint with a knife and grind the paint edge when disassembling parts of the robot See Cut the pain...

Страница 863: ...when disassembling parts of the robot See Cut the paint or surface on the robot before replacing parts on page 118 2 xx2100000947 Remove the three grounding cables from the bracket by unscrew the screws 3 Disconnecting the connectors for axis 1 motor Note Action DANGER Make sure that all supplies for electrical power hydraulic pressure and air pressure are turned off 1 Continues on next page Produ...

Страница 864: ...of the illustration They are still ex isting inside the cable ferrule in the actual situ ation 4 Removing the bracket Note Action DANGER Make sure that all supplies for electrical power hydraulic pressure and air pressure are turned off 1 CAUTION For robots with protection type Clean Room Always cut the paint with a knife and grind the paint edge when disassembling parts of the robot See Cut the p...

Страница 865: ...ure and air pressure are turned off 1 CAUTION For robots with protection type Clean Room Always cut the paint with a knife and grind the paint edge when disassembling parts of the robot See Cut the paint or surface on the robot before replacing parts on page 118 2 Continues on next page Product manual IRB 920 865 3HAC075721 001 Revision C Copyright 2022 ABB All rights reserved 5 Repair 5 8 1 Repla...

Страница 866: ... harness from the axis 1 gearbox position Note Action DANGER Make sure that all supplies for electrical power hydraulic pressure and air pressure are turned off 1 CAUTION For robots with protection type Clean Room Always cut the paint with a knife and grind the paint edge when disassembling parts of the robot See Cut the paint or surface on the robot before replacing parts on page 118 2 Continues ...

Страница 867: ...all supplies for electrical power hydraulic pressure and air pressure are turned off 1 CAUTION For robots with protection type Clean Room Always cut the paint with a knife and grind the paint edge when disassembling parts of the robot See Cut the paint or surface on the robot before replacing parts on page 118 2 Continues on next page Product manual IRB 920 867 3HAC075721 001 Revision C Copyright ...

Страница 868: ...ss IP54 option 3350 540 For robots with protection type Clean Room op tion 3351 1 Check the gasket for the main harness Tip Replace the gasket if needed 4 For robots with protection class IP54 option 3350 540 For robots with protection type Clean Room option 3351 1 xx2100002436 Continues on next page 868 Product manual IRB 920 3HAC075721 001 Revision C Copyright 2022 ABB All rights reserved 5 Repa...

Страница 869: ... For robots with protection class IP54 option 3350 540 Note Remove the bottom plate from the main harness if needed For robots with protection type Clean Room option 3351 1 xx2100002437 xx2200000281 For robots with protection type Clean Room op tion 3351 1 Remove the one way valve by unscrewing it 7 Removing the pulley protection cover Note Action DANGER Make sure that all supplies for electrical ...

Страница 870: ...ote Action DANGER Make sure that all supplies for electrical power hydraulic pressure and air pressure are turned off 1 CAUTION For robots with protection type Clean Room Always cut the paint with a knife and grind the paint edge when disassembling parts of the robot See Cut the paint or surface on the robot before replacing parts on page 118 2 xx2100001038 Remove the screws and washers 3 Remove t...

Страница 871: ...d washers on the base to the axis 1 gear unit 3 Remove the base 4 Removing the axis 1 gear unit sub assembly Note Action DANGER Make sure that all supplies for electrical power hydraulic pressure and air pressure are turned off 1 CAUTION For robots with protection type Clean Room Always cut the paint with a knife and grind the paint edge when disassembling parts of the robot See Cut the paint or s...

Страница 872: ...unit sub assembly Use these procedures to refit the axis 1 gear unit sub assembly Refitting the axis 1 gear unit sub assembly to the inner arm Note Action For robots with protection type Clean Room 1 Clean the joints that have been opened and wipe the parts free from particles with spirit on a lint free See Cut the paint or surface on the robot before replacing parts on page 118 Note After all rep...

Страница 873: ...gear unit and the O ring according to the location pin through the cable Tip Check the O ring and replace it if needed 3 Tip When the gear unit is in the right position you can hear a clear Click Tip Wrap the connectors with the masking tape Continues on next page Product manual IRB 920 873 3HAC075721 001 Revision C Copyright 2022 ABB All rights reserved 5 Repair 5 8 1 Replacing the axis 1 gear un...

Страница 874: ...base Note Action For robots with protection type Clean Room 1 Clean the joints that have been opened and wipe the parts free from particles with spirit on a lint free See Cut the paint or surface on the robot before replacing parts on page 118 Note After all repair work wipe the Clean Room robot free from particles with spirit on a lint free cloth Continues on next page 874 Product manual IRB 920 ...

Страница 875: ...ean Room 1 Clean the joints that have been opened and wipe the parts free from particles with spirit on a lint free See Cut the paint or surface on the robot before replacing parts on page 118 Note After all repair work wipe the Clean Room robot free from particles with spirit on a lint free cloth Put the timing belt into the pulley on the gear 2 Continues on next page Product manual IRB 920 875 3...

Страница 876: ...C070449 001 Hang a strap to the hook on the motor 5 Used belt 51 1 Use a handheld dynamometer hooking to the strap and pull the dynamometer to make the tension falling in the allowed force range Note During the measurement make sure that all inter ferences that may affect the force are removed Pay attention to the force application direction 6 New belt 90 xx2100001043 Continues on next page 876 Pr...

Страница 877: ...sure are turned off 1 CAUTION For robots with protection type Clean Room Always cut the paint with a knife and grind the paint edge when disassembling parts of the robot See Cut the paint or surface on the robot before replacing parts on page 118 2 Screws Hex socket head cap screw M4x10 12 9 Lafre 2C2B FC6 9 8 pcs Refit the pulley protection cover 3 Secure the screws on the pulley protection cover...

Страница 878: ...00000930 Make sure that the robot is at zero position 2 For rear outlet cable version xx2100000955 Insert the internal harness into the inner arm through the sleeve of the axis 1 gearbox from the base Tip Wrap the connectors with the masking tape Tip The air hoses should face the axis 1 motor 3 For undeneath outlet cable version xx2100001206 CAUTION Make sure that no cables or hoses are twisted or...

Страница 879: ...connectors the connectors may be dam aged if excessive force is used Note The harness are not visible due to the cleanness requirements of the illustration They are still ex isting inside the cable ferrule in the actual situ ation 2 xx2100000949 Reconnect the connectors R2 MP1 R2 FB1 Tip See the number markings on the connectors for help to find the corresponding connector 3 Route the cabling behi...

Страница 880: ...00947 Route and secure the cabling with cable straps if needed CAUTION Correct cable routing is highly important If the cables are routed and secured incorrectly the cables can be damaged 3 Refitting the cable ferrule in the base Note Action For robots with protection type Clean Room 1 Clean the joints that have been opened and wipe the parts free from particles with spirit on a lint free See Cut ...

Страница 881: ...nife and grind the paint edge when disassembling parts of the robot See Cut the paint or surface on the robot before replacing parts on page 118 2 Lay the main harness in a natural state without distortion 3 Screws Hex socket head cap screw M3x8 12 9 Lafre 2C2B FC6 9 2 pcs Secure the cable ferrule to the bracket Tip Align all the cable ferrules so that the cable is in a natural bending position to...

Страница 882: ...a lint free See Cut the paint or surface on the robot before replacing parts on page 118 Note After all repair work wipe the Clean Room robot free from particles with spirit on a lint free cloth xx2100000945 Reconnect the connectors SMB P7 SMB J1 SMB J2 Tip Take photos of the connector and cable position before disconnecting them to have as a reference when reconnecting 2 Continues on next page 88...

Страница 883: ...2100000944 Secure the SMB cover to the base with the screws 4 For robots with protection type Clean Room option 3351 1 Screws Stainless Screw Hexagon Socket Head Cap Clean Room 3HAC075438 001 6 pcs Tightening torque 2 6 Nm xx2100002433 For robots with protection class IP54 option 3350 540 Screws Hex socket head cap screw M4x10 12 9 Lafre 2C2B FC6 9 6 pcs Tightening torque 2 6 Nm xx2100002433 Conti...

Страница 884: ...parts on page 118 Note After all repair work wipe the Clean Room robot free from particles with spirit on a lint free cloth xx2200000281 For robots with protection type Clean Room op tion 3351 1 Refit the one way valve by screwing it into the main harness assembly 2 Continues on next page 884 Product manual IRB 920 3HAC075721 001 Revision C Copyright 2022 ABB All rights reserved 5 Repair 5 8 1 Rep...

Страница 885: ... 6 pcs Tightening torque 1 2 Nm 10 xx2100000953 For robots with protection class IP54 option 3350 540 For robots with protection type Clean Room option 3351 1 Screws Hex socket head cap screw M3x30 12 9 Lafre 2C2B FC6 9 6 pcs Tightening torque 1 2 Nm 10 xx2100002436 Continues on next page Product manual IRB 920 885 3HAC075721 001 Revision C Copyright 2022 ABB All rights reserved 5 Repair 5 8 1 Rep...

Страница 886: ...3351 1 Screws Hex socket head cap screw M3x30 12 9 Lafre 2C2B FC6 9 8 pcs Tightening torque 1 2 Nm 10 xx2100002437 Refitting the base plate rear plate Note Action For robots with protection type Clean Room 1 Clean the joints that have been opened and wipe the parts free from particles with spirit on a lint free See Cut the paint or surface on the robot before replacing parts on page 118 Note After...

Страница 887: ...ernal harness cover all moving area of the harness 2 Continues on next page Product manual IRB 920 887 3HAC075721 001 Revision C Copyright 2022 ABB All rights reserved 5 Repair 5 8 1 Replacing the axis 1 gear unit sub assembly Continued ...

Страница 888: ...refit the rear plate to the base Note For robots with protection class IP54 option 3350 540 For robots with protection type Clean Room op tion 3351 1 Check the gasket for the rear plate before refitting the rear plate Tip Replace the gasket if needed For robots with protection class IP54 option 3350 540 For robots with protection type Clean Room option 3351 1 xx2100002434 Secure the base plate rea...

Страница 889: ...ss through the axis 2 gearbox position Note Action For robots with protection type Clean Room 1 Clean the joints that have been opened and wipe the parts free from particles with spirit on a lint free See Cut the paint or surface on the robot before replacing parts on page 118 Note After all repair work wipe the Clean Room robot free from particles with spirit on a lint free cloth Continues on nex...

Страница 890: ...tion For robots with protection type Clean Room 1 Clean the joints that have been opened and wipe the parts free from particles with spirit on a lint free See Cut the paint or surface on the robot before replacing parts on page 118 Note After all repair work wipe the Clean Room robot free from particles with spirit on a lint free cloth Lay the internal harness in a natural state without distortion...

Страница 891: ...errules so that the cable is in a natural bending position to avoid twisting 4 Tightening torque 1 2 Nm 10 xx2100000940 Note The harness are not visible due to the cleanness requirements of the illustration They are still ex isting inside the cable ferrule in the actual situ ation Refit the bracket without securing Tip Do not secure it with the screws before the cable ferrule installed well 5 Note...

Страница 892: ...he connectors the connectors may be dam aged if excessive force is used Note The harness are not visible due to the cleanness requirements of the illustration They are still ex isting inside the cable ferrule in the actual situ ation xx2100000938 Reconnect the connectors R2 MP4 R2 FB4 Tip See the number markings on the connectors for help to find the corresponding connector 2 Route the cabling on ...

Страница 893: ...e connectors the connectors may be dam aged if excessive force is used Note The harness are not visible due to the cleanness requirements of the illustration They are still ex isting inside the cable ferrule in the actual situ ation 2 xx2100000936 Reconnect the connectors R2 MP3 R2 FB3 Tip See the number markings on the connectors for help to find the corresponding connector 3 Route the cabling on...

Страница 894: ...connectors the connectors may be dam aged if excessive force is used Note The harness are not visible due to the cleanness requirements of the illustration They are still ex isting inside the cable ferrule in the actual situ ation 2 xx2100000934 Reconnect the connectors R2 MP2 R2 FB2 Tip See the number markings on the connectors for help to find the corresponding connector 3 Route the cabling behi...

Страница 895: ...tors the connectors may be dam aged if excessive force is used Note The harness are not visible due to the cleanness requirements of the illustration They are still ex isting inside the cable ferrule in the actual situ ation 2 xx2100001030 Reconnect the connector R2 PB R2 LAMP Tip See the number markings on the connectors for help to find the corresponding connector 3 Route and secure the cabling ...

Страница 896: ...g parts on page 118 Note After all repair work wipe the Clean Room robot free from particles with spirit on a lint free cloth Route the air hoses on the process hub behind the bracket CAUTION Correct cable routing is highly important If the cables are routed and secured incorrectly the cables can be damaged 2 Continues on next page 896 Product manual IRB 920 3HAC075721 001 Revision C Copyright 202...

Страница 897: ...e same number connect to the same L shaped connector 4 For robots with C2 cabling 5 Reconnect the connector R1 C2 Tip See the number markings on the air hoses for help to find the corresponding air hoses The air hoses with the same number connect to the same L shaped connector Secure the C2 cabling to the C2 bracket with the cable straps 6 xx2100001032 Reconnect the air hoses in a cross pattern wi...

Страница 898: ... bracket Tip Do not secure it with the screws before the cable ferrule installed well 2 Tightening torque 1 2 Nm 10 xx2100000941 Note The harness are not visible due to the cleanness requirements of the illustration They are still ex isting inside the cable ferrule in the actual situ ation Refitting the cover of the outer arm Note Action For robots with protection type Clean Room 1 Clean the joint...

Страница 899: ... IP54 option 3350 540 For robots with protection type Clean Room option 3351 1 xx2100002427 For Clean Room IP54 robots Refitting the top cover and the flange with bearing Note Action For robots with protection type Clean Room 1 Clean the joints that have been opened and wipe the parts free from particles with spirit on a lint free See Cut the paint or surface on the robot before replacing parts on...

Страница 900: ...e Clean Room op tion 3351 1 3 Tightening torque 0 8 Nm 10 xx2100002401 Refit the screws to the flange with bearing xx2100002399 For robots with protection class IP54 option 3350 540 For robots with protection type Clean Room op tion 3351 1 Refit the top cover to the ball screw Tip The top surface of the cover should be flush with the top end of the ball screw 4 Continues on next page 900 Product m...

Страница 901: ...protection type Clean Room 1 Clean the joints that have been opened and wipe the parts free from particles with spirit on a lint free See Cut the paint or surface on the robot before replacing parts on page 118 Note After all repair work wipe the Clean Room robot free from particles with spirit on a lint free cloth Insert the process hub from the outer arm cover 2 Continues on next page Product ma...

Страница 902: ...e connectors are disconnected as shown in following steps For robots with protection class IP54 option 3350 540 For robots with protection type Clean Room option 3351 1 xx2100002438 Refitting the axis 1 cover Note Action For robots with protection type Clean Room 1 Clean the joints that have been opened and wipe the parts free from particles with spirit on a lint free See Cut the paint or surface ...

Страница 903: ...T 6 0 65 Screw Hex socket head cap flange screw M5x16 12 9 Lafre 2C2B FC6 9 PrO COat111 16 pcs Tightening torque 5 4 Nm 3 For robots with protection class IP30 option 3350 300 xx2100000942 Refit the screws 3 For robots with protection class IP54 option 3350 540 For robots with protection type Clean Room option 3351 1 xx2100002428 Refitting the axis 2 cover Note Action DANGER Make sure that all sup...

Страница 904: ...ption 3350 540 For robots with protection type Clean Room op tion 3351 1 Check the gasket for the cover before refitting the cover Tip Replace the gasket if needed 3 Tightening torque 1 2 Nm 10 For robots with protection class IP30 option 3350 300 xx2100000943 Refit the screws 4 For robots with protection class IP54 option 3350 540 For robots with protection type Clean Room option 3351 1 xx2100002...

Страница 905: ...repair work wipe the Clean Room robot free from particles with spirit on a lint free cloth Calibration is detailed in section Calibration on page 945 Recalibrate the robot 2 DANGER Make sure all safety requirements are met when performing the first test run 3 Product manual IRB 920 905 3HAC075721 001 Revision C Copyright 2022 ABB All rights reserved 5 Repair 5 8 1 Replacing the axis 1 gear unit su...

Страница 906: ...yABB Business Portal www abb com myABB Note Article number Spare part 3HAC076574 001 Axis 2 gear unit sub assembly Replace if damaged 3HAC070461 001 Pulley protection cover Replace if damaged 3HAC061327 017 O ring Required tools and equipment Note Article number Equipment Content is defined in section Standard toolkit on page 996 Standard toolkit Continues on next page 906 Product manual IRB 920 3...

Страница 907: ...libration All external cable packages DressPack and tools must be removed from the robot 1 Follow the instructions given in the refer ence calibration routine on the FlexPendant to create reference values If the robot is to be calibrated with refer ence calibration Find previous reference values for the axis or create new reference values These val ues are to be used after the repair proced ure is...

Страница 908: ...ep it straight If the robot lay down in any situation the grease may come out from gearbox 2 xx2100000930 Jog all axes to zero position 3 DANGER Turn off all electric power supply hydraulic pressure supply air pressure supply to the robot before entering the safeguarded space 4 CAUTION For robots with protection type Clean Room Always cut the paint with a knife and grind the paint edge when disass...

Страница 909: ...100000932 Remove the screws on the process hub Note For robots with protection class IP54 option 3350 540 For robots with protection type Clean Room op tion 3351 1 Remove the screws on the process hub and take out the gasket Tip Check the gasket and replace it if needed 3 For robots with protection class IP54 option 3350 540 For robots with protection type Clean Room option 3351 1 xx2100000932 Ins...

Страница 910: ... or surface on the robot before replacing parts on page 118 2 xx2100002398 For robots with protection class IP54 option 3350 540 For robots with protection type Clean Room op tion 3351 1 Loose the locking screws 3 xx2100002399 For robots with protection class IP54 option 3350 540 For robots with protection type Clean Room op tion 3351 1 Remove the top cover from the ball screw 4 Continues on next ...

Страница 911: ... cover of the outer arm Note Action DANGER Make sure that all supplies for electrical power hydraulic pressure and air pressure are turned off 1 CAUTION For robots with protection type Clean Room Always cut the paint with a knife and grind the paint edge when disassembling parts of the robot See Cut the paint or surface on the robot before replacing parts on page 118 2 Continues on next page Produ...

Страница 912: ...s with protection type Clean Room option 3351 1 xx2100002427 Disconnecting the air hoses C1 cabling and C2 cabling if equipped Note Action DANGER Make sure that all supplies for electrical power hydraulic pressure and air pressure are turned off 1 CAUTION For robots with protection type Clean Room Always cut the paint with a knife and grind the paint edge when disassembling parts of the robot See ...

Страница 913: ...he R1 C2 at the same time Tip Take photos of the connector and cable position before disconnecting them to have as a reference when reconnecting 5 Tip The connector clip has to be pressed 1 and pushed forward 2 to separate the R1 C2 for C2 cabling xx1800002943 Continues on next page Product manual IRB 920 913 3HAC075721 001 Revision C Copyright 2022 ABB All rights reserved 5 Repair 5 8 2 Replacing...

Страница 914: ...supplies for electrical power hydraulic pressure and air pressure are turned off 1 CAUTION For robots with protection type Clean Room Always cut the paint with a knife and grind the paint edge when disassembling parts of the robot See Cut the paint or surface on the robot before replacing parts on page 118 2 xx2100000934 Disconnect the connectors R2 MP2 R2 FB2 3 Continues on next page 914 Product ...

Страница 915: ...supplies for electrical power hydraulic pressure and air pressure are turned off 1 CAUTION For robots with protection type Clean Room Always cut the paint with a knife and grind the paint edge when disassembling parts of the robot See Cut the paint or surface on the robot before replacing parts on page 118 2 xx2100000936 Disconnect the connectors R2 MP3 R2 FB3 3 Continues on next page Product manu...

Страница 916: ...t the paint or surface on the robot before replacing parts on page 118 Note After all repair work wipe the Clean Room robot free from particles with spirit on a lint free cloth xx2100000938 Disconnect the axis 4 motor connectors R2 MP4 R2 FB4 2 xx2100000939 Snap loose and remove the female head of the connectors from the bracket Note The harness are not visible due to the cleanness requirements of...

Страница 917: ...the connector R2 PB R2 LAMP 3 xx2100001031 Snap loose and remove the female head of the connector from the bracket Note The harness are not visible due to the cleanness requirements of the illustration They are still ex isting inside the cable ferrule in the actual situ ation 4 Pull out the process hub Note Action DANGER Make sure that all supplies for electrical power hydraulic pressure and air p...

Страница 918: ...3351 1 xx2100002438 CAUTION Be aware of the cabling that is attached to the cover The cover can not be removed completely until the connectors are disconnected as shown in following steps Removing the cable ferrule and bracket Note Action DANGER Make sure that all supplies for electrical power hydraulic pressure and air pressure are turned off 1 CAUTION For robots with protection type Clean Room A...

Страница 919: ...the cleanness requirements of the illustration They are still ex isting inside the cable ferrule in the actual situ ation 4 xx1800002842 Remove the screws on the cable ferrule and take the cable ferrule out 5 xx1800002849 Removing the gear 2 pulley protection cover Note Action DANGER Make sure that all supplies for electrical power hydraulic pressure and air pressure are turned off 1 Continues on ...

Страница 920: ...that all supplies for electrical power hydraulic pressure and air pressure are turned off 1 CAUTION For robots with protection type Clean Room Always cut the paint with a knife and grind the paint edge when disassembling parts of the robot See Cut the paint or surface on the robot before replacing parts on page 118 2 xx2100001046 Remove the screws and washers 3 Remove the motor Tip Move the intern...

Страница 921: ...ove the timing belt from the outer arm 3 Removing the axis 2 cover Note Action DANGER Make sure that all supplies for electrical power hydraulic pressure and air pressure are turned off 1 CAUTION For robots with protection type Clean Room Always cut the paint with a knife and grind the paint edge when disassembling parts of the robot See Cut the paint or surface on the robot before replacing parts...

Страница 922: ...ing parts on page 118 2 Pull out the internal harness from the axis 2 gear unit 3 Removing the outer arm assembly Note Action DANGER Make sure that all supplies for electrical power hydraulic pressure and air pressure are turned off 1 CAUTION For robots with protection type Clean Room Always cut the paint with a knife and grind the paint edge when disassembling parts of the robot See Cut the paint...

Страница 923: ...lic pressure and air pressure are turned off 1 CAUTION For robots with protection type Clean Room Always cut the paint with a knife and grind the paint edge when disassembling parts of the robot See Cut the paint or surface on the robot before replacing parts on page 118 2 Continues on next page Product manual IRB 920 923 3HAC075721 001 Revision C Copyright 2022 ABB All rights reserved 5 Repair 5 ...

Страница 924: ...unit sub assembly Use these procedures to refit the axis 2 gear unit sub assembly Refitting the axis 2 gear unit sub assembly to the inner arm Note Action For robots with protection type Clean Room 1 Clean the joints that have been opened and wipe the parts free from particles with spirit on a lint free See Cut the paint or surface on the robot before replacing parts on page 118 Note After all rep...

Страница 925: ... tion 3351 1 Refit the gear unit and the O ring according to the location pin Tip Check the O ring and replace it if needed 3 Tip When the gear unit is in the right position you can hear a clear Click Continues on next page Product manual IRB 920 925 3HAC075721 001 Revision C Copyright 2022 ABB All rights reserved 5 Repair 5 8 2 Replacing the axis 2 gear unit sub assembly Continued ...

Страница 926: ...fitting the outer arm to the inner arm Note Action For robots with protection type Clean Room 1 Clean the joints that have been opened and wipe the parts free from particles with spirit on a lint free See Cut the paint or surface on the robot before replacing parts on page 118 Note After all repair work wipe the Clean Room robot free from particles with spirit on a lint free cloth Continues on nex...

Страница 927: ...s Spring washer 9x4 3x1 Steel 14 pcs Tightening torque 3 5 Nm 10 xx2100001049 Refitting the axis 2 motor sub assembly Note Action For robots with protection type Clean Room 1 Clean the joints that have been opened and wipe the parts free from particles with spirit on a lint free See Cut the paint or surface on the robot before replacing parts on page 118 Note After all repair work wipe the Clean R...

Страница 928: ...61861 001 Hang a strap to the motor 5 Used belt 64 7 Use a handheld dynamometer hooking to the strap and pull the dynamometer to make the tension falling in the allowed force range Note During the measurement make sure that all inter ferences that may affect the force are removed Pay attention to the force application direction 6 New belt 70 xx2100001125 Tip If the ball screw will interfere with t...

Страница 929: ...ghtening torque 0 8 Nm xx2100001047 Inserting the main harness through the axis 2 gearbox position Note Action For robots with protection type Clean Room 1 Clean the joints that have been opened and wipe the parts free from particles with spirit on a lint free See Cut the paint or surface on the robot before replacing parts on page 118 Note After all repair work wipe the Clean Room robot free from...

Страница 930: ...tion For robots with protection type Clean Room 1 Clean the joints that have been opened and wipe the parts free from particles with spirit on a lint free See Cut the paint or surface on the robot before replacing parts on page 118 Note After all repair work wipe the Clean Room robot free from particles with spirit on a lint free cloth Lay the internal harness in a natural state without distortion...

Страница 931: ...errules so that the cable is in a natural bending position to avoid twisting 4 Tightening torque 1 2 Nm 10 xx2100000940 Note The harness are not visible due to the cleanness requirements of the illustration They are still ex isting inside the cable ferrule in the actual situ ation Refit the bracket without securing Tip Do not secure it with the screws before the cable ferrule installed well 5 Note...

Страница 932: ...he connectors the connectors may be dam aged if excessive force is used Note The harness are not visible due to the cleanness requirements of the illustration They are still ex isting inside the cable ferrule in the actual situ ation xx2100000938 Reconnect the connectors R2 MP4 R2 FB4 Tip See the number markings on the connectors for help to find the corresponding connector 2 Route the cabling on ...

Страница 933: ...e connectors the connectors may be dam aged if excessive force is used Note The harness are not visible due to the cleanness requirements of the illustration They are still ex isting inside the cable ferrule in the actual situ ation 2 xx2100000936 Reconnect the connectors R2 MP3 R2 FB3 Tip See the number markings on the connectors for help to find the corresponding connector 3 Route the cabling on...

Страница 934: ...connectors the connectors may be dam aged if excessive force is used Note The harness are not visible due to the cleanness requirements of the illustration They are still ex isting inside the cable ferrule in the actual situ ation 2 xx2100000934 Reconnect the connectors R2 MP2 R2 FB2 Tip See the number markings on the connectors for help to find the corresponding connector 3 Route the cabling behi...

Страница 935: ...tors the connectors may be dam aged if excessive force is used Note The harness are not visible due to the cleanness requirements of the illustration They are still ex isting inside the cable ferrule in the actual situ ation 2 xx2100001030 Reconnect the connector R2 PB R2 LAMP Tip See the number markings on the connectors for help to find the corresponding connector 3 Route and secure the cabling ...

Страница 936: ...g parts on page 118 Note After all repair work wipe the Clean Room robot free from particles with spirit on a lint free cloth Route the air hoses on the process hub behind the bracket CAUTION Correct cable routing is highly important If the cables are routed and secured incorrectly the cables can be damaged 2 Continues on next page 936 Product manual IRB 920 3HAC075721 001 Revision C Copyright 202...

Страница 937: ...e same number connect to the same L shaped connector 4 For robots with C2 cabling 5 Reconnect the connector R1 C2 Tip See the number markings on the air hoses for help to find the corresponding air hoses The air hoses with the same number connect to the same L shaped connector Secure the C2 cabling to the C2 bracket with the cable straps 6 xx2100001032 Reconnect the air hoses in a cross pattern wi...

Страница 938: ... bracket Tip Do not secure it with the screws before the cable ferrule installed well 2 Tightening torque 1 2 Nm 10 xx2100000941 Note The harness are not visible due to the cleanness requirements of the illustration They are still ex isting inside the cable ferrule in the actual situ ation Refitting the cover of the outer arm Note Action For robots with protection type Clean Room 1 Clean the joint...

Страница 939: ... IP54 option 3350 540 For robots with protection type Clean Room option 3351 1 xx2100002427 For Clean Room IP54 robots Refitting the top cover and the flange with bearing Note Action For robots with protection type Clean Room 1 Clean the joints that have been opened and wipe the parts free from particles with spirit on a lint free See Cut the paint or surface on the robot before replacing parts on...

Страница 940: ...e Clean Room op tion 3351 1 3 Tightening torque 0 8 Nm 10 xx2100002401 Refit the screws to the flange with bearing xx2100002399 For robots with protection class IP54 option 3350 540 For robots with protection type Clean Room op tion 3351 1 Refit the top cover to the ball screw Tip The top surface of the cover should be flush with the top end of the ball screw 4 Continues on next page 940 Product m...

Страница 941: ...protection type Clean Room 1 Clean the joints that have been opened and wipe the parts free from particles with spirit on a lint free See Cut the paint or surface on the robot before replacing parts on page 118 Note After all repair work wipe the Clean Room robot free from particles with spirit on a lint free cloth Insert the process hub from the outer arm cover 2 Continues on next page Product ma...

Страница 942: ...connectors are disconnected as shown in following steps For robots with protection class IP54 option 3350 540 For robots with protection type Clean Room option 3351 1 xx2100002438 Refitting the axis 2 cover Note Action DANGER Make sure that all supplies for electrical power hydraulic pressure and air pressure are turned off 1 CAUTION For robots with protection type Clean Room Always cut the paint ...

Страница 943: ...ss IP54 option 3350 540 For robots with protection type Clean Room option 3351 1 xx2100002451 Concluding procedure Note Action For robots with protection type Clean Room 1 Seal and paint the joints that have been opened See Cut the paint or surface on the robot before replacing parts on page 118 Note After all repair work wipe the Clean Room robot free from particles with spirit on a lint free clo...

Страница 944: ... all safety requirements are met when performing the first test run 3 944 Product manual IRB 920 3HAC075721 001 Revision C Copyright 2022 ABB All rights reserved 5 Repair 5 8 2 Replacing the axis 2 gear unit sub assembly Continued ...

Страница 945: ...A generic term for all calibration methods that aim to move the robot to calibration position Standard calibration A calibration routine that generates a new zero posi tion of the robot Fine calibration A calibration routine that in the first step generates a reference to current zero position of the robot The same calibration routine can later on be used to re calibrate the robot back to the same...

Страница 946: ...n printed on its name plate To regain 100 Absolute accuracy perform ance the robot must be recalibrated for abso lute accuracy after repair or maintenance that affects the mechanical structure i Only axes 1 and 2 can be calibrated using Axis Calibration method Brief description of calibration methods Axis Calibration method Axis Calibration is a standard calibration method for calibration of IRB 9...

Страница 947: ...es after replacements that do not include taking apart the robot structure standard calibration is sufficient The Absolute Accuracy option varies according to the robot mounting position This is printed on the robot name plate for each robot The robot must be in the correct mounting position when it is recalibrated for absolute accuracy References Article numbers for the calibration tools are list...

Страница 948: ... counter memory is lost If the revolution counter memory is lost the counters must be updated See Updating revolution counters on page 952 This will occur when The battery is discharged A resolver error occurs The signal between a resolver and measurement board is interrupted A robot axis is moved with the control system disconnected The revolution counters must also be updated after the robot and...

Страница 949: ...xes Introduction This section shows the position of the synchronization marks and the synchronization position for each axis Continues on next page Product manual IRB 920 949 3HAC075721 001 Revision C Copyright 2022 ABB All rights reserved 6 Calibration 6 2 1 Synchronization marks and synchronization position for axes ...

Страница 950: ... marks IRB 920 1 2 4 3 xx2000001163 950 Product manual IRB 920 3HAC075721 001 Revision C Copyright 2022 ABB All rights reserved 6 Calibration 6 2 1 Synchronization marks and synchronization position for axes Continued ...

Страница 951: ...h in gears and so on Positive directions are shown in the graphic below Calibration service routines will handle the calibration movements automatically and these might be different from the positive directions shown below Manual movement directions xx2100000931 Product manual IRB 920 951 3HAC075721 001 Revision C Copyright 2022 ABB All rights reserved 6 Calibration 6 2 2 Calibration movement dire...

Страница 952: ...ite i e axis 4 needs to be in synchronization position to update axis 3 IRB 920 Coupled axes x Axis 4 3 Step 1 Manually running the manipulator to the synchronization position Use this procedure to manually run the manipulator to the synchronization position Note Action Select axis by axis motion mode 1 See Synchronization marks and synchron ization position for axes on page 949 Jog the manipulato...

Страница 953: ... power up before the revolution counters are updated If axis 4 is rotated one or more turns from its calibration position before updating the revolution counter the correct calibration position will be lost due to non integer gear ratio This will further affect the calibration position of axis 3 Continues on next page Product manual IRB 920 953 3HAC075721 001 Revision C Copyright 2022 ABB All righ...

Страница 954: ... aligned with the notch on the outer arm cover and the convex edge surface on the mechanical stopper is aligned with the lowest surface on the outer arm cover Continues on next page 954 Product manual IRB 920 3HAC075721 001 Revision C Copyright 2022 ABB All rights reserved 6 Calibration 6 3 1 Updating revolution counters on OmniCore robots Continued ...

Страница 955: ...ach axis is shown as well as calibration method used during last field calibration Tap Calibration Methods on the right pane 5 The calibration options are displayed Tap Revolution Counters 6 In the Selection column select the axes for which revolution counters need to be up dated 7 Tap Update A dialog box is displayed warning that the updating operation cannot be undone Tap Update to proceed with ...

Страница 956: ...movable calibration tool is inserted by the operator into a calibration bushing on the axis chosen for calibration according to instructions on the FlexPendant WARNING Calibrating the robot with Axis Calibration requires special calibration tools from ABB Using other pins in the calibration bushings may cause severe damage to the robot and or personnel WARNING The calibration tool must be fully in...

Страница 957: ... the current state of the robot is stored and not the state when the robot left the ABB factory The reference value will be named according to tool name date etc Follow the instructions given in the reference calibration routine on the FlexPendant to create reference values When reference calibration is performed the robot is restored to the status given by the reference values Update revolution c...

Страница 958: ...ogged to other position than 0 degrees Axis must be put in position 0 degrees 0 System containing SafeMove SafeMove will lose its synchronization to the controller if a new calibration is done New calibration values have to be downloaded to SafeMove and a new SafeMove calibration has to be done Make sure that the user rights admit to change the safety settings and to synchronize SafeMove 958 Produ...

Страница 959: ...hings may cause severe damage to the robot and or personnel Note Article number Equipment etc Delivered as a set of calibration tools Required if Axis Calibration is the valid calib ration method for the robot 3HAC055412 001 Calibration toolbox Ax is Calibration Examining the calibration tool Check prior to usage Before using the calibration tool make sure that the tube insert the plastic protecti...

Страница 960: ...ed solution Note Action It is possible to use any RFID solution with the correct dimensions ABB has verifed function on some suppliers fulfilling the requirements of NFC compatible devices 13 56 Mhz according to ISO 14443 or ISO 15693 Note The maximum dimensions on the RFID chip must not exceed Ø7 9 mm x 8 0 mm Ø5 9 mm x 8 0 mm or Ø3 9 mm x 8 0 mm depending on calibra tion tool size 1 There is a c...

Страница 961: ... pin the axis is equipped with two bushings instead for installation of two calibration tools when calibration is carried out This is shown in the figure xx2000001164 Spare parts When calibration is not being performed a protective cover and an o ring should always be installed on the fixed calibration pin as well as a protective plug included a sealing in the bushing Replace damaged parts with ne...

Страница 962: ...erform the calibration procedure and what to do at each step is given on the FlexPendant You will be guided through the calibration procedure step by step Use the following list to learn about the calibration procedure before running the RobotWare program on the FlexPendant It gives you a brief overview of the calibration procedure After the calibration method has been started on the FlexPendant t...

Страница 963: ...g the calibration procedure Use this procedure to start the Axis Calibration routine on the FlexPendant Note Action Tap the calibration icon and enter the calibration main page 1 All mechanical units connected to the system are shown with their calibration status 2 Tap the mechanical unit in question Note For RobotWare 7 the mechanical unit page is displayed only if there is more than one mechan i...

Страница 964: ...calibration tool is in contact the robot axis needs to be jogged in order to release the calibration tool Jogging the axis in wrong direction will cause the calibration tool to break Directions of axis movement is shown in Calibration movement directions for all axes on page 951 Axis Calibration with SafeMove option To be able to run Axis Calibration SafeMove needs to be unsynchronized The Axis Ca...

Страница 965: ...rotection cover and plug set 3HAC059487 001 xx1500000952 Reinstall the protective plug and sealing in the bushing on each axis directly after the axis has been calibrated Ensure that the sealing is not damaged Replace the plug and the sealing with new spare part if missing or damaged 3 Protection cover and plug set 3HAC059487 001 Product manual IRB 920 965 3HAC075721 001 Revision C Copyright 2022 ...

Страница 966: ...s suitable and accurate so it can be used to validate the repair Use a position where a deviation in axis calibration gives a big deviation in positioning Note Check the position after each repair in one axis 6 Use Reference calibration to save reference values for all axes that is to be replaced Make sure that the values are saved in RobotStudio or FTP program The files are located in Active syst...

Страница 967: ...s The requirement to do manual tuning is that there is a known accurate position that worked accurately before the repair step 5 see Brief introduction to Reference Calibration on page 966 Product manual IRB 920 967 3HAC075721 001 Revision C Copyright 2022 ABB All rights reserved 6 Calibration 6 4 5 Reference calibration Continued ...

Страница 968: ...alibration position Calibration position The table below specifies the axis positions Axis 2 mm 3 0 4 968 Product manual IRB 920 3HAC075721 001 Revision C Copyright 2022 ABB All rights reserved 6 Calibration 6 5 1 Calibration position ...

Страница 969: ... 1 and 2 of the IRB 920 are calibrated using the Axis Calibration method See Calibrating with Axis Calibration method on page 956 Product manual IRB 920 969 3HAC075721 001 Revision C Copyright 2022 ABB All rights reserved 6 Calibration 6 5 2 Calibrating axis 1 and axis 2 ...

Страница 970: ...he figure shows axis 3 and axis 4 in calibration position The axes 3 and 4 are calibrated together 4 3 xx2000001165 Continues on next page 970 Product manual IRB 920 3HAC075721 001 Revision C Copyright 2022 ABB All rights reserved 6 Calibration 6 5 3 Calibrating axis 3 and axis 4 ...

Страница 971: ...calibration position Note Action DANGER Turn off all electric power supply hydraulic pressure supply air pressure supply to the robot before entering the robot working area 1 Remove the fitted extra equipment on the robot if it may cause a collision to the arm when push the ball screw to the calibration position 2 Turn on the electric power to the robot 3 DANGER When releasing the holding brakes t...

Страница 972: ...kes again 7 Performing the fine calibration procedure Note Action On the start screen tap Calibrate 1 Select Calibration from the menu 2 The Mechanical Units page displays a list of available mechanical units Note This step is required only if you are not already in the Mechanical Unit page when you open Cal ibrate Note The Mechanical Unit page is displayed only if there are more than one mechanic...

Страница 973: ...y displaying a dialog box announcing that the calibration pro cess has started The axis is calibrated and the system returns to the list of available mechanical units Tap OK 9 The fine calibration process is complete Checking and finalizing the calibration Note Action DANGER Always remember to remove the calibration tools from the robot before jogging axes to zero position during calibration 1 Rel...

Страница 974: ...ibration Note Action Write down the new system parameters on a new label and stick on top of the calibration label on the robot 1 Note The calibration status of axis 3 may be changed to Not updated after a system reinstallation or warm restart In this case update the revolution counters for axis 3 and axis 4 axis 4 is coupled with axis 3 See Updating revolution counters on page 952 974 Product man...

Страница 975: ...position program twice Do not change the position of the robot axes after running the program 1 This is detailed in section Synchronization marks and synchronization position for axes on page 949 Adjust the synchronization marks when the calibration is done if necessary 2 Write down the values on a new label and stick it on top of the calibration label 3 The label is located on the base Product ma...

Страница 976: ...orrectly If they do not update the revolu tion counters 6 Using the jogging window Use this procedure to jog the robot to the synchronization position of all axes Note Action Tap Jog 1 From the Mechanical unit list select a mechanical unit 2 From the Motion mode section select an axis set that need to be jogged 3 For example to jog axis 2 select the axis set Axis 1 3 Follow the screen instruction ...

Страница 977: ...ed and correctly fitted 2 Replace one thing at a time 3 Do not replace units randomly 4 Make sure that there are no loose screws turnings or other unexpected parts remaining after work has been performed 5 When the work is completed verify that the safety functions are working as intended Keep a track of history Make a historical fault log to keep track of problems over time Consult those working ...

Страница 978: ...tibilities between hardware and software options and their configuration The robot recently had a software upgrade Check connections software versions The robot has recently been moved from one site to another an already working robot 978 Product manual IRB 920 3HAC075721 001 Revision C Copyright 2022 ABB All rights reserved 7 Troubleshooting 7 1 Introduction to troubleshooting Continued ...

Страница 979: ...n CAUTION Allow hot parts to cool down 1 If the oil spill is small this step is sufficient Wipe off the oil or grease see Cleaning the IRB 920 on page 108 2 Monitor the robot over time to see if new oil or grease occurs Check the gearbox oil level 3 Robots performing certain ex tremely heavy duty work cycles may be fitted with vented oil plugs These are not fitted to normal duty robots but can be ...

Страница 980: ...symptom can be caused by Worn bearings Contaminations have entered the bearing grooves Loss of lubrication in bearings Loss of lubrication in ball screw Loose heat sinks fans or metal parts If the noise is emitted from a gearbox the following can also apply Overheating Recommended actions The following actions are recommended Information Action CAUTION Allow hot parts to cool down 1 Verify that th...

Страница 981: ...sed from your local ABB representat ive Too hot gearbox oil may be caused by Incorrect oil quality or level The robot work cycle runs a specific axis too hard Investigate whether it is possible to program small cooling periods into the application Overpressure created inside gearbox 8 Product manual IRB 920 981 3HAC075721 001 Revision C Copyright 2022 ABB All rights reserved 7 Troubleshooting 7 3 ...

Страница 982: ...rounding equipment Possible causes The symptom can be caused by Faulty brake Faulty power supply to the brake Recommended actions The following actions are recommended Information Action Determine which motor s causes the robot to collapse 1 See the circuit diagram Check the brake power supply to the col lapsing motor during the Motors OFF state 2 If found faulty the motor must be replaced as a co...

Страница 983: ...y torque or external forces for the joint can also be too high Recommended actions The following actions are recommended Information Action CAUTION Allow hot parts to cool down 1 Verify that the values for payload and arm load are set correctly 2 Verify that the value for ambient temperature setting in the controller is consistent with the actual operating temperature environment 3 The ways could ...

Страница 984: ...This page is intentionally left blank ...

Страница 985: ... of the country in which the robot and the control unit are installed If the robot or the control unit is partially or completely disposed of the various parts must be grouped together according to their nature which is all iron together and all plastic together and disposed of accordingly These parts must also be disposed of in accordance with the current legislation of the country in which the r...

Страница 986: ... table specifies some of the materials in the product and their respective use throughout the product Dispose components properly according to local regulations to prevent health or environmental hazards Example application Material Structural parts motors covers Aluminium Battery unit Batteries Lithium Cables motors Copper Cover Magnesium Brakes motors Neodymium Drive units ball screw spline unit...

Страница 987: ...zed person contractor in accordance with local regulations Do not dispose of oil and grease near lakes ponds ditches down drains or onto soil Incineration must be carried out under controlled conditions in accordance with local regulations Also note that Spills can form a film on water surfaces causing damage to organisms Oxygen transfer could also be impaired Spillage can penetrate the soil causi...

Страница 988: ...a battery is exposed to heat for example from a blow torch it will explode Always remove all oil grease in gearboxes If exposed to heat for example from a blow torch the oil grease will catch fire When motors are removed from the robot the robot will collapse if it is not properly supported before the motor is removed 988 Product manual IRB 920 3HAC075721 001 Revision C Copyright 2022 ABB All righ...

Страница 989: ...chapter includes general information complementing the more specific information in the different procedures in the manual Product manual IRB 920 989 3HAC075721 001 Revision C Copyright 2022 ABB All rights reserved 9 Reference information 9 1 Introduction ...

Страница 990: ...tandards Immunity standard for industrial environments IEC 61000 6 2 Electromagnetic compatibility EMC Part 6 4 Generic standards Emission standard for industrial environments IEC 61000 6 4 Safety of machinery Safety related parts of control systems Part 1 General principles for design normative reference from ISO 10218 1 ISO 13849 1 2006 Protection of electronic devices from electrostatic phenome...

Страница 991: ...ty 39 37 in 3 28 ft 1 m Length 2 21 lb 1 kg Weight 0 035 ounces 1 g Weight 14 5 psi 100 kPa 1 bar Pressure 0 225 lbf 1 N Force 0 738 lbf ft 1 Nm Moment 0 264 US gal 1 L Volume Product manual IRB 920 991 3HAC075721 001 Revision C Copyright 2022 ABB All rights reserved 9 Reference information 9 3 Unit conversion ...

Страница 992: ...en handling screws treated with Gleitmo protective gloves of nitrile rubber type should be used Generally screws are lubricated with Gleitmo 603 mixed with Geomet 500 or Geomet 702 in proportion 1 3 Geomet thickness varies according to screw dimensions refer to the following Geomet thickness Lubricant Dimension 3 5 μm Gleitmo 603 Geomet 500 M6 M20 any length except M20x60 3 5 μm Gleitmo 603 Geomet...

Страница 993: ...ecified value is 10 Oil lubricated screws with slotted or cross recess head screws The following table specifies the recommended standard tightening torque for oil lubricated screws with slotted or cross recess head screws Note A special torque specified in the repair maintenance or installation procedure overrides the standard torque Oil lubricated screws with allen head screws The following tabl...

Страница 994: ...Molycote 1000 Gleitmo 603 or equivalent with allen head screws Note A special torque specified in the repair maintenance or installation procedure overrides the standard torque Tightening torque Nm Class 12 9 lubricated i Tightening torque Nm Class 10 9 lubricated i Dimension 35 28 M8 70 55 M10 120 96 M12 300 235 M16 550 460 M20 950 790 M24 i Lubricated with Molycote 1000 Gleitmo 603 or equivalent...

Страница 995: ...accessory when handling components with a weight exceeding 22 kg A wide range of lifting accessories and devices are available for each manipulator model Example Following is an example of a weight specification in a procedure Note Action CAUTION The arm weighs 25 kg All lifting accessories used must be sized accord ingly Product manual IRB 920 995 3HAC075721 001 Revision C Copyright 2022 ABB All ...

Страница 996: ...d defined in the following table This way the tools required are the sum of the standard toolkit and any tools listed in the instruction Contents standard toolkit Rem Tool Qty Socket head cap 2 17 mm 1 Torque wrench 0 3 45 Nm 1 For securing robot to foundation Torque wrench 56 Nm 5 6 Nm 1 Small screwdriver 1 T handle with ball head 1 Small cutting plier 1 Plastic mallet 1 996 Product manual IRB 92...

Страница 997: ... toolkit on page 996 and of special tools listed directly in the instructions and also gathered in this section Special tools Note If the replacing procedure is not listed in the table below only standard tools are needed for the procedure Continues on next page Product manual IRB 920 997 3HAC075721 001 Revision C Copyright 2022 ABB All rights reserved 9 Reference information 9 7 Special tools ...

Страница 998: ...tion is the valid calibration method for the robot Sonic tension meter Used for measuring the timing belt tension Dynamometer Used for measuring the timing belt tension IRB 920 special tool 3HAC077249 001 Used to install the ball screw nut Special tool for L2 Continues on next page 998 Product manual IRB 920 3HAC075721 001 Revision C Copyright 2022 ABB All rights reserved 9 Reference information 9...

Страница 999: ...piece of lifting accessories is not detailed in the activity procedure but in the instruction delivered with each piece of lifting accessories The instructions delivered with the lifting accessories should be stored for later reference Product manual IRB 920 999 3HAC075721 001 Revision C Copyright 2022 ABB All rights reserved 9 Reference information 9 8 Lifting accessories and lifting instructions...

Страница 1000: ...This page is intentionally left blank ...

Страница 1001: ...l but delivered as a separate document for registered users on myABB Business Portal www abb com myABB Tip All documents can be found via myABB Business Portal www abb com myABB Product manual IRB 920 1001 3HAC075721 001 Revision C Copyright 2022 ABB All rights reserved 10 Spare parts 10 1 Spare part lists and illustrations ...

Страница 1002: ...This page is intentionally left blank ...

Страница 1003: ...obot 30 connecting the robot and controller cabling 78 copper disposal 986 D damaged bearings 980 dimensions robot 72 direction of axes 951 E environmental information 986 equipment robot 72 ESD damage elimination 49 sensitive equipment 49 expected life 90 extra equipment 72 F faulty brake 982 fire extinguishing 27 fitting equipment 72 FlexPendant jogging to calibration position 976 MoveAbsJ instr...

Страница 1004: ...ating 952 risk of burns 30 robot dimensions 72 equipment fitting 72 labels 19 lifting 57 protection class 40 protection types 40 symbols 19 technical data 38 working range 44 robot cabling inspecting 93 rubber disposal 986 S safety brake testing 34 ESD 49 fire extinguishing 27 release robot axes 33 signals 17 signals in manual 17 symbols 17 symbols on robot 19 test run 56 safety devices 27 safety ...

Страница 1005: ...ifying calibration 975 W weight 38 robot 60 65 working range 47 robot 44 X xx replacing 53 175 193 203 398 436 454 488 601 626 Z zero position checking 976 Product manual IRB 920 1005 3HAC075721 001 Revision C Copyright 2022 ABB All rights reserved Index ...

Страница 1006: ......

Страница 1007: ......

Страница 1008: ...ne 47 22 87 2000 ABB Engineering Shanghai Ltd Robotics Discrete Automation No 4528 Kangxin Highway PuDong District SHANGHAI 201319 China Telephone 86 21 6105 6666 ABB Inc Robotics Discrete Automation 1250 Brown Road Auburn Hills MI 48326 USA Telephone 1 248 391 9000 abb com robotics 3HAC075721 001 Rev C en Copyright 2022 ABB All rights reserved Specifications subject to change without notice ...

Отзывы: