Publication No. HRMCR11 Rev. B.0
About This Manual 21
Or use a tenninal on COM
I
.
Provide Port Settings - Bits, Data Bits, Parity and
Stop Bit.
Initial Power-On Operation
62
-
0
1
02
-
After some seconds
,
the CR! I system BIOS banner will display on the and the
red LED on the front will get non-blinking green
.
If
you have seen all the messages to this point, you can be confident that the
board is mnning properly and is ready to be installed and setup for your
application
.
Entering the BIOS SETUP
To enter SETUP during the initial power-on sequence press the DELETE key
during the boot up
s
e
q
u
e
nce
.
Check the on-screen m
e
s
sages
.
This tells you
when you can enter the BIOS by pressing the DELETE key. If this message
does not appear on your monitor, just press the DELETE key when you hear
short beeps indicating the keyboard was initia
l
ized
.
You may also press the
DELETE key when the LED goes from blinking orange to blinking green
.
Consult the
'
AMI BIOS for CR! I, CPI I
,
CTI I User's and Progranuner's
Manual' for further information on how to change settings and co
n
figuration
s
.
If
the board does not perform as described above, some damage may have
occurred in shipping or the board is not installed or setup properly. Contact
Abaco Technical Support as described in
'
About This Manual
'
for further
instmctions.
If
the BIOS setup is wrong in the CMOS RAM
,
then please press the
'0/INS'key or the 'INS' key during boot up
.
This clears the CMOS settings and
stops the video output at an early stage
.
There you can also see the BIOS ID
line
:
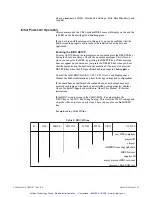
Examp
l
e
/
coding of the ID line:
Table 4: BIOS ID line
004199 -
001
0
1111
-
071595 -
E7501 -
VRII
Y2KC-
O
-
year 2000 compliant
project.ID
chip set
AMIBIOS core copyright date
BIOS featur
es
supplier ID
ma
j
or & minor BIOS revisions
processor
,
flash ROM size
Artisan Technology Group - Quality Instrumentation ... Guaranteed | (888) 88-SOURCE | www.artisantg.com


