background image


However, there is no guarantee that interference will not occur in a 
particular installation. If this equipment does cause harmful interference to 
radio or television reception, which can be determined by turning the 
equipment off and on, the user is encouraged to try to correct the 
interference by one or more of the following measures: 


  Reorient or relocate the receiving antenna. 

  Increase the separation between the equipment and receiver. 

  Connect the equipment into an outlet on a circuit different from that 

to which the receiver is connected. 

  Consult the dealer or an experienced radio/TV technician for help. 

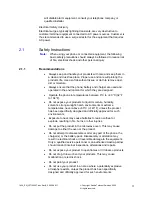
This equipment complies with FCC radiation exposure limits set forth for an 
uncontrolled environment. This device complies with FCC SAR limit of 1.6 
W/kg. The maximum SAR value measured when used at the ear is 0.043 
W/kg. The phone has also been tested when worn on the body using belt 
clip, maximum measured SAR value in this configuration is 0.037 W/kg. 
This device must not be collocated with any other antenna or transmitter: 


ƒ

  This equipment complies with Part 68 of the FCC rules and the 

requirements adopted by the ACTA. On the rear side, underneath the 
battery of this equipment is a label that contains, among other 
information, a product identifier in the format US: AAAEQ##TXXXX. If 
requested, this number must be provided to the telephone company. 

ƒ

  REN is N/A as this product is intended to be connected behind a FCC 

Part 68 compliant PBX system. It is not intended for direct connection 
to telephone network.  

ƒ

  If this equipment cause harm to the telephone network, the telephone 

company will notify you in advance that temporary discontinuance of 
service maybe required. But if advance notice isn't practical, the 
telephone company will notify the customer as soon as possible. Also, 
you will be advised of your right to file a complaint with the FCC if you 
believe it is necessary. 

ƒ

  The telephone company may make changes in its facilities, 

equipment, operations or procedures that could affect the operation of 
the equipment. If this happens, the telephone company will provide 
advance notice in order for you to make necessary modifications to 
maintain uninterrupted service. 

ƒ

  If trouble is experienced with this equipment, for repair or warranty 

information, please contact your Aastra business partner 

http://www.aastra.com

. This equipment is not intended to be repaired 

by the customer (user). If the equipment is causing harm to the 
telephone network, the telephone company may request  that you 
disconnect the equipment until the problem is resolved. 

ƒ

  Connection to party line service is subject to state tariffs. Contact the 

state public utility commission, public service commission or 
corporation commission for information. 

ƒ

  If your home has specially wired alarm equipment connected to the 

telephone line, ensure the installation of this equipment that it does 
not disable your  alarm equipment. If you have questions about what 

1424_EN_LZT103087.doc Rev B2  2009-09-11 

©

 Copyright Aastra Telecom Sweden, 2009. 

All rights reserved. 


10


Содержание DT390

Страница 1: ...1424_EN_LZT103087 doc Rev B2 2009 09 11 DT390 Cordless Phone for MX ONE User Guide...

Страница 2: ...tten permission of the copyright owner The contents of this document are subject to revision without notice due to continued progress in methodology design and manufacturing Aastra shall have no liabi...

Страница 3: ...Accessories 18 3 2 Display Information 20 3 2 1 System Connection Messages 21 3 2 2 Display Icons 22 3 2 3 Menu Tabs 23 3 3 Menu Structure 24 3 3 1 Calls Tab 24 3 3 2 Contacts Tab 26 3 3 3 Settings T...

Страница 4: ...thorization Code common 41 7 9 2 Individual authorization code 42 8 Contacts 43 8 1 Dialing one of your Contacts 43 8 2 Dialing a Contact from Company Phonebook 44 8 3 Dialing a Contact from the Centr...

Страница 5: ...dering Search Profiles 59 10 5 Setting form for search profiles 60 11 Messages 62 11 1 Manual Message Waiting MMW 62 11 1 1 Answering Manual Message Waiting 62 11 1 2 Order Manual Message Waiting to A...

Страница 6: ...anual Key Lock 75 15 4 3 Activating Phone Lock 75 15 4 4 Deactivating Phone Lock 76 15 4 5 Changing PIN Code 76 15 5 Changing Owner ID 76 15 6 Changing Answering Method 77 15 6 1 Normal Answering 77 1...

Страница 7: ...DT390 Cordless Phone for MX ONE 1424_EN_LZT103087 doc Rev B2 2009 09 11 Copyright Aastra Telecom Sweden 2009 All rights reserved VII 17 Troubleshooting 86 18 Glossary 88 19 Telephony Function Codes 90...

Страница 8: ......

Страница 9: ...HANTABILITY AND FITNESS FOR A PARTICULAR PURPOSE Aastra shall not be liable for errors contained herein nor for incidental or consequential damages in connection with the furnishing performance or use...

Страница 10: ...behind a FCC Part 68 compliant PBX system It is not intended for direct connection to telephone network If this equipment cause harm to the telephone network the telephone company will notify you in...

Страница 11: ...iquid moisture humidity solvents strong sunlight harsh environments or extreme temperatures never above 60 C 140 F unless the product has been specifically designed and officially approved for such en...

Страница 12: ...re the AC power supply is positioned so that it will not be subjected to damage or stress To reduce risk of electrical shock unplug the chargers from any power source before attempting to clean or mov...

Страница 13: ...ly the recommended charging equipment Improper charging can cause heat damage or even high pressure rupture Observe proper charging polarity Do not allow the metal contacts on the battery to touch ano...

Страница 14: ...oximately 25 C 77 F for best performance The battery continues to discharge a minimal portion of its power even if the product is switched off or the battery is removed Dispose the battery in accordan...

Страница 15: ...arge and connect the battery see Section 16 Note Place the phone in the charger and charge it for at least one hour before using it the first time 2 4 IPEI and IPDI Code Your phone has a unique Intern...

Страница 16: ...tside this area you will lose contact with the phone network The signal strength icon will disappear and No System will be displayed 2 6 2 Out of Range When you leave the system coverage area you will...

Страница 17: ...k key To connect calls and as a short cut to the Call list 3 Voice mail access To listen to a voice mail 4 Key lock and upper and lower case Combined key lock and Upper Lower Case 5 Space To add space...

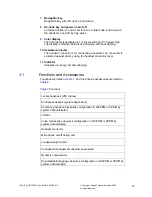
Страница 18: ...incoming call and charging 3 1 Functions and Accessories Functions are listed in Table 1 and the phone s accessories are listed in Table 2 Table 1 Functions Local phonebook 250 entries Central phoneb...

Страница 19: ...the front bottom of the phone Clips There are two different belt clip options to the cordless phone a standard clip and a security swivel clip Use the clip to attach the phone to a belt or similar See...

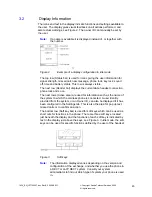
Страница 20: ...h the cordless phone is connected A user identity provided from the system or an Owner ID can also be displayed if it has been configured in the Settings tab This is also the area for pop up text miss...

Страница 21: ...ed only the number of the answering position is displayed Incoming call o Normal incoming call If available the number or the name of the caller is displayed o Diverted call A diversion indicator befo...

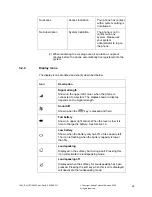
Страница 22: ...em The staples shown in display depends on the signal strength Sound off Shown when the key is pressed and held Full battery Shown in upper right corner When the level is low it is time to charge the...

Страница 23: ...Missed call Added in front of missed calls in the call list Locked entry Indicates a company phonebook contact Names and numbers in the company phonebook cannot be edited or deleted by the user WinPDM...

Страница 24: ...accessed through the menus Press Menu to get access to the phone and network functions To confirm a selection press Select Press Back to return to previous menu and press to exit the menu structure W...

Страница 25: ...ote Call services functions are system dependent Parameters are set up in the CPDM or WinPDM Contact your system administrator 1424_EN_LZT103087 doc Rev B2 2009 09 11 Copyright Aastra Telecom Sweden 2...

Страница 26: ...3 2 Contacts Tab An overview of the Contacts tab is presented in Figure 6 Figure 6 Contacts structure 1424_EN_LZT103087 doc Rev B2 2009 09 11 Copyright Aastra Telecom Sweden 2009 All rights reserved 2...

Страница 27: ...3 Settings Tab An overview of the Connection tab is presented in Figure 7 Figure 7 Settings structure 1424_EN_LZT103087 doc Rev B2 2009 09 11 Copyright Aastra Telecom Sweden 2009 All rights reserved...

Страница 28: ...d during a call from the soft key More Note The displayed options when pressing More are programmed from the WinPDM or CPDM Please contact your system administrator Figure 8 In call 1424_EN_LZT103087...

Страница 29: ...ndicator Indicator Description Orange fixed phone placed in charger Battery is being charged Green fixed phone placed in charger Battery is fully charged Red fixed Battery warning Green flashing Incom...

Страница 30: ...ed Red flashing 100 ms on 800 ms off Error indication during Easy Replacement Put back old portable in charger Charger returns to Not logged in to CPDM or WinPDM mode when portable is removed Red flas...

Страница 31: ...one do the following 1 Press and hold After a few seconds a control question is displayed to confirm switch off 2 Press Yes The phone is switched off Note Pressing while in a menu will return you to i...

Страница 32: ...l external or callback call Both ring signal and vibrator can be disabled The calling party s number name or both is displayed The name of the caller will be shown if the calling party s phone number...

Страница 33: ...press 6 6 1 2 Mute ring signal temporarily If the phone rings at an inconvenient moment 1 Press to suppress the ringing All alert signals including the vibrator will silence for this specific call 2 P...

Страница 34: ...phone Parallel ringing can be temporarily disabled by the phone user using the function Internal Follow me For more information on Internal Follow me see Section 10 2 6 2 1 Disabling Parallel Ringing...

Страница 35: ...ee Section 8 7 1 Calling There are some different ways of initiating a call described in the following sections The 25 last received dialed or missed calls are stored in a call list The numbers can be...

Страница 36: ...started to do this a Press More b Select Edit number and press Select c Change the number and press or Call 7 1 1 1 Delete a number from the Call list To delete a number from the call list when your...

Страница 37: ...nt your name and number to be displayed to the person you are calling do the following 1 Press 42 and press Wait for a dial tone 2 Dial the number Instead of your name and number the display on the ca...

Страница 38: ...for callback you can make and receive calls as usual 4 Press to answer when you are called back The system calls the extension Note If Callback is not programmed and shown in when pressing More you c...

Страница 39: ...ollowing 1 Press 37 Note North America press 6 2 Press Wait for the call timer to start in the display 3 Press to finish the procedure 7 6 4 Activate Call Waiting If you urgently wish to contact a bus...

Страница 40: ...Sweden press 8 2 Before the intrusion is executed a warning tone is sent to the parties in the ongoing call A three party call is established and a warning tone is heard 7 7 Bypass If Bypass is allow...

Страница 41: ...en leaving the phone For a single call do the following 1 Press 72 Note Germany The Netherlands and Sweden press 75 North America press 6 2 Enter Authorization Code and press and Wait for a verificati...

Страница 42: ...s to finish the procedure To make calls with your authority level when your phone is locked do the following 1 Press 75 Note Germany The Netherlands and Sweden press 72 2 Enter Authorization Code and...

Страница 43: ...00 entries can be downloaded to the phone The names and numbers in this phonebook cannot be edited or deleted by the user The phonebook lists all names in alphabetical order The names from the local p...

Страница 44: ...h field and press Call 8 3 Dialing a Contact from the Central Phonebook Optional In the central phonebook it is possible to search by name number or the last result When the search is finished it is p...

Страница 45: ...and number as a contact Do the following 1 Press More 2 Select Add to cont and press Select 3 Press Save 8 3 4 View last Search Result To view the last search result 1 Press Menu select Contacts and p...

Страница 46: ...e contact list are shown in alphabetical order To search in the list enter the first character s in the name or step with the navigation key 3 Select the contact to change and press Edit 4 Select what...

Страница 47: ...right to move the cursor within the chosen row Press to switch between upper and lower case in text input mode Press 0 to enter a space Press Clear to correct a wrong entry Note In number input mode...

Страница 48: ...ference 9 1 Volume Control Adjust the speech volume with the up and down arrows on The phone stores and keeps the new volume level 9 2 Loudspeaking Handsfree To activate loudspeaking during a call do...

Страница 49: ...elect a Select Call contact and press Select to select a contact in the local or company phonebook OR b Select Central Phonebook and press Select to search for a contact in the central phonebook Note...

Страница 50: ...the following 1 Press More during the call 2 Select End call and press Select The third party is disconnected and you are connected to the first party Note If End call is not shown when pressing More...

Страница 51: ...re select Transf to new and press Select 2 Dial the third party and press Note If Transf to new does not show when pressing More you can also do the following to transfer a call Press R dial the third...

Страница 52: ...something other than R this function is disabled 2 Press to finish the call Wait for the system to recall the first party Terminate the ongoing call and answer the waiting call 1 Press to finish the o...

Страница 53: ...9 11 Dialing During a Connected Call When calling interactive teleservices for example phone banks you need to use Dual Tone Multi Frequency DTMF signals If the phone exchange is not already programm...

Страница 54: ...nal or External and press Select 5 Select Activate and press Select 6 Enter the number to divert your calls to and press OK Wait for the call timer to start in the display 7 Press to finish the proced...

Страница 55: ...do the following 1 Press 21 and press Wait for the call timer to start in the display Note U K press 2 2 Press to finish the procedure 10 2 3 Remote Programming of Follow me An internal extension can...

Страница 56: ...for outgoing calls Also see Sextion 10 1 and Section 15 8 2 10 3 1 Order To order external follow me do the following 1 Press 22 Note North America press 23 2 Dial the digit or digits to get a line a...

Страница 57: ...w to do this is described in the following sections an operator can also assist you It is also possible to use any of the Personal Assistant applications if available Contact your system administrator...

Страница 58: ...extension number and press 7 Press the search profile digit 1 5 8 Press and press Note When another party is included in the activated profile for example a colleague or an operator always remember t...

Страница 59: ...on a desk or cordless phone and 20 25 seconds for a mobile phone If an answering machine a fax or other answering device is used as an early answering position it might interrupt the searching Disconn...

Страница 60: ...______________ Department _________________________________ Phone Number ______________________________ Account ___________________________________ Table 7 Profile 1 ____________ Search order Type of...

Страница 61: ...1 2 3 1 Can be for example Desk Cordless Mobile External Voice Mail Operator and so on Table 10 Profile 4 ____________ Search order Type of phone or Answering position 1 Phone number Ring time seconds...

Страница 62: ...ible to initiate a message waiting indication on that extension if this function is allowed If there is a message waiting you will hear a special dial tone and you will see a dialog window in the disp...

Страница 63: ...rch profiles When you enter your mailbox you will hear recorded instructions on how to handle listening recording storing and deleting messages and how to change your security code A new voice mail is...

Страница 64: ...phone with WinPDM or CPDM Please contact your system administrator 12 1 Order To order absence information do the following 1 Press Menu select Calls and press Select 2 Select Call services and press...

Страница 65: ...mation for another extension if you are authorized to do this and if your own extension is the answering position of the other extension To order absence information for another extension do the follo...

Страница 66: ...s function do the following Press 8 and press to answer Note Finland and Sweden press 0 North America press 59 Note One call pick up group can serve as an alternative to another group Calls to the alt...

Страница 67: ...ess and Wait for the call timer to start in the display 3 Press to finish the procedure 13 3 2 Reentering the Group To reenter the hunting group do the following 1 Press 21 and press Wait for the call...

Страница 68: ...get an external line and the external number 14 1 1 Ongoing External Call When the Account Code function is used to charge a call it is also possible to connect an ongoing external call to an Account...

Страница 69: ...ng calls to the operator are transferred to one specific extension Answer the call in the normal way Individual Night Service Selected external calls to the operator are transferred to one specific ex...

Страница 70: ...ness calls Business call will be charged your office extension number or an account number You will just be charged for the call to the office The external phone must be of push button type provided w...

Страница 71: ...ngs and time and date settings 15 1 Sound and Alert Sound and alert settings include volume ring signals vibrating alert and key sound 15 1 1 Adjusting Ringer Volume To adjust ringer volume do the fol...

Страница 72: ...the Key Sound This means that each time a key is used the phone gives a small sound To enable this function do the following 1 Press Menu select Settings and press Select 2 Mark Sounds Alerts and pre...

Страница 73: ...2 Select Display and press Select 3 Select Contrast and press Select 4 Step with or to adjust the contrast 5 Press OK to save the setting 15 3 Time and Date You can set time and date by following the...

Страница 74: ...hone Locks There are two different phone locks Key lock to prevent keys to be pressed by mistake Phone lock to protect the phone from unauthorized use When the phone lock function is activated a PIN c...

Страница 75: ...is locked 15 4 2 1 Unlock To unlock the keypad do the following 1 Press 2 Press Yes 15 4 3 Activating Phone Lock Activating Phone lock will protect the phone from unauthorized use When this function...

Страница 76: ...t 5 Select Off and press Select 6 Enter PIN code press OK 7 Press Back to save the setting 15 4 5 Changing PIN Code To change PIN code do the following 1 Press Menu select Settings and press Settings...

Страница 77: ...t Settings and press Select 2 Select Answering and press Select 3 Select Answering key and press Select 4 Select Any key and press Select 5 Press Back to save the setting 15 6 2 Automatic Answer Note...

Страница 78: ...and press Select 3 Mark Answer behaviour and press Select 4 Mark Loudspeaking and press Change to activate 5 Mark Automatically and press Change to activate the automatic mode 6 Press Back to save th...

Страница 79: ...is possible to set the systems in priority by moving them up or down in the list 1 Press Menu select Settings and press Select 2 Select Priority and press Select 3 Change the priority if needed by mar...

Страница 80: ...confirm Note It is not possible to delete a protected subscription with this procedure Contact your system administrator if you need to delete a protected subscription 15 8 2 Rename System It is poss...

Страница 81: ...save the setting 16 Installation In this section battery and chargers and other equipments for the cordless phone are described 16 1 Charging the Battery The battery requires charging when in the dis...

Страница 82: ...move the battery 2 Disconnect the battery cable and replace with a new battery 3 Make sure the battery cable cannot be trapped while closing the battery lid 4 Close the lid Figure 10 Battery replaceme...

Страница 83: ...a PC through the USB or one of the network connectors see Figure 13 When connecting the charger with a PC through one of the network connectors the charger acts as a switch which makes it possible to...

Страница 84: ...ing Security Swivel Clip Attach the security swivel clip as described in Figure 20 Figure 15 Click on the clip 16 8 WinPDM and CPDM Software and parameters in your DT390 cordless phone can be upgraded...

Страница 85: ...or USB connectors at the back of the charger see Figure 16 Figure 16 Desk PDM Charger connected to a PC through USB Connector For more information on WinPDM and CPDM or upgrading of your cordless phon...

Страница 86: ...is defective Long press on the Mute key or increase volume or contact system administrator Signal strength icon off Out of system coverage area or the phone is defective Enter coverage area or contac...

Страница 87: ...reset option is available or fault does not resolve the phone needs repair Note Display message only shown in English SERVICE NEEDED Invalid IPDI Easy replacement procedure not followed correctly or f...

Страница 88: ...rability with other manufacturers products Desk charger A charger for the DT390 cordless phone Desk PDM charger A charger that also can be connected to WinPDM or CPDM for configuration and upgrading o...

Страница 89: ...ne switching system for example MX ONE PIN Personal Identification Number for security Rack PDM charger A rack charger that also can be connected to WinPDM or CPDM for configuration and upgrading of t...

Страница 90: ...For H 323 phones dedicated keys are used Service codes are entered as code for activation and code for deactivation Table 14 Standard and alternative codes Functions Codes Suffix digits only for SIP...

Страница 91: ...1 Account Code Predialing 61 Finland 71 Norway 71 Authorization Code Predialing 72 Germany 75 The Netherlands 75 North America 6 Sweden 75 Lock Unlock Common Authorization Code 73 North America 71 Ch...

Отзывы: