background image

6 AastraLink RP System Administrator Guide

Response Point Administrator

Response Point Administrator

The Microsoft Response Point Administrator software connects the components of your AastraLink RP Solution, and allows 
you to configure phones and users individually. Administrator should be installed on one computer connected to your 
LAN, for use by the system administrator.

Installing Administrator

The Microsoft Response Point Administrator software will auto-detect the system components you have already powered 
up and connected to the LAN.

Follow these steps to install the Administrator software and other Microsoft Response Point components on the System 
Administrator’s computer.

Note: Administrator should only be installed on one computer connected to the same LAN as all phones, base units and 
gateways.

1   Locate the AastraLink RP system CD which was supplied with the AastraLink RP 500 base unit. 

2   Insert the CD into the CD drive of your computer. 

Note: If the Autoinstall window does not open, use the Windows Explorer to view the CD directory. Double-click Install.exe 
to start the installation process.

3   Click Install AastraLink RP software.

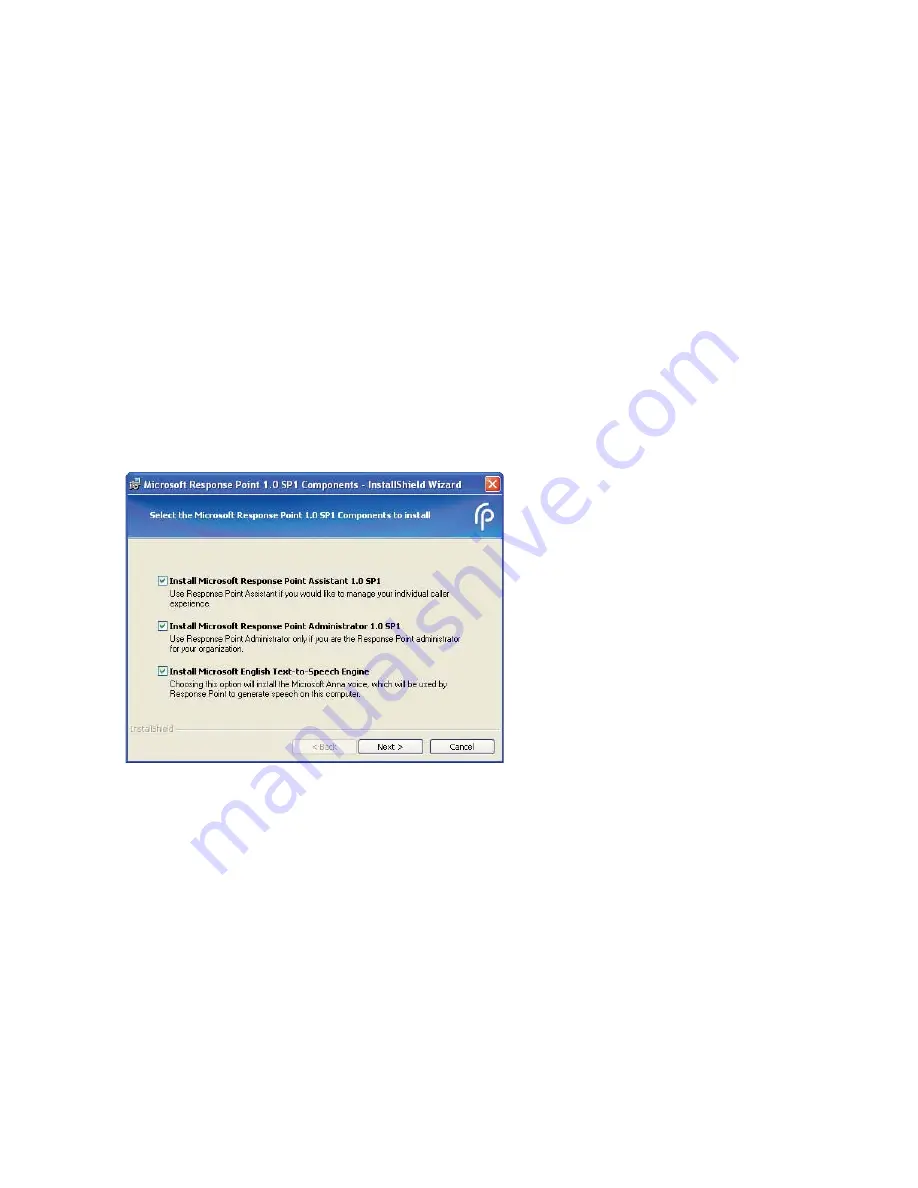
4   As the system administrator, you should install all of the Response Point software components on your computer. Check 

the Install Microsoft Response Point Administrator box and ensure all boxes are checked. 

5   Click Next. Follow the prompts to install all of the Microsoft Response Point components.

Note: You must review and accept the license agreements in order to install the software.

Starting Administrator

The Administrator software walks you through setting up and configuring your AastraLink RP Solution. Once you have 
installed the software on the System Administrator’s computer, you are ready to start the system.

To start the Administrator software and configure your system, follow these steps.

1   Select Start > Programs > Microsoft Response Point Administrator. The Important Notice screen appears.

2   Review the emergency considerations listed and click OK. The Select the base unit screen appears.

Note: If no base units are listed, ensure your base unit is turned on and wait 30 seconds for the list to refresh. If it is still not 
detected see Auto-Discovery Troubleshooting on page 54 in this guide.

Содержание 6751i RP

Страница 1: ...Guide 41 001256 00 Rev 02 6751i RP 6757i CT RP 6753i RP CT Cordless Go odbye Servi ces Ho ld Redia l De lete Save Speaker Mute Go odbye Ho ld Redia l Mute Op tions Line 1 Line 2 Mute Line 1 Line 2 Li...

Страница 2: ......

Страница 3: ...distribute transcribe translate or reduce to electronic medium or machine readable form or language derive source code without the express written consent of the Seller and its Suppliers or disseminat...

Страница 4: ......

Страница 5: ...s 26 Editing Voice Services 26 Removing Voice Services 26 Advanced Administrator Options 28 Setting the Date and Time 28 Configuring the Email Server 29 Setting Parked Call Music 29 Setting Voicemail...

Страница 6: ...Table of Contents vi Table of Contents Microsoft Utilities 51 Troubleshooting Solutions 53 General Troubleshooting 53 Auto Discovery Troubleshooting 54 Limited Warranty 57...

Страница 7: ...des AastraLink IP Phone User Guide The AastraLink RP 500 Base Unit Installation Guide includes detailed instructions on setting up the AastraLink RP 500 Base Unit required for all AastraLink RP system...

Страница 8: ...the AastraLink RP Solution is a straightforward process done on the system administrator s PC Microsoft Response Point Administrator The Microsoft Response Point Administrator software administers the...

Страница 9: ...ase Unit the AastraLink 540 Gateway all Aastra RP phones the system administrator s PC and phone users PCs for the Assistant software Microsoft Response Point Administrator and Microsoft Response Poin...

Страница 10: ...ide or AastraLink RP Solution Quick Start Guide The AastraLink 500 Base Unit may be installed as a desktop unit flat on the desk or on end or may be wall mounted to save space The AastraLink 500 Base...

Страница 11: ...given in the phone installation guide for the correct model The Aastra RP phones can be set up and connected to the LAN initially or can be connected when prompted by the Response Point Administrator...

Страница 12: ...er to view the CD directory Double click Install exe to start the installation process 3 Click Install AastraLink RP software 4 As the system administrator you should install all of the Response Point...

Страница 13: ...certificate The Connect to Base Unit dialog appears 6 Enter the default password admin and click Connect The change password now dialog appears The base unit is now connected to the Microsoft Response...

Страница 14: ...esponse Point Administrator Note In some cases the security certificate will not match the previously downloaded certificate when you connect to the base unit This will occur if the base unit has been...

Страница 15: ...r installation instructions Starting Assistant Once you have installed the Assistant software on your computer you are ready to personalize your phone settings To start the Assistant software and set...

Страница 16: ...10 AastraLink RP System Administrator Guide Response Point Assistant You can now change your personal phone settings by clicking Settings See the AastraLink IP phone Users Guide for more information...

Страница 17: ...nfigure Phone Wizard at least one primary user must be assigned to the new phone You can also add additional users at any time on the Phone System page by clicking Add User To add a new phone user in...

Страница 18: ...nd file of your own The words that the Automated Receptionist will use to confirm a caller s request are not always the same as the user name or directory entry For example a caller may request to spe...

Страница 19: ...with your operating system regardless of which TTS program you ve manually specified in Windows Recording audio from a phone If you are not satisfied with the computer generated speech you can specify...

Страница 20: ...to create sound files use the PCM format and make sure that the sound files are 8 kHz 16 bit mono WAV files Likewise you may find that the volume is too low Adjust the volume in the sound recording ap...

Страница 21: ...ou may want to remove phone users from your system if they leave the company or you have made multiple entries for one phone user Note You cannot remove users if they are assigned to a phone You must...

Страница 22: ...ou connected your phone page and click Next The What phone do you want to add page opens 4 Click the phone you just connected Note If you do not see the phone that you just connected click Refresh in...

Страница 23: ...ype the correct information on the Identification tab 7 Click Next 8 On the What do you want to name this phone page the name and owner of the phone have been filled in for you You can change them bot...

Страница 24: ...he phone lines to become active To add a multiple line phone using the Administrator software do the following 1 Click the Phone System button 2 In the Tasks pane under Phones click Add Phone which di...

Страница 25: ...You can change them both if you want 9 Click Finish 10 When the configuration process is complete click Close Activating phone lines on the Web UI If you are using more than 2 phone lines on model 675...

Страница 26: ...eb browser 5 At the prompt enter your username and password and click Note For an administrator the default username is admin and the password field is 22222 For a user the default username is user an...

Страница 27: ...igured Note Make sure the line has been assigned in the Administrator software configured on the Web UI and the phone has been restarted Phone lines will only work once all three steps have been compl...

Страница 28: ...u want to do so 6 Click Finish 7 When the configuration process is complete click Close The changes you have made will appear on the phone screen once it has finished restarting The phone will not be...

Страница 29: ...strator Guide 23 Using Administrator 3 Click the phone that you want to remove and then click OK A warning appears allowing you to change your mind 4 Confirm that you want to remove the phone by click...

Страница 30: ...g signal coming from the landline phone line to the AastraLink RP Solution Likewise it takes the outgoing digital signals from the phone system and translates them to analog signals that can be sent o...

Страница 31: ...block outbound calls through a phone line tick the Block Outbound Calls box for that line 6 Click next to choose the prefix used to access analog service Note If only analog service is configured onl...

Страница 32: ...Provider Wizard opens Note You must be using a VoIP service provider that supports Microsoft Response Point A list of compatible service providers is available on the Microsoft Response Point website...

Страница 33: ...on window opens Ensure you have selected the voice service you want to remove and click Yes Note Once you remove a voice service you cannot undo your action and the settings for the removed service ar...

Страница 34: ...anually or automatically adjust the time for changes such as daylight savings Note When you confirm the changes that you want to make the base unit will restart which could take several minutes Notify...

Страница 35: ...is correct configure your user account in the Assistant program to send voice messages as e mail attachments 5 Call your own extension number from another phone and leave a voice message for yourself...

Страница 36: ...te the configuration Using an external music source for Parked Call Music 1 Use a cable to connect your radio CD player or other sound device to the analog jack marked with a microphone on the base un...

Страница 37: ...alog box Note Voicemail settings can also be changed by users through the Assistant software Using the Automated Receptionist Incoming calls may be routed directly to one or more phones or answered by...

Страница 38: ...es using Administrator do the following 1 Click the Call Routing button 2 In the Tasks pane click Configure Automated Receptionist Properties 3 Specify the options you want including enabling the dire...

Страница 39: ...plan The table of phone numbers and users is sorted first by conflicts For example if two employees have used Bypass Receptionist for the same incoming phone number these conflicts are grouped togeth...

Страница 40: ...then select the person who will receive incoming calls 4 Click OK Note You can customize this plan by specifying call forwarding for the user you ve specified as receptionist For instance you can edit...

Страница 41: ...pecify that the Receptionist user receive incoming phone calls When calls are sent to the Receptionist user both Rene s and Diane s phones ring because Receptionist is assigned to both phones Setting...

Страница 42: ...or a more complex view save the history to a CSV file and use Microsoft Office Excel to perform further analysis To view a specific call history log do the following 1 Click the Phone System button 2...

Страница 43: ...files in the temporary folder on the base unit 2 All personal contacts 3 All voicemail older than 15 days Note This information also appears under Storage Space Use in the Base Unit page If base unit...

Страница 44: ...sages as e mail attachments Where is this information stored All data is stored on the physical device which is why it s important to keep the base unit in a secured location with restricted access Wh...

Страница 45: ...nd extension number passwords will be reset to their default values The e mail server password must be re entered To restore a backup of the base unit using Administrator do the following 1 Click the...

Страница 46: ...under Status click View Event Log 3 Review the event summary and list of events 4 Filter the events as needed using options in the Show list 5 Click Base Unit Performance for more information about t...

Страница 47: ...you want to edit list opens 3 Click the phone that you want to edit and then click OK The Confirm the identity of the phone dialog opens You will see the IP address of the phone beside Network Addres...

Страница 48: ...that you want to edit and then click OK The Confirm the identity of the phone dialog opens 4 Click Advanced to open the Aastra Web UI in your web browser The password window opens 5 At the prompt ente...

Страница 49: ...e Lock Allows you to assign an emergency dial plan to the phone lock the phone to prevent any changes to the phone and to prevent use of the phone and reset the user password Keypad Speed Dial model 6...

Страница 50: ...es must be reset for the new lines to take effect See the AastraLink RP Phone User Guide for more details Action URI Supports an advanced XML interface for end user customization Download Aastra s XML...

Страница 51: ...ministrator compares the versions of the base unit and Administrator and displays these in the Upgrade Base Unit dialog box if the base unit is an earlier version than Administrator When you click Upg...

Страница 52: ...atus of every device whether the upgrade started succeeded failed or is still in progress When the process finishes if you only want to see devices that failed select the Show only failed upgrades in...

Страница 53: ...upgrade is complete a message displays indicating Administrator has finished the upgrade process 9 The Upgrading device firmware page shows you the status of every device whether the upgrade started...

Страница 54: ...Firmware Update window opens 3 Enter the TFTP server IP address or qualified domain name in the TFTP Server IP field 4 Enter the firmware file name phone model st that you want to download to your IP...

Страница 55: ...y defaults using the Aastra Web UI Restore to Factory Defaults Remove Local Configuration Settings The Restore to Factory Defaults option resets the factory defaults for all of the phone settings and...

Страница 56: ...he phone Click Reset to continue 5 In the Reset Window click Restart to restart your Aastra RP Phone If you chose to restore all factory default settings the phone displays Waiting Assignment To recon...

Страница 57: ...trator program and connect to the base unit using the default password admin 4 If you are unable to connect plug the USB drive into your computer and open the file named ResponsePointPasswordReset txt...

Страница 58: ...sometimes 30 minutes or more for all of the private information to be erased The precise time required depends on the amount of information to be erased 4 Plug the USB drive into your computer and ve...

Страница 59: ...storage space is still available For more information see Base Unit Storage FAQs on page 37 Why can t our employees use all the lines I set through the Administrator If you are using softkeys model 67...

Страница 60: ...The base unit is not responding and it probably needs to be restarted Why isn t the AastraLink RP 500 Base Unit responding This condition may occur when there is a connectivity issue between the compu...

Страница 61: ...number If the Automated Receptionist answers the phone line and the adapter are configured and connected properly If the problem persists check the phone itself See if any red messages appear in the P...

Страница 62: ...56 AastraLink RP System Administrator Guide Troubleshooting Solutions...

Страница 63: ...tal or consequential damages including but not limited to loss damage or expense directly or indirectly arising from the customers use of or inability to use this telephone either separately or in com...

Страница 64: ......

Страница 65: ...services 26 ringing groups 35 simultaneous ringing 35 uninstalling 11 using 11 voicemail 31 storage 37 analog voice services adding 24 Assistant starting 9 auto discovery 2 automated receptionist adva...

Страница 66: ...ssing 33 removing voice services 26 ringing groups 35 S simultaneous ringing 35 system features 2 limitations 3 overview 2 requirements deployment requirements 3 upgrading 45 system installation 4 sys...

Страница 67: ......

Страница 68: ...e Troubleshooting section and still have problems please visit our Web site at www aastra com or call 1 800 574 1611 for technical assistance Microsoft Response Point is a trademark of Microsoft Corpo...

Отзывы: