


‐ ‐
12
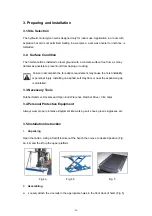
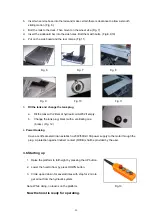
b.
Insert wheel vice base into the rails and make certain there is clearance to allow a smooth
sliding motion ( Fig. 6).
c.
Bolt the rails to the deck. Then mount on the wheel vice.(Fig. 7).
d.
Insert the sideboard bar into the side holes. Bolt them with bolts. ( Fig.8,9,10)
e.
Put on the side board and the rear ramps. (Fig 11)
Fig. 6
Fig. 7
Fig. 8
Fig. 9
Fig. 10
Fig. 11
3.
Fill the tank and change the tank plug
a.
Fill the tank with
2
liter
s
of hydraulic oil AW32
if empty
.
b.
Change the tank plug( black) with a ventilating one
( brass). (Fig. 12)
4.
Power Hooking
Have a certificate electrician establish a 230V/50Hz/10A power supply to the motor through the
plug. A protection against indirect contact (RCCB) shall be provided by the user.
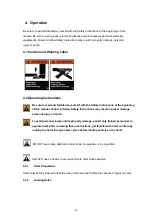
3.6. Starting up
1.
Raise the platform to full height by pressing the UP button.
2.
Lower the
hoist
to floor by press DOWN button.
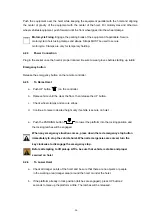
3.
Circle up and down for several times with stop for 2 min to
get air out from the hydraulic system.
Fig.13
Note: While doing, no load is on the platform.
Now the
hoist
is ready for operating.
Содержание AutoLift AL-243156
Страница 6: ... 6 ...
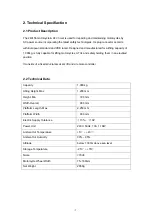
Страница 8: ... 8 Fig 1 2250mm 785mm 800 mm 380 mm 562mm 1270 mm ...
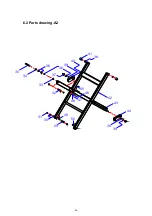
Страница 20: ... 20 6 2 Parts drawing A2 29 31 32 37 33 34 35 38 39 40 41 38 44 43 42 39 30 36 38 45 48 47 46 49 50 ...
Страница 21: ... 21 6 3 Parts drawing A3 29 31 52 53 54 55 31 66 51 51 65 59 60 57 56 58 61 62 63 64 54 4 68 67 27 72 72 27 ...
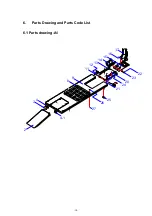
Страница 22: ... 22 6 4 Parts drawing A4 54 1 54 5 54 14 54 13 54 9 54 6 54 7 54 12 54 8 54 2 54 3 54 4 54 10 54 11 ...
Страница 23: ... 23 6 5 Parts drawing A5 1 6 5 10 28 ...
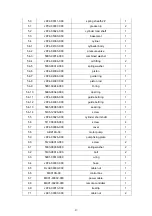
Страница 28: ... 28 72 5109 05020 000 threaded pin 2 ...
Страница 29: ... 29 6 8 Parts drawing B 2 9 10 12 13 14 16 19 20 22 23 24 25 5 15 11 8 7 1 3 6 18 17 4 6 21 ...


