


HV/HW-C/CP Series
Page 7
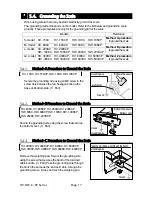
4. Setting up and Installing the Scale
There are two ways of assembling (setting up) the HV
-
C
/
CP and HW
-
C
/
CP series.
Assemble the scale according to the method
-
A procedure or method
-
B procedure.
Models Reference
S
-
model: HV
-
15KC, HV
-
15KCP, HW
-
10KC, HW
-
10KCP
M
-
model: HV
-
60KC, HV
-
60KCP, HW
-
60KC, HW
-
60KCP
Method-A procedure
to assemble the scale
L
-
model: HV
-
200KC, HV
-
200KCP,
HW
-
100KC, HW
-
100KCP, HW
-
200KC, HW
-
200KCP
L2
-
model: HV
-
300KC, HV
-
300KCP, HV
-
600KC, HV
-
600KCP,
HW
-
300KC, HW
-
300KCP, HW
-
600KC, HW
-
600KCP
Method-B procedure
to assemble the scale
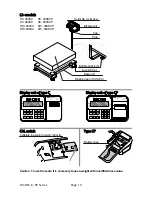
4.1.1. Model-A Procedure to Assemble the Scale
HV
-
15KC, HV
-
15KCP, HV
-
60KC, HV
-
60KCP, HV
-
200KC, HV
-
200KCP, HW
-
10KC, HW
-
10KCP,
HW
-
60KC, HW
-
60KCP, HW
-
100KC, HW
-
100KCP, HW
-
200KC, HW
-
200KCP
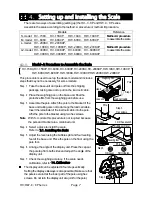
This procedure is used to set up the above models and includes
steps that may not be necessary for some models.
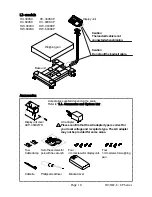
Step 1 Take the base unit and pole out from the shipping
package, taking care not to pull on the load cell cable.
Step 2 Place the weighing pan on the base unit. Peel the
protective film from the weighing pan before use.
Step 3 Assemble the pole. Attach the pole to the bracket of the
base unit, taking care not to damage the load cell cable.
Insert the remainder of the load cell cable into the pole.
Affix the pole to the bracket using two hex screws.
Note
With
S
-
models, this procedure is not required because
the pole and bracket are a combined unit.
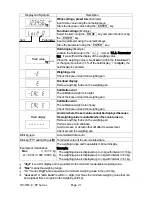
Step 4 Select a place to install the scale.
Refer to "
3.1. Installing the Scale
" .
Step 5 Adjust the level using the bubble spirit and four leveling
feet of the base unit. Place the pole on the floor using the
pole foot.
Step 6 Arrange the angle of the display unit. Press the caps at
the pole top from both sides and adjust the angle of the
display unit.
Step 7 Check the weighing accuracy. If the scale needs
calibration, refer to "
14. Calibration
".
The display unit can be adjusted in four steps vertically.
Setting the display sideways is also possible. (Make sure that
the pole is secured at the lower part of the pole using hex
screws. Do not turn the display unit at a joint for the pole.)
Bubble spirit level
Leveling
foot
Pole
foot
Step
5
OK:
Level NO:
Inclination
Step
6
Weighing
Pan
Pole
Step 2
Step
1
Base unit
Load cell cable
Pole
Step
3
Hex
screws
Bracket
3
mm hex wrench
Содержание HV-C Series
Страница 89: ...HV HW C CP Series Page 87 MEMO...
Страница 90: ...Page 88 HV HW C CP Series MEMO...
Страница 91: ...13...


