10
WebGUI Control
Automation Tab
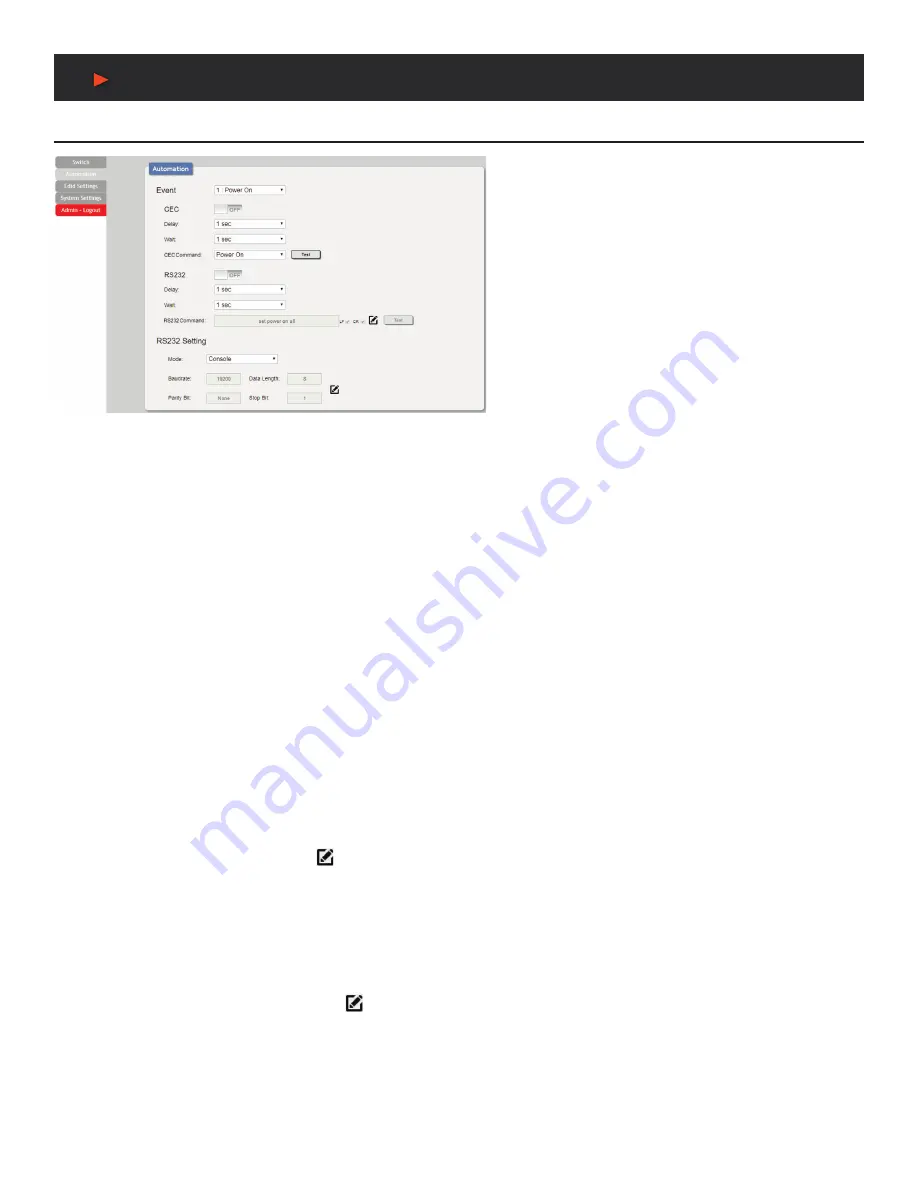
The Automation tab provides control over the unit’s automatic
control command broadcast behavior when the specified
system Automation Events occur. Automation commands
may be sent to 3rd party devices via standard CEC, or
customizable RS-232.
Note:
Sending RS-232 commands requires the use of a
compatible HDBaseT
™
Receiver with an RS-232 port.
1. Event:
Use the dropdown to select the Automation Event
to configure. Available Automation Events are:
- Power On:
This unit is powered on.
- Out A Source Active:
The currently selected input
changes from inactive to active.
- Out A Source Lost:
The currently selected input
changes from active to inactive.
• CEC:
Enable or disable sending a CEC command when the currently selected Automation Event is activated.
NOTE:
CEC support must be enabled on the connected HDMI device.
• Delay:
Set the length of time, in seconds, that the specified Automation Event must continue to be true before sending the defined
CEC command.
• Wait:
Set the length of time, in seconds, to wait after this CEC Automation Event has been activated before ANY other Automation
Event can be detected.
• CEC Command:
Set the CEC command to send when the specified Automation Event is activated. Clicking the
“Test”
button will
send the command immediately. Available CEC commands are:
- Power Off:
Turn off the connected HDMI display device.
- Power On:
Turn on the connected HDMI display device.
- Active Source:
Force the connected HDMI display device to switch to the HDMI input that this unit is connected to.
NOTE:
Not all HDMI devices support all CEC commands.
• RS-232:
Enable or disable sending an RS-232 command when the currently selected Automation Event is activated.
NOTE:
The RS-232 port must be in
“Control”
mode to send commands to external devices.
• Delay:
Set the length of time, in seconds, that the specified Automation Event must continue to be true before sending the defined
RS-232 command.
• Wait:
Set the length of time, in seconds, to wait after this RS-232 Automation Event has been activated before ANY other Automation
Event can be detected.
• RS-232 Command:
Click the Edit icon ( ) to define the RS-232command to send when the specified Automation Event is activated.
Clicking the
“Test”
button will send the command immediately.
2. RS-232 Setting:
Provides controls to configure the settings and behavior of the RS-232 port.
• Mode:
Switch the behavior of the RS-232 port between
“Console”
and
“Control”
. When
“Console”
is selected, the unit can receive
and be controlled directly via RS-232 commands. When
“Control”
is selected the RS-232 port can send Automation commands to
control other devices.
• RS-232 Setting Edit:
Click on the Edit icon ( ) to configure the various RS-232 port settings including baud rate, data length, parity
and stop bits.
A
NEU
VIDEO
Содержание ANI-H-KIT
Страница 21: ...19 w allplate CONNECTION DIAGRAM Connection Diagram A NEUVIDEO...
Страница 22: ...20 receiver CONNECTION DIAGRAM Connection Diagram A NEUVIDEO...
Страница 26: ...THIS PAGE IS INTENTIONALLY LEFT BLANK...
Страница 27: ...THIS PAGE IS INTENTIONALLY LEFT BLANK...


