V-Series Camera Quick Start Guide |
VX-2V-MD-RIWH
12000 Pecos St., Suite 290, Westminster, CO 80234 | www.3xlogic.com | (877) 3XLOGIC
19
Quick Start - Remote Monitoring and Viewing - Adding a V-Series Camera to
3xLOGIC View Lite II Mobile (Android and iOS)
Steps:
1.
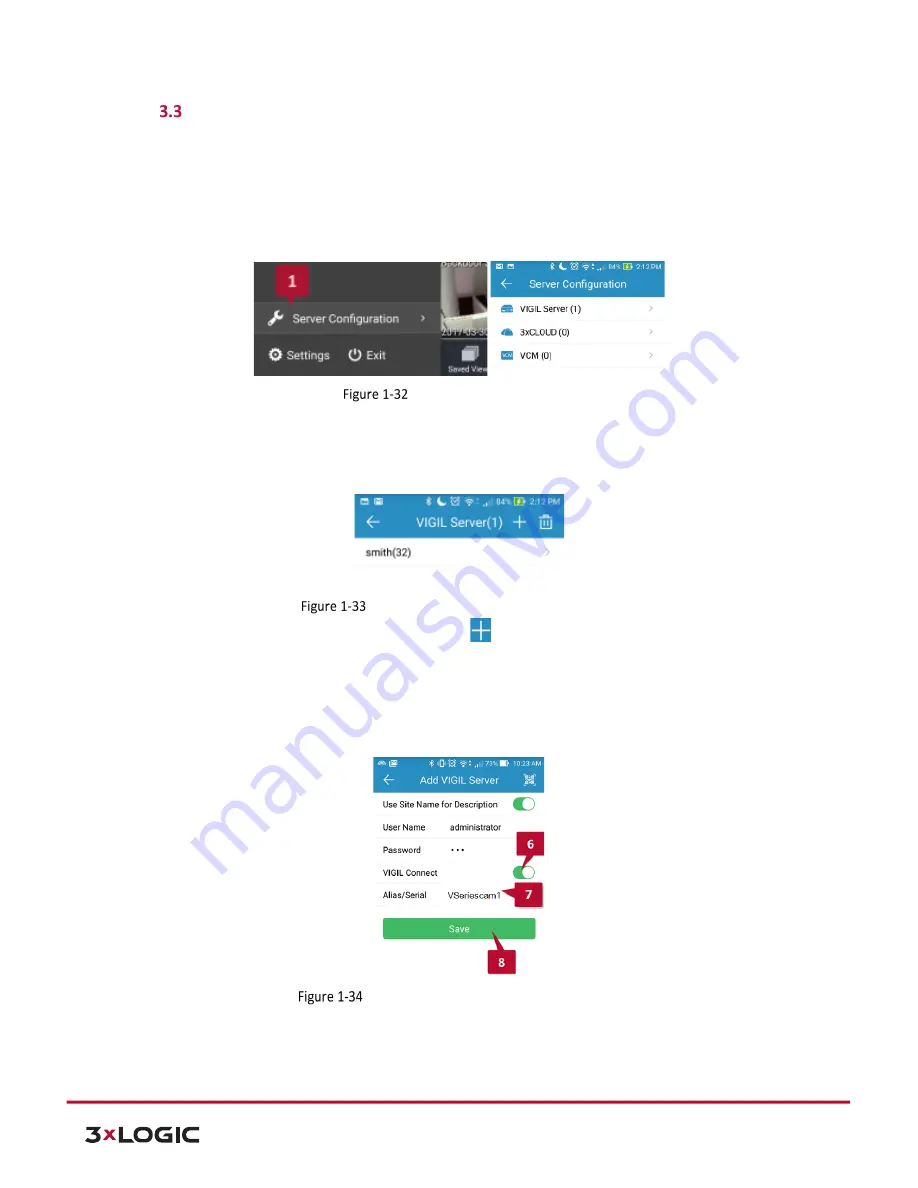
To interface a V-Series camera with 3xLOGIC’s View Lite II mobile app, launch the View Lite II app on
your mobile device (Android OS is pictured in the below screenshot, however, the process is identical
in the iOS version).
2.
Open the
Options
side menu and select
Server Configuration
. The Video Source list will display.
Opening Video Source Menu
3.
Select VIGIL Server. VISIX V-Series devices are considered edge recording devices, and thus are
recognized as their own VIGIL Server within View Lite II. The VIGIL Server window will now deploy. A
menu of all VIGIL Servers already interfaced with View Lite II will be visible.
:
Adding a Video Source - Add Video Source
4.
To add a new instance of a video source, tap the
icon.
5.
Enable
VIGIL Connect
.
Alternatively, if you wish to use traditional network connection criteria, leave
VIGIL Connect
disabled and enter in an
IP/DNS Name
and
Port
info (if using standard network
connection criteria, also ignore step 6 of these instructions) for the device.
6.
Enter in the VIGIL Connect alias for the desired VISIX V-Series camera (VSeriescam1 used in the above
example).
View Lite II - Add/Edit Server Form - Android
7.
Fill in the remaining required fields and tap
Save
to save the V-Series camera to View Lite II. A user
may now add the camera stream to the View Lite viewer using the same process as adding VIGIL
Server, VCM or 3xCLOUD networked cameras.


