3xLogic VISIX V Series Скачать руководство пользователя страница 9

V-Series Camera Quick Start Guide |


VX-4V-B-RI


12000 Pecos St., Suite 290, Westminster, CO 80234 | www.3xlogic.com | (877) 3XLOGIC


2.


Confirm the PC is networked with the cameras then launch the utility.  If properly networked, the utility 

will automatically detect cameras on the network (click

 Refresh

 to refresh the list).  

3.


Select the desired device from the list of available cameras. 

4.


Click IP Setup and assign the desired IP. 

5.


Fill out installer and company information.  

6.


To activate the camera, you will be required to assign a complex password. 

7.


Confirm the camera Live View preview is as desired and click 

Continue

.  

8.


Adjust any/all camera settings including the camera name and VIGIL Connect alias. Be sure to remember 

the VIGIL Connect Alias as well as the username and password you assign to the camera. These 

credentials will be required to add the camera to other VIGIL utilities. 

9.


Fill out remaining information and complete steps in the setup tool to receive an installation summary 

e-mail. 

Note: 

The V-Series camera will automatically check for updates and format the SD card.  Please allow 

15 minutes before power cycling the camera. 


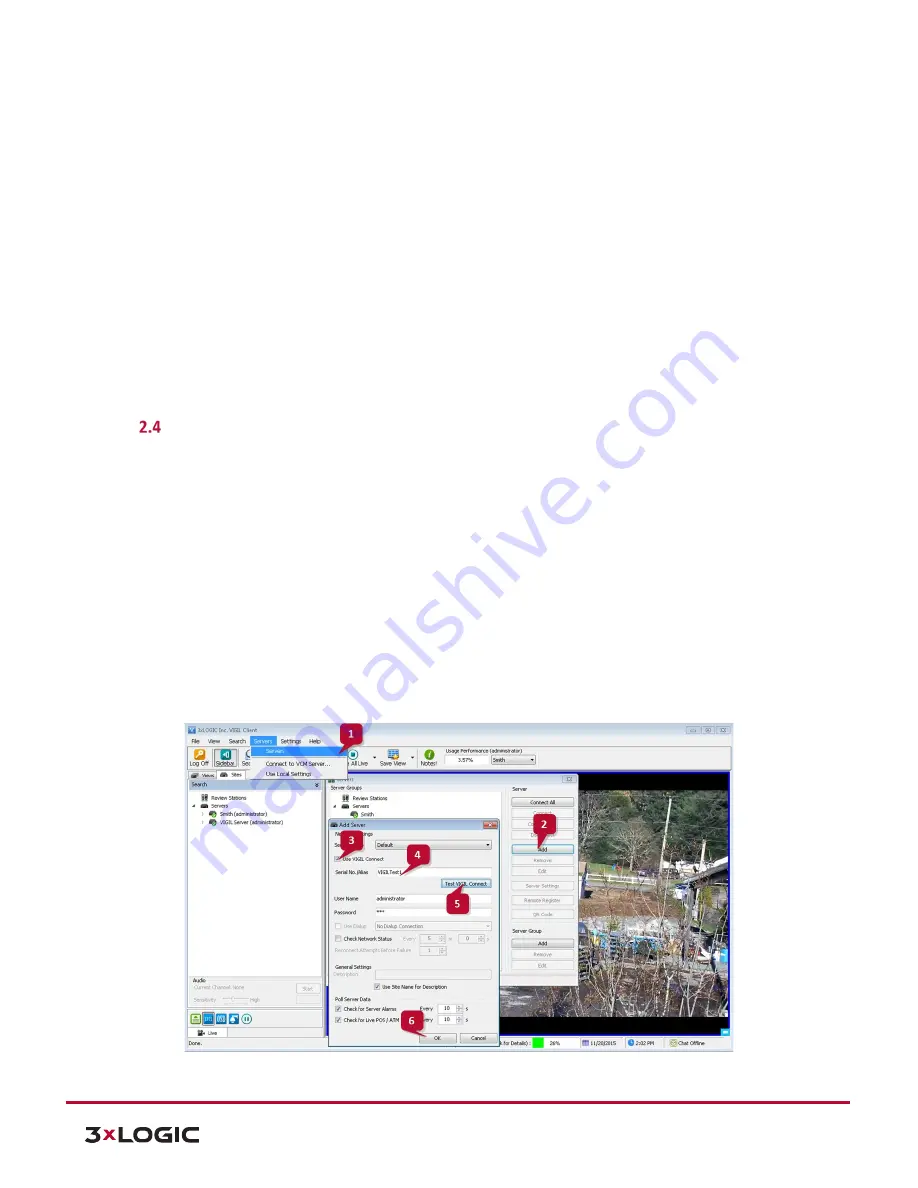
Remote Monitoring and Viewing - Adding a V-Series Camera to VIGIL Client 

Steps: 

To interface a V-Series Camera with VIGIL Client: 

1.


Launch VIGIL Client (

Local Mode 

only; VCM mode will only display Servers from a networked VCM Server) 

and select 

Servers

  from the 

Servers 

top menu. This will launch the Servers window. VISIX V-Series 

devices are considered edge recording devices and thus are recognized as their own VIGIL Server within 

the VIGIL suite. 

2.


Click 

Add

. This will deploy the 

Add/Edit VIGIL Server

 window. 

3.


Enable the 

Use VIGIL Connect


option. If connecting using traditional network connection criteria is 

desired, enter the cameras 

IP Address/DNS Name


and confirm TCP/IP port status.  

4.


Enter in the VIGIL Connect alias of the desired V-Series Camera (

VIGILTest1

 used in the below example). 

Skip this step if using traditional network connection criteria (IP/Port). 

5.


Click 

Test VIGIL Connect


to confirm the camera can be communicated with through the Connect system 

using the provided alias. Skip this step if using traditional network connection criteria (IP/Port). 


Figure 2-1


Adding V-Series Camera to VIGIL Client 


Содержание VISIX V Series

Страница 1: ...V Series Camera Quick Start Guide VX 4V B RI 12000 Pecos St Suite 290 Westminster CO 80234 www 3xlogic com 877 3XLOGIC 1 VISIX V Series All in One Camera Gen II VX 4V B RI Quick Start Guide v01 2018...

Страница 2: ...RI CAMERA DESCRIPTION 3 Available Mounts 3 INSTALLATION 4 Installation Wall Mount 4 View Angle Adjustment 4 Zoom and Focus Adjustment 5 Installation Micro sd card 6 2 CAMERA SETUP 8 AVAILABLE CAMERA S...

Страница 3: ...Sun Shield 2 Front Cover 3 Zoom and Focus Lever 4 IR LED 5 Lens 6 Air Vent 7 Video Output Interface 8 Integrated Bracket 9 Reset Button 10 Micro SD Card Slot 11 Power Interface 12 Network Interface NO...

Страница 4: ...les in the Wall If you need to route cables through the wall or ceiling cut a cable hole according to the drill template Skip this step if you want to route the cables on the surface of the ceiling Ro...

Страница 5: ...of the image The adjusting range is from 0 degrees to 360 degrees Tighten the lock screw 3 Figure 1 4 Lens Adjustment ZOOM AND FOCUS ADJUSTMENT You can use the zoom lever and focus lever to adjust the...

Страница 6: ...the arrow direction as shown in Figure 1 5 left Remove the sun shield according to the arrow direction as shown in Figure 1 5 right Remove the front cover by rotating it counterclockwise as shown in...

Страница 7: ...un shield according to the arrow direction as shown in Figure 1 7 left Tighten the lock screw on the sun shield Figure 1 7 Assemble the Camera NOTE For water proofing please align the rotating label o...

Страница 8: ...d 1 Ensure the connected network provides a DHCP address and allows outbound access to the internet For installations where DHCP is not available or where the camera is being used with an appliance se...

Страница 9: ...automatically check for updates and format the SD card Please allow 15 minutes before power cycling the camera Remote Monitoring and Viewing Adding a V Series Camera to VIGIL Client Steps To interface...

Страница 10: ...ng and Viewing Adding a V Series Camera to 3xLOGIC View Lite II Mobile Android and iOS Steps 1 To interface a V Series camera with 3xLOGIC s View Lite II mobile app launch the View Lite II app on your...

Страница 11: ...877 3XLOGIC 11 Figure 2 4 View Lite II Add Edit Server Form Android 7 Fill in the remaining required fields and tap Save to save the V Series camera to View Lite II A user may now add the camera stre...

Страница 12: ...3xLOGIC www 3xlogic com 2018 3xLOGIC Inc All rights reserved Information in this document is subject to change without notice 3xLOGIC and the 3xLOGIC logo are trademarks of 3xLOGIC Inc all other trad...

Отзывы: