3xLogic VISIX V Series Скачать руководство пользователя страница 3

V-Series Camera Quick Start Guide |


VX-4V-B-RI


12000 Pecos St., Suite 290, Westminster, CO 80234 | www.3xlogic.com | (877) 3XLOGIC


1


Camera Overview   


VX-4V-B-RI Camera Description 

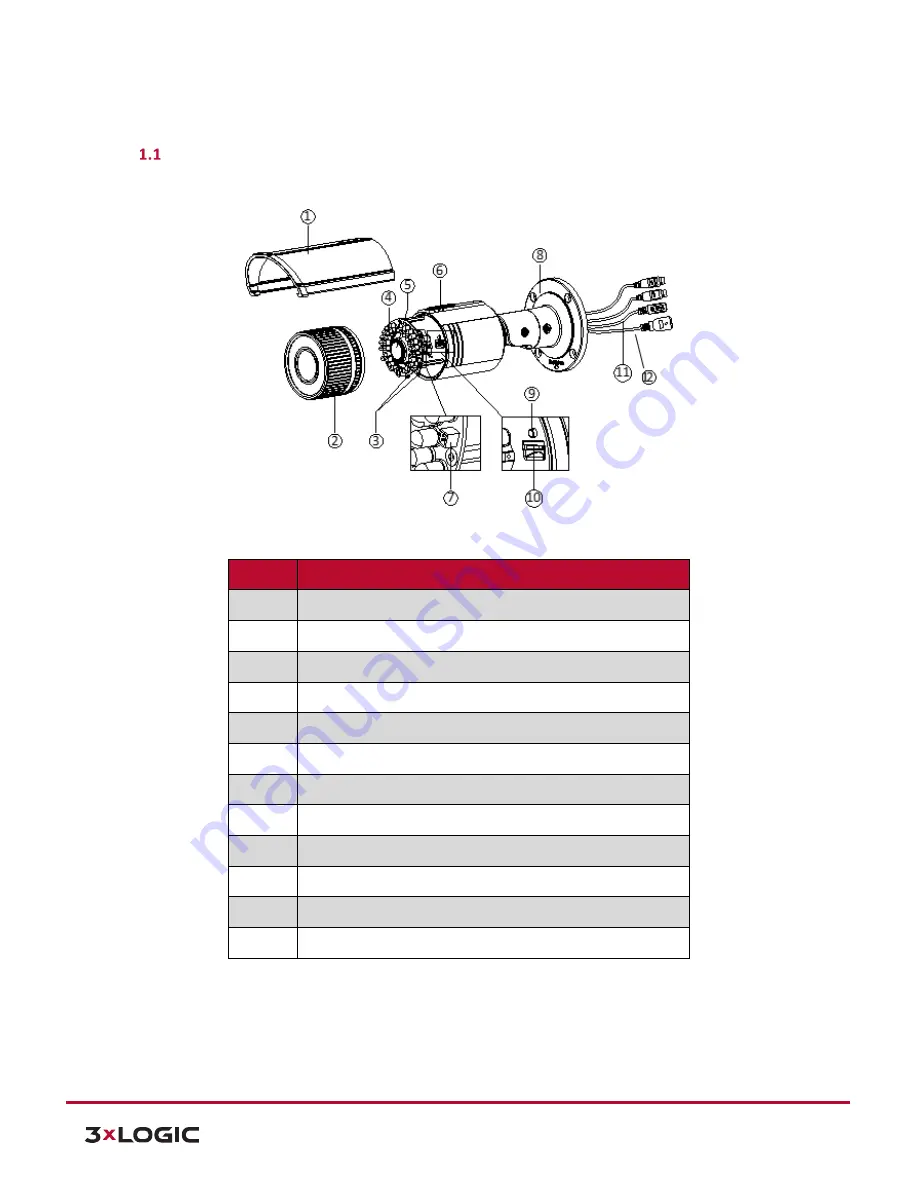
Please see the descriptions of the camera’s components below.  


Figure 1-1


Overview 


Number


Description 

1


Sun Shield 

2


Front Cover 

3


Zoom and Focus Lever 

4


IR LED 

5


Lens 

6


Air Vent 

7


Video Output Interface 

8


Integrated Bracket 

9


Reset Button 

10


Micro SD Card Slot 

11


Power Interface 

12


Network Interface 


NOTE: 

Press and hold RESET for 10s when the camera is powering on or rebooting to restore the default 

settings, including the user name, password, IP address, port No., etc.


AVAILABLE MOUNTS 


Universal Corner Mount (

3xLOGIC Product #: 

VX-CM) 


Universal Pole Mount (

3xLOGIC Product #:

 VX-POLE) 

Содержание VISIX V Series

Страница 1: ...V Series Camera Quick Start Guide VX 4V B RI 12000 Pecos St Suite 290 Westminster CO 80234 www 3xlogic com 877 3XLOGIC 1 VISIX V Series All in One Camera Gen II VX 4V B RI Quick Start Guide v01 2018...

Страница 2: ...RI CAMERA DESCRIPTION 3 Available Mounts 3 INSTALLATION 4 Installation Wall Mount 4 View Angle Adjustment 4 Zoom and Focus Adjustment 5 Installation Micro sd card 6 2 CAMERA SETUP 8 AVAILABLE CAMERA S...

Страница 3: ...Sun Shield 2 Front Cover 3 Zoom and Focus Lever 4 IR LED 5 Lens 6 Air Vent 7 Video Output Interface 8 Integrated Bracket 9 Reset Button 10 Micro SD Card Slot 11 Power Interface 12 Network Interface NO...

Страница 4: ...les in the Wall If you need to route cables through the wall or ceiling cut a cable hole according to the drill template Skip this step if you want to route the cables on the surface of the ceiling Ro...

Страница 5: ...of the image The adjusting range is from 0 degrees to 360 degrees Tighten the lock screw 3 Figure 1 4 Lens Adjustment ZOOM AND FOCUS ADJUSTMENT You can use the zoom lever and focus lever to adjust the...

Страница 6: ...the arrow direction as shown in Figure 1 5 left Remove the sun shield according to the arrow direction as shown in Figure 1 5 right Remove the front cover by rotating it counterclockwise as shown in...

Страница 7: ...un shield according to the arrow direction as shown in Figure 1 7 left Tighten the lock screw on the sun shield Figure 1 7 Assemble the Camera NOTE For water proofing please align the rotating label o...

Страница 8: ...d 1 Ensure the connected network provides a DHCP address and allows outbound access to the internet For installations where DHCP is not available or where the camera is being used with an appliance se...

Страница 9: ...automatically check for updates and format the SD card Please allow 15 minutes before power cycling the camera Remote Monitoring and Viewing Adding a V Series Camera to VIGIL Client Steps To interface...

Страница 10: ...ng and Viewing Adding a V Series Camera to 3xLOGIC View Lite II Mobile Android and iOS Steps 1 To interface a V Series camera with 3xLOGIC s View Lite II mobile app launch the View Lite II app on your...

Страница 11: ...877 3XLOGIC 11 Figure 2 4 View Lite II Add Edit Server Form Android 7 Fill in the remaining required fields and tap Save to save the V Series camera to View Lite II A user may now add the camera stre...

Страница 12: ...3xLOGIC www 3xlogic com 2018 3xLOGIC Inc All rights reserved Information in this document is subject to change without notice 3xLOGIC and the 3xLOGIC logo are trademarks of 3xLOGIC Inc all other trad...

Отзывы: