1.
Ensure the SoundPro is turned On and is either stopped or paused.
2.
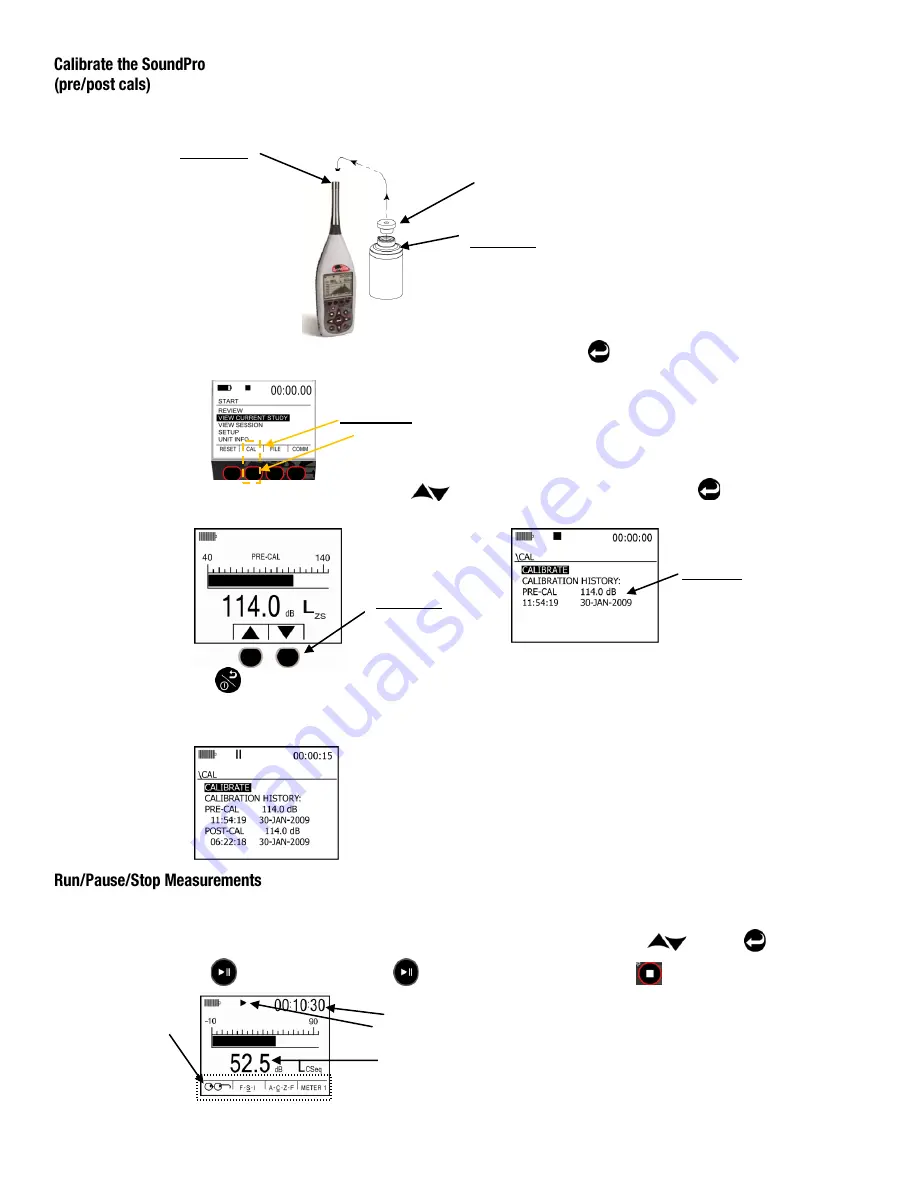
Attach the calibrator and cal adapter to the SoundPro. Set the calibrator to 1 KHz and 114 dB (if it is a selectable).
3.
From the Start screen, press the
Cal
softkey and the Cal screen will open. Press when Calibrate is highlighted. The Pre-Cal
screen will open.
4.
Allow the measurement to stabilize and press
Arrows
to set 114.0 dB level (see A). Then, press key. When set, the
Calibration history screen appears (see B).
5. Press
key to exit the Cal screen.
6. For a
Post Calibration
, ensure the SoundPro is in “Pause” mode. (Essentially, run a measurement and press the run/pause key.)
The Pause indicator will appear at the top of the display.) Then repeat the Calibration steps above and press Enter to store the Post
Calibration information. A sample screen is displayed below with post calibration history.
Position the SoundPro in the field. Press the run key to start measuring. To pause a study (for example: lunch breaks), press the run/pause key. To
start measuring again, press the run/pause key. Continue this process until your measurements are complete by press the Stop key. This will end
the session.
1. From the
Start screen
, select either
View Session
or select
View Current Study
by press the arrows and key to select.
2. Press key to begin measuring. Press key to Pause (optional). At any time, press to end the session/study.
QC10/QC20
Select 1kHz and 114 dB
Microphone
Place calibrator
over microphone
A. Calibrate
Press corresponding
softkey to 114.0 dB
level.
Cal softkey
Select softkey to open
B. Pre-Cal
Displays pre-calibration
information
RunTime
Run icon
Lookup softkey:
Select to change
measurement
parameter (Lpk,
Lmx, Lmn,
Leq,Las)
Measurement value (Average SPL)


