


9
IMPORTANT NOTE
i
To determine which model of probed test plug should be used for the selected hearing protector, click on the icon with
the probed plugs. A complete crossover guide for probed hearing protectors is also available in the resources tab within
the software.
4)
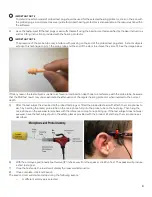
Have the test subject fit the test plugs or earmuffs themself using the insertion method specified by the User Instructions
and/or Fitting Instructions provided with the hearing protector.
IMPORTANT NOTE
i
The presence of the probe tube may interfere with pressing on the end of the probed test plug stem. Instruct subjects
who use this technique to pinch the probe tube and the end of the stem to achieve the same fit. See the image below.
If for any reason the test subject is unable to achieve normal insertion depth due to interference with the probe tube, be aware
that the PAR test result may under-estimate the attenuation of the regular hearing protector when inserted to the correct
depth.
5)
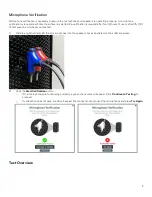
After the test subject has inserted both probed test plugs or fitted the probed test earmuff, attach the microphones to
each by inserting the metal probe tube on the microphone fully into the probe tube on the test plug. Then hang the
microphones on the eyewear temple bars with the reference microphone pointing up. If the test subject does not wear
eyewear, have the test subject put on the safety glasses provided with the product kit and hang the microphones as
described.
6)
With the employee positioned about twelve (12) inches away from the speaker, click Run Test. The speaker will produce
a short test signal.
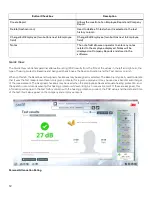
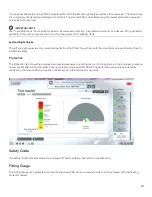
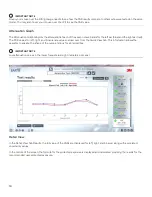
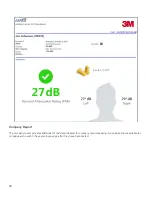
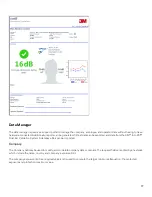
7)
Once the test ends, the results will display the measured attenuation.
8)
Once complete, click End Session.
The session timer will start and stop during the following events:
–
A different employee is selected


