


78-8130-6741-6 Rev G
11
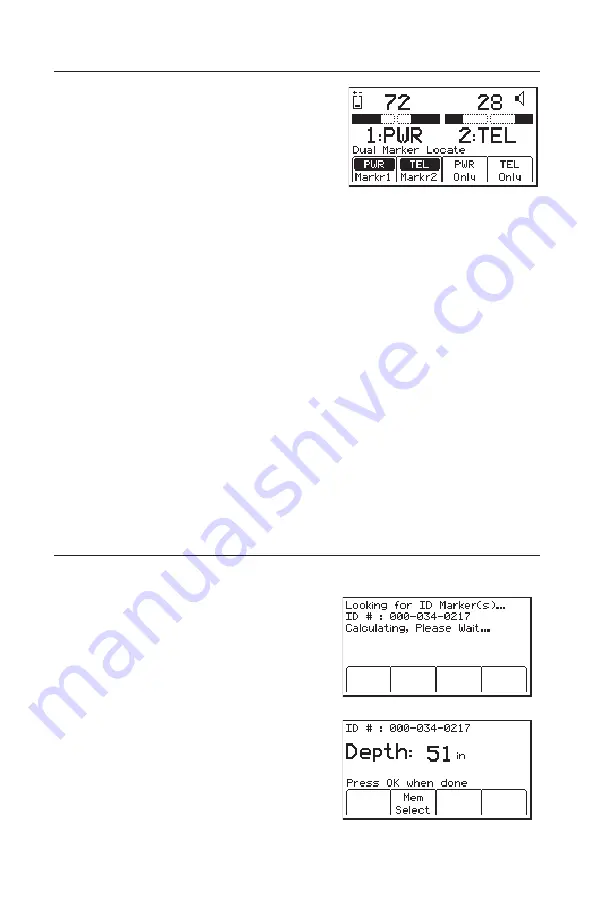
E. Dual 3M™ Marker Locate
Step 1. Press
Locate/OK
[5].
Step 2. Press
Marker
[SK].
Step 3. Press
MARKR 1
[SK Toggle] to select
desired Utility.
Step 4. Press
MARKR 2
[SK Toggle] to select
desired Utility.
Note: Only the marker types enabled in the setup menu will be shown. (See 4.C.
Enabling/Disabling Marker types). When scanning for markers, the Gain Level [12]
should be set high.
−
The third and fourth soft key commands will populate with the types of
utilities selected for Marker 1 and Marker 2.
Step 5. Adjust the
Gain
[4] down
until the bar graphs open.
−
The bar graph will close, the audio will increase, and the Signal Strength
[10] will be maximum when the locator detects a marker of the specified
utility.
−
When one of the two markers is detected, press the “XXX Only” [SK] for
the detected utility marker. (“XXX” represents the marker types selected. In
the above example, PWR Only and TEL Only.)
−
The unit will switch to Single Marker Locate in order to pinpoint the
marker.
Step 6. Press
Markr 2
[SK Toggle] to return to Dual Marker Locate.
F. 3M iD Marker Depth
Step 1. Lower the tip of the locator to the ground over the targeted marker.
Step 2. Press
Depth
[SK].
−
The locator will examine the marker
(Calculating, please wait...).
−
If the marker is a 3M iD Marker, the
locator will display the depth of the
marker, and its identification (serial)
number.
Содержание Dynatel 1420-iD
Страница 27: ...78 8130 6741 6 Rev G 27 ...


