


28
9. Push down the metal lever on the left side of the lamp cartridge.
10. Reconnect black wires to the receptacle.
11. Close the lamp housing door and tighten the screw.
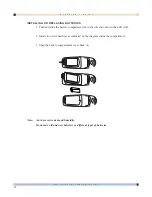
12. Align the slots and tabs of the right side of the
facade and projection arm as shown, then snap
firmly into place.
13. Align the slots and tabs of the left side of the
facade and projection head as shown, then snap
firmly into place.
Note: You must hear or feel a distinctive snap to
ensure facade is securely attached.
Whenever the lamp is replaced, please reset the total lamp operating time. (Refer to next page.)
O P E R A T O R ’ S G U I D E
3 M™ D I G I T A L W A L L D I S P L A Y
CAUTION
•
To reduce the risk of cuts to fingers and/or decreased image
quality by touching the lens, do not insert hand into the empty
lamp compartment.
•
This lamp contains mercury. Consult your local hazardous
waste regulations and dispose of this lamp properly.
•
A potential hazard may exist in the rare case of lamp rupture.
Please have a 3M™ Digital WallDisplay dealer replace a ruptured
lamp.
•
The lamp is extremely hot during normal operation. Before
replacing the lamp, wait at least 45 minutes after last operation.
•
Do not loosen any screws except those mentioned in the lamp
replacement instructions.


