


9
Setup
WARNING
PRESSURIZED EQUIPMENT HAZARD
To reduce the risk of a serious injury, follow the
Pressure Relief Procedure
on page 11 whenever
you are instructed to relieve pressure.
Positioning the Air Cap
Rotate the air cap as needed to achieve the desired
spray pattern direction. To create a round pattern, turn
the pattern air off by turning the pattern adjustment
knob (25) fully clockwise. Refer to Fig. 11.
Vertical Pattern
Horizontal Pattern
Fig. 9
02020
Adjusting the Spray Pattern
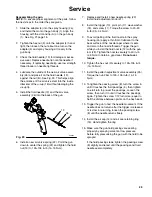
Follow these steps to establish the correct fluid flow
and air flow:
1.
Turn the fluid adjustment knob (21)
counterclock-
wise until no restriction of the trigger movement is
felt, then turn out another half turn. When the knob
is turned far enough, the trigger should be able to
touch the gun handle when the gun is triggered.
WARNING
PRESSURIZED EQUIPMENT HAZARD
To avoid injury, never open the fluid adjustment
knob (21) beyond the one half turn indicated in
Adjusting the Spray Pattern
. If the red band on
the knob stem (21) is visible, the knob is not ad-
justed correctly and could result in serious injury.
Repeat steps in
Adjusting the Spray Pattern
.
Fig. 10
21
open
TI3615a
2.
Turn the pattern adjustment valve (25) fully coun-
terclockwise to achieve the widest fan pattern.
Fig. 11
25
Open
(wider
pattern)
Close
(narrower
pattern)
TI3615A