background image

3D   Universe   Presents:   The   Unofficial   FlashForge   Creator   X   Manual   

shop3duniverse.com   

Page   4   of   43   

800-­‐689-­‐4344   

Important   Safety   Information       

General   Safety   Guidelines   

Caution:

   The   Creator   X   generates   high   temperatures   and   includes   moving   parts   that   can   cause   

injury.   Never   reach   inside   The   Creator   X   while   it   is   in   operation,   and   allow   time   for   The   Creator   
X   to   cool   down   after   operation.   


The    Creator    X    is    very    sensitive    to    static    electricity,    so    make    sure    you    contact    a   
grounded   object   before   operating   the   machine.   


Before    repairing    or    making    any    alterations    to    the    Creator    X    it    is    essential    that    the   
machine   is   turned   off   and   the   power   cord   is   unplugged.   


The    Creator    X    operates    at    very    high    temperatures;    allow    the    nozzle,    the    extruded   
plastic   and   heating   plate   to   cool   before   touching.   


Some    plastic    filaments    may    give    off    a    little    odor    when    heated,    because    of    this,    the   
machine   should   always   be   set   up   in   a   well-­‐ventilated   area.   


Do    not    wear    gloves    when    operating    or    repairing,    as    entanglement    may    occur    and   
cause   injury.   


Do   not   leave   the   machine   unattended   when   in   operation.   

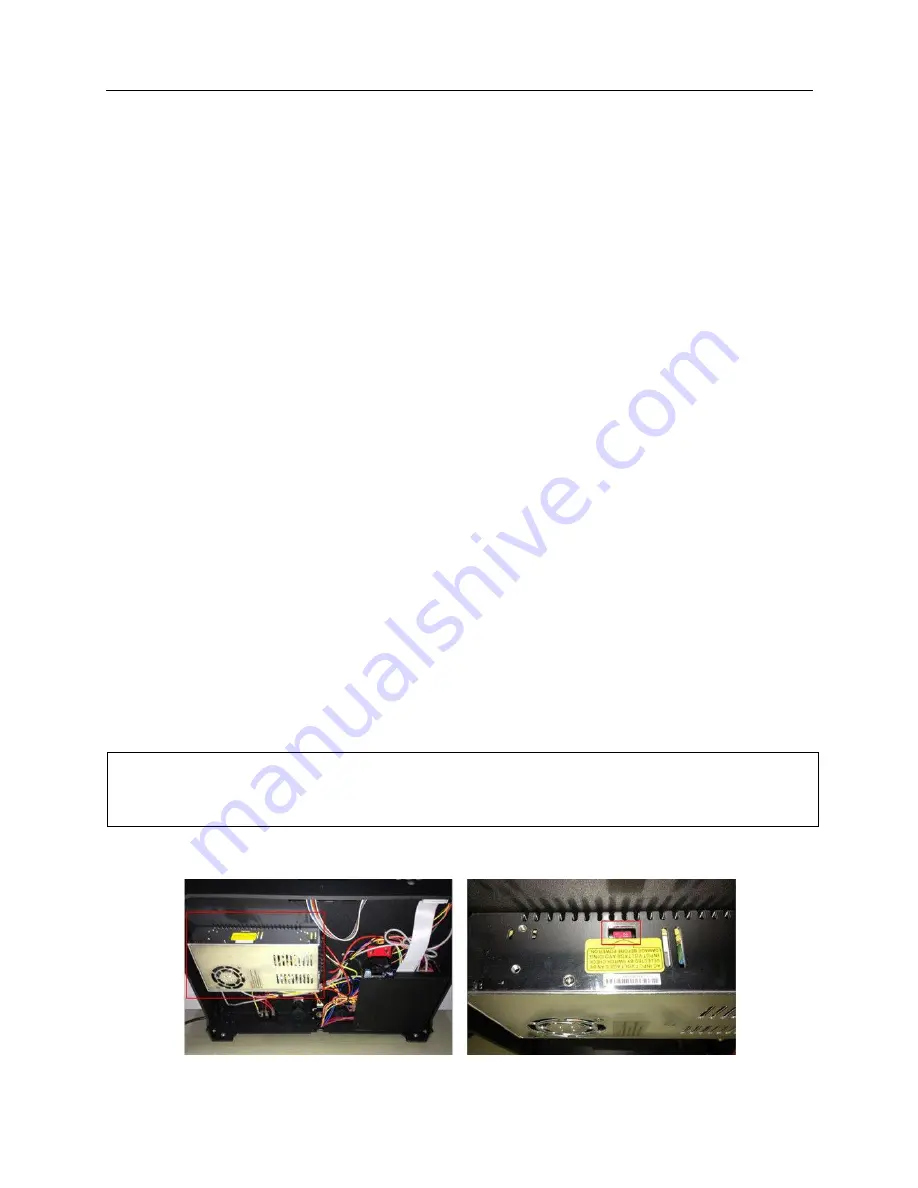
Please   always   check   power   setting   before   plugging   in!   

FlashForge    sets    the    power    supply    to    230V    before    leaving    the    factory.

    If    voltage    in    your   

location   is   between   90V   to   132V,   please   switch   the   power   setting   from   230V   to   115V   before   
you   plug   in.   You   will   find   the   power   source   at   the   bottom   of   The   Creator   X.   

   
The   following   photos   show   the   location   of   voltage   selector   switch:   


Содержание FlashForge Creator X

Страница 1: ... is pleased to present The Unofficial FlashForge Creator X Manual Last updated on July 10 2014 ...

Страница 2: ...cator G with the FlashForge Creator X 13 Downloading and Installing Replicator G 13 Importing an STL File and Generating Gcode 14 Connecting the USB Cable Setting the Extruder and Platform Temperatures 17 Loading and Unloading Filament 22 The First Print 26 Using Slic3r with the FlashForge Creator X 30 Installation and Initial Configuration 30 Custom G Code Single Material Prints 30 Custom G Code ...

Страница 3: ...r X on the SD card before contacting FlashForge support The FlashForge support team will not provide support for anything not covered in their official manual FlashForge only provides support for their hardware and the Replicator G software For any questions related to other topics covered in this unofficial manual 3D Universe customers are welcome to contact 3D Universe at support 3duniverse org ...

Страница 4: ...f and the power cord is unplugged The Creator X operates at very high temperatures allow the nozzle the extruded plastic and heating plate to cool before touching Some plastic filaments may give off a little odor when heated because of this the machine should always be set up in a well ventilated area Do not wear gloves when operating or repairing as entanglement may occur and cause injury Do not ...

Страница 5: ...cked at the FlashForge factory Please follow the un boxing steps laid out below Handle the package and its contents with extra care do not use any unnecessary force Do not remove the thin yellow film from the heating plate It is heat resistant tape that improves the adhesion of the extruded plastic to the plate Do not remove the wrapping around the nozzle It consists of a ceramic fiber fabric and ...

Страница 6: ...the Creator X out of the box using the two handles on the sides of the printer or by gripping the inner sides of the frame as shown in the photo below Gently lift and transfer the printer to your work surface You will find the extruder in the protective packaging along with the black cable carefully remove it and place it on your work surface Remove the cardboard packing material and take the acce...

Страница 7: ...e printing platform with one hand on each side raising it slowly and keeping it level Stop once the platform is just shy of the bronze nozzle Now you should be able to see underneath the build platform you ll find the filament here it s easiest to remove the filament by setting aside the remaining packaging material After that cut off the ties between the X axis and front metal frame You have now ...

Страница 8: ...of the accessory sleeve and position it on the extruder seat with the fans facing forward Align the screw holes and fasten with the two short silver screws Installing the Spool Holders and Filament Guide Tubes Next is the installation of the spool holders Install one on each side The installation of the spool holder is very simple just insert it into the circular opening and tighten the nut behind...

Страница 9: ... switch Remember to verify your power supply is set to the proper voltage for your location Now plug the USB A to B cable into the USB B type port Do not plug the other end in yet Finally take the filament out of the box install it on the spool holder and screw in the nut Use only your fingers and avoid over tightening the nut Congratulations You have completed the initial hardware installation If...

Страница 10: ...ies Level Build Plate Pay close attention leveling your platform is very important to print quality Here s the first screen Actually the Creator X has only three knobs on the bottom of the platform just inside the plastic arms that hold it up Your Creator X has been leveled perfectly before leaving the factory However it may become unleveled during shipping Please do level the build plate again be...

Страница 11: ...ct 355893 from Thingiverse http www thingiverse com thing 355893 2 Use your favorite slicing software to prepare this object to print using 0 2mm layer height 3 Start the print job 4 While the print job is running carefully make slight adjustments to each of the three adjustment knobs until the extruded filament is the proper thickness all the way around the build plate a When properly leveled the...

Страница 12: ...orge Please refer to the Software Alternatives section for other options Choosing which software to use is primarily a matter of personal preference At 3D Universe we ve done a great deal of testing with a variety of software options to determine the strengths and weaknesses of each The following is a high level summary of how some of these options compare based upon our experience Special Notes t...

Страница 13: ...inter Steps for installing and configuring your software 1 Download and install the appropriate version of PyPy from http pypy org download html 2 Download and install the appropriate version of Replicator G suitable for your system from http replicat org download a During the installation if you receive a message saying that a Python interpreter was not found ignore it and press Install to contin...

Страница 14: ...and then generate Gcode to print your creation Click File Open then browse and select the STL file that you would like to print import the file by double clicking Then the drawing will appear on the Replicator G interface When the object is imported you may find that it is not on the virtual build platform or even on the screen Using the function keys indicated by the red boxes you can change the ...

Страница 15: ...no support Exterior means surface support Full support means all support Object infill where 100 is a solid print 0 is a hollow object The recommended setting is 10 20 this will save time and filament Low infill also can reduce the corners lift up issue during ABS printing Layer height this controls the vertical resolution of the print The recommended thickness is 0 20mm Number of shells this is t...

Страница 16: ... 16 of 43 800 689 4344 Click Generate Gcode and a progress bar will appear The machine will now work properly when generating Gcode from Replicator G Now we will start a preliminary test of the machine s USB connection and we will heat the platform and extruder in preparation for printing ...

Страница 17: ...xtruder and Platform Temperatures First connect the machine and computer with the provided USB A to B cable The USB port on the machine is indicated by the red box in the above image After connecting the cable open the Replicator G software We are now going to connect the computer and printer Click Machine Connection serial port Rescan serial ports ...

Страница 18: ...en the software driver has not been installed To install the driver manually right click My computer and select properties The basic system parameters appear Then select Device Manager Locate the software driver shown in the red box right click and select Update Driver Click Browse to find the location of ReplicatorG0040 on your system ...

Страница 19: ... 689 4344 Click FTDI USB Drivers in the driver folder before confirmation and click OK The drivers will then be installed The next step is to connect the printer Rescan the serial ports and select the one that appears on your machine on our test machine the port was COM10 but different computers vary ...

Страница 20: ...se com Page 20 of 43 800 689 4344 Now we can connect the machine Select the function key in the red box below If the red area turns green it means the printer is connected with the computer Now we need to heat the extruder and build platform Click the cross shaped function key ...

Страница 21: ...ut the following target values 230 degrees for the extruder and 110 degrees for the heating platform After entering the values the platform will start to warm up When the extruder temperature reaches 50 degrees the cooling fan will activate and the current temperature value will display to the right as shown below ...

Страница 22: ...t the extruder is still over 200 degrees First push the filament in a little and then directly pull it out To avoid any blockages during printing please ensure that the two threads are loaded from the middle One spool should be mounted so it turns clockwise and the other one should run counter clockwise as shown below There are two ways of feeding the filament into the extruder head one is using t...

Страница 23: ...ad The display will show Monitor Mode Change Filament Level Build Plate Home Axes Select Change Filament click the ok button in the middle of the control pad The display will show Load Right Unload Right Load Left Unload Left Select Load right Click the ok button on the control pad The display will indicate I m heating up my extruder At this time the temperature of the right nozzle is being heated...

Страница 24: ...click the down arrow button to select Preheat Click the ok button in the middle Then you will see Start Preheat Right Tool ON Left Tool ON Platform OFF 3 Click the ok button You will see Heating n n R Extruder 033 230C L Extruder 033 230C Platform 024 This means the left extruder is heating up When it reaches 230C first push in the filament a little bit until you see filament come out of the nozzl...

Страница 25: ...ial click the right extruder on the upper right corner of the control panel and manually modify the temperature in the Right Target setting for the extruder temperature control changing the temperature to 230 degrees A red line will be plotted in the temperature map When the actual Current temperature reaches 230 degrees you can pull the filament out ...

Страница 26: ...mm_Calibration_Box stl The preview interface will then appear along with a virtual impression of the 20mm cube on the virtual printer bed On the preview interface click Move Centre and Put on platform so that the sample will be printed on the center of the build plate Next click Generate Gcode A dialogue box will pop up After inputting your chosen parameters the Gcode will be generated ...

Страница 27: ... of the Gcode generation Once your Gcode is generated click the left most button on the green bar near the top of the screen to start the print The Gcode has now been sent to the printer and the object will start printing shortly Dual Extruder Print To use the two color printing that comes with the Replicator G software select Gcode Merge STL for Dual Extrusion ...

Страница 28: ...ck browse for left extruder locate the folder examples found wherever you installed Replicator G Open the folder examples and select Two_color_world_a stl as shown below Repeat the process for the right extruder and select Two_color_world_b stl as shown below Use the third Browse button to save the combined object as a gcode file in a folder of your choice ...

Страница 29: ... to remove the tick in front of the use raft support option Make sure the rest of your settings are the same in both boxes then click the Generate Gcode button in both windows Once your Gcode is generated click the left most button on the green bar near the top of the screen to start the print The Gcode has now been sent to the printer and the object will start printing shortly ...

Страница 30: ... the appropriate number of extruders For G Code flavor choose Makerbot if you are using the default firmware or Sailfish Makerbot if you have upgraded to the Sailfish firmware Set the print bed dimensions X 228 Y 150 Set the number of extruders to 2 Custom G Code Single Material Prints Under Custom G Code in your single material printer profile try using the following Start G Code T0 set primary e...

Страница 31: ... commands that follow G1 Z first_layer_height F6000 000 move to first layer height G1 X100 Y 73 F14000 000 move to front right corner of bed G1 X 90 Y 73 E24 F2000 000 extrude a line of filament across the front edge of the bed G4 P2000 wait for ooze to slow G1 Z0 F6000 000 lower nozzle height to 0 G1 X 95 wipe nozzle G1 Z first_layer_height F6000 000 set nozzle to first layer height G1 F12000 ens...

Страница 32: ... position front left corner of print bed G130 X0 Y0 A0 B0 set stepper motor vref to lower value while heating M6 T0 wait for bed and extruder 1 to heat up M6 T1 wait for extruder 2 to heat up T0 change to primary extruder G130 X127 Y127 A127 B127 set stepper motor vref to defaults M108 T0 R3 set extruder speed G92 E0 set E to 0 M320 acceleration enabled for all commands that follow G1 Z first_laye...

Страница 33: ...bed temperature to 0 M104 S0 T0 set 1st extruder temperature to 0 M104 S0 T1 set 2nd extruder temperature to 0 M18 disable all stepper motors M70 P5 Display We 3 Making Things message M72 P1 Play Ta Da song And for Tool Change G Code T next_extruder Converting from G Code to X3G Using GPX as a Slic3r Post Processor You can download the GPX utility from here http www thingiverse com thing 81425 Pla...

Страница 34: ...e path suffix1 fileparse fname qr my shortname name suffix1 my shortpath Win32 GetShortPathName path exec C gpx win32 1 3 gpx exe g p m r1d shortpath shortname C Dropbox 3DPRIN 2 name x3g You ll need to modify the last line according to where you have gpx exe and where you want the x3g files placed Note that the path used here should not contain any spaces This will call GPX tell it that I m using...

Страница 35: ...tor G MakerWare is easier to use has a nicer user interface is more stable and is significantly faster Visit http makerbot com makerware download the latest version of MakerWare for your operating system and run the downloaded file to install After installing run the program In the configuration wizard choose Replicator Dual as the device type This can also be configured by going to Devices Select...

Страница 36: ...you would like to manually change the firmware settings you can go to Tools Firmware Configuration From here you can change the firmware profile and the general communication settings For the FlashForge you should select the Sailfish Makerbot Firmware profile This will allow the software to work with both the FlashForge firmware and the common Sailfish firmware upgrade see the Upgrading to Sailfis...

Страница 37: ... and the software will copy the x3g and G Code file to the FlashForgeʹ s SD card You can then insert the SD card back into your printer and use the built in LCD menu to select the Build from SD option Select the file you wish to print and start printing 2 Print over a USB connection When you plug the USB cable into your computer the software will automatically connect with the printer A pop up mes...

Страница 38: ...d before trying to connect to your printer using the Simplify3D Software You can do this by opening MakerWare and going to Services Stop Background Service If the bot is printing off center to the left for the left extruder only you can use this modified starting G Code script to resolve the issue Replicator 1 dual start gcode M103 extruder off M73 P0 enable build progress M70 P2 Simplify3D G162 X...

Страница 39: ...3D Universe Presents The Unofficial FlashForge Creator X Manual shop3duniverse com Page 39 of 43 800 689 4344 M73 P1 body notify GPX body has started end of start gcode ...

Страница 40: ...any temperature settings in a x3g file and instead use the current preheat settings for printing temperatures This allows you to switch materials without having to re generate your x3g files If you are trying to upgrade to Sailfish here are some tips and suggestions Make sure you follow all the instructions specified on Makerbot s Sailfish installation guide http www makerbot com sailfish install ...

Страница 41: ... you wish to print with other materials you will need to change the print surface by adding glass blue painter s tape or other materials depending on what you re printing with As an alternative you may consider adding a thick heat resistant glass build plate on top of the standard build plate The thermal glass build plate can be used to print on directly in a variety of materials assuming you prep...

Страница 42: ...face preparations For ABS The glass is coated with a thin layer of ABS juice mixture of ABS and acetone Heated bed temperature of 110C Clean the glass with a straight edged razor tool For PLA The glass is coated with Aqua Net Extra Super Hold hairspray Heated bed temperature of 60C Clean the glass with a damp cloth For Taulman Bridge Nylon The glass is coated with a glue stick or liquid PVA glue H...

Страница 43: ...messy when you scrape the dried ABS juice off the print bed It cleans off easily with a flat razor blade but it creates very thin shavings that tend to get everywhere We keep a portable vacuum nearby to clean these shavings out of the printer from time to time Still if you like keeping your 3D printer looking shiny and new this might not be the best option for you ...

Отзывы: