background image

1

3D Systems, Inc

.

1

  INTRODUCTION


COPYRIGHT

© 2014 by 3D Systems, Inc. All rights reserved. This document is subject to change without notice. This document is copyrighted and 

contains proprietary information that is the property of 3D Systems, Inc. Cubify, and the 3D Systems logo are registered trademarks 

of 3D Systems, Inc. CubePro is a trademark of 3D Systems, Inc. Use of the Cubify.com website constitutes acceptance of its Terms 

of Service and Privacy Policy.

FCC NOTICE

This equipment has been tested and found to comply with the limits for a Class B digital device, pursuant to part 15 of the FCC Rules. 

These limits are designed to provide reasonable protection against harmful interference in a residential installation. This equipment 

generates, uses and can radiate radio frequency energy and, if not installed and used in accordance with the instructions, may 

cause harmful interference to radio communications. However, there is no guarantee that interference will not occur in a particular 

installation. If this equipment does cause harmful interference to radio or television reception, which can be determined by turning the 
equipment off and on, the user is encouraged to try to correct the interference by one or more of the following measures:
—Reorient or relocate the receiving antenna.
—Increase the separation between the equipment and receiver.
—Connect the equipment into an outlet on a circuit different from that to which the receiver is connected.
—Consult the dealer or an experienced radio/TV technician for help.

NOTE: Changes or modifications to this equipment not specifically approved by 3D Systems may void the user’s 

authority to operate this equipment.

KCC

이 기기는 가정용(B급) 전자파적합기기로서 주 로 가정에서 사용하는 것을 목적으로 하며, 모 든 지역에서 사용할 수 있습니다.

This equipment is home use (Class B) electromagnetic wave suitability equipment and to be used mainly at home and it can be used 

in all areas.

COMPLIANCE

This equipment conforms with International Electric Committee (IEC) 60950-1 and meets the requirements of the applicable EC 

directives. 

CAN ICES-3 (B)/NMB-3(B)
This device complies with Industry Canada license-exempt RSS standard(s). Operation is subject to the following two conditions: 

(1) this device may not cause interference, and (2) this device must accept any interference, including interference that may cause 

undesired operation of the device.
Le présent appareil est conforme aux CNR d’Industrie Canada applicables aux appareils radio exempts de licence. L’exploitation est 

autorisée aux deux conditions suivantes: (1) l’appareil ne doit pas produire de brouillage, et (2) l’utilisateur de l’appareil doit accepter 

tout brouillage radioélectrique subi, même si le brouillage est susceptible d’en compromettre le fonctionnement.

Содержание CubePro

Страница 1: ...CubePro Cartridge Bay Replacement Guide Original Instructions Prosumer 3D Printer...

Страница 2: ...f the following measures Reorient or relocate the receiving antenna Increase the separation between the equipment and receiver Connect the equipment into an outlet on a circuit different from that to...

Страница 3: ...conferred by our ninety 90 day warranty are in addition to and operate concurrently with all rights and remedies conveyed by such consumer protection laws and regulations including but not limited to...

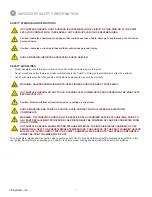
Страница 4: ...P FINGERS AND OTHER BODY PARTS AWAY HOT SURFACE HAZARD DO NOT TOUCH THE PRINT JETS DURING SETUP AND OPERATION THE PRINT JETS BECOME VERY HOT Caution Read and follow all instruction prior to setting up...

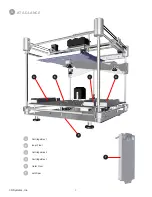
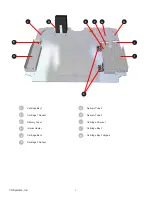
Страница 5: ...4 3D Systems Inc 3 AT A GLANCE A E A Cartridge Bay 1 B Inner Floor C Cartridge Bay 2 D Cartridge Bay 3 E Outer Floor F Jet Wiper B C D F...

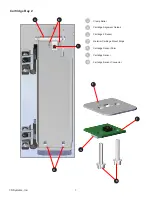
Страница 6: ...G H I J K A Cartridge Bay 1 B Cartridge 1 Sensor C Delivery Tube 1 D Interior Heater E Cartridge Bay 2 F Cartridge 2 Sensor G Delivery Tube 2 H Delivery Tube 3 I Cartridge 3 Sensor J Cartridge Bay 3...

Страница 7: ...ems Inc Cartridge Bay 2 A Clamp Roller B Cartridge Alignment Guides C Cartridge 2 Sensor D Material Cartridge Mount Rings E Cartridge Sensor Shim F Cartridge Sensor G Cartridge Sensor Connector A B D...

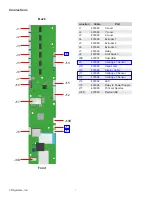
Страница 8: ...9 Z Loom J4 401889 Extruder 1 J5 401889 Extruder 2 J6 401889 Extruder 3 J7 401893 Relay J8 401889 Limit Switch J8B 401897 Host USB J9 401895 Cartridge 1 Sensor J10 401889 Head Loom J12 401899 Display...

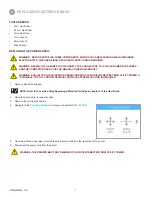
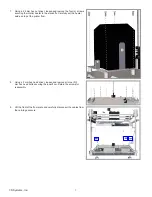
Страница 9: ...Y WARNING EVEN AFTER THE PRINTER HAS BEEN TURNED OFF AND DISCONNECTED FROM UTILITY POWER IT IS POSSIBLE TO STILL CONTAIN RESIDUAL VOLTAGE EXTREME CAUTION IS REQUIRED 1 Remove all print cartridges NOTE...

Страница 10: ...to the standoffs Carefully set the heater aside on top of the printer floor 8 Using a 3 mm hex head driver loosen and remove all nine 9 3 mm hex head bolts securing the inner floor Retain the screws...

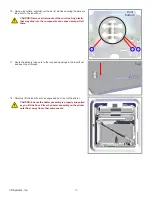
Страница 11: ...o the components can cause damage if left there 11 Route the delivery tube nuts to the rounded openings in the inner floor and push them through 12 Carefully tilt the inner floor at an angle and pull...

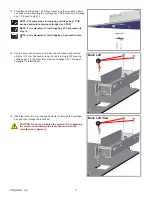
Страница 12: ...NOTE For replacement of cartridge bay 2 proceed to step 18 14 Using a 3 mm hex driver and an 8 mm wrench loosen and remove all three 3 3 mm hex head screws A and 8 mm nuts B securing cartridge bay 1...

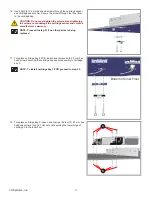
Страница 13: ...void the manufacturer s warranty NOTE Proceed to step 21 if no other parts are being replaced 17 To replace cartridge bay 2 PCB loosen and remove both 2 5 mm hex head screws securing the cartridge bay...

Страница 14: ...ure the cartridge sensor assembly to the bottom of cartridge bay 2 by inserting and tightening both 2 2 5 mm hex head screws CAUTION Do not over tighten the screws Over tightening the screws could dam...

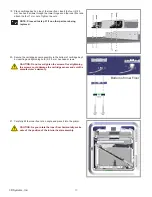
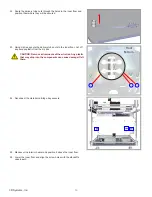
Страница 15: ...ner floor Cut off any excess plastic from the zip ties CAUTION Remove all remnants of the wire ties Any plastic that may drop into the components can cause damage if left there 24 Reconnect the materi...

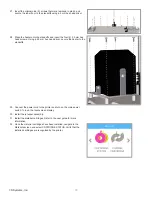
Страница 16: ...m hex head driver secure the heater to the standoffs 29 Connect the power cord to the printer and turn on the main power switch Turn on the touchscreen display 30 Install the jet wiper assembly 31 Ins...

Страница 17: ...3D Systems Inc 333 Three D Systems Circle Rock Hill SC 29730 www 3dsystems com 2014 3D Systems Inc All rights reserved PN 403167 00 Rev A...

Отзывы: