


Download the Allevi Client app
. Extract the downloaded .zip and run the application.
You’ll need to keep this open whenever you are using your Allevi bioprinter.
Step 2
Plug your Allevi Adapter into your computer’s USB port.
Step 3
Turn your printer on.
Step 4
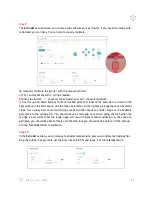
In your Wi-Fi list, you should see a dropdown to select different Wi-Fi networks. The dropdown
allows you to switch between “Wi-Fi 1” and “Wi-Fi 2”; however on some computers this may be
called “Wi-Fi 2” and “Wi-Fi 3”. See the screenshot below for an example. It does not matter what
your networks are called, as long as they are connected as follows:
• Wi-Fi 1:
Connect this to your home or work Wi-Fi network
• Wi-Fi 2:
Connect this to the Allevi Printer Wi-Fi Access Point
“Allevi Printer <serial number>”
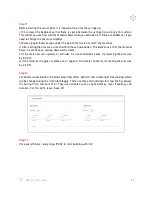
Step 5
Navigate to
and log in as normal using your Bioprint credentials.
Step 6
On your printer dashboard, turn off your printer’s Cloud Mode using the cloud icon and follow the
system prompts. This will take 3-5 minutes to complete.
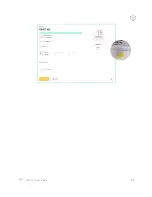
Step 7
If connection is successful, you will see the following state on the Allevi Client Application and a
green Connect button in the printer dashboard.
16
Allevi 1 | User Guide
Содержание Allevi 3
Страница 1: ...Allevi 3 User Guide 1 1 2 ...
Страница 2: ...BUILD WITH LIFE ...
Страница 4: ...WELCOME ...
Страница 8: ...GETTING STARTED ...
Страница 10: ...28mm 77 50mm Diameter 88 30mm 9 Allevi 3 User Guide PRINT BED DIMENSIONS ...
Страница 18: ...START PRINTING ...
Страница 24: ...23 Allevi 3 User Guide ...
Страница 25: ...MAINTENANCE TROUBLESHOOTING ...
Страница 28: ...Copyright Allevi Inc 2022 Allevi Inc 2929 Arch St 17th Floor Philadelphia PA 19104 ...
Страница 29: ......