3D Systems Allevi 3 Скачать руководство пользователя страница 15

14

Allevi 3 | User Guide
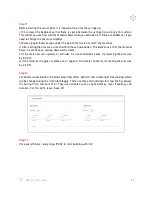
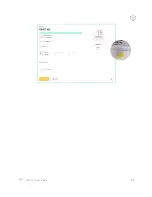
Step 4

Type in your device serial number and click 

‘Add printer’

. Your serial number can be found

on the back of your printer or in your onboarding email from the Allevi Support Team.

      Note: The serial number has 7 characters and should be limited to letters between a-f and numbers.
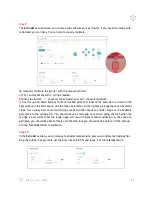
Step 5

Once your printer is registered, it will appear as an available printer in your printer list.

Содержание Allevi 3

Страница 1: ...Allevi 3 User Guide 1 1 2 ...

Страница 2: ...BUILD WITH LIFE ...

Страница 3: ...IONS WARNINGS 3 4 5 GETTING STARTED WHAT S IN THE BOX PRINT BED DIMENSIONS ALLEVI 3 DIAGRAM 7 8 9 10 SETTING UP YOUR SOFTWARE CONNECTING TO YOUR PRINTER 13 15 START PRINTING YOUR FIRST BIOPRINT 17 18 MAINTENANCE TROUBLESHOOTING TROUBLESHOOTING AND CONTACT US 24 25 ...

Страница 4: ...WELCOME ...

Страница 5: ... 24V DC 16 7A SOFTWARE Bundle Allevi Bioprint Online Connectivity WiFi Ethernet Allevi Wireless Adapter Supported File Types STL gcode Operating System Windows MacOSX Linux PRINTING Print Technology Extrusion Printing Pressure Range 1 120 PSI 7 827 kPa Pressure Variance 0 1 PSI Build Volume 3 5 x 2 4 x 5 1 in 42 8 in 9 x 6 x 13 cm 702 cm CORE PRINTHEAD Max Temp E1 160ºC Min Temp 4ºC LED Range 365 ...

Страница 6: ...tion facilities for recovery and recycling UV WARNING This symbol indicates potential ultraviolet light exposure The Allevi 3 s extru der s can emit wavelengths of 365 405nm Wear UV glasses when operating and avoid eye and skin exposure to unshielded product CE MARKING This mark indicates conformity with health safety and environmental protec tion standards for products sold within the European Ec...

Страница 7: ...sponsible for appropriate decontamination in case of spillage of hazardous materials on or inside of the equipment If the equipment is used in a manner not specified by Allevi the protection provided by the equip ment may be impaired 6 Allevi 3 User Guide ENVIRONMENTAL CONDITIONS The Allevi 3 should be operated in the following conditions MAINTENANCE AND CLEANING INSTRUCTIONS Recommended decontami...

Страница 8: ...GETTING STARTED ...

Страница 9: ...8 Allevi 3 User Guide WHAT S IN THE BOX Allevi 3 bioprinter 1 Starter bioink kit 2 Power supply 3 Air compressor 4 Compressor hose 5 Air compressor arrives separately ...

Страница 10: ...28mm 77 50mm Diameter 88 30mm 9 Allevi 3 User Guide PRINT BED DIMENSIONS ...

Страница 11: ...A Air Compressor Lines B CORE printhead heating and cooling C Autocalibration pad D Build Plate heating E Power On Off C A B D E 10 Allevi 3 User Guide ALLEVI 3 DIAGRAM ...

Страница 12: ...printer is securely placed on a flat surface connect the CORE extruders to the gantry Each CORE extruder is magnetized so each will snap into place Note You can operate the printer with the CORE print heads in many different configurations We will discuss further in Your First Bioprint later in this manual Step 3 Connect the red plastic air hoses to the top of the frame and the air input junction ...

Страница 13: ...ion should be formed F Give the connection a light tug to ensure it is secure Note The air compressor must remain turned on for the entirety of the print Using the knob near the outlet valve set the pressure on both gauges to 120 PSI This will ensure you have plenty of pressure to use during printing Any adjustment to your printing pressure is made in the software so leave the air compressor on th...

Страница 14: ...mend Google Chrome or Firefox but Safari and Edge are also acceptable Step 2 Login to the software To set up an account click Create an account Step 3 To register your printer scroll down in your printer list and click Add printer If you re planning on having multiple users work with your printer we would recommend that you first make a Team and add the printer to your Team A guide to do this can ...

Страница 15: ...number can be found on the back of your printer or in your onboarding email from the Allevi Support Team Note The serial number has 7 characters and should be limited to letters between a f and numbers Step 5 Once your printer is registered it will appear as an available printer in your printer list ...

Страница 16: ... Click Configure under Wifi Settings and enter your network credentials on the next screen The chosen WiFi network should be a private network without a Click to accept intermediate page Once the network has been successfully added a green message will pop up at the bottom of the page You can now close this window Adapter Connection With this connection method your Allevi bioprinter will not be co...

Страница 17: ...elow for an example It does not matter what your networks are called as long as they are connected as follows Wi Fi 1 Connect this to your home or work Wi Fi network Wi Fi 2 Connect this to the Allevi Printer Wi Fi Access Point Allevi Printer serial number Step 5 Navigate to https bioprint allevi app and log in as normal using your Bioprint credentials Step 6 On your printer dashboard turn off you...

Страница 18: ...START PRINTING ...

Страница 19: ...e some material in the barrel c Place the rubber seal in the syringe barrel d Use the plunger to push the rubber seal to move the material all the way to the tip of the syringe Invert the syringe and push the plunger pointing the syringe upwards This can also help reducing bubbles Note If you are using the syringe plunger make sure it doesn t lock back into the rubber seal Note Bioinks may be load...

Страница 20: ... while the printer loads its firmware and connects to the Internet You can connect to your printer once the yellow lights are off Step 5 Login to bioprint allevi3d com Select your printer from the printer list and click Connect Step 6 This will bring you to your printer Status section Here you can get an overview of your print settings We recommend always autocalibrating first Always autocalibrate...

Страница 21: ...an either upload STL or gcode files We recom mend starting with the cylinder or cube under Allevi Files Step 8 Next choose your dish in the Build Plate section For your first bioprint we ll be using a petri dish For wellplates print files will automatically be replicated in all wells ...

Страница 22: ... on the right to pick appropriate movement steps It is usually best to start with large steps and then move to smaller steps as the bedplate gets close to the syringe tip You should leave a small gap to avoid scraping the dish when the syringe is pressurized but too large a gap will result in poor material adhesion In the case of a petridish you should be able to freely spin the dish but you shoul...

Страница 23: ...l flows in a continuous steady downward stream d If the material curls upward or extrudes in an uncontrolled stream try lowering the pressure by 2 3 PSI e If the material struggles to come out or appears in discrete chunks try increasing the pressure by 2 3 PSI Step 12 For photocurable bioinks the Allevi bioprinter offers both UV and visible light crosslinking which can be changed using the UV Vis...

Страница 24: ...23 Allevi 3 User Guide ...

Страница 25: ...MAINTENANCE TROUBLESHOOTING ...

Страница 26: ... help you be more successful with bioprinting Visit us at www allevi3d com and check out our Protocols page for step by step bioprinting instructions Support page for informational articles and troubleshooting guides Services page for help accelerating your research Blog for the latest in bioprinting news You can also visit the Allevi YouTube channel for video instructions Have more questions or n...

Страница 27: ...tive 2011 65 EU of 7 January 2011 Directive EU 2015 863of21March 2015 Statement about the relevant harmonized standards that have been used or statement about the specifications in relation to which conformity is declared Standard Date of Issue EN 12100 2010 IEC 61010 1 2010 A1 2016 IEC 61010 2 010 2014 EN 55032 2015 A11 2020 EN 55035 2017 A11 2020 EN 61000 3 2 2014 EN 61000 3 3 2013 EN 301 489 3 ...

Страница 28: ...Copyright Allevi Inc 2022 Allevi Inc 2929 Arch St 17th Floor Philadelphia PA 19104 ...

Страница 29: ......

Отзывы: