


936
C
HAPTER
85: M
ONITOR
L
INK
C
ONFIGURATION
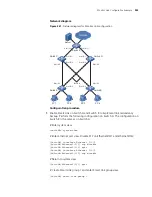
# Configure Ethernet2/0/1 as the master port of the Smart Link group and
Ethernet2/0/2 as the slave port.
[SwitchA-smlk-group1] port Ethernet 2/0/1 master
[SwitchA-smlk-group1] port Ethernet 2/0/2 slave
# Configure to send flush messages in VLAN 1.
[SwitchA-smlk-group1] flush enable control-vlan 1
2
Enable Monitor Link on Switch C and Switch D and enable the function of
processing flush messages received from VLAN 1. Perform the following
configuration on Switch C. The operation procedure on Switch D is the same as
that performed on Switch C.
# Enter system view.
<SwitchC> system-view
# Create Monitor Link group 1 and enter Monitor Link group view
[SwitchC] monitor-link group 1
# Configure Ethernet2/0/1 as the uplink port of the Monitor Link group and
Ethernet2/0/2 and Ethernet2/0/3 as the downlink ports.
[SwitchC-mtlk-group1] port Ethernet 2/0/1 uplink
[SwitchC-mtlk-group1] port Ethernet 2/0/2 downlink
[SwitchC-mtlk-group1] port Ethernet 2/0/3 downlink
# Return to system view. Enable the function of processing flush messages
received from VLAN 1 on Ethernet2/0/2 and Ethernet2/0/3.
[SwitchC-mtlk-group1] quit
[SwitchC] smart-link flush enable control-vlan 1 port Ethernet 2/0/2
to Ethernet 2/0/3
3
Enable the function of processing flush messages received from VLAN 1 on
Ethernet 2/0/10 and Ethernet 2/0/11 of Switch E.
# Enter system view.
<SwitchE> system-view
# Enable the function of processing flush messages received from VLAN 1 on
Ethernet 2/0/10 and Ethernet 2/0/11.
[SwitchE] smart-link flush enable control-vlan 1 port Ethernet 2/0/1
0 to Ethernet 2/0/11
Содержание Switch 7757
Страница 32: ...32 CHAPTER 1 CLI OVERVIEW...
Страница 70: ...70 CHAPTER 5 LOGGING IN USING MODEM...
Страница 76: ...76 CHAPTER 7 LOGGING IN THROUGH NMS...
Страница 86: ...86 CHAPTER 9 CONFIGURATION FILE MANAGEMENT...
Страница 120: ...120 CHAPTER 13 ISOLATE USER VLAN CONFIGURATION...
Страница 126: ...126 CHAPTER 14 SUPER VLAN...
Страница 136: ...136 CHAPTER 16 IP PERFORMANCE CONFIGURATION...
Страница 152: ...152 CHAPTER 17 IPX CONFIGURATION...
Страница 164: ...164 CHAPTER 19 QINQ CONFIGURATION...
Страница 172: ...172 CHAPTER 21 SHARED VLAN CONFIGURATION...
Страница 182: ...182 CHAPTER 22 PORT BASIC CONFIGURATION...
Страница 198: ...198 CHAPTER 24 PORT ISOLATION CONFIGURATION...
Страница 208: ...208 CHAPTER 25 PORT SECURITY CONFIGURATION...
Страница 224: ...224 CHAPTER 27 DLDP CONFIGURATION...
Страница 232: ...232 CHAPTER 28 MAC ADDRESS TABLE MANAGEMENT...
Страница 240: ...240 CHAPTER 29 CENTRALIZED MAC ADDRESS AUTHENTICATION CONFIGURATION...
Страница 280: ...280 CHAPTER 30 MSTP CONFIGURATION...
Страница 348: ...348 CHAPTER 35 IS IS CONFIGURATION...
Страница 408: ...408 CHAPTER 39 802 1X CONFIGURATION...
Страница 412: ...412 CHAPTER 40 HABP CONFIGURATION...
Страница 422: ...422 CHAPTER 41 MULTICAST OVERVIEW...
Страница 426: ...426 CHAPTER 42 GMRP CONFIGURATION...
Страница 480: ...480 CHAPTER 47 PIM CONFIGURATION...
Страница 506: ...506 CHAPTER 48 MSDP CONFIGURATION...
Страница 552: ...552 CHAPTER 51 TRAFFIC ACCOUNTING CONFIGURATION...
Страница 570: ...570 CHAPTER 53 HA CONFIGURATION...
Страница 582: ...582 CHAPTER 54 ARP CONFIGURATION SwitchA arp protective down recover interval 200...
Страница 622: ...622 CHAPTER 58 DHCP RELAY AGENT CONFIGURATION...
Страница 684: ...684 CHAPTER 61 QOS CONFIGURATION...
Страница 718: ...718 CHAPTER 63 CLUSTER...
Страница 738: ...738 CHAPTER 67 UDP HELPER CONFIGURATION...
Страница 752: ...752 CHAPTER 69 RMON CONFIGURATION...
Страница 772: ...772 CHAPTER 70 NTP CONFIGURATION...
Страница 796: ...796 CHAPTER 72 FILE SYSTEM MANAGEMENT...
Страница 802: ...802 CHAPTER 73 BIMS CONFIGURATION...
Страница 814: ...814 CHAPTER 74 FTP AND TFTP CONFIGURATION...
Страница 830: ...830 CHAPTER 75 INFORMATION CENTER...
Страница 836: ...836 CHAPTER 76 DNS CONFIGURATION...
Страница 852: ...852 CHAPTER 77 BOOTROM AND HOST SOFTWARE LOADING...
Страница 858: ...858 CHAPTER 78 BASIC SYSTEM CONFIGURATION DEBUGGING...


