Normal LAN Configuration
5 - 3
Normal LAN
Configuration
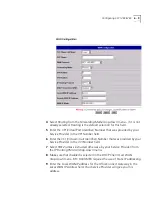
To configure your LAN settings for the normal level, perform the
following steps:
1
LAN Configuration Level
: Normal
is the default selection on the LAN
Configuration page. Select
Normal
in the
LAN Configuration Level
drop-down menu if it is not already selected.
2
LAN IP Address
: Enter the LAN IP address for the OfficeConnect
Gateway in the
LAN IP Address
field. This address must be unique. Ensure
that it is not used by anything else on your LAN. The default LAN IP
Address for the OfficeConnect Gateway is 192.168.1.1.
If you change your LAN IP Address, network connectivity will be lost.
Restart your workstation(s) to acquire the new IP address. If you are using
static IP addresses on your LAN, you must manually reconfigure the
workstation’s IP addresses.
3
LAN IP Mask
: Enter the LAN IP Mask address for the OfficeConnect
Gateway in the
LAN IP Mask
field. The LAN IP Mask is used together with
the LAN IP address to determine if local IP traffic should be forwarded to
other networks. The default LAN IP Mask address for the OfficeConnect
Gateway is 255.255.255.0, for a Class C IP network
4
DHCP Server Status
: By default, the DHCP Server Status option of the
OfficeConnect Gateway is
Enabled
. When this option is enabled, the
OfficeConnect Gateway will assign IP addresses dynamically to each PC
on the LAN. To disable this option, select
Disable
in the
DHCP Server
Status
drop-down menu.
Ensure that only one DHCP Server is running on the same network.
5
Start Address
: Enter the start (first) address for the range of IP addresses
to be used by the DHCP Server for dynamically assigning IP addresses to
PCs on the same subnet. For example, 192.168.1.2.
6
End Address
: Enter the ending (last) address for the range of IP
addresses to be used by the DHCP Server for dynamically assigning IP
addresses to PCs on the same subnet. For example, 192.168.1.200.
7
Click
Apply
to save your changes to the
LAN Configuration
page. (If you
click
Reset
, all changes you made on this page will be deleted, and the
fields will be re-set to their default values.)
8
Click
SaveAll
on the upper right portion of the OfficeConnect Gateway
menu bar to save your changes permanently.
Содержание OfficeConnect 3CR100A97
Страница 1: ...http www 3com com OfficeConnect Gateway Users Guide Release 1 0 Part No 10042307 Rev AA...
Страница 44: ...3 10 CHAPTER 3 USING THE OFFICECONNECT GATEWAY...
Страница 52: ...4 8 CHAPTER 4 ADMINISTRATION...
Страница 58: ...5 6 CHAPTER 5 LAN CONFIGURATION...
Страница 126: ...9 12 CHAPTER 9 MANAGEMENT FEATURES...
Страница 132: ...10 6 CHAPTER 10 STATISTICS...
Страница 154: ...12 12 CHAPTER 12 TROUBLESHOOTING...
Страница 172: ......

