background image

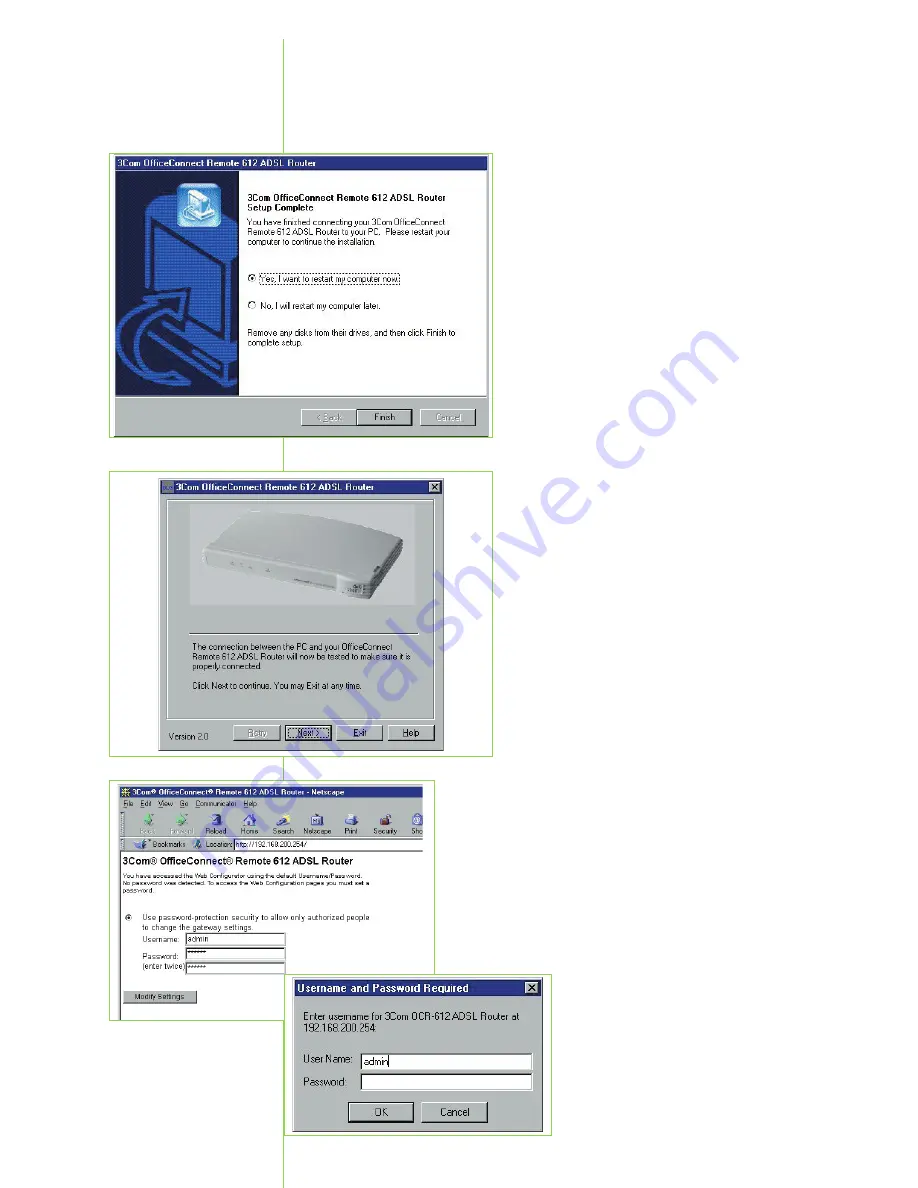
10. Verifying the Connection

After the computer has rebooted, you
will be presented with the screen
shown in Figure 9. Click Next to start
the verification process for your
Router. This ensures that your PC can
communicate properly with your
Router. If there is an error, follow the
on-screen prompts to fix the problem.

When the PC has successfully commu-
nicated with your Router, click on
Next to proceed.

11. Initial Logon

On your first connection with the Router, you
will be prompted to enter a User Name. At
the screen shown in Figure 10a, enter 

admin

as the User Name, and leave the Password box
blank. Click OK. 

At the next screen shown in Figure 10b, enter
a password twice, and click Modify Settings. 

Your Router is now password
protected. You will need this
login information to make any
configuration changes to the
Router.

6

Figure 10b

9. Restart your computer.

Remove all CDs and disks from their
drives and click Finish. When the sys-
tem has restarted, the installation will
continue.

Figure 8

Figure 9

Figure 10a

Installation
Procedure
Cont’d

Содержание OfficeConnect 3C612

Страница 1: ...OfficeConnect Remote 612 ADSL Router 3C612 Quick Start Guide English ...

Страница 2: ...documentation and the software described herein are provided to you subject to the following United States Government Legend All technical data and computer software is commercial in nature and developed solely at private expense Software is delivered as Commercial Computer Software as defined in DFARS 252 227 7014 June 1995 or as a commercial item as defined in FAR 2 101 a and as such is provided...

Страница 3: ...s a three step process 1 Unpacking and positioning the OfficeConnect Remote 612 ADSL Router 2 Running the Installation Procedure 3 Configuring the OfficeConnect Remote 612 ADSL Router This guide describes how to install and configure the OfficeConnect Remote 612 ADSL Router for shared Internet access To set up your OfficeConnect Remote 612 ADSL Router you must have the following An Internet Servic...

Страница 4: ...tab on the TCP IP Properties window Windows 2000 Double click the Network and Dial up Connections icon then double click the Local Area Connection icon Click Properties on the Local Area Connection Status window and then select Internet Protocol TCP IP from the list of components shown on the General tab of the Local Area Connection Properties win dow Click the General tab on the Internet Protocol...

Страница 5: ...nnect the power adapter Connect the cable from the power adapter to the Power inlet on the rear panel of the unit Connect the other end of the power cord into a surge protected electrical outlet 3 Connect the LAN cable Connect one end of the LAN cable to the Ethernet port of your computer and the other end to the Ethernet port on the rear panel of the OfficeConnect Remote 612 ADSL Router If you ar...

Страница 6: ... path for the files that will be copied onto your PC When you are ready to proceed click Next Click Next again in the screen setting up Program folder entries 1 Select Activity The first screen Fig 2 lets you select the Installation procedure run the Diagnostics or view the online User s Guide The Installation procedure is selected by default Click Next and click Next again at the Welcome screen I...

Страница 7: ...r inlet on the rear panel of the unit Connect the other end of the power cord into a surge protected electrical outlet Wait for the Alert light on the front of the Router to stop flashing then click Next 6 Connect the Ethernet cable Connect one end of the Ethernet cable to the Ethernet port of your computer and the other end to the Ethernet port on the rear panel of the OfficeConnect Remote 612 AD...

Страница 8: ... On your first connection with the Router you will be prompted to enter a User Name At the screen shown in Figure 10a enter admin as the User Name and leave the Password box blank Click OK At the next screen shown in Figure 10b enter a password twice and click Modify Settings Your Router is now password protected You will need this login information to make any configuration changes to the Router ...

Страница 9: ...hat both the ADSL Line and the Internet Connection are Up you are ready to use the Router for Internet Access If you need to connect additional users proceed to the next section Connecting multiple Users After the initial setup of the unit you can access Router Diagnostics Uninstall the User s Guide and the User Manager from the Program Menu as shown in Figure 12 your system may look slightly diff...

Страница 10: ...r OfficeConnect Remote 612 you can connect an Ethernet hub to add up to 40 users which is the maximum supported by the OfficeConnect Remote 612 An example of an eight user connection is shown below Fig 13 using a 3Com OfficeConnect Ethernet Hub 8 1 Verify network configuration Check with your network administrator that the built in DHCP server will not cause conflicts on the network 2 Connect the ...

Страница 11: ...DSL LED is Blinking Orange The ADSL cable is not connected or has been damaged Ensure that the ADSL cable is fully plugged in or replace it with another telephone cable Otherwise contact your ISP The ADSL Link is Not Stable Wiring inside the house may be causing interference Make sure that any filter or splitter that you received from your ISP is installed properly There is another DSL device plug...

Страница 12: ...nection is up On the Diagnostics screen you will see an entry for Internet Connection If the Diagnostics screen shows that the Internet Connection is down refer to the Troubleshooting section on page 9 to determine your next course of action If the Diagnostics screen shows that the Internet Connection is up try to browse the Internet again If it still fails contact your ISP Which cable is which Th...

Страница 13: ... powered on This lets you know that the Router has recognized the Reset request It lasts for about 4 seconds Orange An unexpected error has occurred but it does not affect the operation of the Router Red A non recoverable error has occurred If this happens the Router will automatically reboot If the error persists contact your Internet Service Provider LAN Off No Ethernet signal has been detected ...

Страница 14: ... contact your network supplier for assistance have the following information ready Product model name part number and serial number A list of system hardware and software including revision levels Diagnostic error messages Details about recent configuration changes if applicable If you are unable to contact your network supplier see the following section on how to contact 3Com Support from 3Com If...

Страница 15: ...rea 00798 611 2230 02 3455 6455 Taiwan R O C 0080 611 261 Thailand 001 800 611 2000 Middle East Africa http www 3com com meaf All locations 971 4 807 4555 North America http www 3com com North America 1 800 net 3Com 1 800 638 3266 Europe http www 3com com europe Austria 07110 900116 Belgium 32 0 70 233 545 Flemish 32 0 70 233 546 French Denmark 45 0 35 44 5531 Finland 358 0 98170015 France 33 0 80...

Страница 16: ...za Santa Clara CA 95052 8145 USA To learn more about 3Com solutions visit www 3com com 3Com Corporation is publicly traded on Nasdaq under the symbol COMS All specifications are subject to change without notice Printed in Ireland Part No 10046406 Rev AB 9 01 ...

Отзывы: