background image

3

Connecting the Bridge

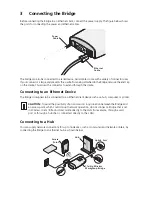
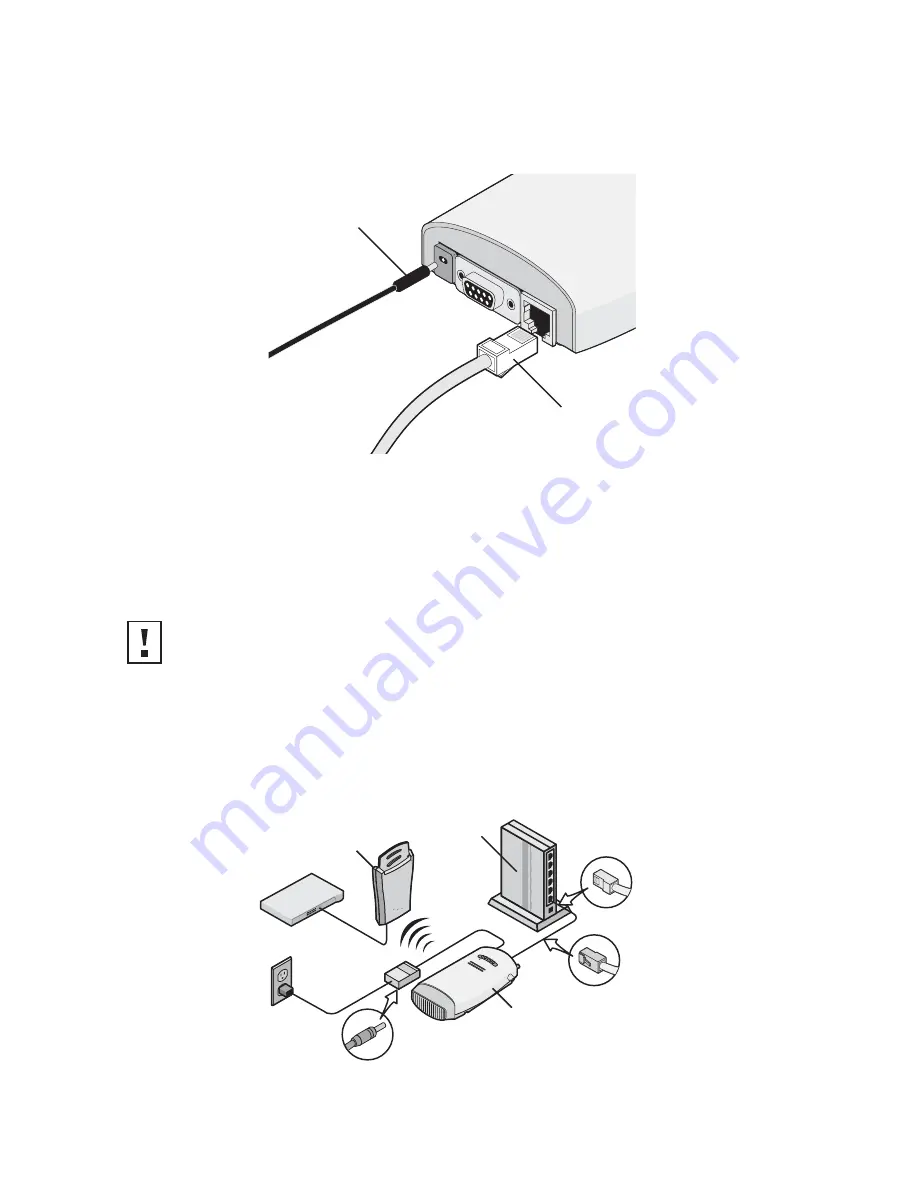
Before connecting the Bridge to an Ethernet client, connect the power supply. The figure below shows 
the ports for connecting the power and Ethernet cables.

The bridge can also be connected to a serial device.  Serial cables come with a variety of connector sizes.  
If your connector is large and prevents the cradle from being attached to the Bridge, remove the end cap 
on the cradle. This allows the connector to extend through the cradle.

Connecting to an Ethernet Device

The Bridge is designed to be connected to an Ethernet client device such as a hub, computer, or printer.

Connecting to a Hub

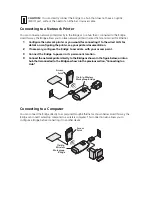
You can supply network connections for up to 16 devices, such as computers and network printers, by 
connecting the Bridge to an Ethernet hub, as shown below.

CAUTION:

  To avoid the possibility of a transmission loop situation between the Bridge and 

an access point, which could disrupt network operation, do not connect a Bridge that is set 
in Wireless Client (Infrastructure) mode directly to the LAN (for example, through a wall 
port or through a hub that is connected directly to the LAN).

P

ower

C

able

E

thernet

C

able

.11g

.100

.10

.11a

H

ub

11

a/ b/ g Wireless

W

orkgroup Brid ge

U

plink  Port

A

ccess

P

oint

PO

W

ER

PO

W

ER

ET

HE

RNE

T

ET

HE

RN

ET

W

IR

ELES

S

W

IR

EL

ES

S

Содержание 3CRWE675075 - 11a/b/g Wireless LAN Workgroup...

Страница 1: ...11a and 802 11g For a complete list of the Bridge s features see the 3Com 11 a b g Wireless Workgroup Bridge User Guide located on the 3Com Installation CD This Quick Start Guide describes the basic i...

Страница 2: ...1a compatibility place the Bridge within 50 m 164 ft of a Wi Fi compliant wireless LAN access point For 802 11b g compatibility place the Bridge within 100 m 300 ft of a Wi Fi compliant wireless LAN a...

Страница 3: ...of the Bridge 4 Snap the Bridge onto the cradle To install the locking bar push the locking bar through the opening in the side of the cradle until the hole on the locking bar is exposed Insert a lock...

Страница 4: ...d to an Ethernet client device such as a hub computer or printer Connecting to a Hub You can supply network connections for up to 16 devices such as computers and network printers by connecting the Br...

Страница 5: ...in the figure below or into a hub that is connected to the Bridge as shown in the previous section Connecting to a Hub Connecting to a Computer You can connect the Bridge directly to a computer throu...

Страница 6: ...t takes about one to two minutes for the Bridge to determine if there is a DHCP server on the network If your network does not have a DHCP server or is more complex you will want to configure the Brid...

Страница 7: ...r s web browser If the Configuration Management System starts the Bridge is using the factory assigned IP address You can configure the Bridge with the following login information Login name admin Pas...

Страница 8: ...er 1 Turn on the computer 2 Insert the 3Com Installation CD in the CD ROM drive The setup menu appears If it does not appear you can start the setup menu from the Windows Start menu For example Start...

Отзывы: