background image

Step 4 

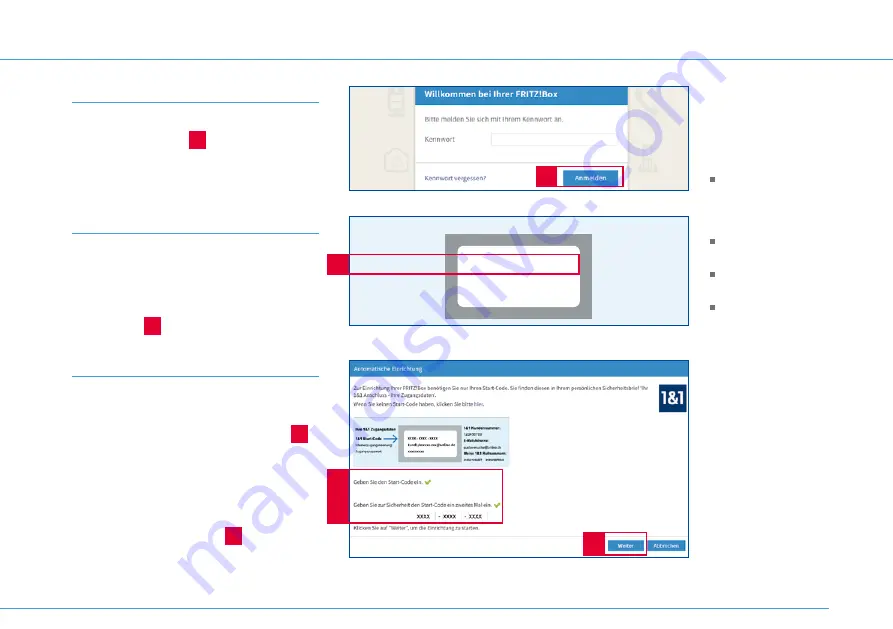
Enter the FRITZ!Box password and click on 

Anmelden

 (Log on) 

4

 .

6

6a

Step 6 

Enter the 12-character 

1&1 Start-Code

containing both upper and lower case letters 
and numbers, into the appropriate field 

6

 . 

Ignore the hyphens. When entering the 
Start-Code, make sure that you enter the 
Start-Code correctly into the two rows, 
without making any typing errors. 
Click on 

Weiter

 (Continue) 

6a

 . 

If you receive an error message, try entering 
the 1&1 Start-Code again.  

– Beispiel – 1&1 Start-Code –

Step 5 

You need your personal security letter entitled 

“Ihr 1&1 Anschluss – Ihre Zugangsdaten” 

(Your 1&1 connection - your login details) for 
the next steps. This letter contains your 

1&1 

Start-Code 

5

 . 

Ihre 1&1 Kundennummer:

123456789

Ihre E-Mail-Adresse:

[email protected]

Ihre 1&1 Rufnummern:

01234/1234567


+49 9876543210

Ihre 1&1 Zugangsdaten

1&1 Start-Code:

Internetzugangskennung:

Zugangspasswort:

XXXX - XXXX - XXXX

1und1/[email protected]

xxxxxxxxx

Sehr geehrter Herr Muster,


heute erhalten Sie die Zugangsdaten für Ihren 1&1 Anschluss. Bitte beachten Sie hierzu die 

Hinweise auf 

der Rückseite

 und bewahren Sie diese Zugangsdaten in Ihren Unterlagen auf.

Mit dem 

1&1 Start-Code

 und der 

Schnell-Start-Anleitung

 richten Sie Ihre Internetverbindung und Telefonie 

bequem ein. Dies ist mit 1&1 Hardware und aktuellen Produkten des Herstellers AVM möglich.

Sollte eine Einrichtung über den 1&1 Start-Code nicht möglich sein, können Sie Ihren Router mit der Inter-

netzugangskennung und dem Internetpasswort auch manuell konfigurieren. Wird anschließend keine 

Internetverbindung aufgebaut, setzen Sie bitte ein „H“ vor Ihre Kennung – z. B.: H1und1/[email protected]

Sobald eine Verbindung zum Internet besteht, richten Sie Ihre Telefonie ganz einfach im 1&1 Control-Center 

–  https://control-center.1und1.de –  unter dem Menüpunkt 

„Rufnummern verwalten“

 ein. Dort können Sie 

Ihre Zugangsdaten übrigens auch aufrufen und anpassen.

Haben Sie Fragen? Wir sind gerne für Sie da. Sie erreichen uns täglich rund um die Uhr – kostenfrei aus 

dem Fest- und Mobilfunknetz der 1&1 Telecom GmbH – unter: 0721 96 00.

Ich wünsche Ihnen viel Spaß beim Surfen mit 1&1.

Freundliche Grüße aus Montabaur

Ihre 1&1 Kundenkommunikation

Ihr 1&1 Anschluss – Ihre Zugangsdaten

Montabaur, 01.06.2018

1&1 Kundenservice

Telefon: 0721 96 00

E-Mail: [email protected]

1&1 Telecom GmbH

Elgendorfer Str. 57

56410 Montabaur

5

4

Note: 

Please note that we can 
only guarantee a complete 
installation and smooth 
functioning of your DSL 
account if you use the 1&1 
Start-Code!

1&1 Start-Code

Your 1&1 Start-Code is a 
combination of letters and 
numbers.  
It is used to:

  Enter your internet 

and telephone login 
details for your 1&1 
HomeServer 

  Set up your internet 

connection 

  Set up at least one 

telephone number 

  Enter your account 

 details so you can use 
the 1&1 online storage 

15

Содержание Homeserver+

Страница 1: ...QUICK START GUIDE 1 1 HOMESERVER AVM FRITZ Box 7490 Connect HomeServer Connect device Enter 1 1 Start Code Connect telephone Help and contact information...

Страница 2: ...ion you receive everything that you need to set up your own home network You can for example store your data centrally so that it can be accessed by all of the computers in your household This quick s...

Страница 3: ...ive connection Wi Fi connection Enter 1 1 Start Code Connect telephone Analogue telephone Cordless telephones DECT ISDN telephone Troubleshooting 20 No internet connection Device doesn t work correctl...

Страница 4: ...rike which could lead to surge damages to connected electronic devices Do not install the 1 1 HomeServer during a storm In the case of storms unplug the 1 1 HomeServer from the mains socket and from t...

Страница 5: ...socket Do not use any extension cables between the telepho ne socket and the 1 1 HomeServer Do not extend the cable linking the telephone socket to the 1 1 HomeServer The longer this cable is the more...

Страница 6: ...nknetz der 1 1 Telecom GmbH unter 0721 96 00 Ich w nsche Ihnen viel Spa beim Surfen mit 1 1 Freundliche Gr e aus Montabaur Ihre Denise Kleis Leiterin Kundenkommunikation Ihr 1 1 Anschluss Ihre Zugangs...

Страница 7: ...lashing Internet is now connecting or has been deactivated Festnetz Permanently illuminated Active telephone connection via the internet Flashing Messages in the 1 1 Mailbox WLAN Permanently illuminat...

Страница 8: ...DSL TEL FON1 FON2 LAN1 LAN2 LAN3 LAN4 Power FONS0 1 1 Ho me S e r v e r 5 0 0 0 0 4 3 5 6 9 10 8 7 FRITZ Box 7490 Einfache Einrichtung mit http fritz box WLAN Netzwerkschl ssel WPA2 1234 5678 9012345...

Страница 9: ...e the set up assistant to change the Wi Fi settings e g from the data you have been using to date page 13 3 2x Analogue telephone port TAE 4 DSL VDSL port 5 2 x Analogue telephone port RJ11 6 ISDN por...

Страница 10: ...eServer with a computer tablet or smartphone page 12 Connect telephone Connect one analogue or up to six DECT telephones page 18 Enter 1 1 Start Code Set up the 1 1 HomeServer with the 1 1 Start Code...

Страница 11: ...seconds Step 2 Plug the long end of the DSL cable into the port labelled DSL on your 1 1 HomeServer Step 3 Plug the other end of the DSL cable into the port labelled F on the telephone socket Note Onl...

Страница 12: ...on your computer Connection either via a network cable LAN or wireless Wi Fi Set up wireless connection at the touch of a button WPS Ensure that the WLAN LED is illuminated on the 1 1 HomeServer If so...

Страница 13: ...Windows symbol Settings Network and Internet Wi Fi Show available networks macOS Apple symbol System Preferences Network Wi Fi Instructions by operating system smartphone or tablet Apple iOS Settings...

Страница 14: ...on page does not open automatically enter http fritz box or http 192 168 178 1 into the address line of your browser FRITZ Box password The password provides ac cess to the user interface Step 3 Set a...

Страница 15: ...Sie Ihre Internetverbindung und Telefonie bequem ein Dies ist mit 1 1 Hardware und aktuellen Produkten des Herstellers AVM m glich Sollte eine Einrichtung ber den 1 1 Start Code nicht m glich sein k n...

Страница 16: ...rtfahren Continue to set up your telephone devices and Wi Fi settings and click on Weiter Continue 7 Step 8 You can now set up new telephones and answering machines You can find out more in the DSL us...

Страница 17: ...set up assistant 11 You have now set up your device and your DSL connection You can now surf the web and once you have connected a telephone to the FON connection or via DECT you can also make phone c...

Страница 18: ...into the port labeled FON S0 on the 1 1 Home Server Make sure that you plug the cable into the socket precisely as shown 4 Connect telephone The telephone number that you gave to or received from 1 1...

Страница 19: ...are requested to press the registration paging button on the base station press and hold the DECT button A on the 1 1 HomeServer until the Info LED starts to flash The default DECT pin for the 1 1 Ho...

Страница 20: ...tart the device page 25 No phone line connection or faulty phone line Telephone not connected correctly Plug the telephone in properly DECT telephone doesn t work Activate DECT on your 1 1 HomeServer...

Страница 21: ...ference Avoid sources of interference choose a different location page 27 No LAN connection Check that the cables between your 1 1 HomeServer and your device are plugged in correctly Check the sockets...

Страница 22: ...LL A B Incorrect cabling Most faults are due to issues with the cables Ensure that the DSL cable is plugged into the DSL port on the 1 1 HomeServer A and that the other end of the cable is plugged int...

Страница 23: ...melden Log on Step 2 Click on Diagnose Funktion Diagnostics Run 2 Step 3 Click on Starten Start 3 The diagnostics tool will now check the device and all the connections If a fault is discovered furthe...

Страница 24: ...ad the latest firmware 2 Go to http fritz box and click on System Update 3 Click on the menu symbol B on the top right and activate the Erweiterte Ansicht Detailed view C 4 Click on the FRITZ OS file...

Страница 25: ...tep 1 Unplug the 1 1 HomeServer from the mains and from the telephone socket Wait for 20 seconds Step 2 Plug the 1 1 HomeServer back into the plug socket and wait until the WLAN LED is permanently ill...

Страница 26: ...s update regularly so you can see any changes as they occur Try moving a device to see if this improves the connection speed 2 Measure speed with the 1 1 Control Center app Under WLAN Verbin dung Wi F...

Страница 27: ...1 1 HomeServer and the device The 1 1 HomeServer emits a signal at two frequencies 2 4 GHz and 5 GHz and automatically switches to the frequency with the better signal conditions Place your 1 1 HomeS...

Страница 28: ...Fi or depending on the repeater via LAN The Wi Fi repeater must be positioned so that it can effectively receive the Wi Fi signal emitted by the 1 1 HomeServer identified by at least three LEDs illumi...

Страница 29: ...he factory settings Do not under any circum stances unplug the device from the power socket it can damage the firmware The 1 1 HomeServer is ready for use as soon as the Power DSL LED is permanently i...

Страница 30: ...ispo sed of properly and in an environmentally friendly way For more information about disposal and where you can find a collection point run by our disposal partner please visit www 1und1 de entsorgu...

Страница 31: ...y use the form in the 1 1 Control Center to contact technicians customer support staff or the billing team https control center 1und1 de Forum Or take a look in our 1 1 Forum You can interact with oth...

Страница 32: ...Nr 56396 Stand 04 19 DE110 01 40 00204 EN YOUR 1 1 USER GUIDE The up to date detailed 1 1 DSL user guide is always available online It can also be downloaded as a PDF Telephone home network Wi Fi clou...

Отзывы: