


DVR-0022C
User Guide
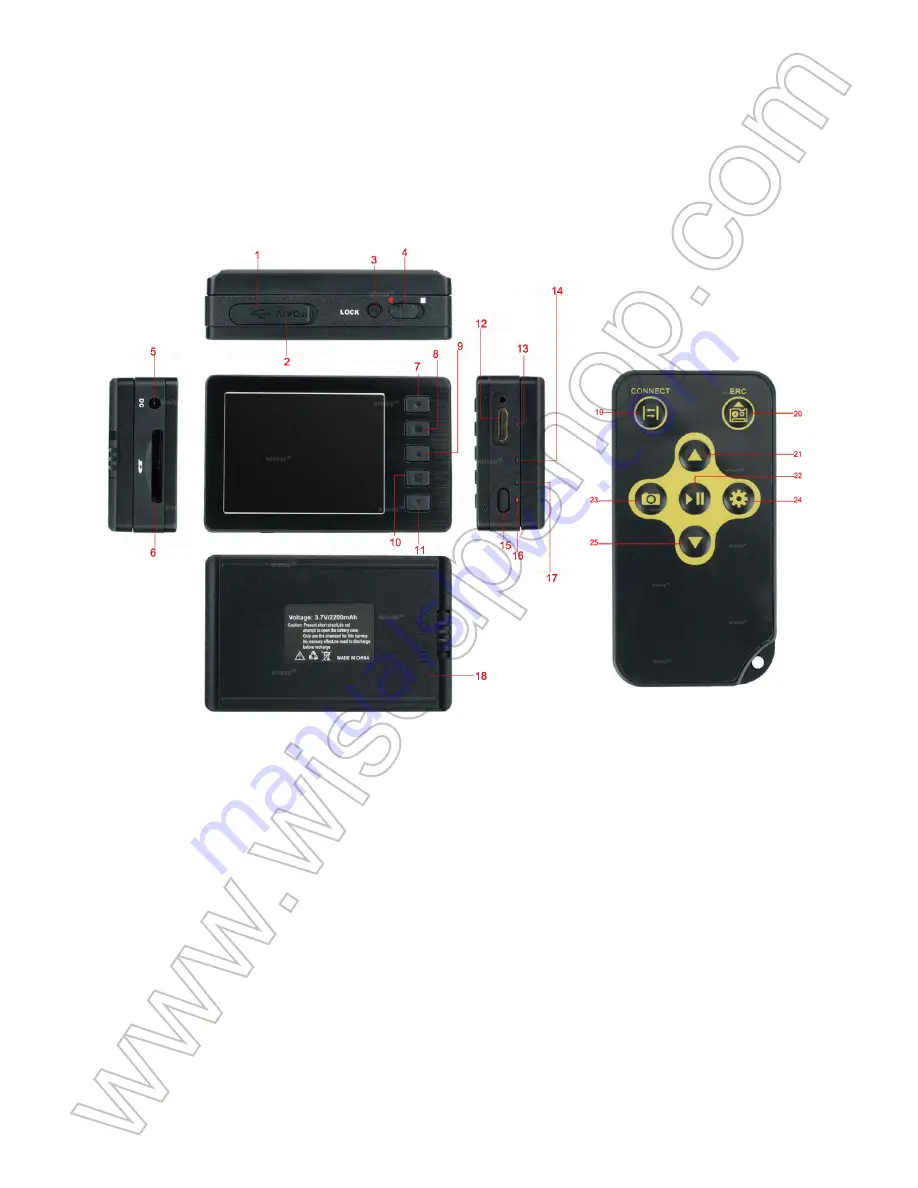
I. Product Overview
1. USB Port
2. Headphone Jack/Video Output Port
3. Lock Screen Button
4. Mode Switch
5. DC5V In Jack
6. SD Card Slot
7. Video Recording/Cancel Button
8. Camera Button
9. Up Button
10. Play/Pause/Enter Button
11. Down Button
12. Camera In Port
II. What’s in the Box
1. DVR Pouch
2. Camera Lens
3. USB Cable & DC5V Charger
4. Handheld DVR
5. DIY Buttons
6. AV Cable
7. IR Remote Controller
8. SD Card Adapter fitted with a 16GB Micro SD card
9. Earphones
III. Installing & Removing Battery
3.1. Remove the adhesive tape on the electrodes; otherwise the battery will not work with
the DVR.
3.2. To remove the battery, gently unlock by switching LOCK switch to the right side and
push battery in red arrow pointed direction.
3.3. To install the battery, attach the battery to the DVR and gently push the battery in red
arrow pointed direction. Lastly, don’t forget to slide LOCK switch to the left to ensure it is
locked properly.
IV. Connecting Camera Lens to DVR
4.1. Power off the DVR by pressing the Power Button for 2 seconds.
4.2. To connect the camera, plug the camera’s Micro USB end into Camera in Port on the DVR.
4.3. The DVR will not work unless it is fitted with a valid memory card and connected to
the camera lens.
V. Operation
>> To make the memory card recognizable, please be sure to format the memory card before
using for the first time. Please note that formatting on your PC computer is not recommended,
for it might result in the failure for the computer to recognize the memory card.
>> Make sure that the DVR is fully charged. If you need the DVR to work 24/7, use the
included DC5V charger to plug the DVR into an outlet AC power supply.
>> Make sure that the DVR is fitted with a memory card and connected to the camera lens
properly.
5.1. USING REMOTE CONTROLLER & EDITING SETTINGS
5.1.1. Power on the DVR by pressing the Power Button for 2 seconds before using the
remote controller.
5.1.2. Press the DVR Pairing Button once to pair the DVR with the IR remote controller.
5.1.3. Aim the remote controller at the DVR to control the DVR remotely.
5.1.4. Once the pairing is done, you are free to operate the DVR using the remote controller.
5.1.5. See the table below for an explanation of system settings.
5.2. CONTINUOUS VIDEO RECORDING
5.2.1. After the DVR is powered on, press the Menu Button once, locate “
Pre-capture
”
and then choose “
Manual
”.
5.2.2. Press the Cancel Button to exit system settings and press the Video Recording Button
once to start recording video continuously. Press it once again to stop recording video.
5.2.3. A video clip will be generated and saved every 10 minutes automatically.
5.2.4. The DVR is able to record video continuously for 3 hours straight on a full charge.
5.2.5. A 16GB SD card is able to store up to 3 hours of video footage.
[Note]:
Video Format: AVI
5.3. MOTION DETECTION VIDEO RECORDING
5.3.1. After the DVR is powered on, press the Menu Button once, locate “
Pre-capture
” and
then choose “
Motion detect
”.
5.3.2. The DVR is now in motion detection recording mode. The DVR will start recording
a one-minute video when motion is detected.
5.3.3. If no motion is detected, the DVR will be back to motion detection standby mode
automatically until it detects motion again.
5.3.4. The DVR can run up to 4 hours when no motion is detected all the time.
5.4. CONNECTING DVR TO MONITOR
5.4.1. Make sure the DVR is powered on and the camera lens is inserted into the DVR
properly.
5.4.2. Press the Menu Button once, locate “
TV Standard
” then select “
PAL
” or “
NTSC
”.
5.4.3. Plug one end of the AV cable into the AV port, then the other 3 AV connectors into
your monitor.
5.4.4. It will take a few seconds for the live video to appear on the monitor.
VI. CHARGING
6.1. Power off the DVR and then plug the DC5V charger into DVR first, then plug the
charger into an outlet AC power supply.
6.2. It will take 10 hours to obtain a full charge.
6.3. The Blue LED-Charge will be remain solid during the charging process.
6.4. When the DVR is fully charged, the Blue LED-Charge will turn off automatically.
13. Red LED-Power
14. Blue LED-Charge
15. Power/Menu/Cancel Button
16. Red LED-Camera Status
17. Blue LED-Record
18. Backup Battery
19. DVR Pairing Button
20. Video Recording Button
21. Play/Pause/Enter Button
22. Down Button
23. Camera Button
24. Menu Button
25. Up Button


