WHITE BROWN EX 823, User Manual
"Looking for a comprehensive User Manual for the WHITE BROWN EX 823? Look no further! Download the FREE manual from our website for all the information you need to operate this exceptional product. Clear, concise instructions ensure a seamless experience. Visit manualshive.com to get your hands on this essential download now!"
Share
Download


Reviews:
No comments
Related manuals for EX 823

Ice Cream Maker
Brand: Back to Basics Pages: 32

ICE Maker
Brand: Vitrifrigo Pages: 30

Cafe 115
Brand: Capresso Pages: 19

PC-ICM 1140
Brand: Profi Cook Pages: 58

MONZA IMOLA MARANELLO
Brand: BFC Pages: 2

TM-2408
Brand: tomado Pages: 20

Brio 250
Brand: Necta Pages: 44

Slot Plast
Brand: Faber Pages: 28

18536
Brand: Russell Hobbs Pages: 8
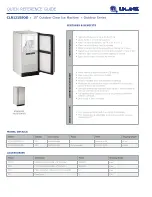
CLR1215SOD
Brand: U-Line Pages: 2

SCC-4000D
Brand: SwiftColor Pages: 16

PKR CGA Coffee Grinder Mill Kit
Brand: PROKRAFT Pages: 5

SK41
Brand: HPRT Pages: 18

CM 45
Brand: Teka Pages: 118

RM-GG-950W
Brand: G&G Pages: 3

CE Sensazione
Brand: UFESA Pages: 200

HPL3D2304
Brand: iDPRT Pages: 2

PL 046
Brand: Lelit Pages: 7


