

High Resolution
Digital Photo Frame
Owner’s Manual
Please read this manual before operating
1. SLIDE SHOW:
start/stop slideshow & select duration.
2. PHOTO:
browse photos.
3. AUTO ZOOM:
display photo in different formats.
4. ZOOM:
zoom into photos.
5. EXIT:
get out of current mode and move to one level up.
6. ENTER:
confirm selection/make photo quality adjustment.
/DIRECTION:
: UP
: Down
: Left (display previous photo)
: Right (display next photo)
7. COPY:
copy photos between memory devices.
8. ROTATE:
rotate selected photos at 90°, 180° or 270°.
9. CALENDAR:
display Calendar mode.
10. SETUP:
display Settings menu.
11. COLOUR BOOSTER:
turn colour enhancement on/off.
12. MENU:
display main MENU.
13. DELETE:
delete selected photo from memory.
1. Screw in the stand to the stand screw hole on the back of
the Photo Frame.
2. Adjust the stand position for vertical or horizontal placement,
tighten the screw.
(The photo automatically turns 90° as the Photoframe turns 90°)
UDV-90HD
UDV-70HD
Digital Photo Frame Parts
Getting Started
Viewing Photos
Attach the Stand
Note:
• Always turn off the Photo Frame before connecting or
disconnecting the AC adaptor.
• Only use the AC adaptor supplied with this Photo Frame.
Using a different type of adaptor may cause malfunction or
damage to the product.
• When the AC adaptor is used for a prolonged period of time,
the adaptor may heat up, this is normal and is not a cause
for concern.
• When not using the Photo Frame, unplug the adaptor from
the outlet.
1. Connect the AC adaptor into DC IN 5V jack, and the other
end into a standard 240V AC power outlet.
Connect the AC Adaptor
The clock function is backed up by a battery in case of power
interruption.
1. Open the battery compartment cover in the back of the
Photo Frame by using a coin.
2. Remove the old battery and insert a fresh 3V lithium battery
with the polarity ( + ) facing up as marked.
3. Replace the compartment cover.
Replacing the Clock Batteries
Preparation
1. Connect AC adaptor as described above.
2. Slide POWER ON /OFF to the “ON” position, the
POWER
INDICATOR
illuminates.
3. The Uniden logo screen appears and then the main menu screen.
4. Adjust the screen brightness using the Brightness Adjustment
Knob ( ) on the back of the frame and the Photo
Frame starts the slideshow automatically.
Note: if the brightness setting is at the minimum, the screen is dark.
5. Insert your memory card into SD/MMC/MS/xD, CF slots, and
USB stick into USB Host, use
and to select
PHOTO
,
press
ENTER
to display the connected devices.
Keypad Functions
1
8
9
10
11
12
13
2
3
4
5
6
7
1. To pop out the key pad, just push in and release.
2. To hide the keypad, simply push it all the way until it clicks.
Using the Retractable Keypad
1. Insert the memory card or USB stick into the appropriate slot
of the Photo Frame, making sure that the metal contacts of
SD/MMC/MS/xD memory card are facing the front of the
Photo Frame.
2. To remove, simply pull out the SD card or USB stick.
Note:
1. If you use Memory Stick Pro, a Memory Stick Pro-to-
Memory Stick adaptor must be used otherwise the card can
be stuck in the slot.
2. If your memory card is not listed above, you can use a
USB - CARD READER to connect to the Photo Frame.
Connecting an SD Card or USB Stick
1. Retractable keypad
2. USB Host Slot
3. SD/MMC/MS/xD Slot
4. CF Slot
5. Stand screw hole
6. Power on/off
indicating LED
7. DC power input
8. POWER ON/OFF
9. Screen brightness
adjustment knob
10. Clock Battery Cover
(pre-installed)
1
2
6 7 8 9
3
4 5
10
• The red frame indicates this device was last selected to
display photos. The frame remains until the new device is
selected.
Method 1:
Press
SLIDE SHOW
to start the slideshow, repeatedly press
SLIDE SHOW
to select the duration of each photo (3Sec,
5Sec, 1Min, 15Min, 1Hour, 1Day). To stop the slideshow,
repeatedly press
SLIDE SHOW
to select “Slideshow Off”.
Method 2:
1. Press
SETUP
, use and to select Auto Slide Set.
2. Press and
to select “Slideshow On”.
3. Press
EXIT
to confirm and get out.
4. On any page, the Photo Frame starts the slideshow
automatically if no key is pressed for more than 30 seconds.
5. To stop the slideshow on any page, use steps 2 to 3 to select
“Slideshow Off”.
If the Photo Frame is playing photos either in Browse or Slide
show mode, simply press
EXIT
to enter Thumbnail mode.
Method 1:
The Photo Frame is in browse mode when you press
PHOTO
after selecting the storage device. Use to view the next photo
and to view the previous photo.
Method 2:
In Slide show mode, repeatedly press
SLIDE SHOW
to select
“Slideshow Off” to stop the slide show and enter browse mode, use
to browse the next photo and to browse the previous photo.
Method 3:
In Thumbnail mode, press and to select the photo,
then press
ENTER
and use and to browse photos.
Note: if no file is stored in the device, the Photo Frame
displays “No Picture Found”.
6. Use and
to select the SD/MMC/MS/xD or CF or USB
or Internal.
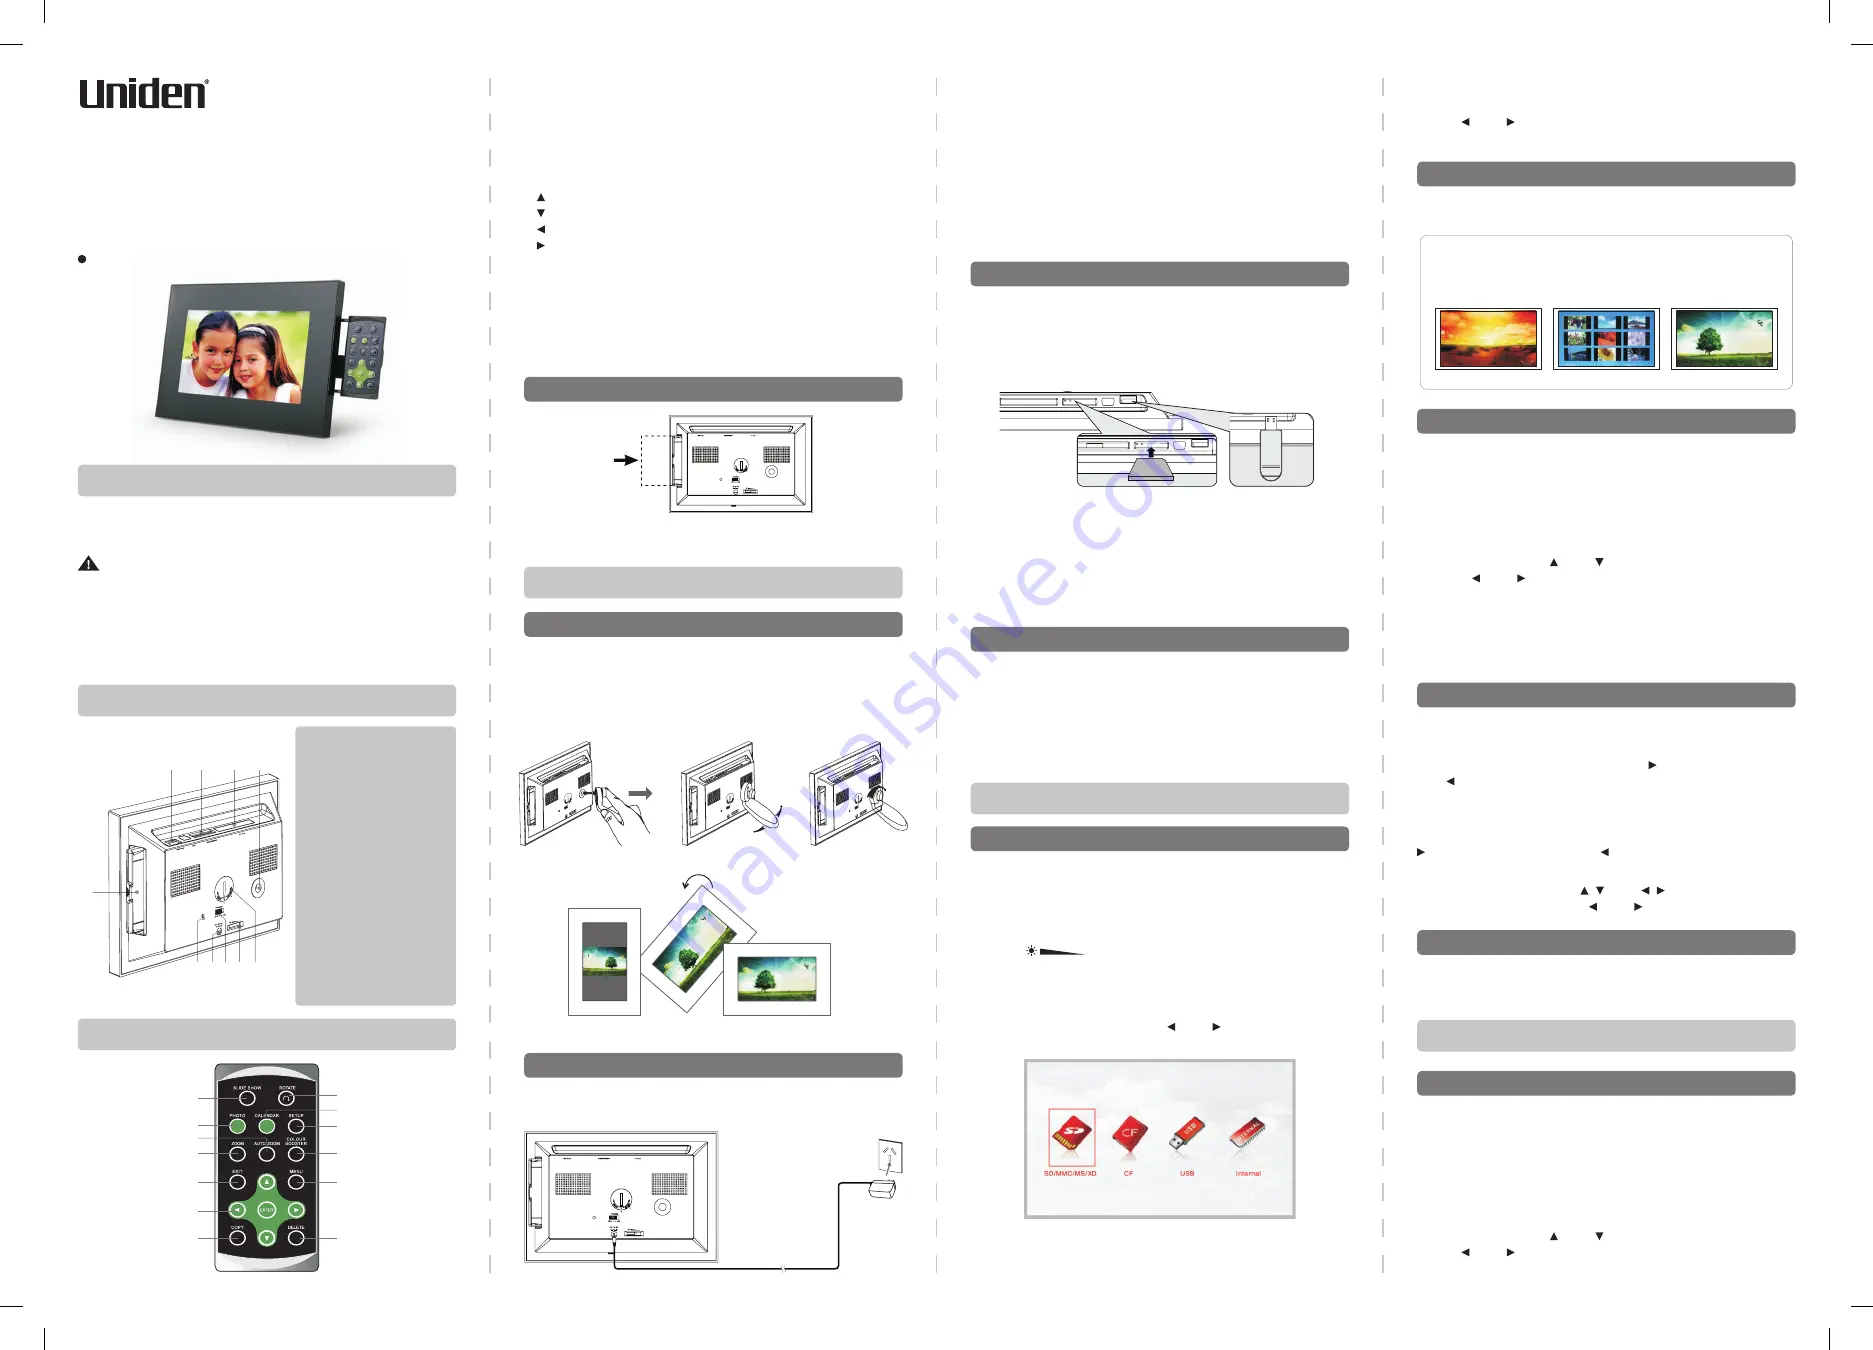
You can view photos in three ways: Browse, Thumbnail and Slideshow.
Three Viewing Modes
Browse Photos
View Photo
View Slideshow
Photo Viewing Modes
Browse:
Manual viewing of photos one-by-one.
Thumbnail:
A list of photos in smaller size.
Slideshow:
Automatic display of photos.
Browse Mode
Thumbnail Mode
Sideshow Mode
1. Digital Photo Frame x 1
2. Power Adaptor x 1
WARNING:
Important Safety Instruction
• Do not expose this device to excessive moisture, rain or heat
sources.
• Keep the device away from direct sunlight.
• Use ONLY the AC adaptor supplied with the device.
• Do not spill liquids on or inside the device.
3. Stand (with screw) x 1
4. Owner’s Manual x 1
Check the Package Contents
To standard 240V
AC power outlet
This determines the display time of each photo before
changing to the next.
To change:
Method 1:
Repeatedly press
SLIDE SHOW
to select the duration.
Method 2:
1. Press
SETUP
, use and to select Slide Show Duration.
2. Use and to select the duration time.
3. Press
EXIT
to confirm and get out.
Slideshow Duration
Setting Slideshow (Duration and Effect)
SD/MMC/MS/xD
USB Stick


