

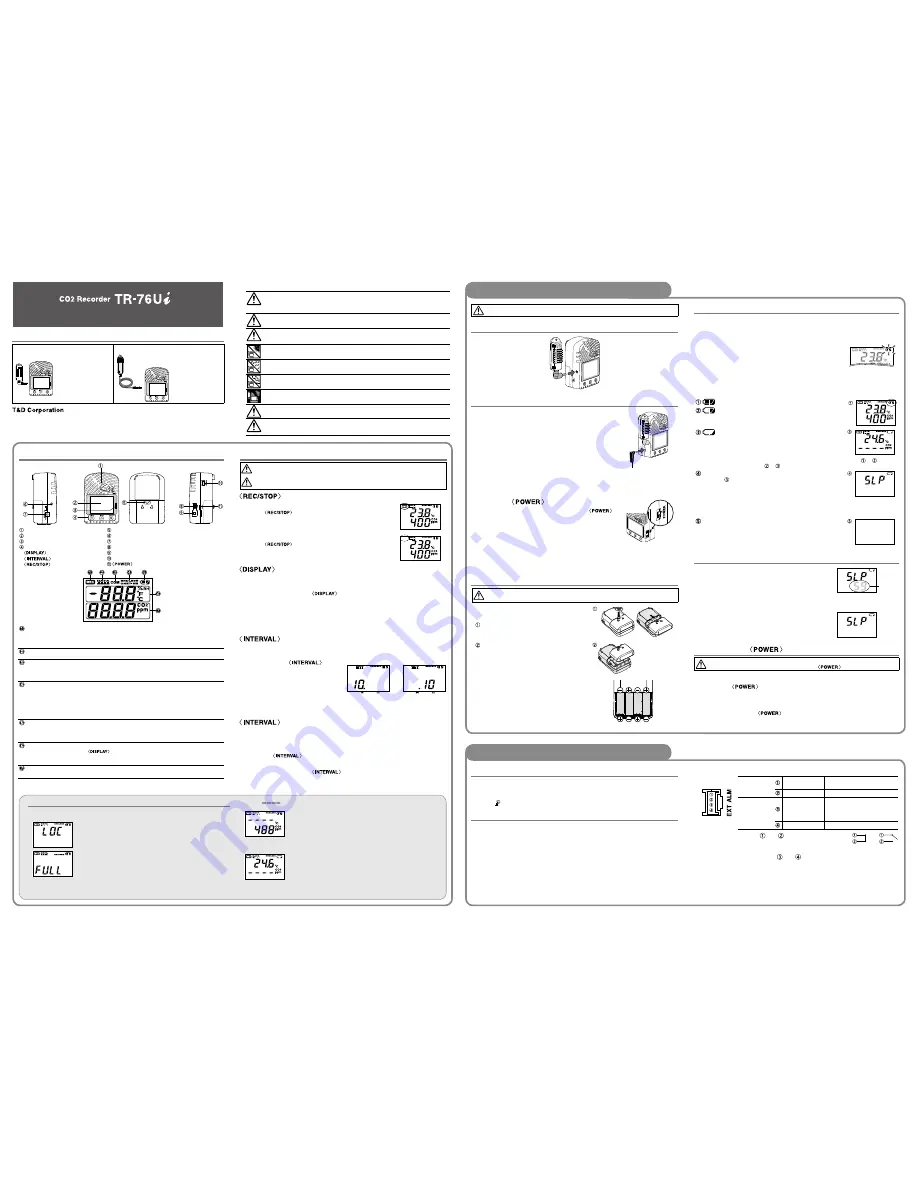
Part Names and LCD Display
CO2 Sensor Area (Internal)
LCD Display
Infrared Communication Port
Operation Buttons
Button
Button
Button
Battery Cover
Temperature and Humidity Sensor Jack
AC Adaptor Jack
USB Communication Cable Jack
Serial Communication Cable Jack (RS-232C)
External Alarm Terminal (EXT ALM)
Switch
[REC] Mark
Shows recording status
ON: Recording in progress
BLINKING: Waiting for programmed start
OFF: Recording stopped
Data Scale
At the beginning of every 2,000 readings the scale will be marked from left to right.
Logging capacity is 8,000 readings.
[COM] Mark
Shows communication status but not displayed normally.
ON: The unit is connected to a PC with a USB cable.
RAPID BLINKING: The unit is in communication with the computer via USB or
infrared communication.
Recording
Mode
Recording mode settings can be made by using the supplied software.
Endless:
Upon reaching the logging capacity of 8,000 readings, the oldest data will be
overwritten and recording will continue.
One Time:
Upon reaching the logging capacity of 8,000 readings, recording will automatically
stop and in the LCD the current measurement and the word “FULL” will alternately
appear.
Battery Mark
Shows source of power and voltage level
ON: Running on external power source
BLINKING: Running on battery power
OFF: No battery
Current
Temperature
and Humidity
Readings Area
Shows the current readings for temperature ( °C or °F) and humidity (%RH).
Pressing the
button will change the measurement item to be displayed.
By using the supplied software, the unit of temperature can be changed. is also
used to display messages.
Current CO2
Readings Area
Shows the current readings for CO2 concentration (ppm). is also used to display
messages.
Button Operations
Upon the start of recording, all previously recorded data in the TR-76Ui will be deleted.
If "Button Lock" has been set to ON in the CO2 Recorder for Windows, the operational
buttons will not be active.
Button: Starting and Stopping Recording
Starting Recording
Press the
button for about two seconds until the [REC]
mark appears on the display.
•
It is possible to start recording even while waiting for a programmed
recording to start.
Stopping Recording
Press the
button for about two seconds until the [REC]
mark disappears from the display.
Button: Changing the LCD Display Pattern
It is possible to change the current readings display for temperature and humidity
(upper row). CO2 concentration (lower row) is always displayed.
11
With each pressing of the
button the item on the display will change.
Temperature and Humidity:
The display will alternate every one second.
Temperature only
Humidity only
21
When the desired display pattern appears, stop pressing the button.
Button: Checking Recording Interval
It is possible to check the recording interval during recording or while waiting for
a programmed recording to start.
11
By pressing the
button
for about two seconds, the currently
set recording interval will appear on
the LCD display.
21
If no operation is carried out after the
recording interval has been displayed,
the current measurement readings
will return to the LCD display.
10 minutes
10 seconds
Button: Changing the Recording Interval Setting
Recording interval settings cannot be changed while a recording session is in
progress.
11
Stop recording.
21
Press the
button for about two seconds to display the currently set
recording interval on the LCD screen.
31
With each pressing of the
button the recording interval time will
change; stop pressing the button when the desired interval appears.
41
Restart the recording session.
Package Contents
TR-76Ui
TR-76Ui-S
•
CO2 Recorder TR-76Ui
•
Temperature and Humidity Sensor
(THA-3001)
•
AC Adaptor (AD-06A1 or AD-06C1)
•
USB Communication Cable
(US-15C)
•
Software CD-ROM
•
AA Alkaline battery x 4
•
Getting Started Guide (Warranty
Included)
•
Please Read First
T
em
pe
ra
tu
re
H
um
id
ity
S
en
so
r
•
CO2 Recorder TR-76Ui
•
High Precision Temperature-
Humidity Sensor (SHA-3151)
•
AC Adaptor (AD-06A1 or AD-06C1)
•
USB Communication Cable
(US-15C)
•
Software CD-ROM
•
AA Alkaline battery x 4
•
Getting Started Guide (Warranty
Included)
•
Please Read First
© Copyright T&D Corporation. All rights reserved. 2017. 07 16504640016 (7th Edition)
http://www.tandd.com
Notes about Operation
This product has been designed for use in normal living conditions, and is not suited
for controlled environments such as a CO2 incubator. When measuring outdoors,
avoid exposure to sunlight, dust, rain, or wind. Also make sure to use in the operating
environment indicated in the specifications.
This product cannot measure CO or O2. Do not use the unit for purposes such as
avoiding O2 deficiency, CO intoxication or any other health related purpose.
For one to two weeks after installation of the TR-76Ui, CO2 concentration measurements
may fluctuate suddenly. This is due to the normal operation of Auto Calibration and is not
a malfunction of the unit.
Do not use or store the unit in areas exposed to direct sunlight and abrupt changes in
temperature.
Do not allow the unit to become wet. Do not use or store the unit in places where
condensation occurs.
To help prevent deterioration of the unit, do not use or store the unit in areas exposed to
cigarette smoke, corrosive, explosive or organic gases or dust in the air.
Do not expose the unit to a strong impact. This will adversely affect measurement
accuracy and may cause the case to break resulting in bodily injury.
The measurement accuracy of the CO2 sensor can not be guaranteed for CO2
concentrations of 5,000ppm or more.
The Warning Monitoring function provided in the TR-76Ui is for informational purposes
only. By clicking “I Agree” button you confirm your understanding that it is not to be relied
upon for human health or safety.
Messages and Display on the LCD
Settings Messages
Button Lock
When "Button Lock" has been set to ON in
CO2 Recorder for Windows, operational buttons are not active.
Memory Full
When recording mode has been set to “One Time” and the unit
reaches its logging capacity of 8,000 readings, the measurement
and the message [FULL] will alternately appear in the LCD.
Stop recording and download the recorded data before re-starting
recording.
•
When this happens, measurement will continue so battery power will be consumed.
Notes on Special Functions
Getting Started Guide
Setting up the TR-76Ui
Make sure to install the provided software before connecting the TR-76Ui to your PC.
Connect the Temperature and Humidity Sensor
Turn On the Power
AC Adaptor
When measuring and recording over long periods of time,
please use a supplied AC adaptor.
Four AA Alkaline Batteries
Keeping batteries in the unit allows a backup source of
power * for when and if electrical power is cut from the
AC adaptor. If running on only batteries, the estimated
battery life is about two days.
*
Leaving alkaline batteries in the unit for a long period of time may cause battery leakage and
corrosion. When using as a backup source, we recommend that you change the batteries every few
years.
Turn On the
Switch
After setting up the power supply, turn on the
Switch.
"ON" position
Warm-up Time for CO2 Sensor
After switching on the unit, it will take about one minute to display the normal
CO2 concentration.
Install the Batteries
If battery power is lost, all recorded data stored in the unit will be erased. Do not leave the
unit without batteries.
11
Remove the battery cover from the back of
the unit.
While pressing down on the triangular mark,
slide the cover to the bottom of the unit.
Lift off the cover.
21
Insert the batteries.
•
Make sure to use four new batteries of the same
kind.
•
Make sure not to m / -.
•
Do not insert or change batteries with wet hands.
•
Be sure to completely close the cover.
Interpreting the Battery Mark
Checking the Power Supply Condition
Whether the battery mark is "blinking" or "on" indicates the source of power.
BLINKING (Running on battery):
The battery mark will blink on the LCD display when measuring and
recording by battery power.
Mark blinks when running on bat-
tery power.
ON (Running on external power):
The battery mark will be on when measuring and recording by AC adaptor
power.
Checking the Battery Level
The battery level will be shown in three stages as below.
Battery Power - OK
Battery Power - Getting Low
Please change the batteries as soon as possible.
Battery Power - Too Low
Battery power is too low to carry out measurement
and recording of CO2 concentration.
•
When running on batteries only, it will take about 24 hours to go from Stage to and
another 24 hours from Stage to .
Sleep Mode (stopping measurement and recording)
After Stage , if the battery is not changed but it remains in use,
the unit will enter sleep mode and stop measurement and
recording in order to protect recorded data until this point.
•
To continue recording, it is necessary to change the batteries
before the unit enters sleep mode.
•
If the unit is already in sleep mode, download the recorded data
into the PC before re-starting recording.
Erasing recorded data
If the battery is further left unchanged, the display will
automatically shut off and all previously recorded data will be lost.
•
Recording settings will remain. (See STEP 4 in the back side of this
page for details.)
Removing the Batteries during Recording
11
If the batteries are removed when running on battery
power only, the unit will start a sixty-second
countdown.
21
To continue recording, before the countdown comes
to an end, insert new batteries or connect the AC
adaptor to supply power.
Countdown
31
If power is not supplied within 60 seconds, the unit
will enter sleep mode.
Turning Off the
Switch
During recording or when the "Button Lock" is set to ON in the CO2 Recorder for Windows,
the power cannot be turned off even by pressing the
Switch.
11
Stop recording.
21
Turn off the
Switch.
Standby Power
If the TR-76Ui is connected to an AC adaptor, standby power will be supplied
even after turning off the
switch, allowing the CO2 sensor to continue
operation.
Getting Ready for Using Infrared Communication
In order to download recorded data from the TR-76Ui via infrared
communication, it is necessary to purchase the dedicated Data Collector
TR-57DCi (sold separately).
•
Go to [ Operation Guide] to see how to download data via data collector.
Getting Ready for Using the Warning Monitoring Function
It is possible to connect an external device such as siren or lamp to the TR-76Ui.
Please make sure to check specification details of the external alarm terminal
before purchasing or getting an external device ready for connection.
Upper and Lower Limit Settings
To use the warning monitoring function, go to the [Start Recording] tab in the
CO2 Recorder for Windows and make settings for Upper and Lower Limits and
Judgement Time. When the measurement exceeds one of the set upper and
lower limits, the TR-76Ui will turn ON the external alarm terminal. Upon a
warning, the measurement value on the display will also flash.
About the External Alarm Terminal (EXT ALM)
Enabling
Warnings
Warning Output
(Enable / Disable)
Internal Pull-up: 3V 100kΩ
Maximum Input Voltage: 30V
GND
Warning Output
(OUT)
Output Terminal
(Warning Output)
Open Drain Output
Voltage when OFF: DC less than 30V
Current when ON: less than 0.1A
Resistance when ON: 15Ω
GND
The connection between and decides whether Warning
Output is enabled or disabled.
If a warning condition occurs while Warning Output is
enabled, a connection between and will be established
and a warning will be output.
Enabled
Disabled
About the Compatible Connector
The JST Connector PAP-04V-S is compatible with the external alarm terminal.
For questions concerning sales of the connector, please directly contact JST
Mfg. Co., Ltd. (http://www.jst-mfg.com/)
When [
] appears in the following:
Temperature and Humidity Display Area
This appears when the temperature-humidity sensor is not
connected to the TR-76Ui, the connection is loose, the wire is
broken, or when power has just been turned ON. If after
re-connecting the sensor, measurements can still not be displayed,
it is very possible that the sensor or the logger is defective or has
been damaged.
CO2 Concentration Display Area
This appears when power has just been turned ON. If measurements
don't appear in the display after waiting for a considerable time,
there is a possibility that the sensor is defective or has been
damaged. Also, the CO2 sensor will not work if battery power is low.
•
Measurement and recording will continue in this situation, so battery power will be
consumed.


