background image

Load Ranger Wheel Weigh Pads

Quick Start Guide

This document provides the procedures necessary to quickly setup the Load Ranger Wheel Weigh Pads and pair them with the 

Ai-1 Indicator to take weight readings.

Wheel Weigh Pad Configuration

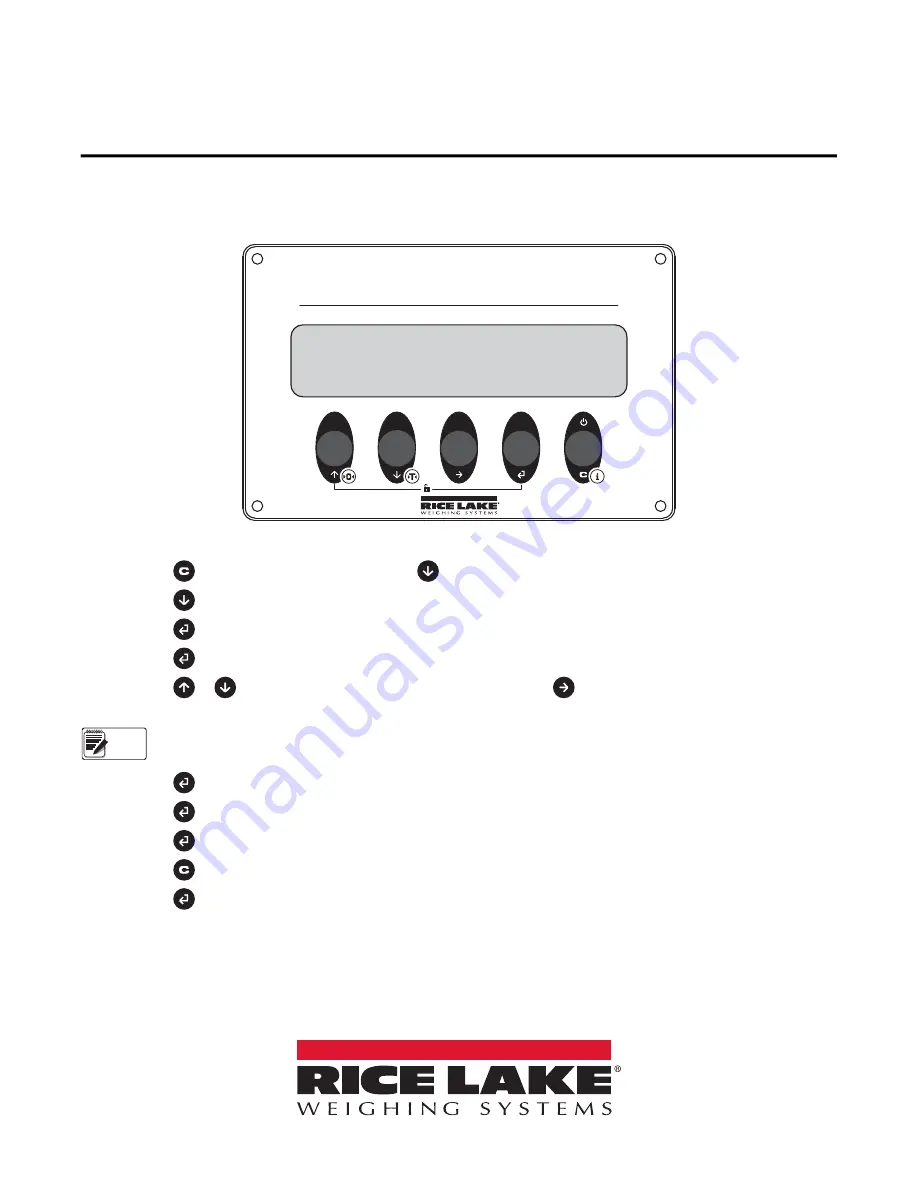
Figure 1. Wheel Weigh Pad Display

1. Press   to power on the indicator then press   during startup. 



 displays.

2. Press   three times. 



 displays.

3. Press   to enter the 

Serial

 menu. 



 displays.

4. Press   to enter the ID settings.
5. Press   or   to increase or decrease the selected digit and press   to move between the digits to enter the 

pad ID number.

The first Pad ID number must be 01 and the remaining pad ID numbers must increment in ascending numeric order. 

Example: 01, 02, 03, etc.

6. Press   to confirm. 



 displays.

7. Press   to enter the 

Bluetooth Initialization

 menu. 



 displays.

8. Press   to confirm. 



 displays followed by 



.



 displays.

9. Press   twice. 



 displays.

10. Press   to confirm. 



 briefly displays and all the changed parameters are saved.

11. Repeat steps for all wheel weigh pads in the system.

MODE

SET

DIAG

NUM

SET

NUM

DATA

Note

PN 189611 Rev B

February 22, 2021

Summary of Contents for Load Ranger

Page 1: ... the ID settings 5 Press or to increase or decrease the selected digit and press to move between the digits to enter the pad ID number The first Pad ID number must be 01 and the remaining pad ID numbers must increment in ascending numeric order Example 01 02 03 etc 6 Press to confirm displays 7 Press to enter the Bluetooth Initialization menu displays 8 Press to confirm displays followed by displa...

Page 2: ...e screen when the logo displays to enter the Technical Setup menu Figure 2 Touch Upper Right Corner of the Display 3 Press 4 Press 5 Press Figure 3 Select Scales 6 Select the number of wheel weigh pads to be used 7 Press 8 Press 9 Press Calibration F1 Scale selection F1 1 scale s Number of scales F1 1 1 F1 2 F2 3 F3 4 F4 5 F5 6 F6 Number of scales 1 3 Cancel OK OK WWS configuration F1 WWS pairing ...

Page 3: ... 14 Once the serial number of the first wheel weigh pad displays turn on the second wheel weigh pad assigned ID 02 Figure 5 Pairing 15 Repeat this process until all of the weigh pad pin numbers in the desired system are displayed Once the last wheel weigh pad is paired a prompt displays Figure 6 Pairing Successful 16 Press to confirm the completion of pairing The Gravity Value Setting keyboard dis...

Page 4: ...ters The following parameter windows display during initial setup before the indicator reboots to Weigh mode The Backup of the Configuration window Press to backup all settings The Password window displays Press or depending if a password is needed The Technical Setup window displays Press to convert the indicator units to match the weigh pad units Gravity value setting 1 Esc 2 3 4 5 6 7 BkSp 8 9 ...

Page 5: ...on the Ai 1 indicator The pad ID assigned within the weigh pad dictates the scale number and it does not need to match the Ai 1 indicator channel number 6 Turn on all of the weigh pads 7 Turn on the Ai 1 indicator briefly displays on weigh pads represents the assigned pad ID number then displays on the weigh pads and they are ready for use Wired Setup A wired system allows for weighing up to four ...

Page 6: ... 321 6703 International 715 234 9171 Europe 31 0 26 472 1319 Rice Lake Weighing Systems is an ISO 9001 registered company Rice Lake Weighing Systems Specifications subject to change without notice www ricelake com Load Ranger Wheel Weigh Pads PN 189611 Rev B February 22 2021 ...

Reviews: