background image

Documentation Center

Quick Start Guide

Prerequisites

What do you need?

1. RAK7244 WisGate Developer D4 Gateway
2. 16GB SD Card (included) + Card Reader
3. 5V at least 2.5A Micro USB Power Supply
4. A Windows/Mac OS/Linux Computer

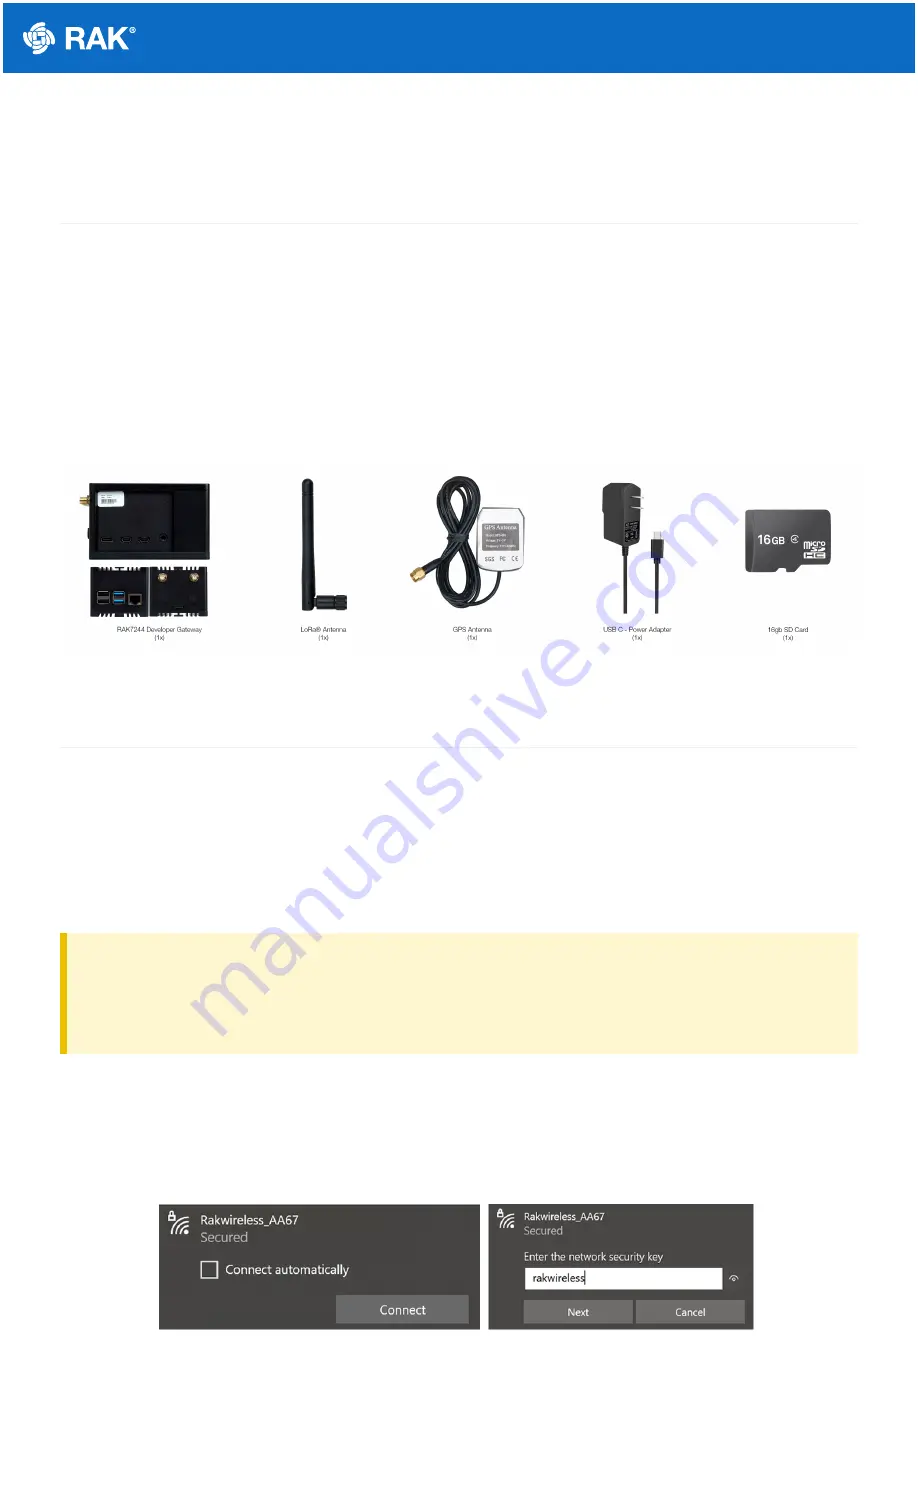
What's included in the Package?

Figure 1: RAK7244 WisGate Developer D4 Gateway Package Contents

Product Configuration

Accessing your Gateway

After burning the image into the SD Card, make sure you have inserted the SD Card with the Latest Firmware
installed to the RAK7244 WisGate Developer D4 Gateway and the LoRa and GPS Antenna attached to it. After
which, you can now safely power on the gateway. In this section, several ways in accessing the gateway are
provided to have different alternatives for you to choose depending on the availability of the requirements needed.

WARNING

Before powering the Raspberry Pi 4 you should install the LoRa and GPS antennas. Not doing so might
damage the boards.

Wi-Fi AP Mode

By default, the gateway will work in Wi-Fi AP Mode which means that you can find an SSID named like
"Rakwireless_XXXX" on your PC Wi-Fi Network List.

Figure 2: RAKwireless Access Point

Summary of Contents for RAK 7244-915

Page 1: ...st Firmware installed to the RAK7244 WisGate Developer D4 Gateway and the LoRa and GPS Antenna attached to it After which you can now safely power on the gateway In this section several ways in access...

Page 2: ...168 230 1 Raspberry Pi 4 Ethernet Port You can also connect your PC with the gateway through an Ethernet cable By default the IP address of the gGateway s Ethernet interface is 192 168 10 10 so you n...

Page 3: ...ow you should be able to access your gateway from your PC successfully using the IP Address 192 168 10 10 through SSH Log into the Gateway 1 Windows OS SSH Secure Shell is typically used to log in to...

Page 4: ...s is 192 168 10 10 It will then prompt you to enter the username and password The default username and password is provided below Username pi Password raspberry Figure 7 Command line after log in 2 Ma...

Page 5: ...t mode enter ssh pi 192 168 230 1 in the terminal to login to your gateway the default password is raspberry If you connect your PC with the gateway through Ethernet Cable you should enter ssh pi 192...

Page 6: ...th 3 Restart packet forwarder used to restart the LoRa packet forwarded process 4 Edit packet forwarder config used to open the global_conf json file in order to edit LoRaWAN parameters manually 5 Con...

Page 7: ...will be disabled 3 Modify SSID and pwd for AP Mode used to modify the SSID and password of the Wi Fi AP Only works if the Wi Fi AP Mode is enabled 4 Add New SSID for Client this is used if you want t...

Page 8: ...you want to connect WARNING Please ensure to input the correct Wi Fi SSID and Password or you will not be able to connect to the RAK7244 again via SSH in Wi Fi AP Mode If stuck in this situation plea...

Page 9: ...le do the following steps In the main configuration menu choose 6 Configure LAN This will let you set up a static IP address for the Gateway s Ethernet adapter Just fill a static IP Address according...

Page 10: ...udo reboot in the command line and it will connect to the router successfully through Ethernet Optional Configurations These configurations under this section are only optional and situational Reverti...

Page 11: ...te to your SD Card and type this command to generate the rak_ap file Check if the rak_ap file is created succesffuly If so re insert the SD Card into your RAK7244 WisGate Developer D4 Gateway and it s...

Page 12: ...the Wi Fi settings in order to connect to a network 6 Configure LAN used to configure the Ethernet adapter settings NOTE A unique ID will be generated in for Gateway This is also called Gateway EUI s...

Page 13: ...Figure 23 Confirm Password Change 3 Alright the success message for changing password will then pops up Figure 24 Successful Password Change Setup RAK Gateway LoRa Concentrator This menu allows you to...

Page 14: ...wo supported LoRa Servers here TTN or ChirpStack Server is TTN Figure 26 Server is TTN TTN The Things Network If you choose TTN as the LoRa Server you will see the following page Visit this article fo...

Page 15: ...Figure 27 Selecting the TTN Channel Plan After choosing the correct frequency the success message will appear as shown below Figure 28 Successfully Changed the Frequency Server is Chirpstack Figure 29...

Page 16: ...Data Rate ADR functionality First select 1 ChirpStack Channel plan configuration for configuring your frequency channel Then set the IP address of the ChripStack Figure 30 Regional Frequency Band Opt...

Page 17: ...r documentation First you should have connected your gateway into the internet through the router according to the method which has been introduced in the Accessing the Internet section Second config...

Page 18: ...Documentation Center Figure 34 The Things Network Console Page All of your Registered Gateways will be displayed here in this page Click register gateway Figure 35 Adding a Gateway to TTN...

Page 19: ...readable description of your Gateway Frequency Plan This is the frequency you want to use and it must be the same with Gateway and the Node Router The router this gateway will connect to To reduce la...

Page 20: ...fter burning the latest firmware the Gateway will work in the EU868 Band and use the built in ChirpStack as its default LoRa Server If you don t want to change the frequency or LoRa Server you don t h...

Page 21: ...n a browser and enter the following credentials Browser Address Gateway IP address 8080 Example http 192 168 254 176 8080 Username admin Password admin WARNING It is advisable to change your password...

Page 22: ...re 41 Available Gateways in Chirpstack Go to the rak_gateway and see the Last seen status It must be a few seconds ago which signifies that the Gateway is visible in the ChirpStack server Figure 42 La...

Page 23: ...alled Chirpstack on This can be done in item 2 in the menu Setup RAK Gateway LoRa concentrator Assuming you have set it up correctly Login to your ChirpStack to register your Gateway by opening the Ch...

Page 24: ...information Figure 46 Registering your own Gateway Fill in the Gateway ID that we got from the Configuring the Gateway section also called Gateway EUI If you have properly configured your Gateway and...

Page 25: ...Documentation Center Figure 47 Successfully Registered the Gateway Congratulations You have connected your gateway to an external ChirpStack Successfully Last Updated 9 13 2020 2 53 36 PM...

Reviews: