background image

Installation Guide

ADT Pulse

®

 Interactive Solutions

Model: ADT Pulse Gateway PGZNG1
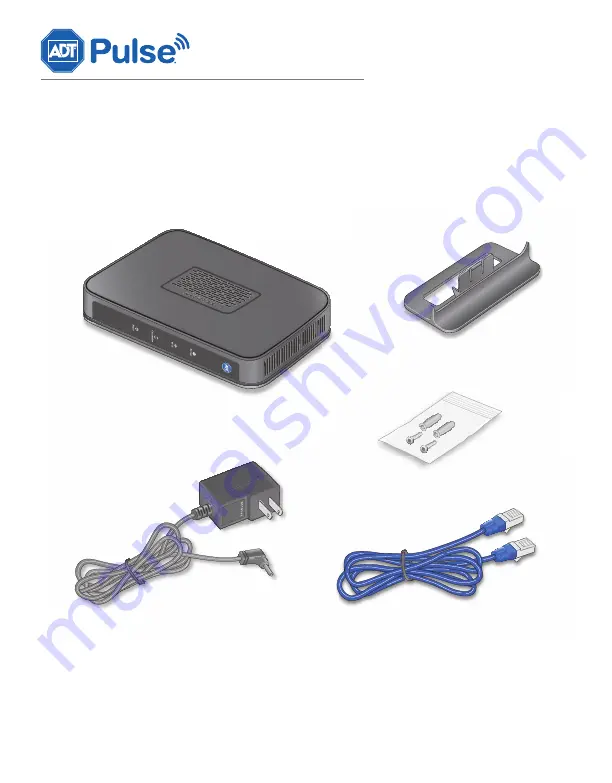
Package Contents

Warning: 

Do not

 stack equipment, or place equipment in tight spaces, in drawers, or on 

carpets. Make sure that your equipment is surrounded by at least 2 inches (5 centimeters) of 
air space. 

Gateway

Ethernet Cable

Stand

Power Adapter

Wall Mount Kit

Connecting the Gateway

1. 

Verify the package contents.

2. 

Decide where to place the Gateway.

Note: For best Wi-Fi coverage, identify a relatively central location within the 
premises. Ensure that the Gateway can be conveniently wired to both the broadband 
router and security panel, and is close to an AC outlet.

3. 

Install the Gateway in the proper orientation:

Mount vertically (using the stand or wall mount kit) if the security panel and most 
devices are on the same floor as the Gateway.

Place horizontally if the security panel, devices and Gateway occupy multiple 
floors.

4. 

Connect the cables following steps a through d below.

a.

Use a 4-wire cable to connect the Security Panel to the Security connector on the 
Gateway.

Notes:

The security panel connection requires one of the following: Honeywell 
HSPIM, DSC Communicator Module, GE Automation Module.

Wiring: Tx(-) to Rx(-), Tx(+) to Rx(+), Rx(-) to Tx(-), Rx(+) to Tx(+).

Wires must be stripped and seated deeply in terminal connection points.

b.

Connect an Ethernet cable from one of the open ports of the broadband router to 
the Broadband Ethernet port of the Gateway.

c.

Pull wires gently to verify that Gateway connections are secure.

d.

Plug the power cord into the Gateway and then plug the power adapter into an AC 
outlet.

5. 

Wait until the Power and Devices LEDs on the Gateway become solid green (this could 
take a few minutes).

6. 

To begin the installation process, go to https://portal.adtpulse.com/activation and use 
installer credentials to log into the ADT Pulse system.

Horizontal Mount

Wall Mount

Vertical Mount

5 1/2 inches

3/16 inches

Broadband Router

Gateway

Security Panel

Gateway

TX+
TX-
RX+

RX-

TX+
TX-

RX+

RX-

Security Panel

Summary of Contents for PGZNG1

Page 1: ...teway PGZNG1 Package Contents Warning Do not stack equipment or place equipment in tight spaces in drawers or on carpets Make sure that your equipment is surrounded by at least 2 inches 5 centimeters of air space Gateway Ethernet Cable Stand Power Adapter Wall Mount Kit ...

Page 2: ...iently wired to both the broadband router and security panel and is close to an AC outlet 3 Install the Gateway in the proper orientation Mount vertically using the stand or wall mount kit if the security panel and most devices are on the same floor as the Gateway Place horizontally if the security panel devices and Gateway occupy multiple floors Horizontal Mount Wall Mount Vertical Mount 5 1 2 in...

Page 3: ...n Ethernet cable from one of the open ports of the broadband router to the Broadband Ethernet port of the Gateway c Pull wires gently to verify that Gateway connections are secure d Plug the power cord into the Gateway and then plug the power adapter into an AC outlet 5 Wait until the Power and Devices LEDs on the Gateway become solid green this could take a few minutes 6 To begin the installation...

Page 4: ...g up Wi Fi Solid green Gateway is linked with Wi Fi clients Blinking green Data is being transmitted or received over Wi Fi Off Wi Fi is not enabled or there are no Wi Fi devices installed Connection Solid green Gateway is connected for remote interactive services Pulsing green Gateway is establishing a connection for remote interactive services Blinking green Data is being transmitted for remote ...

Page 5: ...uipment has been tested and found to comply with the limits for a Class B digital device pursuant to Part 15 of the FCC Rules These limits are designed to provide reasonable protection against harmful interference in a residential installation This equipment uses and can radiate radio frequency energy and if not installed and used in accordance with the instructions may cause harmful interference ...

Page 6: ...0cm between the radiator your body Caution Ce dispositif est conforme à la norme CNR 210 d Industrie Canada applicable aux appareils radio exempts de licence Son fonctionnement est sujet aux deux conditions suivantes 1 le dispositif ne doit pas produire de brouillage préjudiciable et 2 ce dispositif doit accepter tout brouillage reçu y compris un brouillage susceptible de provoquer un fonctionneme...

Reviews: