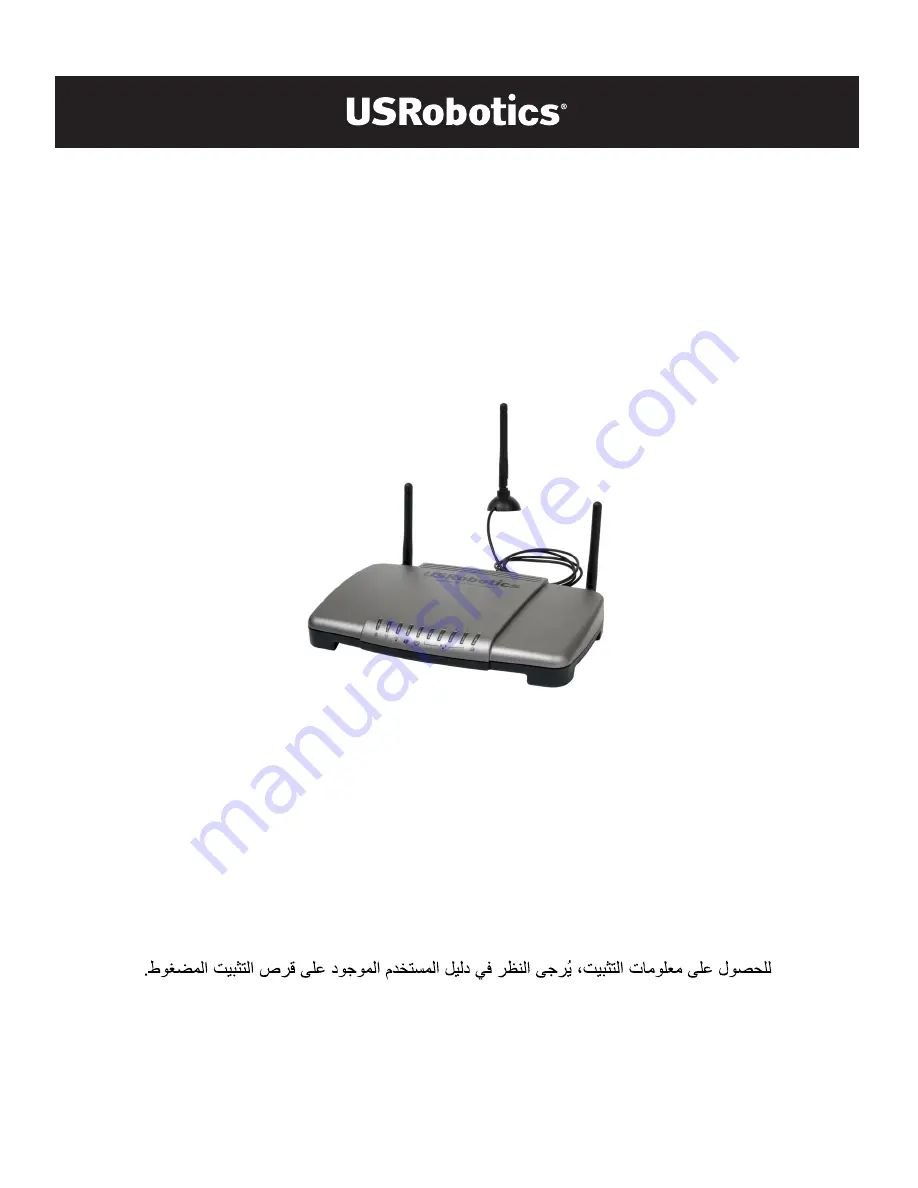
background image

 Wi re l e s s  

N

d x   A D S L 2 +  

G a t e w a y

Q u i c k   I n s t a l l a t i o n   G u i d e

G u i d e   d ' i n s t a l l a t i o n   ra p i d e

I n s t a l l a t i o n s a n l e i t u n g

G u i d a   p e r   l ' i n s t a l l a z i o n e   ra p i d a

G u í a   b re ve   d e   i n s t a l a c i ó n

B e k n o p t e   i n s t a l l a t i e g i d s

H

õ

zl

õ

 Kurulum K

õ

lavuzu

Οδηγός


γρήγορης


εγκατάστασης

R24.0691.00

rev 2.1 3/07

Summary of Contents for Wireless Ndx ADSL2+ Gateway

Page 1: ...k Installation Guide Guide d installation rapide Installationsanleitung Guida per l installazione rapida Guía breve de instalación Beknopte installatiegids Hõzlõ Kurulum Kõlavuzu Οδηγός γρήγορης εγκατάστασης R24 0691 00 rev 2 1 3 07 ...

Page 2: ......

Page 3: ...untiva 51 Risoluzione di problemi 56 Informazioni aggiuntive 58 Español 59 Instalación 59 Configuración adicional 65 Solución de problemas 70 Información adicional 72 Nederlands 73 Installatie 73 Aanvullende configuratiegegevens 79 Problemen oplossen 84 Aanvullende informatie 86 Türkçe 87 Kurulum 87 Ek Konfigürasyon 93 Sorun Giderme 97 Ek Bilgiler 100 Ελληνικά 101 Εγκατάσταση 101 Πρόσθετη διαμόρφω...

Page 4: ......

Page 5: ...AN Wireless Net work Off Wireless connection is disabled Solid Wireless connection is enabled Flashing Sending and receiving data SecureEasySetup Off SecureEasySetup mode is not ready on the gateway Solid SecureEasySetup mode is ready Blinking Communicating with SecureEasySetup devices WAN Internet Off No Internet connection established or the gateway is in bridge mode Flashing Sending and receivi...

Page 6: ...t your gateway without changing your cur rent settings press and hold the Reset button for 1 full second To restore your access point to the factory default settings press and hold the Reset button for at least 7 seconds 15VDC Connects the power adapter to your gateway SecureEasySetup Enables SecureEasySetup on your gateway To enable SecureEasySetup on your gateway press and hold the SecureEasySet...

Page 7: ...luded or required by your ISP A microfilter removes interference between voice and ADSL signals If a micro filter was not included with the gateway ask your ISP if microfilters are necessary for your telephony devices 1 Plug each telephony device cable telephone fax machine etc into a micro filter 2 Connect the microfilter into the telephone wall jack Note Do not install a microfilter on the cable...

Page 8: ...nnect the other end to one of the gateway s LAN ports 3 Power up the network A Connect the supplied power adapter to the 15VDC port on the gateway Note The USB port on the gateway is for connecting a USB printer only For instructions on connecting a USB printer to your gateway see Install a USB Printer on page 8 Note UK Users With the power adapter unplugged connect the appropriate power plug for ...

Page 9: ...USRobotics Installation CD ROM into your computer s CD or DVD ROM drive and do one of the following Windows A If the CD doesn t start automatically start it manually as follows i Windows Vista Click Windows Start Computer Windows XP Click Windows Start My Computer Windows 2000 On the desktop double click My Computer ii Double click the CD drive B Select your preferred language then read the licens...

Page 10: ... ROM Step Four Configure Your Wirless Security Settings 1 To configure your wireless security settings press the SecureEasySetup button on the back of the gateway for one full second This will set WPA2 and WPA PSK wireless security and configure a pass phrase network key for your wireless network 2 If you will be connecting this computer to your network via a wireless con nection you can unplug th...

Page 11: ...ation proce dure You can verify your Internet connection by registering your Wireless Ndx ADSL2 Gateway at www usr com productreg Additional Configuration Connect Installed Wireless Clients You can use the SecureEasySetup button to connect Wireless Ndx and other certified SecureEasySetup wireless devices to your gateway 1 If you still need to install any wireless adapters refer to the wireless dev...

Page 12: ...92 168 1 1 and press ENTER 2 Enter the user name and the password for your gateway and click OK 3 On the gateway configuration pages go to the Security menu and select Wireless to view your wireless security settings Install a USB Printer A USB printer can be connected to the Wireless Ndx ADSL2 Gateway and used as a network printer if both your operating system and your printer support the Interne...

Page 13: ...t the printer from your computer and plug the thin rectangular end of the USB cable into the USB port on the Wireless Ndx ADSL2 Gateway 2 Turn your printer on 3 On your computer start a Web browser 4 In the location or address line type 192 168 1 1 and press ENTER to access the gateway configuration pages 5 Enter the user name and the password for your gateway and click OK 6 From the Device menu s...

Page 14: ...ows XP and 2000 1 Do one of the following Windows XP Click Windows Start Printers and Faxes Windows 2000 Click Windows Start Settings Printers 2 Click Add a Printer The Add Printer Wizard will start 3 Click Next 4 Select the radio button labeled A network printer or a printer attached to another computer Click Next 5 Select Connect to a printer on the Internet or on a home or office network In the...

Page 15: ...o the LED descriptions in this guide and then check the LEDs on the gateway to make sure you are receiving power and all ports are functioning See the LED descriptions on page 1 4 For wireless connections only Low link quality or range can be caused by environmental interference such as lead based paint and concrete walls or some electronic items such as 2 4GHz phones Try to move the antenna of th...

Page 16: ...equired connection information contact your ISP 3 Click Save I am no longer able to access the Internet Solution 1 Press the Reset button on the back of your gateway for 1 second to reboot your gateway Wait for the gateway to completely reboot 2 Reboot your computer Wait for the computer to completely reboot and try to access the Internet 3 If you still cannot access the Internet see the Troublesh...

Page 17: ... or VoIP device Solution If you want to connect a device to your gateway such as a gaming console or VoIP device you will have to open up access to specific ports so the devices can communicate with the Internet This is done from the Security menu on the gate way configuration pages using Port Triggering For detailed information on Port Triggering see the Configuration and Tutorials sections of th...

Page 18: ...al information 1 See the User Guide on the USRobotics Installation CD ROM 2 Go to the Support section of the USRobotics Web site at www usr com support Many of the most common difficulties that customers experience have been addressed in the FAQ and Troubleshooting Web pages for your Wireless Ndx ADSL2 Gateway The Support pages also contain information on the latest firmware and may contain docume...

Page 19: ...a connexion sans fil est désactivée Continu La connexion sans fil est activée Clignotant Envoi ou réception de données SecureEasySetup Eteint Le mode SecureEasySetup n est pas activé sur la passerelle Continu Le mode SecureEasySetup est activé Clignotant Communication en cours avec des périphériques SecureEasySetup WAN Internet Eteint Aucune connexion Internet établie ou la passerelle est en mode ...

Page 20: ...er votre passerelle sans modifier vos paramètres actuels appuyez sur le bouton Reset Réinitialiser et maintenez le enfoncé pendant 1 seconde Pour rétablir les réglages d usine par défaut de votre passerelle appuyez sur le bouton de Reset Réinitialiser pendant au moins 7 secondes 15VDC 15 VCC Connecte l adaptateur secteur à votre passerelle SecureEasySetup Active SecureEasySetup sur votre passerell...

Page 21: ...microfiltre empêche les interférences entre le téléphone et les signaux ADSL Lorsque votre passerelle ne comporte pas de microfiltre renseignez vous auprès de votre FAI afin de savoir si vos appareils téléphoniques nécessitent de tels filtres 1 Branchez le câble de vos appareils téléphoniques téléphone fax etc dans un microfiltre 2 Connectez le microfiltre à la prise téléphonique murale Remarque N...

Page 22: ... de la passerelle 3 Mise sous tension du réseau A Branchez l adaptateur secteur fourni sur le port 15 VCC de la passerelle Remarque Le port USB de la passerelle ne permet de raccorder qu une imprimante USB Pour lire des instructions sur la façon de connecter une imprimante USB à votre passerelle consultez la section Installer une imprimante USB page 22 Remarque Utilisateurs du R U avec l adaptateu...

Page 23: ...nstallation d USRobotics dans le lecteur CD ROM ou DVD ROM de votre ordinateur et procédez de l une des manières suivantes Windows A Si le CD ne se lance pas automatiquement démarrez le manuellement comme suit i Windows Vista cliquez sur Démarrer Ordinateur Windows XP cliquez sur Démarrer Poste de travail Windows 2000 Me et 98SE sur le bureau double cliquez sur Poste de travail ii Puis double cliq...

Page 24: ...tape 4 configuration de vos paramètres de sécurité sans fil 1 Pour configurer vos paramètres de sécurité sans fil appuyez sur le bouton SecureEasySetup situé à l arrière de la passerelle pendant une seconde Cela permet d activer la sécurité sans fil WPA2 et WPA PSK et de configurer une phrase d authentification clé réseau pour votre réseau sans fil 2 Si vous devez connecter cet ordinateur à votre ...

Page 25: ...nstallation est terminée Vous pouvez vérifier votre connexion Internet en enregistrant votre Wireless Ndx ADSL2 Gateway à l adresse www usr com productreg Configuration supplémentaire Connecter des clients sans fil installés Le bouton SecureEasySetup vous permet de connecter des périphériques Wireless Ndx ou d autres périphériques sans fil certifiés SecureEasySetup à votre passerelle 1 Si vous dev...

Page 26: ...illez à appliquer les mêmes paramètres de sécurité à l adaptateur sans fil qu à la passerelle Pour voir les paramètres de sécurité de votre passerelle 1 Lancez un navigateur Web sur votre ordinateur puis dans le champ d adresse saisissez 192 168 1 1 et appuyez sur Entrée 2 Saisissez le nom d utilisateur et le mot de passe utilisés pour votre passerelle et cliquez sur OK 3 Sur les pages de configur...

Page 27: ...z l imprimante hors tension Etape 2 informations relatives à votre serveur d impression 1 Débranchez l imprimante de l ordinateur et branchez l extrémité rectangulaire fine du câble USB dans le port USB de la passerelle Wireless Ndx ADSL2 Gateway 2 Allumez votre imprimante 3 Sur votre ordinateur démarrez un navigateur Web Remarque Lorsqu elle est utilisée avec des imprimantes multifonctions capabl...

Page 28: ...uetooth Cliquez sur Suiv ant 4 Cliquez sur The Printer That I Want Isn t Listed L imprimante que je désire uti liser n est pas indiquée dans la liste 5 Choisissez Select a shared printer by name Sélectionner une imprimante par tagée par son nom et saisissez dans le champ URL l emplacement de l impri mante que vous avez noté à l étape 2 Cliquez sur Suivant 6 Sélectionnez le fabricant et le modèle d...

Page 29: ...Yes Oui 8 Cliquez sur Finish Terminer Etape 4 vérification de la connexion de l imprimante 1 Effectuez ensuite l une des opérations suivantes Windows Vista cliquez sur Démarrer Panneau de configuration Matériel et audio Imprimantes Windows XP cliquez sur Démarrer Imprimantes et télécopieurs Windows 2000 cliquez sur Démarrer Paramètres Imprimantes 2 Cliquez avec le bouton droit de la souris sur vot...

Page 30: ...él iorer la qualité de la connexion 5 Pour les connexions sans fil uniquement assurez vous que chaque périphérique qui se connecte à la passerelle est configuré sur le mode infra structure Configurez le nom du réseau ou SSID dans les paramètres de l adaptateur sans fil en fonction du Network Name nom du réseau qui est utilisé dans la passerelle et assurez vous que vous utilisez le même type de séc...

Page 31: ...yant SecureEasySetup situé à l avant de la passerelle commence à clignoter avant de lancer SecureEasySetup dans l utilitaire client de votre adaptateur sans fil Les pages de configuration de ma passerelle ne répondent pas mais je peux tout de même accéder à Internet Solution Appuyez sur le bouton Reset Réinitialiser de la passerelle pendant 1 seconde pour redémarrer la passerelle Si vous ne parven...

Page 32: ...e CD ROM d installation d USRobotics Pour obtenir plus d informations sur le fonctionnement et la configuration reportez vous au Guide de l utilisateursur le CD ROM d installation d USRobotics Le Guide de l utilisateur contient des informations détaillées sur l utilisation et la configuration de votre Wireless Ndx ADSL2 Gateway Pour obtenir des informations complètes sur le dépannage et des précis...

Page 33: ... WLAN Wireless Netzwerk Aus Die WLAN Verbindung ist deaktiviert An Die WLAN Verbindung ist aktiviert Blinkt Daten werden gesendet oder empfangen SecureEasySetup Aus SecureEasySetup Modus am Gateway nicht bereit An Der Modus SecureEasySetup ist bereit Blinkt Kommunikation mit SecureEasySetup Geräten WAN Internet Aus Keine Internetverbindung oder Gateway befindet sich im Bridge Modus Blinkt Daten we...

Page 34: ...tarten des Gateways ohne Verlust der aktuellen Einstellungen halten Sie die Reset Taste 1 Sekunde lang gedrückt Zum Zurücksetzen des Gateways auf die Werkseinstellungen halten Sie die Reset Taste 7 Sekunden lang gedrückt 15VDC Anschluss des Netzteils an das Gateway SecureEasySetup Startet SecureEasySetup auf dem Gateway Zum Starten von SecureEasySetup auf dem Gateway halten Sie die SecureEasySetup...

Page 35: ...vorhanden oder falls vom ISP vorgeschrieben Ein Mikrofilter beseitigt Interferenzen zwischen dem Sprach und dem ADSL Signal Falls Ihrem Gateway kein Mikrofilter beigelegt war fragen Sie bei Ihrem ISP nach ob dieser für Ihre Telefongeräte erforderlich ist 1 Schließen Sie jedes Telefongerät Telefon Fax usw an einen Mikrofilter an 2 Stecken Sie den Mikrofilter in die Telefonsteckdose Hinweis Installi...

Page 36: ...C Verbinden Sie das andere Kabelende mit einem der LAN Anschlüsse des Gateways 3 Nehmen Sie das Netzwerk in Betrieb A Schließen Sie das mitgelieferte Netzteil an den 15VDC Anschluss des Gateways an Hinweis Der USB Anschluss am Gateway dient nur zum Anschluss eines USB Druckers Anweisungen zum Anschließen eines USB Druckers an das Gateway finden Sie unter Installieren eines USB Druckers auf Seite 3...

Page 37: ...s Computers und führen Sie einen der folgenden Schritte durch Windows A Wenn die CD nicht automatisch gestartet wird können Sie sie man uell starten i Windows Vista Klicken Sie auf Start Computer Windows XP Klicken Sie auf Start Arbeitsplatz Windows 2000 Me und 98SE Doppelklicken Sie auf dem Desk top auf Arbeitsplatz ii Doppelklicken Sie dann auf das Symbol des CD ROM Laufwerks B Wählen Sie die ge...

Page 38: ... auf der USRobotics Installations CD ROM 4 Schritt Konfigurieren der WLAN Sicherheitseinstellungen 1 Zum Konfigurieren der WLAN Sicherheitseinstellungen halten Sie die SecureEasySetup Taste an der Rückseite des Gateways eine Sekunde gedrückt Dadurch werden die WLAN Sicherheitsstandards WPA2 und WPA PSK in Kraft gesetzt und ein Kennwort Netzwerkschlüssel für das WLAN konfiguriert 2 Wenn Sie diesen ...

Page 39: ...en die Installation abgeschlossen Sie können Ihre Internetverbindung prüfen indem Sie Ihren Wireless Ndx ADSL2 Gateway unter www usr com productreg registrieren Weitere Konfiguration Verbinden installierter Wireless Clients Mit der SecureEasySetup Taste können Sie Wireless Ndx und andere SecureEasySetup zertifizierte Wireless Geräte an Ihr Gateway anschließen 1 Falls Sie dennoch Wireless Adapter i...

Page 40: ...m Gateway entsprechen So zeigen Sie die für Ihr Gateway geltenden WLAN Sicherheitseinstellungen an 1 Starten Sie auf Ihrem Computer einen Webbrowser geben Sie in der Adressleiste 192 168 1 1 ein und drücken Sie die Eingabetaste 2 Geben Sie den Benutzernamen und das Passwort für das Gateway ein und klicken Sie auf OK 3 Öffnen Sie auf den Gateway Konfigurationsseiten das Menü Security Sicherheit und...

Page 41: ...1 Trennen Sie den Drucker von Ihrem Computer und stecken Sie das dünne rechteckige Ende des USB Kabels in den USB Anschluss des Wireless Ndx ADSL2 Gateways 2 Schalten Sie den Drucker ein 3 Öffnen Sie auf Ihrem Computer einen Webbrowser 4 Geben Sie zum Öffnen der Gateway Konfigurationsseiten in der Adresszeile 192 168 1 1 ein und drücken Sie die Eingabetaste Hinweis Beim Einsatz mit Multifunktionsg...

Page 42: ...Option Printer Server Druckserver 7 Geben Sie im Feld Printer name den Druckernamen ein und im Feld Comment einen Kommentar für den Drucker 8 Schreiben Sie sich die Druckerstandortadresse z B http 192 168 1 1 1631 printers My_Printer auf Sie benötigen die Adresse um den Drucker auf Computern einzurichten die Zugriff auf den Drucker haben sollen ...

Page 43: ...xgeräte Unter Windows 2000 Klicken Sie auf Start Einstellungen Drucker 2 Klicken Sie auf Drucker hinzufügen 3 Der Druckerinstallations Assistent wird gestartet Klicken Sie auf Weiter 4 Wählen die Option Netzwerkdrucker oder Drucker der an einen anderen Computer angeschlossen ist Klicken Sie auf Weiter 5 Wählen Sie die Option Verbindung mit einem Drucker im Internet oder Heim Firmennetzwerk herstel...

Page 44: ...mführende Steckdose angeschlossen 3 Überprüfen Sie die LED Anzeigen am Gateway anhand der Beschreibung in dieser Anleitung daraufhin ob die Stromzufuhr aktiv ist und alle Anschlüsse funktionieren Siehe LED Beschreibungen auf Seite 29 4 Wireless Verbindungen Eine schlechte Verbindungsqualität oder eine geringe Reichweite kann durch Störungsquellen in der Umgebung verursacht werden z B bleihaltige F...

Page 45: ...thentifizierung PAP oder CHAP für PPP Verbindungen IP Adresse Benutzername und Passwort falls von Ihrem ISP zugewiesen Subnetzmaske und Angaben zu Gateway und DNS Server 2 Falls Sie die erforderlichen Verbindungsdaten nicht mit Sicherheit wissen wenden Sie sich an Ihren Internet Service Provider ISP 3 Klicken Sie auf Save Speichern Ich kann nicht mehr auf das Internet zugreifen Lösungsvorschlag 1 ...

Page 46: ...enommen haben müssen Sie die Änderungen entweder erneut eingeben oder anhand einer Sicherungsdatei falls vorhanden wiederherstellen Wie sieht die Konfiguration des Gateways für eine Spielkonsole oder ein VoIP Gerät aus Lösungsvorschlag Wenn Sie eine Spielkonsole oder ein VoIP Gerät an das Gateway anschließen möchten müssen Sie den Zugriff auf bestimmte Anschlüsse freigeben damit die Geräte mit dem...

Page 47: ...1 Siehe Bedienungsanleitung auf der USRobotics Installations CD ROM 2 Rufen Sie den Support Bereich auf der Website von USRobotics unterUSRobotics www usr com support auf Viele der häufigsten Probleme denen Kunden begegnen können werden in den FAQ Häufig gestellte Fragen und auf den Webseiten zur Fehlerbehebung für Ihren Wireless Ndx ADSL2 Gateway angesprochen Auf diesen Seiten finden Sie außerdem...

Page 48: ...44 Deutsch ...

Page 49: ...reless Spento Connessione wireless disattivata Acceso Connessione wireless attivata Lampeggiante Invio o ricezione di dati SecureEasySetup Spento La modalità SecureEasySetup non è pronta Acceso La modalità SecureEasySetup è pronta Lampeggiante Comunicazione con dispositivi SecureEasySetup in corso WAN Internet Spento La connessione a Internet non è stabilita oppure il gateway è in modalità Bridge ...

Page 50: ...zioni predefinite Per riavviare il gateway senza modificare le impostazioni attuali tenere premuto il tasto Reset per 1 secondo Per ripristinare le impostazioni predefinite di sicurezza wireless del gateway tenere premuto il tasto Reset per almeno 7 secondi 15VDC Consente di collegare l adattatore di alimentazione al gateway SecureEasySetup Attiva SecureEasySetup sul gateway Per attivare la funzio...

Page 51: ...usi o richiesti dal proprio ISP Il microfiltro consente di rimuovere le interferenze tra segnali vocali e segnali ADSL Se un microfiltro non è fornito con il gateway richiedere al proprio ISP se i dispositivi telefonici in uso ne richiedono l utilizzo 1 Collegare a un microfiltro il cavo di ciascun dispositivo telefonico in uso tel efono fax ecc 2 Collegare il microfiltro alla presa telefonica a m...

Page 52: ...elle porte LAN del gateway 3 Alimentazione della rete A Collegare il cavo di alimentazione fornito in dotazione alla porta 15VDC del gateway Nota la porta USB del gateway consente di collegare unicamente la stampante USB Per istruzioni su come collegare la stampante USB al gateway vedere la sezione Installazione della stampante USB a pagina 52 Nota utenti nel Regno Unito con l alimentatore scolleg...

Page 53: ...tivi al server DNS 1 Inserire il CD ROM di installazione USRobotics nell unità CD o DVD ROM del computer ed eseguire una delle seguenti opzioni Windows A Se l installazione non si avvia automaticamente eseguire la procedura manualmente come indicata di seguito i Windows Vista fare clic su Start quindi su Computer Windows XP fare clic su Start selezionare Risorse del computer Windows 2000 Me e 98SE...

Page 54: ...Configurator Per ulteriori informazioni su EasyConfigurator consultare la Guida utente sul CD ROM di installazione USRobotics Fase quattro configurazione delle impostazioni di sicurezza wireless 1 Per configurare le impostazioni di sicurezza wireless tenere premuto il tasto SecureEasySetup sul retro del gateway per 1 secondo In questo modo la sicurezza wireless verrà impostata su WPA2 and WPA PSK ...

Page 55: ...allazione è completa Per controllare la connessione a Internet eseguire la registrazione di Wireless Ndx ADSL2 Gateway all indirizzo www usr com productreg Configurazione aggiuntiva Collegamento di client wireless installati Utilizzando il tasto SecureEasySetup è possibile connettere Wireless Ndx e altri dispositivi wireless certificati SecureEasySetup al gateway 1 Se ancora non è stato installato...

Page 56: ...incidano con le impostazioni di sicurezza dell adattatore wireless Per visualizzare le impostazioni di sicurezza wireless del gateway 1 Dal computer avviare un browser Web nella barra degli indirizzi digitare 192 168 1 1 e premere Invio 2 Inserire il nome utente e la password del gateway quindi fare clic su OK 3 Nelle pagine di configurazione del gateway accedere al menu Security Sicurezza e selez...

Page 57: ... golare del cavo USB alla porta USB di Wireless Ndx ADSL2 Gateway 2 Accendere la stampante 3 Dal computer avviare un browser Web 4 Nella barra degli indirizzi digitare 192 168 1 1 e premere Invio per accedere alle pagine di configurazione del gateway 5 Inserire il nome utente e la password del gateway quindi fare clic su OK 6 Dal menu Device Dispositivo selezionare Printer Server Server di stampa ...

Page 58: ... registrata durante la Fase due Fare clic su Next 6 Selezionare il produttore e il modello della stampante 7 Inserire il nome della stampante che si desidera installare Stampare una pagina di prova se necessario 8 Fare clic su Fine per completare la procedura di configurazione Windows XP e 2000 1 Eseguire una delle seguenti operazioni Windows XP fare clic su Start Stampanti e fax Windows 2000 fare...

Page 59: ...nti e fax Windows 2000 fare clic su Start Impostazioni Stampanti 2 Fare clic con il pulsante destro del mouse sulla stampante e scegliere Proprietà 3 Fare clic su Stampa pagina di prova La pagina di prova viene stampata Nota il campo URL rileva la distinzione tra maiuscole e minuscole Le informazioni devono pertanto essere inserite esattamente come mostrato nella sezione Printer location Posizione...

Page 60: ...gateway siano impostati sulla modalità Infrastructure Infrastruttura Impostare il nome della rete o SSID tra le impostazioni dell adattatore wireless sul Network name Nome di rete utilizzato dal gateway e verificare l uso dello stesso tipo di protezione wireless Consultare la documentazione dell adattatore wireless per determinare come modificare queste impostazioni Se si continuano a riscontrare ...

Page 61: ...ibile Per riavviare il gateway premere il tasto Reset sul retro dello stesso per 1 secondo Se il problema persiste tenere premuto il tasto Reset per 7 secondi In questo modo verranno ripristinate le impostazioni predefinite del gateway Se si utilizzano impostazioni di configurazione personalizzate sarà necessario definirle nuovamente o ripristinarle se è stato creato un file di backup Come si conf...

Page 62: ... Guida utente contiene informazioni dettagliate sull uso e la configurazione di Wireless Ndx ADSL2 Gateway Per ulteriori informazioni sulla risoluzione dei problemi 1 Consultare la guida utente sul CD ROM di installazione USRobotics 2 Visitare la sezione relativa al supporto tecnico del sito Web di USRobotics all indirizzo www usr com support La maggior parte dei problemi riscontrati dai clienti è...

Page 63: ...La conexión inalámbrica está desactivada Luz fija La conexión inalámbrica está activada Intermitente Enviando y recibiendo datos SecureEasySetup Apagado El modo SecureEasySetup no está preparado en la puerta de enlace Luz fija El modo SecureEasySetup está preparado Intermitente Se ha establecido la comunicación con dispositivos SecureEasySetup WAN Internet Apagado No se ha establecido la conexión ...

Page 64: ...reiniciar la puerta de enlace sin cambiar la configuración actual mantenga pulsado el botón Reset Reinicio durante un segundo Para restablecer la configuración de fábrica de la puerta de enlace mantenga pulsado el botón Reset Reinicio durante al menos 7 segundos 15VDC Conecta la fuente de alimentación a la puerta de enlace SecureEasySetup Activa SecureEasySetup en la puerta de enlace Para activar ...

Page 65: ...cluidos o si lo exige su proveedor de acceso a Internet Los microfiltros eliminan las interferencias producidas entre las señales ADSL y las de voz Si la puerta de enlace no incluye uno pregunte a su proveedor si sus dispositivos telefónicos necesitan microfiltros 1 Conecte el cable de cada dispositivo telefónico teléfono fax etc a un microfiltro 2 Enchufe el microfiltro al cajetín de la línea tel...

Page 66: ...ace 3 Establezca la conexión de la red A Conecte la fuente de alimentación suministrada al puerto 15VDC de la puerta de enlace Nota El puerto USB de la puerta de enlace solo se puede utilizar para impresoras USB Para obtener instrucciones sobre cómo conectar una impresora USB a la puerta de enlace consulte Instalación de una impresora USB en la página 66 Nota Usuarios residentes en el Reino Unido ...

Page 67: ...ad de CD ROM o de DVD del equipo y realice una de las siguientes acciones Si es usuario de Windows A Si la instalación no comienza automáticamente puede iniciarla de forma manual i Si es usuario de Windows Vista Haga clic en Inicio Equipo Si es usuario de Windows XP Haga clic en Inicio Mi PC Si es usuario de Windows 2000 Me o 98SE Haga doble clic en el icono Mi PC que aparece en el escritorio ii H...

Page 68: ... USRobotics Paso 4 Configuración de los parámetros de seguridad inalámbrica 1 Para configurar los parámetros de seguridad inalámbrica mantenga pulsado el botón de SecureEasySetup situado en la parte trasera de la puerta de enlace durante un segundo De esta manera se configurará el sistema de seguridad inalámbrica WPA2 o WPA PSK y se establecerá una clave de red o contraseña para su red inalámbrica...

Page 69: ...ve Guardar Enhorabuena El proceso de instalación ha finalizado Si registra Wireless Ndx ADSL2 Gateway en www usr com productreg podrá comprobar el funcionamiento de su conexión a Internet Configuración adicional Conexión de clientes inalámbricos ya instalados Podrá utilizar el botón SecureEasySetup para conectar a su puerta de enlace Wireless Ndx y otros dispositivos inalámbricos homologados por S...

Page 70: ...lace asegúrese de que los parámetros de seguridad del adaptador inalámbrico coinciden con los que figuran en la puerta de enlace Para visualizar los parámetros de seguridad inalámbrica de la puerta de enlace siga los pasos siguientes 1 Abra el navegador de Internet escriba 192 168 1 1 en la barra de direcciones y a continuación pulse Intro 2 Introduzca el nombre de usuario la contraseña de la puer...

Page 71: ...Datos del servidor de impresión 1 Desconecte la impresora del ordenador y conecte el extremo rectangular estrecho del cable USB en el puerto USB de la Wireless Ndx ADSL2 Gateway 2 Encienda la impresora 3 Abra el navegador de Internet 4 En la barra de direcciones escriba 192 168 1 1 y pulse Intro para acceder a las páginas de configuración de la puerta de enlace 5 Introduzca el nombre de usuario y ...

Page 72: ...n el campo URL escriba la ubicación de la impresora introduc ida en el paso 2 Haga clic en Next Siguiente 6 Seleccione la marca y el modelo de la impresora 7 Introduzca el nombre la localización y la descripción de la impresora que está instalando y haga clic en Siguiente Cuando se le pregunte podrá optar por imprimir una página de prueba 8 Haga clic en Finalizar para completar la configuración Wi...

Page 73: ... Hardware y sonido Impresoras Si es usuario de Windows XP Haga clic en Inicio Impresoras y faxes Si es usuario de Windows 2000 Haga clic en Inicio Configuración Impresoras 2 Haga clic con el botón derecho del ratón en el icono de la impresora y selec cione Propiedades 3 Haga clic en Imprimir página de prueba La página de prueba debería imprimirse correctamente Nota La información del URL distingue...

Page 74: ... inalámbricos de sitio 5 Información exclusiva para conexiones inalámbricas Compruebe que todos los dispositivos conectados a la puerta de enlace están configurados en modo Infrastructure Infraestructura El nombre de red o SSID Network name que aparece en la configuración del adaptador inalámbrico debe coincidir con el de la puerta de enlace Compruebe además que el tipo de seguridad inalám brica e...

Page 75: ...p en el programa del cliente que utilizará para el adaptador inalámbrico compruebe que el LED de SecureEasySetup situado en la parte frontal de la puerta de enlace parpadea Las páginas de configuración de la puerta de enlace no funcionan correctamente pero aún puedo acceder a Internet Solución Mantenga pulsado el botón Reset Reinicio de la puerta de enlace durante un segundo para reiniciarla Si aú...

Page 76: ...or Consulte la Guía del usuario del CD de instalación de USRobotics para obtener información sobre el funcionamiento y la configuración En la guía del usuario encontrará información pormenorizada sobre el uso y la configuración de la Wireless Ndx ADSL2 Gateway Si desea obtener más información sobre el dispositivo y la solución de problemas consulte 1 La Guía del usuario del CD de instalación de US...

Page 77: ...ld Aan Draadloze verbinding is ingeschakeld Knippert Er worden gegevens verzonden of ontvangen SecureEasySetup Uit SecureEasySetup is niet gereed op de gateway Aan SecureEasySetup is gereed Knippert Er wordt met de SecureEasySetup apparaten gecommuniceerd WAN Wide Area Network internet Uit Er is geen internetverbinding tot stand gebracht of de gateway staat in de Bridge mode Modus Bridge Knippert ...

Page 78: ...ingen van de gateway herstellen Houd de Reset knop 1 seconde ingedrukt om de gateway opnieuw op te starten zonder de huidige instellingen te wijzigen Houd de Reset knop minimaal 7 seconden ingedrukt om de fabrieksinstellingen van de gateway te herstellen 15 VDC Voor aansluiting van de netvoedingsadapter op de gateway SecureEasySetup Hiermee wordt SecureEasySetup op de gateway ingeschakeld Houd als...

Page 79: ...ndien meegeleverd of vereist door uw ISP Een microfilter verwijdert de storing tussen spraak en ADSL signalen Als er geen microfilter met de gateway is meegeleverd dient u uw ISP te vragen of er microfilters nodig zijn voor uw telefonie apparatuur 1 Sluit de kabel van elk telefonie apparaat telefoon fax etc aan op een microfilter 2 Sluit het microfilter aan op de telefoonaansluiting in de muur Opm...

Page 80: ...poorten van de gateway 3 Schakel het netwerk in A Sluit de meegeleverde netvoedingsadapter aan op de 15 VDC poort van de gateway Opmerking de USB poort van de gateway is alleen bedoeld voor de aansluiting van een USB printer Raadpleeg Een USB printer installeren op pagina 80 voor instructies over de aansluiting van een USB printer op de gateway Opmerking gebruikers in Groot Brittannië sluit als de...

Page 81: ...uter en voer een van de onderstaande procedures uit Windows A Indien de cd niet automatisch begint kunt u deze als volgt handmatig starten i Windows Vista klik op Start Klik vervolgens op Computer Windows XP klik in Windows op Start Deze computer Windows 2000 Me en 98SE dubbelklik op Deze computer ii En dubbelklik vervolgens op uw cd station B Selecteer de door u gewenste taal lees de licentieover...

Page 82: ...ap vier de draadloze beveiligingsinstellingen configureren 1 Druk om de draadloze beveiligingsinstellingen te configureren de SecureEasySetup knop aan de achterzijde van de gateway 1 seconde in Op deze manier wordt de draadloze beveiligingsmethode WPA2 en WPA PSK ingesteld Ook wordt er een coderingstekenreeks netwerksleutel voor uw draadloze netwerk geconfigureerd 2 Als u deze computer via een dra...

Page 83: ...et succes voltooid U kunt uw internetverbinding verifiëren door uw Wireless Ndx ADSL2 Gateway te registreren op www usr com productreg Aanvullende configuratiegegevens Verbinding maken met geïnstalleerde draadloze clients Met de SecureEasySetup knop kunt u een verbinding tot stand brengen tussen de gateway en geïnstalleerde Wireless Ndx of andere door SecureEasySetup gecertificeerde draadloze appa...

Page 84: ...er overeenkomen met die van de gateway De draadloze beveiligingsinstellingen van de gateway bekijken 1 Start een webbrowser op de computer en voer 192 168 1 1 op de locatie of adresregel in Druk vervolgens op ENTER 2 Voer de gebruikersnaam en het wachtwoord van de gateway in en klik op OK 3 Ga in de configuratiepagina s van de gateway naar het menu Security Beveiliging en selecteer Wireless Draadl...

Page 85: ...ay 2 Schakel de printer in 3 Start op de computer een webbrowser 4 Voer 192 168 1 1 op de locatie of adresregel in en druk op ENTER om naar de configuratiepagina s van de gateway te gaan 5 Voer de gebruikersnaam en het wachtwoord van de gateway in en klik op OK 6 Selecteer Printer Server Printserver in het menu Device Apparaat 7 Voer bij Printer name Printernaam de naam van de printer en bij Comme...

Page 86: ...inter Klik op OK 7 Klik op Ja als u wordt gevraagd of u de printer wilt instellen als standaard printer 8 Klik op Voltooien om de installatieprocedure af te sluiten Windows XP en 2000 1 Voer een van de volgende stappen uit Windows Vista Klik in Windows op Start Configuratiescherm Hardware en geluiden Printers Windows XP klik in Windows op Start Printers en faxapparaten Windows 2000 klik in Windows...

Page 87: ...ters en faxapparaten Windows 2000 klik in Windows op Start Instellingen Printers 2 Klik met de rechtermuisknop op uw printer en selecteer Eigenschappen 3 Klik op Testpagina afdrukken De printer dient met succes een testpagina af te drukken Opmerking de URL informatie is hoofdlettergevoelig en dient precies zo te worden ingevoerd als weergegeven in het gedeelte Printer loca tion Printerlocatie op d...

Page 88: ...die op de gateway zijn aangesloten op de modus Infrastructure Infrastructuur zijn ingesteld Stel de netwerknaam of SSID in de instellingen van de draadloze adapter in op de Network name Netwerknaam die door de gateway wordt gebruikt Controleer of u hetzelfde type draadloze beveiliging gebruikt Raadpleeg de documentatie bij uw draadloze adapter om na te gaan hoe u deze instellingen kunt wijzigen Ra...

Page 89: ...r ik heb wel verbinding met het internet Oplossing Houd de Reset knop op de gateway 1 seconde ingedrukt om de gateway opnieuw op te starten Houd als u nog steeds niet met de configuratiepagina s van de gateway kunt communiceren de Reset knop 7 seconden ingedrukt Op deze manier worden de fabrieksinstellingen van de gateway hersteld Als u persoonlijke configuratie instellingen gebruikt dient u de wi...

Page 90: ...ruikershandleiding vindt u meer informatie over het gebruik en de configuratie van uw Wireless Ndx ADSL2 Gateway Meer informatie over het oplossen van problemen en overige informatie 1 Raadpleeg de Gebruikershandleiding op de installatie cd van USRobotics 2 Ga naar het gedeelte Support Ondersteuning op de website van USRobotics op www usr com support De meest voorkomende problemen waar gebruikers ...

Page 91: ...alõ Kablosuz bağlantõ devre dõşõdõr Yanõyor Kablosuz bağlantõ etkindir Yanõp sönüyor Veri gönderiyor ve alõyor SecureEasySetup Kapalõ SecureEasySetup modu ağ geçidi cihazõnda hazõr değil Yanõyor SecureEasySetup modu hazõr Yanõp sönüyor SecureEasySetup cihazlarõyla iletişim kuruyor WAN Internet Kapalõ Internet bağlantõsõ sağlanamadõ ya da ağ geçidi köprü modunda Yanõp sönüyor Veri gönderiyor ve alõ...

Page 92: ...r Ağ geçidi cihazõnõzõ mevcut ayarlarõnõzõ değiştirmeden yeniden başlatmak için Reset düğmesini 1 saniye basõlõ tutun Ağ geçidi cihazõnõ varsayõlan fabrika ayarlarõna geri döndürmek için Reset düğmesini en az 7 saniye basõlõ tutun 15VDC Güç adaptörünü ağ geçidi cihazõna bağlar SecureEasySetup Ağ geçidi cihazõnda SecureEasySetup programõnõ etkinleştirir Ağ geçidi cihazõnda SecureEasySetup programõn...

Page 93: ...õn verilmişse veya İSS niz gerektiriyorsa Bir mikrofiltre ses ve ADSL sinyalleri arasõndaki parazitleri ortadan kaldõrõr Eğer ağ geçidi ile birlikte bir mikrofiltre verilmemişse telefon cihazlarõnõz için mikrofiltre gerekip gerekmediğini ISS nizden öğrenebilirsiniz 1 Her tip telefon cihazõnõn kablosunu telefon faks makinesi vs mikrofiltreye takõn 2 Mikrofiltreyi duvardaki telefon soketine bağlayõn...

Page 94: ...er ucu að geçidi cihazõ LAN portlarõndan birine bağlayõn 3 Ağõn başlatõlmasõ A Cihazla birlikte verilen güç adaptörünü að geçidi cihazõnõn 15VDC portuna bağlayõn Not Ağ geçidi üzerindeki USB portu yalnõzca USB yazõcõ bağlamak içindir Ağ geçidi USB yazõcõ bağlamakla ilgili talimatlar için bkz Bir USB Yazõcõsõ Kurun sayfa 94 Not İngiltere deki Kullanõcõlar Güç adaptörü prize takõlõ değilken güç adap...

Page 95: ...S sunucusu bilgileri 1 USRobotics Kurulum CD ROM u unu bilgisayarõnõzõn CD veya DVD ROM sürücüsüne takõn ve aşağõdaki işlemlerden birini gerçekleştirin Windows A CD otomatik olarak başlatõlmazsa aşağõdaki gibi manuel olarak başlatõn i Windows Vista Windows Başlat Bilgisayar Windows XP Windows Başlat Bilgisayarõm Windows 2000 Me ve 98SE Masa üzerinde Bilgisayarõm ii Simgesini tõklatõn ve CD sürücüs...

Page 96: ...i daha geniş ayrõntõ için USRobotics Kurulum CD ROM undaki Kullanõm Kõlavuzuna bakõn Dördüncü Adõm Kablosuz Güvenlik Ayarlarõnõ Konfigüre Edin 1 Kablosuz güvenlik ayarlarõnõ konfigüre etmek için ağ geçidi cihazõnõn arkasõndaki SecureEasySetup düğmesine bir saniye basõn Bu WPA2 ve WPA PSK kablosuz güvenliğini ayarlayacak ve kablosuz ağ için parola tümce ağ anahtarõ konfigüre edecektir 2 Eğer bu bil...

Page 97: ...ünü tamamladõnõz Internet bağlantõnõzõ Wireless Ndx ADSL2 Gateway cihazõnõzõ www usr com productreg adresinde kaydettirerek kontrol edebilirsiniz Ek Konfigürasyon Kurulmuş Kablosuz İstemciler Bağlayõn Wireless Ndx ya da diğer onaylõ ağ geçidi kablosuz cihazlarõnõ SecureEasySetup cihazõna bağlamak için SecureEasySetup düğmesini kullanabilirsiniz 1 Hala kurmanõz gereken bir kablosuz adaptör varsa ku...

Page 98: ...ptörün kablosuz güvenlik ayarlarõnõn ağ geçidi cihazõnda yaptõğõnõz ayarlarla aynõ olduğundan emin olun Ağ geçidinin kablosuz güvenlik ayarlarõnõ görüntülemek için 1 Bilgisayarõnõzda bir Internet tarayõcõ başlatõn konum ya da adres satõrõna 192 168 1 1 yazõn ve ENTER tuşuna basõn 2 Ağ geçidi için kullanõcõ adõnõ ve şifreyi girin ve OK Tamam düğmesini tõklatõn 3 Ağ geçidi konfigürasyon sayfalarõnda...

Page 99: ...nõ kesin ve USB kablosunun ince dikdörtgen ucunu Wireless Ndx ADSL2 Gateway üzerindeki USB portuna takõn 2 Yazõcõnõzõ açõn 3 Bilgisayarõnõzdan Internet tarayõcõsõnõ açõn 4 Yer veya adres satõrõna 192 168 1 1 yazõn ve ağ geçidi konfigürasyon sayfalarõna erişmek için ENTER tuşuna basõn 5 ağ geçidi için kullanõcõ adõnõ ve şifreyi girin ve OK Tamam düğmesini tõklatõn 6 Device Cihaz menüsünden Printer ...

Page 100: ...Kurmakta olduğunuz yazõcõnõn ismini girin ve Next e İleri tõklayõn İstendiğinde bir deneme sayfasõ basõp basmayacağõnõzõ seçebilirsiniz 8 Kurulumu tamamlamak için Finish i Son tõklatõn Windows XP ve 2000 1 Aşağõdaki işlemlerden birini gerçekleştirin Windows XP için Windows Başlat Yazõcõlar ve Fakslar seçeneğini tõklatõn Windows 2000 için Başlat Ayarlar Yazõcõlar seçeneklerini tõklatõn 2 Yazõcõ Ekl...

Page 101: ...me Bu temel prosedür ağ geçidi cihazõnõzda karşõlaşabileceğiniz birkaç sorunu çözmek içindir 1 Güç kablosu ve tüm Ethernet kablolarõnõn doğru biçimde bağlandõğõnõ doğrulayõn Bunlarõn arasõnda ağ geçidi cihazõnõ ağdaki tüm bilgisayarlara bağlayan kablolar da bulunmaktadõr sayfa 90 teki Kurulum resimlerine bakõn 2 Ağ geçidi cihazõnõn bağlõ olduğu elektrik prizinde elektrik olduğundan emin olun 3 Güç...

Page 102: ...ğlantõmõ bulamadõ Çözüm 1 EasyConfigurator programõndaki Internet sayfasõna gidin Bulunduğunuz ülkeyi ve servis sağlayõcõnõzõ seçin Eğer servis sağlayõcõnõz listede yoksa bulunduğunuz ülke için Other Diğer seçeneğini seçin ve bağlantõ bilgilerini manuel olarak girin ISS nizden alabileceğiniz aşağõdaki bilgilerden bazõlarõna ihtiyaç duyabilirsiniz VPI VCI değerleri ADSL standardõ modülasyon Kapatma...

Page 103: ...resetleyecektir Kişisel herhangi bir ayar yaptõysanõz bu değişiklikleri tekrar yapmanõz ya da eğer bir yedek dosyasõ yarattõysanõz bu ayarlarõ geri yüklemeniz gerekir Bir oyun konsoluna ya da VoIP cihazõna bağlanõrken ağ geçidimi nasõl yapõlandõrmam gerekir Çözüm Ağ geçidine oyun konsolu ya da VoIP cihazõ gibi cihazlar bağlamak isterseniz cihazlarõn İnternet e erişebilmesi için belirli portlara er...

Page 104: ...ek bilgiler için 1 Bkz Kullanõm Kõlavuzu USRobotics Kurulum CD ROM unda 2 USRobotics Web sitesinin Destek bölümüne gidin www usr com support Müşterilerin en yaygõn karşõlaştõğõ sorunlarõn çoğu Wireless Ndx ADSL2 Gateway cihazõnõzõn SSS ve Sorun Giderme Internet sayfalarõnda açõklanmõştõr Destek sayfalarõnda ayrõca en yeni bellenim ve belge güncellemeleri de yer almaktadõr 3 Teknik destek ile ilgil...

Page 105: ...τός λειτουργίας Η ασύρματη σύνδεση είναι απενεργοποιημένη Σταθερή Η ασύρματη σύνδεση είναι ενεργοποιημένη Αναβοσβήνει Γίνεται αποστολή και λήψη δεδομένων SecureEasySetup Εκτός λειτουργίας Η λειτουργία SecureEasySetup δεν είναι έτοιμη στην πύλη Σταθερή Η λειτουργία SecureEasySetup είναι έτοιμη Αναβοσβήνει Γίνεται επικοινωνία με τις συσκευές SecureEasySetup Σελίδα WAN Διαδίκτυο Εκτός λειτουργίας Δεν...

Page 106: ...άξετε τις τρέχουσες ρυθμίσεις σας πατήστε και κρατήστε πατημένο το κουμπί Reset Επαναφορά για 1 δευτερόλεπτο Για να επαναφέρετε το πύλη στις προεπιλεγμένες εργοστασιακές του ρυθμίσεις πατήστε και κρατήστε πατημένο το κουμπί Reset Επαναφορά για τουλάχιστον 7 δευτερόλεπτα 15VDC Συνδέει το τροφοδοτικό στην πύλη σας SecureEasySetup Ενεργοποιεί τη λειτουργία SecureEasySetup στην πύλη σας Για να ενεργοπ...

Page 107: ...ίται από τον πάροχό σας Το μικροφίλτρο καταργεί τις παρεμβολές μεταξύ των σημάτων φωνής και ADSL στην ίδια γραμμή Εάν στη συσκευασία της πύλη σας δεν περιλαμβανόταν κάποιο μικροφίλτρο ρωτήστε τον πάροχο υπηρεσιών πρόσβασης στο Διαδίκτυο ISP που χρησιμοποιείτε εάν τα μικροφίλτρα είναι απαραίτητα για τις τηλεφωνικές σας συσκευές 1 Συνδέστε κάθε καλώδιο συσκευής τηλεφωνίας τηλέφωνο φαξ κλπ σε ένα μικ...

Page 108: ...υνδέστε το άλλο άκρο σε μια από τις θύρες LAN στην πύλη 3 Ενεργοποιήστε το δίκτυο A Συνδέστε το παρεχόμενο καλώδιο ρεύματος στη θύρα τροφοδοσίας 15V DC στην πύλη Σημείωση Η θύρα USB στην πύλη προορίζεται αποκλειστικά για σύνδεση με εκτυπωτή USB Για οδηγίες σύνδεσης ενός εκτυπωτή USB στην πύλη σας ανατρέξτε στην ενότητα Εγκατάσταση εκτυπωτή USB στη σελίδα 108 Σημείωση Για χρήστες στο Ηνωμένο Βασίλε...

Page 109: ...obotics στη μονάδα CD ή DVD του υπολογιστή σας και εκτελέστε μια από τις ακόλουθες ενέργειες Στα Windows A Εάν ο δίσκος CD δεν εκκινήσει αυτόματα εκκινήστε τον εσείς ως εξής i Στα Windows Vista Κάντε κλικ στο μενού Windows Start Έναρξη Computer Υπολογιστής Στα Windows XP Κάντε κλικ στο μενού των Windows Start Έναρξη My Computer Ο Υπολογιστής μου Στα Windows 2000 Στην επιφάνεια εργασίας κάντε διπλό...

Page 110: ...ROM Εγκατάστασης της USRobotics Βήμα τέταρτο Διαμορφώστε τις ρυθμίσεις ασφαλείας του ασύρματου δικτύου σας 1 Για να διαμορφώσετε τις ρυθμίσεις ασφαλείας για το ασύρματο δίκτυό σας πατήστε το κουμπί SecureEasySetup στο πίσω μέρος της πύλη για ένα δευτερόλεπτο Αυτό θα θέσει την ασφάλεια του ασύρματου δικτύου σε ισχύ με βάση τα πρότυπα WPA2 και WPA PSK και θα διαμορφώσει μια κωδική φράση κλειδί δικτύ...

Page 111: ...κασία εγκατάστασης με επιτυχία Μπορείτε να επιβεβαιώσετε τη σύνδεσή σας στο δίκτυο εγγράφοντας την Wireless Ndx ADSL2 Gateway στη διεύθυνση www usr com productreg Πρόσθετη διαμόρφωση Σύνδεση εγκατεστημένων πελατών ασύρματου δικτύου Μπορείτε να χρησιμοποιήσετε το κουμπί SecureEasySetup για να συνδέσετε στην πύλη σας την Wireless Ndx ή άλλες πιστοποιημένες συσκευές SecureEasySetup 1 Εάν και πάλι χρε...

Page 112: ... name Όνομα χρήστη και ένα Password Κωδικό για την πύλη σας και κάντε κλικ στο ΟΚ 3 Στις σελίδες διαμόρφωσης της πύλης μεταβείτε στο μενού Security Ασφάλεια και επιλέξτε Wireless για να προβάλετε τις ρυθμίσεις ασύρματου δικτύου Εγκατάσταση εκτυπωτή USB Ένας εκτυπωτής USB μπορεί να συνδεθεί στην ασύρματη πύλη Wireless Ndx ADSL2 Gateway και να χρησιμοποιηθεί ως εκτυπωτής δικτύου εάν χρησιμοποιείτε λ...

Page 113: ...ογώνιο άκρο του καλωδίου USB στη θύρα USB της Wireless Ndx ADSL2 Gateway 2 Ανάψτε τον εκτυπωτή σας 3 Στον υπολογιστή σας εκκινήστε ένα πρόγραμμα περιήγησης Web 4 Στο πεδίο της τοποθεσίας ή της διεύθυνσης πληκτρολογήστε 192 168 1 1 και πατήστε το ENTER για να προσπελάσετε τις σελίδες διαμόρφωσης ρυθμίσεων της πύλη 5 Πληκτρολογήστε ένα User name Όνομα χρήστη και ένα Password Κωδικό για την πύλη σας ...

Page 114: ...ε κλικ στο μενού των Windows Start Έναρξη Printers and Faxes Εκτυπωτές και φαξ Windows 2000 Κάντε κλικ στο μενού των Windows Start Έναρξη Settings Ρυθμίσεις Printers Εκτυπωτές 2 Κάντε κλικ στο Add a Printer Προσθήκη εκτυπωτή Θα εκκινηθεί ο Add Printer Wizard Οδηγός προσθήκης εκτυπωτή 3 Κάντε κλικ στο Next Επόμενο 4 Επιλέξτε το κουμπί επιλογής A network printer or a printer attached to another comp...

Page 115: ...εβαιωθείτε ότι υπάρχει παροχή ρεύματος στην πρίζα όπου έχετε συνδέσει την πύλη 3 Ανατρέξτε στις περιγραφές των λυχνιών LED και στη συνέχεια ελέγξτε τις λυχνίες LED του πύλη για να βεβαιωθείτε ότι τροφοδοτείται με ρεύμα και ότι δεν υπάρχουν σφάλματα Ανατρέξτε στις περιγραφές των λυχνιών LED στην ενότητα σελίδα 101 4 Αποκλειστικά για συνδέσεις ασύρματου δικτύου Οι παρεμβολές από το περιβάλλον όπως β...

Page 116: ...r PPP connections Τύπο ελέγχου ταυτότητας PAP ή CHAP για συνδέσεις PPP Τη διεύθυνση IP το όνομα χρήστη και τον κωδικό πρόσβασης εάν έχουν εκχωρηθεί από τον πάροχό σας Στοιχεία για τη μάσκα υποδικτύου Subnet mask την πύλη gateway και διακομιστή DNS DNS server 2 Αν δεν είστε βέβαιοι σχετικά με κάποιες απαραίτητες πληροφορίες που αφορούν τη σύνδεση επικοινωνήστε με τον Πάροχο Υπηρεσιών Διαδικτύου ISP...

Page 117: ...λαγές και πάλι ή να επαναφέρετε τις ρυθμίσεις σας εάν δημιουργήσατε αρχείο ασφαλείας Πώς διαμορφώνω την πύλη μου εάν συνδέω μια κονσόλα παιχνιδιών ή συσκευή VoIP Λύση Εάν θέλετε να συνδέσετε στην πύλη σας μια συσκευή όπως κονσόλα παιχνιδιού ή συσκευή VoIP θα πρέπει να επιτρέψετε την πρόσβαση σε συγκεκριμένες θύρες ώστε οι συσκευές να μπορούν να συνδεθούν στο Διαδίκτυο Αυτό γίνεται από το μενού Sec...

Page 118: ...ατάστασης της USRobotics 2 Πηγαίνετε στην ενότητα Support Υποστήριξη της τοποθεσίας Web της USRoboticsU S Robotics στη διεύθυνση www usr com support Πολλές από τις συνηθέστερες δυσκολίες που αντιμετωπίζουν οι πελάτες εξετάζονται στις ιστοσελίδες των πιο κοινών αποριών και αντιμετώπισης προβλημάτων για το δικό σας Wireless Ndx ADSL2 Gateway Οι σελίδες της ενότητας Support περιέχουν επίσης πληροφορί...

Page 119: ......

Page 120: ......

Page 121: ...w usr com emailsupport hu 0180 567 1548 Ireland www usr com emailsupport uk 1890 252 130 Italy Italia www usr com emailsupport it 39 02 69 43 03 39 Luxembourg Luxemburg www usr com emailsupport be 342 080 8318 Middle East Africa www usr com emailsupport me 44 870 844 4546 Netherlands Nederland www usr com emailsupport bn 0900 202 5857 Norway www usr com emailsupport ea 23 16 22 37 Poland Polska ww...

Page 122: ......

Page 123: ......

Page 124: ...Printed in Xxxx ...

Reviews: