background image


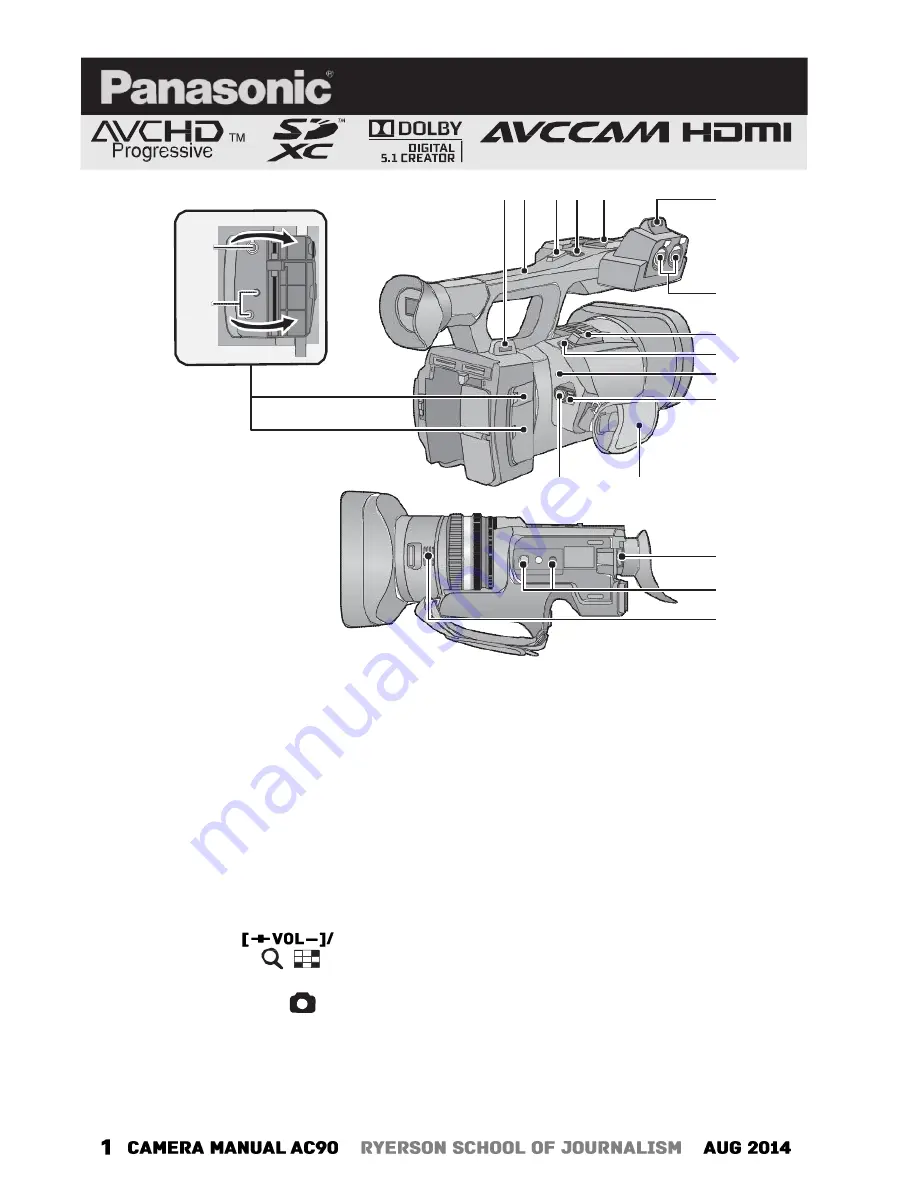
AG-AC90P CAMERA MANUAL 


 2   3 4  5 

6


14


15 

7


8


9


10


11


12 

13


16


17


18


Shoulder strap fixture 


Handle


Sub zoom lever 


● 

This lever functions in the same manner as 

the zoom lever. 

Sub recording start/stop button


● 

This button functions in the same manner as 

the recording start/stop button. 

Accessory shoe


Microphone holder attachment part


Audio input terminals 1, 2 (XLR 3 pin) 
[AUDIO INPUT1, 2]


Zoom lever [T/W] (In Recording Mode) 


Volume lever 

Thumbnail 

display switch [ 

] (In Playback 

Mode)


Photoshot button [ 


  10   Status indicator 


   11    Power switch 


  12   Recording start/stop button 


  13   Grip belt  


14   Headphone terminal 


15   Camera remote jack [CAM REMOTE] 
[CAM REMOTE] (3.5 mm mini jack) 

It is 

possible to adjust the focus or iris connecting 
with the remote control (optional). 

● 

It is not possible to use the remote control 

(optional) in the Intelligent Auto Mode. 

[ZOOM S/S] (2.5 mm super mini jack) 

It is 

possible to operate zoom operation or 
recording start/stop connecting with the remote 
control (optional). 

● 

Do not connect any equipment except the 

remote control (optional) to the camera 
remote jack. Brightness of the image may 
change or it may not focus when an 
equipment other than the remote control 
(optional) is connected. 

16   Eyepiece corrector lever 


17   Tripod receptacle


18   Inlet (cooling fan)


Summary of Contents for AVCCAM AG-AC90P

Page 1: ... switch 12 Recording start stop button 13 Grip belt 14 Headphone terminal 15 Camera remote jack CAM REMOTE CAM REMOTE 3 5 mm mini jack It is possible to adjust the focus or iris connecting with the remote control optional It is not possible to use the remote control optional in the Intelligent Auto Mode ZOOM S S 2 5 mm super mini jack It is possible to operate zoom operation or recording start sto...

Page 2: ...8 Intelligent auto Manual switch iA MANU 29 Quick start button QUICK START 30 Quick start lamp 31 Focus ring 32 Zoom ring 33 Iris ring 34 Focus assist button FOCUS ASSIST 35 Iris auto Manual button IRIS A M 36 Focus auto Manual button FOCUS A M 37 Optical image stabilizer button O I S 38 White balance button W B 39 Zebra button ZEBRA 40 Color Bar Screen button BARS 41 Menu button MENU 42 Display M...

Page 3: ... button PUSH 52 Battery holder 53 DC input terminal DC IN Do not use any other AC adaptors except the supplied one 54 Mode switch 55 CH1 CH2 switches CH1 CH2 56 Audio control knobs CH1 CH2 57 SD Card slot cover 58 Access lamp card 1 59 Card slot 1 left Card slot 2 right 60 Access lamp card 2 61 HDMI connector HDMI 62 AV multi connector AV MULTI Use the AV multi cable only the supplied cable 63 USB...

Page 4: ...below http pro av panasonic net Inserting removing an SD card When using a non Panasonic SD card for the first time or one which was previously used on another equipment it is necessary to format the SD card When the SD card is formatted all of the recorded data is deleted Once the data is deleted it cannot be restored Caution Check that the access lamp has gone off Access lamp A When this unit is...

Page 5: ...to OFF while pressing the lock release button The status indicator goes off A The status indicator lights on To turn on the unit again after the ECONOMY BATT or ECONOMY AC is activated set the power switch to OFF once and then to ON again Preparation Selecting a mode Operate the mode switch to change the mode to or C Mode switch C Recording Mode Playback Mode ...

Page 6: ...ing the LCD monitor 1 Extract the LCD monitor in the direction as indicated in the figure Hold the LCD monitor when pulling out 2 Rotate to the position that is easy to view To retract the LCD monitor Retract as shown in the figure with the LCD facing downward Range of rotation of the LCD monitor It can rotate up to 270 degrees towards the lens Using the menu screen 1 Press the MENU button MENU ...

Page 7: ...n the medium will be erased and cannot be restored Back up important data on a PC disc etc When using two SD cards format both SD cards Select the menu MENU OTHER FUNCTION FORMAT CARD SD CARD 1 or SD CARD 2 Selecting a media to record SD CARD 1 and SD CARD 2 can be selected separately to record motion pictures or still pictures 1 Select the menu MENU SW DISP SETUP MEDIA SELECT 2 Touch the media to...

Page 8: ...again B C A When you begin recording changes to B Mode switch Recording still pictures 1 Change the mode to Extract the LCD monitor 2 Press the button When photos are being recorded the remaining recordable number of photos and the photo operation display are displayed D D Mode switch Intelligent Auto Mode Manual Mode MANU iA MANU switch Slide the switch to change the Intelligent Auto Mode Manual ...

Page 9: ...pressing the W B button Iris adjustment Switch to Manual Mode 1 Press the IRIS A M button to switch to Manual Iris Mode disappears The gain is displayed in dB 2 Adjust the iris by rotating the iris ring MNL A F4 0 B C A Gain value B Iris value C Auto iris icon It is displayed in Auto Iris Mode Manual shutter speed Switch to Manual Mode 1 Touch the LCD monitor to display the operation icons and tou...

Page 10: ...by touching 5 Select the playback operation by touching the operation icon PH PH PH PS PS HA HE SA SA TC 00 00 00 00 B B Operation icon To play or pause a video touch ii If you touch the screen while an operation icon is being displayed or do not touch the icon for a certain period it will disappear To display again touch the screen Record Modes Important Recording mode and transfer rate PS 1080 6...

Page 11: ... ...

Reviews: