Canon Vixia HF R20, Instruction Manual
The Canon Vixia HF R20 is a high-performance camcorder with advanced features for professional-quality video recording. Capture stunning moments with ease and explore its full potential by accessing the free Instruction Manual, available for download at manualshive.com. Enhance your filming experience with this comprehensive manual, ensuring optimal usage and creativity.
Share
Download


Reviews:
No comments
Related manuals for Vixia HF R20

i182
Brand: Iluv Pages: 41

Vision Viewer 7890UM
Brand: Ken A Vision Pages: 2

BUTP300
Brand: E-Vision Pages: 4

DW-HC-70
Brand: ABLEYE Pages: 10

6008 S
Brand: BEAULIEU Pages: 74
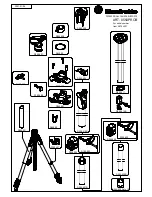
ART. 055XPROB
Brand: Manfrotto Pages: 1

UVC-G3
Brand: Ubiquiti Pages: 60

2694B001 - DC 310 Camcorder
Brand: Canon Pages: 93

GR-AX96
Brand: JVC Pages: 60

GR-AX999UM
Brand: JVC Pages: 88

GR-AXM100
Brand: JVC Pages: 56

GR-AX920
Brand: JVC Pages: 60

GR-AXM270
Brand: JVC Pages: 60

GR-AX930
Brand: JVC Pages: 64

GR-AX640
Brand: JVC Pages: 56

GR-AX911
Brand: JVC Pages: 60

GR-AX880US
Brand: JVC Pages: 84

GR-AX97
Brand: JVC Pages: 64


