

www.ultramagicard.com
RIO 2e & TANGO 2e PRINTERS QuickStart GUIDE
1
4
5
6
7
8
9
3
• Sufficient space for:
- opening the top cover
- cable access at the rear.
- allowance for air circulation.
• An adequately ventilated dust free room.
• Access to a properly grounded power supply.
• Ambient tempe10 to 30 degrees C.
• Relative humidity 20 - 70%.
• Protection from direct sunlight and chemicals.
• Protection from abrupt temperature changes.
1.
Open a clean pack of cards and make sure they are
not sticking together. Load the cards into the feed
hopper. Avoid touching the card surfaces because
finger marks can effect image quality.
Note: When using magstripe cards,
ensure the stripe is on the right and
underneath when viewed from the front.
2. Tilt the loaded hopper back as shown, and lower gently
into the receptacle at the rear of the printer. You will be
able to lower the hopper about an inch (25mm).
3. At this point, tilt the hopper forward to the vertical position
and lower all the way down until the hopper is completely
within the body of the printer.
Printer location requirements
Attach the card output stacker
Insert the card collection stacker into the
aperture in the front panel and hook into place.
The stacker can hold
up to 50, 30mil thick
cards, after which it
should be emptied.
The printer can be
operated without the
stacker if you wish.
2
Note: To complete installation and begin using
your printer you will require a roll of Magicard
dye-film and cards (not included).
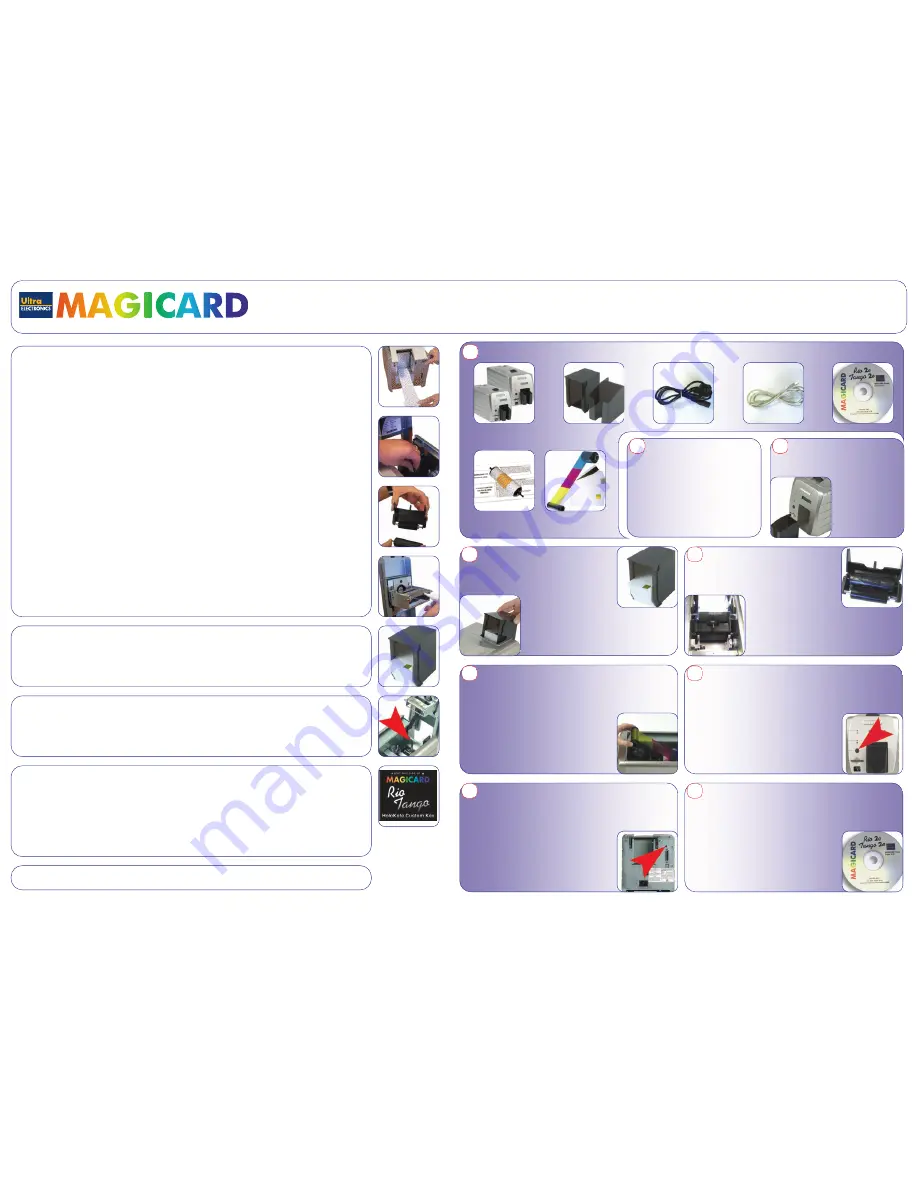
Unpacking
Consumables
Rio 2e/Tango 2e
Hopper and Stacker
Power Cable
USB Cable
Driver CD
Cleaning Cards & Roller
Dye Film and Cards
Attach the Card Feed Hopper
Prepare the cleaning cassette
Press down on the top cover, operate the top cover
release catch and open the cover. First remove the white
tape holding the black plastic cleaning cassette. Grip the
handle between finger and thumb, then push and release
the cleaning cassette. Remove the
orange tape and protective layer
from the disposable cleaning
cassette roller.
Note: This is a good time to familiarise yourself with the
way that this automatic cleaning system is designed to
operate.
Finally replace the cleaning cassette by inserting the roller
shaft into the U shaped guides and clicking into place.
Install the dye film
1. Open a new roll of dye film.
2. Place the loaded spool into the rear clips and press it into place.
The orientation is correct when the bar code on the end of the spool to
the left hand side when viewed from the front. Rotate to make sure that
the slot engages with the lug.
3.
Place the empty take up spool into the front clips,
and adjust the film tension so that the film is lying
flat and straight between the two spools.
4.
Press the top cover down until it clicks into the
closed position. The printer will automatically
recognize the type of film that has been loaded
.
Plug in the printer
Make sure that the printer is turned Off, i.e. the On/Off button is slightly
protruding from the front panel.
Plug the power supply lead provided into the socket on the
rear panel of your printer, and the other end into a properly
grounded electrical outlet.
Print a test card
1.
Switch the printer on. You will hear some motor activity and see the
indicators flash.
2.
When ready, the red Error indicator should be off and the green
indicator on.
3.
Press and release the small test push button on the
rear panel once.
4.
After several seconds, the printer will print a test
pattern on a card, and feed it to the card output
stacker. This indicates that all is well with the
printer, i.e. cards loaded, dye film loaded, power
is on and lid is closed.
Load the CD into your PC
Make sure the printer is switched off. Load the driver CD ROM into the
PC you have connected to the printer. If the CD does not run
automatically, click the start button, then click on “run”. Type
“D:\autorun”, where D is the drive letter
for your CD drive, then press the return key.
Now follow the on screen instructions to install the
printer drivers. On completion of installation, you
will be able to print cards.
WARNING. Only connect one interface (USB or Ethernet
or Parallel) to your PC. Do not connect multiple interfaces,
as this can cause incorrect operation.
Rio 2e and Tango 2e QuickStart Guide. Drawing No. 3627-22-01 QuickStart Guide, Issue No. 3623-22-01 Issue 1, February 2006 (Stock No. M9006-743)
How to
use a custom key to:
• Print custom HoloKote™ watermarks.
• Lock the printer.
The printer should be set up before introducing you custom key with the power switched off. Insert the key into the slot on the lower
left hand side of the front of the printer, ensuring the correct orientation which is clearly marked on the label, and the key is pushed
in. Now switch on the printer. Providing the key is not removed, all cards printed will now include your own custom mark into the
HoloKote™ pattern.
If the custom key has been programmed with a locking facility, then the printer will not allow any card printing or encoding
operationunless the original locking custom key is inserted before before powering up the printer remains in place. Note: Do not
insert or remove the custom key while the printer is powered on as this may damage the key. Note: Driver settings are available to
adjust the orientation of the custom mark for 0°, 90°, 180° and 270°.
How to
clean your printer
How to
adjust card thickness
We recommend you purchase a Cleaning Kit (Magicard part no. M9005-761) which consists of cleaning cards, pens and rollers.
We recommend that you clean your printer using a cleaning card each time you replace the dye-film.
To clean the printer feed mechanism :
•
Remove the card hopper and open the top door (the red light comes on).
•
Take a fresh cleaning card from its packaging.
•
Insert the narrow end into the card feed slot.
•
Press the black button on the back of the printer (located above the USB connector). The card is drawn into the printer and
then ejected. Repeat this several times with both sides of the same card.
•
To ensure that the rear feed rollers situated under the card hopper are thoroughly cleaned, set the printer to its cleaning cycle,
and instead of inserting the card, simply hold it against these rollers.
You are provided with 5 cleaning cards and one roller with your printer.
Replacing the cleaning roller
There is a cleaning roller inside the printer. It is recommended that it is replaced after every 1,000 prints. A spare roller is provided
with each printer.
To see instructions for replacing the cleaning roller, see section 5 (‘Prepare the cleaning cassette’) in this guide. You re-use the
cassette, but replace the roller within it.
To clean the printhead :
Open the printer and draw the pen several times, in the same direction, along the complete length of the printhead.
The only other user maintenance is replacement of the printhead. This should normally only be necessary following damage by dirt,
so cards must be kept clean before loading into the printer.
The print engine adjusts automatically to the cards used. However, to prevent misfeeds the card feed preventor should be set using
the lever in front of the card hopper which is best accessed by removing the cleaning cassette. Card thicknesses between 0.015in
to 0.063in (0.38mm to 1.6mm) can be accommodated.
How to
set up your Rio 2e and Tango 2e to use HoloPatch™ cards
When used with HoloPatch™ cardstock, the HoloKote™ watermark provides a defense against card fraud. Cards with this feature
are available for both plain and magstripe formats.
To select this feature, ensure that the card design allows space for the HoloPatch™ cut-out. In the printer driver, set HoloPatch™ to ‘Yes’
and click OK. Cards will be printed with a ‘cookie cutter’ hole in the image lining up with the gold patch on the card.
Note: HoloPatch™ cards should be fed with the gold patch on top, and on the right-hand side (viewed from the front).
How to
use magnetic stripe cards
When loading magnetic stripe cards, make sure that the stripe is on the right and underneath when viewing from the front of the printer.


