

© 2021 Aruba, a Hewlett Packard Enterprise company All rights reserved.
PN 201787 Rev B
Aruba
6280 America Center Drive
San Jose, CA 95002
1.877.210.7325 (toll-free in USA)
+1.408.935.1850
www.silver-peak.com/support
EdgeConnect
Quick Start Guide
EdgeConnect Extra-Small Chassis
EdgeConnect Small Chassis
EdgeConnect Medium Chassis
EdgeConnect Large Chassis
EdgeConnect Extra-Large Chassis
Before You Begin
Check your packing slip to verify
that you have all the necessary
items.
If installing an EC-M-P,
fi
rst read,
Small Form-Factor Pluggable
(SFP) Module Installation Guide.
If your EdgeConnect model
requires it, ensure that you
have the associated rack mount
instructions.
Make sure you have a standard
Phillips screwdriver.
Supply circuits should be protect-
ed by a minimum 15A, maximum
20A circuit breaker.
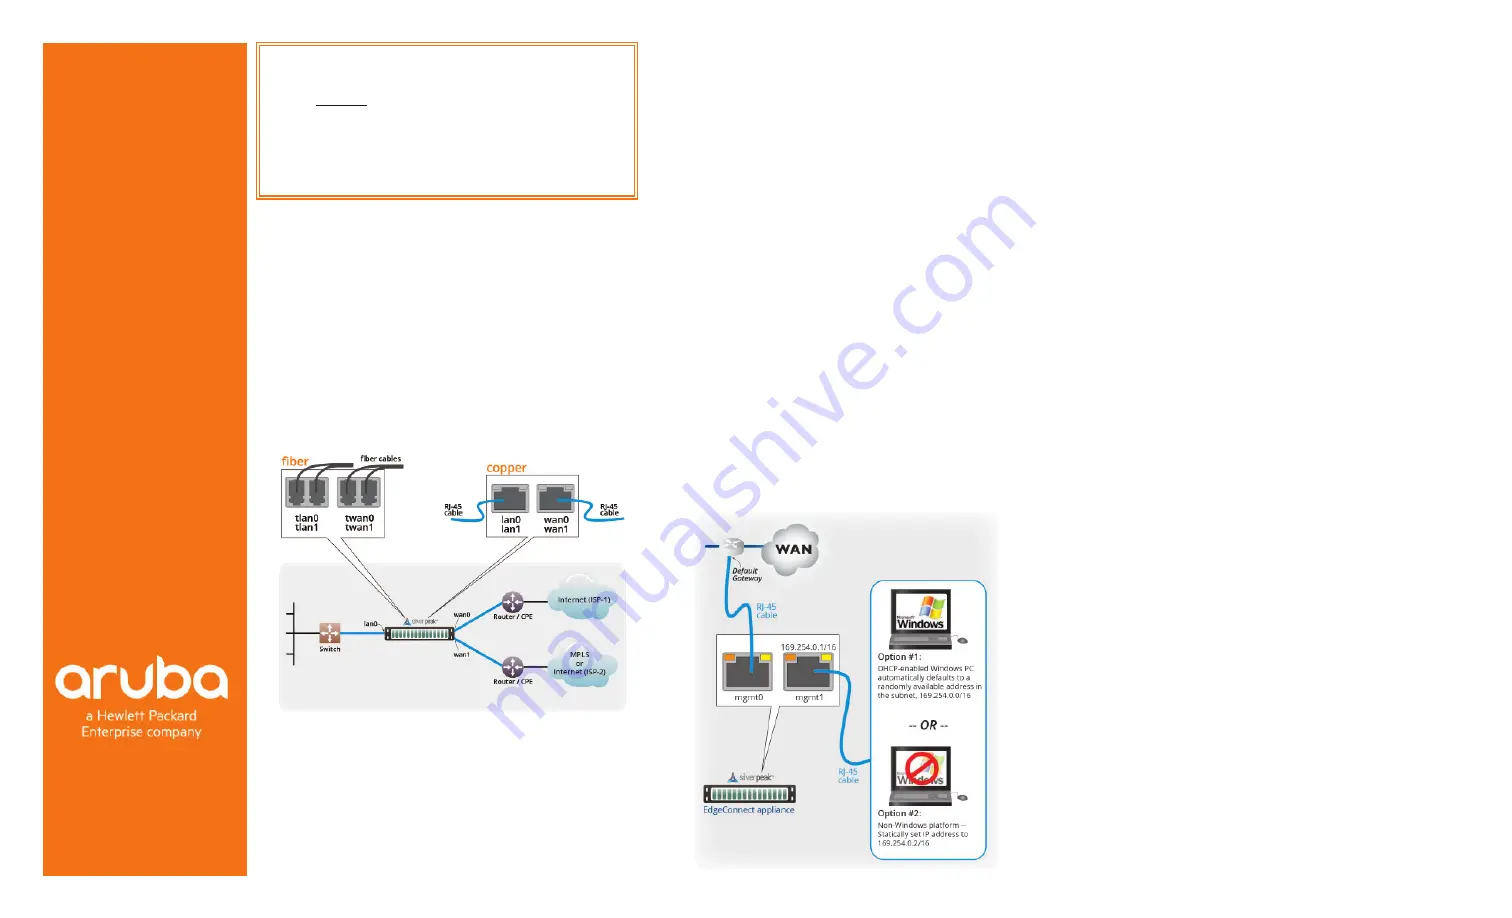
On the network equipment, iden-
tify the 10/100/1000 Ethernet
ports and/or the 1Gbps/10Gbps
fi
ber ports.
1
Rack Mount the Appliance
Based on your model, refer to the separate instructions for rack
mount, desk mount, or wall mount.
2
Install the Appliance into the Network
a. Identify the relevant ports on the rear of the appliance.
b. Connect network cables from the appliance to the identi
fi
ed
network equipment ports.
c.
DO NOT connect the power cables yet.
All copper RJ-45 Gigabit Ethernet interfaces in the Silver Peak
appliance support MDI/MDI-X and auto-negotiation.
The
fi
ber interfaces support:
• LC
connectors
• multi-mode
50
fi
ber / 62.5
fi
ber
• single-mode
9
fi
ber (EC-M-P only)
3
Connect Power Cords
Depending on the model, your appliance may have a single
power supply, or redundant power supplies.
a. Connect each power cable to the Silver Peak appliance and
to your local power source.
b. For redundancy, plug in all power cords, preferably to
di
ff
erent power sources.
4
Turn the Power On
Some appliances power up as soon as they’re plugged in, oth-
ers don’t. If the power is o
ff
, turn it on. If you don’t plug in all
the power cords, an audible alarm sounds until you do.
a. Verify that each power supply’s LED illuminates green.
b. On the front panel, verify that the Power LED illuminates
green or blue.
5
Optionally
, connect the management ports
It is not necessary, however, if you want to create local, physical
access to the management ports, you can do so as follows:
Silver Peak assigns the MGMT1 ethernet interface a default IP
address of 169.254.0.1 and a subnet mask of /16 (the same as
255.255.0.0).
Both RJ-45 Gigabit Ethernet interfaces (MGMT0 and MGMT1)
support MDI/MDI-X and auto-negotiation.
a. Identify the appliance’s MGMT0 and MGMT1 interfaces.
b. Using an RJ-45 cable, connect the appliance’s MGMT0
interface to the network equipment interface.
c. Using another RJ-45 cable, connect the appliance’s MGMT1
interface to your PC.
You’ve now completed the physical installation and are ready to
register the product with Unity Orchestrator.
Port Con
fi
guration
(EC-S-P, EC-S-P DC, and EC-M-H appliances only)
When linking any of the speci
fi
ed appliances to a 1G SFP port,
con
fi
gure the peer (switch/router) 1G SFP port as
Forced 1G/
Full Duplex, Auto/Auto Disable
.
These Aruba appliances will not link to a peer 1G SFP port that
is con
fi
gured as
Auto/Auto
.
Part 1 - Physical Installation
IMPORTANT - READ THIS FIRST:
You must install and
register your Orchestrator with the Silver Peak Cloud
Portal BEFORE setting up an EdgeConnect appliance.
After Orchestrator is registered with your account
name and key, you can proceed with EdgeConnect
installation.
If you don’t know or are unsure of Orchestrator’s role,
contact your network architect or deployment lead.


