EE Systems Group Inc.
Rev: 05017021
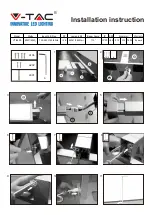
Suggest:
Charge 1-2
days before
installing with
switch in OFF
position
5-min walk
test mode
Motion
If
Yes
Light ON
Light OFF
No
5 min
Daytime?
Light ON
Yes
Light
OFF
Light turns ON
When
night
comes
Push
Switch
No
One Step Setup (Just 1 Click!)
Auto convert to
Dimming mode
AI SMART lighting profile
Dimming brightness
until dawn
Dusk to Dawn with
dimming brightness
Full brightness
Up to 4 Hours
come to
Max
brightness
The fixed hours high
brightness period will
be automatically
adjusted depends on
the multiple factors to
ensure all-night
illumination
In most cases, occur
on continuous
cloudy/snowing
days during the
winter season
Motion
detected
Motion
detected
If low power
(20% left)
ON with full
brightness
Motion
Switch to
AUTO Mode
Light OFF
No
Yes
Yes
Full Charge
Back to
AI
Mode
NO
Critical Reserve
(10% left)
ON with half
brightness
Motion
Light OFF
No
Yes
Second stage Intelligence Power Management (IPM) system : monitor & adjust power consumption
AI
Mode
In real critical weather
12346 Valley Blvd, El Monte, CA 91732 Phone Number: 1-877-579-3889 Fax: 626-452-9194 Web: www.eleding.com
After Fully
Charged
eLEDing, EE812W-AI8 & EE824W-AI18
AI SMART Solar Powered Area CREE LED Lights
Thank you for choosing eLEDing
! World’s First AI SMART solar powered lighting:
This innovative
AI
SMART light is unlike all solar lights in the current market without any manually functional setting up. It's able to Auto-
Optimize performance via AI firmware self-calibration in four seasons and different geographical location.
US and international patents
granted and pending worldwide. All rights reserved. Users must read this manual before installation, comply with local standard and regulations
of construction & electrical/electronic projects, follow the safety guidelines to prevent any possible accidents, incident and/or injuries. Consult
experienced contractor/installer and electrical technicians for assistance.
Thermal
Dissipation
Air Duct
Tempered
Glass
Solar Panel
Angle
Adjustment
Nuts
Bracket
Arm
U or
Teeth
Clamp
ePIR
Sensor
CREE
LED
Illuminators
Power ON
Switch: One
Step Push ON
Diameter: 2” up to 5”
Mounting High: 6’
-
15’
T
As AI SMART version, once initially power ON, it needs at
least one day automatic self-calibration to make it works at
maximum performance in most geographical environment.
Installation Guidelines
(video link
: https://youtu.be/6NUnVgGdHG4
)
1. Securely mount the unit on top of 2”
-
5” pole or wall surface,
adjust
the light head direction by the applications. Pre-charge under sunny day
for 1-2 days with power OFF is recommended.
2. Solar Panel must be mounted at a non-obstructed position/area that
allows at least 4-8 hours direct sunlight daily all year round. For most of
the North America projects, adjust the tilt of the solar panel at 0-45
°
degrees based on your actual location (15
°
is default setting for most
case in use). The solar panel can be pointed to between east to west,
south will be the best Facing-to-Sun direction and
definitely NOT to
north
. For northern hemisphere installations, a south-facing position is
best and visa-versa for southern hemisphere installation.
3. Solar Panel Maintenance: Use soft, wet cloth to clean the solar panel
periodically (at least once a one year) to avoid energy output reduction
resulted from accumulated dust. Clean accumulated snow ASAP during
snowing season.