

OUTDOOR
HEAVY-DUTY TIMER
ITEM #1001 804 572
Safety Information
TROUBLESHOOTING
Installing the timer outdoors
Suitable for indoor/outdoor use-Store indoors while not in use. For temporary outdoor use.
NOTE:
* Before initial use, please plug your timer for at least 30 minutes to charge the internal battery. After
the LCD display appears, your unit will be ready for programming.
* The mounting nail or screw head must extend at least 3/16 in. out from the wall (nails or screws
not included).
* NOTE: The LCD display might turn off after a long time without use. Plug the timer into an outlet
once every 3 months to keep the battery charged.
LCD Layout:
2. Press the "SET" button to enter the hour setting. Press "+" or "-" buttons to set the current hour.
Be sure that AM or PM appears correctly.
3. Press the "SET" button to enter the minute setting, press the "+" or "-" buttons to set the current
minute.
4. Press the "SET" button to finish setting the current time and return to normal display.
5. While setting those processes above, press and hold the “SET” button to clear the setting and go
back to the original timer settings. While setting those processes above, press the “ ” button or
wait for 15 seconds to return back to the standby display.
MODE Setting
Press the “MODE” button to choose the desired mode.
ON, OFF, RDM Timer, AUTO Timer, AUTO CDS, AUTO CDS + TIMER as following listed.
Photocell Setting
Press the “MODE” button to select the photocell function.
Turn on the power at Dusk and turn off the power at Dawn automatically.
Illustration
ON
OFF
AUTO
AUTO
AUTO
RDM
Security feature.
On at a random time,
and will remains ON
for 15 minutes.
Program and
Photocell
Up to 5 on/off events every day.
The on/off events are built-into this
product, turn ON at a random time and
the ON time is different each day,
creating a more “lived-in” look.
ON/OFF at your exact
programmed time.
ON at dusk, OFF at dawn.
On at dusk, OFF at your exact
programmed time.
Program
Setting
Photocell
Setting
Programand
Photocell
Setting
Remark
Mode
Explanation
The outputs remain always on.
Always on
The outputs remain always off.
Always off
ON/OFF program
at AUTO mode
Photocell
Program Setting
Make sure the current mode is at AUTO mode, then press and hold
"PROG" button for two seconds to begin program setting, using the "+" and
"-" buttons to adjust the setting.
1. Press the "+" or "-" button to set the correct day.
MO, TU, WE, TH, FR, SA, SU, MO TU WE TH FR, SA SU, MO TU WE TH FR SA SU(cycle).
2. Press the "SET" button to enter the hour setting. Press "+" or "-" buttons to set the desired hours
for your timer to turn on. Be sure that AM or PM appears correctly.
3. Press the "SET" button to enter the minute setting. Press the "+" or "-" buttons to set the desired
minutes for your timer to turn on.
4. Press “SET” button to enter the program OFF setting, the “1 OFF” will appear on the display.
Repeat steps 1 to 3 to set your desired OFF time, up to 8 on/off programs settings.
5. While setting the programs, press and hold the “SET” button to clear the set program time.
6. Once you complete the programs settings, press the “ ” button or wait for 15 seconds to restore
your programs to back the standby display.
Program and Photocell Setting
1. Press “MODE” to select “AUTO Program and photocell setting”, then
press and hold the “PROG” button for two seconds to set the off time.
2. Press the “+” or “-“ button to set the desired OFF day of the week program.
You can select each day individually, Monday to Friday, Saturday/Sunday, or an entire week to
have your timer turn on at dusk and off at the set time.
3. Press the “SET” button to enter the OFF time hour setting. Press the "+" or "-" buttons to set time.
Be sure to cycle through until AM or PM appears correctly.
4. Press the “SET” button to enter the OFF time minutes setting. Press the "+" or "-" buttons to set
time.
5. You can press the “SET” button to enter additional programs, up to 8 off program settings. While
setting the programs, press and hold the “SET” button to clear the set program time. Press the
“ ” button or wait for 15 seconds to store the program, and return back to the standby display.
WARNING:
INSTALL THE CORD AND UNIT ABOVE GROUND LEVEL AT LEAST 2 FT WITH
THE RECEPTACLE FACING DOWNWARD.
Federal Communications Commission Interference Statement
This equipment has been tested and found to comply with the limits for Class B digital device,
pursuant to part 15 of the FCC Rules. These limits are designed to provide reasonable protection
against harmful interference in a residential installation. This equipment generates, uses and can
radiate radio frequency energy and, if notinstalled and used in accordance with the instructions, may
cause harmful interference to radio or television reception, which can be determined by turning the
equipment off and on, the user is encouraged to try to correct the interference by one or more of the
following measures:
•
Reorient or relocate the receiving antenna.
•
Increase the separation between the equipment and the receiver.
•
Connect the equipment into an outlet on a circuit different from that to which the receiver is
connected.
•
Consult the dealer or an experienced radio/TV technician for help.
This device complies with Part 15 of the FCC Rules.
Operation is subject to the following two conditions: (1) This device may not cause harmful
interference, and (2) this device must accept any interference received, including interference that
may cause undesired operation of the device.
FCC Caution: Any changes or modifications not expressly approved by the party responsible for
compliance could void the user's authority to operate this equipment.
Product Description
RATINGS:
125 VAC, 60 Hz, 15 A General Purpose, 15 A Resistive, 125 VAC 1000 W Tungsten,
500W Electronic Ballast, 120VAC 8.3A Standard Ballast, 1/3 HP.
1. MODE: Manual override and scroll between the timer status options.
2. (Time): Press and hold for two seconds to set current time.
3. PROG: Press and hold for two seconds to begin setting function.
4. SET/ : Setting confirm and clear setting.
5. < + >: To increase time and day setting.
6. < - >: To reduce time and day setting.
7. RESET: Reset all the functions.
8. Photo sensor: The sensor will sense for light and dark, and direct the timer to act accordingly.
9. Outlets: The three outlets located on the bottom of the timer allows the user to plug an array of
devices into it.
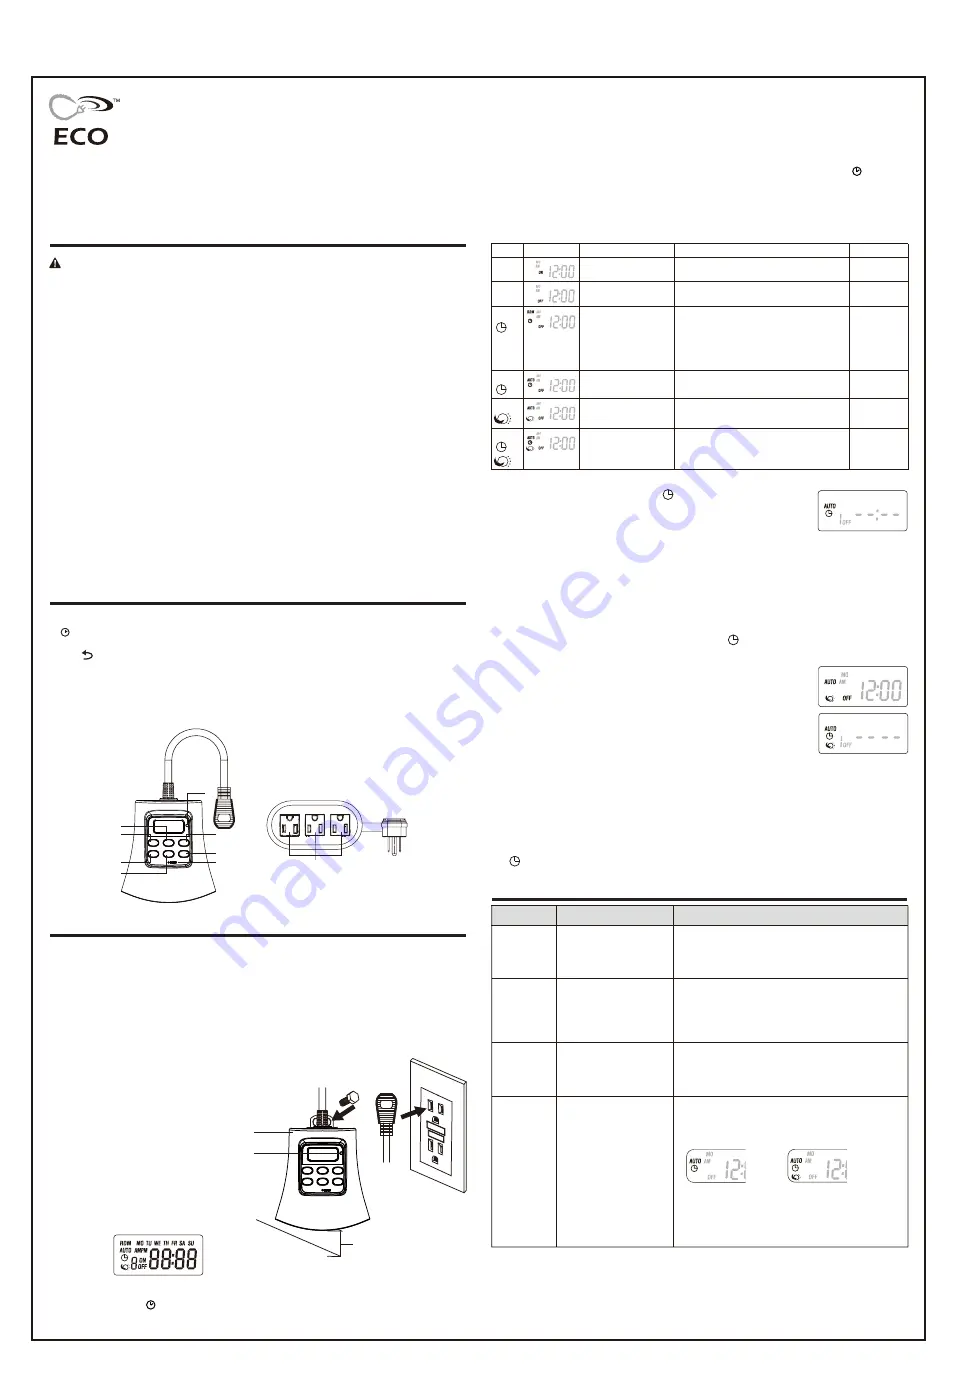
Installation Instructions
9
1
2
3
4
5
6
7
8
Timer
2 FT
Photo
sensor
Ground
1. Mount the timer onto a wall near a GFCI receptacle
with the timer’s photo sensor facing outward.
2. Hang the timer from the mounting nail or screw
using the slot on the back of the unit.
3. Plug the power supply cord into
the outlet.
Made in China
SAVE THESE INSTRUCTIONS!
Setting the Timer
Reset: There has a reset hole
under the dashboard. Insert a pin or
paperclip end into the hole to reset the
timer. This will clear all programmed settings.
Questions, problems ? Before returning to the store, call our toll free customer support line
8 a.m. - 6 p.m., EST, Monday - Thursday, 8 a.m. - 5 p.m., EST, Friday.
1-888-269-7316
Email: [email protected]
Set Current Time
1. Press and hold the " " button for 2 seconds to enter the current time settings, press the "+" or
"-" button to set the correct day.
Problem
Possible cause
Corrective action
Lights do not
turn on at dusk.
Timer is not in a good area
for light meter to function as
there is too much ambient
light to detect darkness.
Move the timer to another location where there is no
ambient light.
Lights do not
turn on, even
when timer is
in “ON”
position.
Lights are not in “ON” position,
lights are not functioning, or
timer is not receiving power.
Be sure that lights are functional by plugging them directly
into the outlet. Be sure that lights are in “ON” position if they
have their own switch. Be sure that timer is receiving power -
the LED should light up when plugged into an outlet and put
in the “ON” position.
Lights are
flashing
(turning on
and off).
The timer is in Dusk to Dawn
mode, and the light from the
plugged-in lights is affecting
the light sensor.
Move the lights away from the timer, or reposition the timer
so that it does not face the lights.
AUTO Timer
or AUTO
Photocell and
Timer mode
programs are
not working.
1. Event programs improperly
set
2. Event set for current time
and has not yet been
through a full day cycle.
1. Make sure event programs are properly set up. Refer to
earlier instructions. Make sure the correct icons show on
the display after programming.
AUTO Timer:
AUTO Photocell/Timer:
2. If programmed event is covering current time, a full day
cycle is needed for program to work. For example, if the
current time is 5 p.m. and event 1 is set for 4 p.m. to 6 p.m.,
the event will not automatically turn on until the next day to
start the program.
Size: W-21 x H-29.7/cm
Front


