


© Clare Controls, LLC
1 / 5
Doc ID --197 • REV 05
CH-OS-L Controller Installation Sheet
Last modified:
09/29/16
Description
The Clare Controls CH-OS-L controller provides all device
management services to AppModules, supports all Clare user
interface services, and acts as the gateway to the ClareCloud
for system updates. The controller comes complete with the
ClareOS and all AppModules preloaded.
Note:
Models, and their appearance, are subject to change
without any prior notice.
Unpacking the CH-OS-L
Remove all contents from the CH-OS-L packaging and ensure
you have the following items.
CH-OS-L device
Power supply
USB to Ethernet adapter (dongle) for RJ-45 connection
Mounting bracket
Record the device’s UUID address (labeled on the bottom of
the device) on the line below. Your system programmer will
need this information to configure the CH-OS-L device.
UUID address: __________________________________
Do not use this address for more than one account.
WARNING:
Do not power on the CH-OS-L until installation is
complete. Failure to do so may result in bodily injury and/or
damage to the equipment.
Installation
The CH-OS-L can be set on a rack shelf, or mounted in a
structured panel, along with a CS-iMR multi-room audio
device. Use the mounting bracket (included) to mount the
CH-OS-L in the panel.
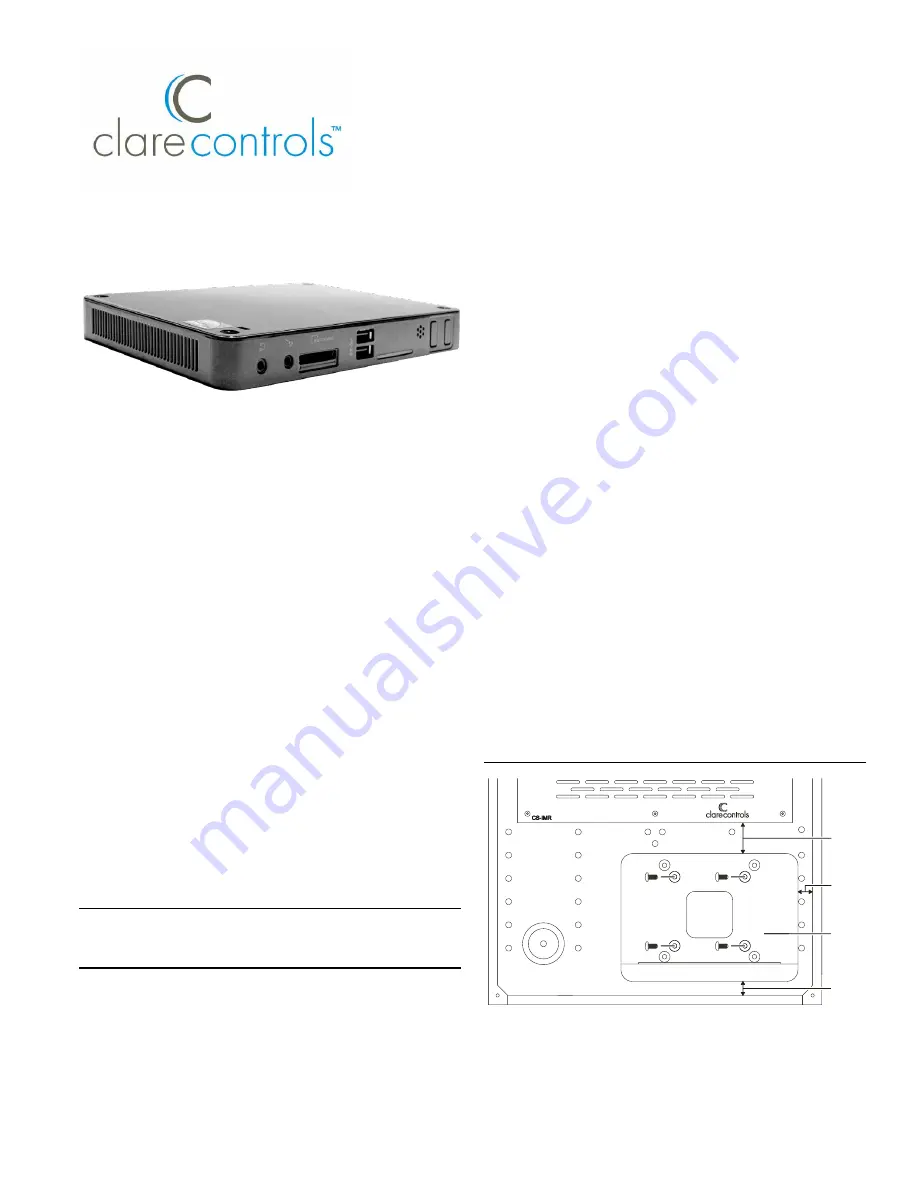
To mount the CH-OS-L in the structured panel:
1. Place the mounting bracket inside the structured panel,
under the CS-iMR, ensuring that you allow at least .5 in
(1.3 cm) of clearance space at sides and bottom of the
bracket, and at least 2 in. (5.1 cm) at the top. See
Figure 1.
2. Using four 6-20 × 3/8 in. self-drilling screws (not included)
and a power drill, securely attach the mounting bracket to
the back of the panel box. See Figure 1.
3. Slide the CH-OS-L device into the mounting bracket with
the rear connections facing up. Make sure the device is
flush with the bracket and fits securely. See Figure 2.
4. Plug one end of the power cord into the power input port
on the rear of the CH-OS-L. See Figure 2, item 5.
5. Run the power cord between the CH-OS-L and the panel’s
sidewall, and then place the AC power adapter under the
mounting bracket. See Figure 2, item 4.
6. Insert the other end of the power cord though the bottom
of the panel box (where the hole was cut out), and then
plug it into the electrical outlet. See Figure 2, item 3.
Note:
Do not turn on power to the CH-OS-L until you have
made all your network device connections. See
“Connecting devices to the CH-OS-L” on page 2.
Figure 1: CH-OS-L mounting bracket in panel
(1) CH-OS-L mounting bracket
(1)
2 in.
(5.1 cm)
.5 in.
(1.3 cm)
.5 in.
(1.3 cm)


