background image

SMART GUIDE: Shooting movies with the Canon 5D Mark II 

Insert battery and turn camera on  

Set shooting mode to CA ( Creative Auto ) 

SETUP MENU #2  

LCD brightness set to Manual (4) 

Set the date and time and the operating language 

Video system must be NTSC for North American video 

Sensor cleaning - enable auto cleaning 

Enable Movie recording 

select Live View/ Movie func. set 

Movie Recording to Enable 

Grid Display to off 

AF Mode to Quick Mode 

Movie Rec. Size to 1920 x 1080 (24) 

Sound Recording to On. 

SETUP MENU #1 

increase the time for Auto Power off or turn it OFF. 

format the CF card  

SHOOTING A MOVIE 

Press the Live View button to the left of the viewfinder 

Focus your subject with Auto Focus 

set focus switch on lens to AF ( auto focus ) 

press and hold the AF-ON button to activate auto focus. hold this button until you see 

one or more red lights on the dark screen. The image will reappear in focus. 

Focus your subject with Manual Focus 

Use the Magnify by 5X / 10X to “zoom” in on your subject. 

Manually adjust the focus ring on the lens 

Press the “Set” button of the back wheel to start and stop recording your movie. 

The LCD Brightness setting is 

d e s i g n e d  t o  m a ke  t h e 

camera adjust to the lighting 

in  your  environment.  This 

can  be  problematic  when 

tr ying  to  make  critical 

exposure adjustments. 

Therefore,  it’s  a  good  idea 

to  change  this  setting  from 

Auto  to  Manual  and  move 

the  adjustment  slider  to  the 

center setting, which is 4.
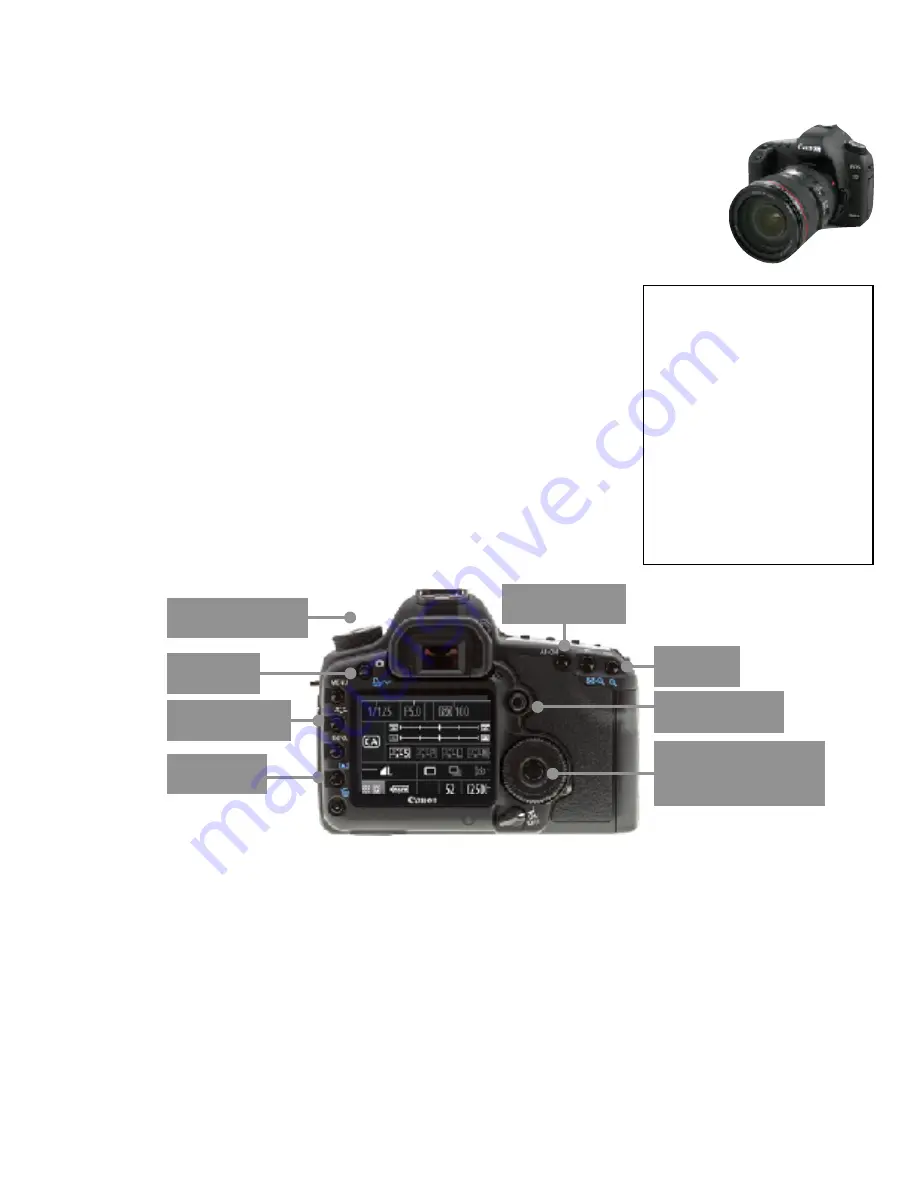
Live View 

Magnify

Select / Set  
Movie Start / Stop

Multi Selector

Shooting Mode

Picture Style

Playback

Auto Focus

Summary of Contents for 5D Mark II

Page 1: ...ubject with Auto Focus set focus switch on lens to AF auto focus press and hold the AF ON button to activate auto focus hold this button until you see one or more red lights on the dark screen The image will reappear in focus Focus your subject with Manual Focus Use the Magnify by 5X 10X to zoom in on your subject Manually adjust the focus ring on the lens Press the Set button of the back wheel to...

Page 2: ...se it use the back wheel and the set button to either cancel or erase the selected movie COPYING MOVIE FILES TO A COMPUTER In order to protect the delicate pins of the CF card do not remove the card Uuse the provided USB cable to transfer your files to the computer using the Image Capture Software turn on the camera and connect it to a Mac computer with the USB cable In the application menu of the...

Page 3: ...utton to configure your microphones Rec Mode 2 channels Rec Source Internal use the built in mic to record room tone and ambient sound Analog use this setup if you are plugging in one or two microphone in the Analog inputs located on the bottom of the recorder set the Sample Rate to 48kHz and the Rec Format to Wav 24 bit SETTING THE RECORDING LEVELS aim for an average peaking between 12 and 6 dB P...

Page 4: ... Drag the video file to the timeline find the clap and place a marker by pressing M Drag the audio file underneath the video file find the sound of the hand clap and place a marker line up the 2 markers then play the 2 tracks you may have to make some adjustments to the audio file When the tracks work together Silence the audio track of the video file by reducing the volume line all the way to the...

Reviews: