MINI DIGITAL MULTIMETER
FRONT PANEL DESCRIPTION
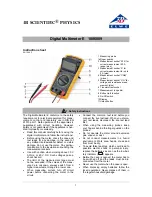
1. Function and Range Switch: This switch
is used to select the function and
desired range as well as to turn on the
instrument. NOTE: To extend the life
of the battery, the switch should be in
the "OFF" position when the
instrument is not in use.
2. Display: 3½ digit, 7 segment, 0.5" high
LCD
3. "Common" Jack: Plug in connector for
black (negative) test lead.
4. "V mA" Jack (volt, ohm, milliamp): Plug
in connector for red (positive) test lead
for all voltage and resistance and
current (except 10A) measurements.
5. "10A" Jack: Plug in connector for red
(positive) test lead for 10A
measurement.
Overload Protection: 220V rms AC
WARNING:
1. To avoid electrical shock and/or damage
to the instrument, do not measure
voltages that might exceed 500V
above earth ground.
2. Before the use of instrument inspect test
leads, connectors and probes for
cracks or
breaks in the insulation.
OPERATING INSTRUCTIONS
DC VOLTAGE MEASUREMENT
1. Connect red test lead to "V mA" Jack.
Black lead to "COM" Jack.
2. Set RANGE switch to desired DCV
position. If the voltage to be
measured is not known beforehand,
set switch to the highest range and
reduce it until satisfactory reading is
obtained.
3. Connect test leads to device or circuit
being measured.
4. Turn on power of the device or circuit
being measured. Voltage value will
appear on Digital Display along with
the voltage polarity.
AC VOLTAGE MEASUREMENT
1. Connect red test lead to "V mA" Jack.
Black lead to "COM" Jack.
2. Set RANGE switch to desired ACV
position.
3. Connect test leads to device or circuit
being measured.
4. Voltage value will appear on Digital
Display.
DC CURRENT MEASUREMENT
1. Connect red test lead to "V mA" Jack.
Black lead to "COM" Jack. (For 10amp
measurement connect red lead to
"10A" Jack, fully depressed
.
2. Set RANGE switch to desired DCA
position.
3. Open the circuit to be measured, and
connect the test leads IN SERIES with
the load in which current is to be
measured.
4. Read current value on Digital Display.
RESISTANCE MEASUREMENT
1. Connect red test lead to "V mA" Jack.
Black lead to "COM" Jack.
2. Set RANGE switch to desired (ohm)
position.
3. If the resistance being measured is
connected to a circuit, turn off power
and discharge all capacitors before
measurement.
4. Connect test leads to circuit being
measured.
5. Read resistance value on Digital
Display.
1
2
3
4
5