ZyXEL Communications NWA1100N-CE CloudEnabled Quick Start Manual Download Page 12

Page 12 

Appendix 1 – Hardware Installation 
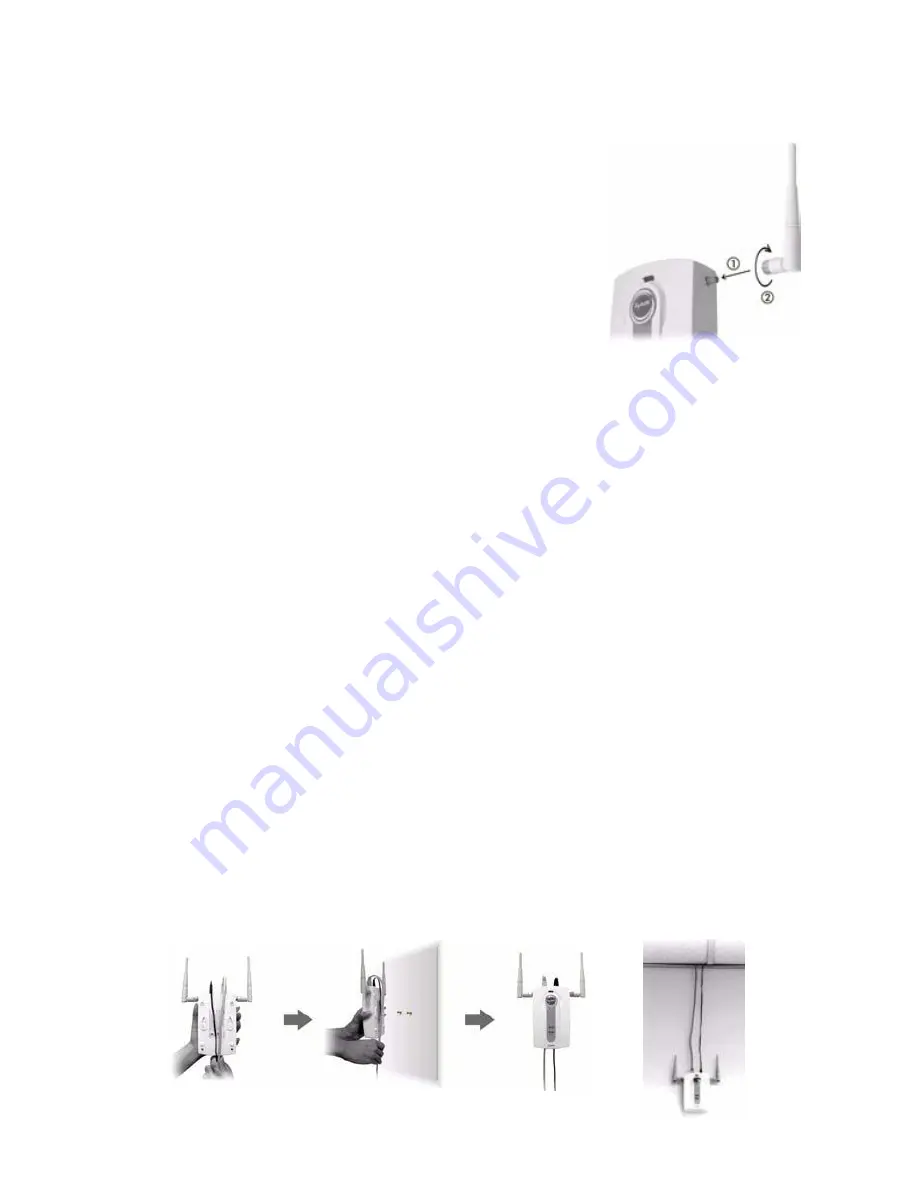
 

Attaching Antennas 

Screw the antennas clockwise onto the antenna 
connectors on the sides of your NWA1100-N. The 
antennas should be perpendicular to the ground 
and parallel to each other. Make sure the antennas 
are securely screwed onto the antenna connectors. 
 

Hardware Mounting 

In general, the best location for the access point is at the center of your 
intended wireless coverage area. For better performance, mount the 
NWA1100-N high up in an area that is free of obstructions. 
 

Wall-mounting 
Step 1:

 Screw the two screws provided with your NWA1100-N into the wall 

60mm apart (see the figure in step 3). Use screws with 6mm ~ 8mm (0.24" ~ 
0.31") wide heads. Do not screw the screws all the way in to the wall; leave a 
small gap between the head of the screw and the wall. The gap must be big 
enough for the screw heads to slide into the screw slots and the connection 
cables to run down the back of the NWA1100-N. Make sure the screws are 
securely fixed to the wall and strong enough to hold the weight of the Access 
Point with the connection cables. 
 

Step 2: 

Adjust the cables. Run the connection cables down the back of the 

NWA1100-N as shown in the following figure. Alternatively, run the 
connection cables upward and along the edge of the ceiling. 
 

Step 3: 

Align the holes on the back of the NWA1100-N with the screws on 

the wall. Hang the NWA1100-N on the screws


Summary of Contents for NWA1100N-CE CloudEnabled

Page 1: ...10 2011 English Edition 1 Quick Start Guide NWA1100N CE CloudEnabled Business N Wireless Access Point...

Page 2: ...oller adds enterprise grade features essential for deployments of three or more access points including Remote configuration and management of multiple access points concurrently Simplified deployment...

Page 3: ...Page 3...

Page 4: ...i 4 0 Internet Explorer 8 0 or later versions 1 2 Registering the Access Point Online Step 1 Locate the Unit Identification Code UIC on the label placed beneath your Access Point Step 2 On a compatibl...

Page 5: ...ce simply connect the Access Point to your network Plug the included Ethernet cable into the LAN port on the back of the access point Plug the other end into your existing router or switch There is no...

Page 6: ...1100N CE directly to your computer using an Ethernet cable Step 2 Configure the Ethernet connection of your computer as follows IP Address within the 192 168 1 3 192 168 1 254 range Subnet Mask 255 25...

Page 7: ...mputer and connect it to the Local Area Network The access point will automatically receive its configuration from CloudCommand as it connects to the Internet The NWA1100N CE is PoE Power over Etherne...

Page 8: ...ect Devices and Change configurations WiFi Network Names security and passwords 2 View Alerts and Events and set up Alert Notifications 3 Display detailed activity reports for users and access points...

Page 9: ...of your computer as follows IP Address within the 192 168 1 3 192 168 1 254 range Subnet Mask 255 255 255 0 Step 3 Launch a web browser type the default IP address of the Access Point http 192 168 1 2...

Page 10: ...the bottom of the page This will unlock all local configuration features 2 3 Important Local Configuration Elements SYSTEM Menu General Choose a distinctive System Name to identify each access point...

Page 11: ...ixed IP Address and enter it along with the subnet mask and gateway IP address If your ISP provided specific DNS DomainNameSystem settings enter them in the System DNS Servers section Otherwise leave...

Page 12: ...the wall 60mm apart see the figure in step 3 Use screws with 6mm 8mm 0 24 0 31 wide heads Do not screw the screws all the way in to the wall leave a small gap between the head of the screw and the wa...

Page 13: ...ng the following configuration SYS Green Solid WLAN Green Moderate Blinking Step 1 Ensuring Valid Connectivity a Replace the Ethernet cable with a known good cable b Ensure the cable is plugged into a...

Page 14: ...Step 3 Deregistering and Re Registering a De register the AP I Make note of the AP s UIC number for the problematic AP II In CloudCommand under the Network Manager tab Access Point section on the stat...

Page 15: ...ins the latest user documentation and software updates for ZyXEL products U S and Canadian customers can contact ZyXEL Technical Support through our website or by phone United States Telephone 1 800 2...

Page 16: ...e ZyXEL logo are registered trademarks of ZyXEL Corporation or its subsidiaries in the United States and other countries CloudCommand is a trademark of PowerCloud Systems Inc All rights reserved Other...

Reviews: