background image


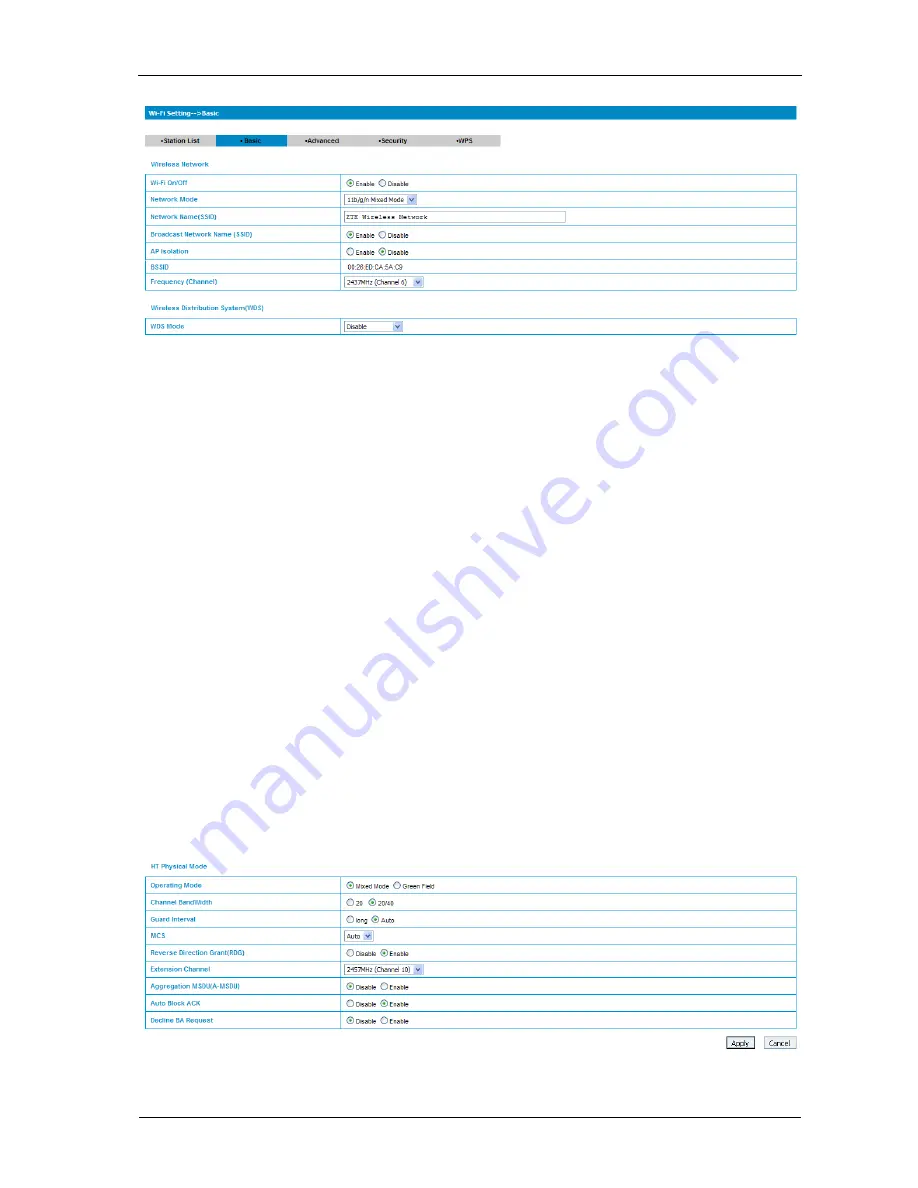
Wi-Fi On/Off

: Select 

On

 or 

Off

 to set the WIFI On or Off. 


Network Mode

: Including 11b/g Mixed Mode, 11b only,11g only and 11b/g/n Mixed Mode. 


Network Name(SSID)

: Service Set Identifier. Enter a string not more than 32 characters as the name for 

your wireless local area network(WLAN). 


Broadcast Network Name(SSID)

: Disable or Enable(Default) this function. The router broadcasts the 

SSID, and other devices can detect and connect to it by selecting 

Enable

. The router disables 

broadcasting and hides the name of your network by selecting 

Disabl

e. 


AP Isolation:


When 

Enabled 

is selected, each of your wireless clients will not be able to communicate with 

each other. 


BSSID

: Show the MAC address of the Wi-Fi. 


Frequency(Channel)

: The frequency band in which the WLAN operates. If some channels in your area 

may have interference from other electronic devices, please choose the clearest channel to optimize the 

performance and coverage of your wireless network. The default value is 

2437MHz (Channel 6)


WDS Mode

: WDS provides the radio monitoring and management communication. Lazy Mode, Bridge 

Mode and Repeater Mode are available. The default value is 

Disable

The HT physical Mode (Only available for 802.11n mode

  parameters are shown in the following figure: 


Operating Mode

: Set the HT physical operating mode. 

22 


Summary of Contents for MF10

Page 1: ...MF10 Wireless Router Fixed Wireless Adapter User Manual ...

Page 2: ...uced translated or utilized in any form or by any means electronic or mechanical including photocopying and microfilm without the prior written permission of ZTE Corporation The manual is published by ZTE Corporation We reserve the right to make modifications on print errors or update specifications without prior notice ...

Page 3: ... MF10 Fixed Wireless Adapter if you want to enjoy the Internet service you must prepare a USB modem which supports internet service To get more information from your router and to keep it in the best condition please read this manual carefully The pictures symbols and contents in this manual are for reference only They might not be completely identical with your router ZTE operates a policy of con...

Page 4: ...em for Mobile Communications GPRS General Packet Radio Service HSDPA High Speed Downlink Packet Access HSUPA High Speed Uplink Packet Access IP Internet Protocol LAN Local Area Network LED Light Emitting Diode MHz Megahertz PDP Packet Data Protocol PIN Personal Identification Number PPP Point to Point Protocol PUK PIN Unlocking Key UPNP Universal Plug and Play WCDMA Wideband CDMA Code Division Mul...

Page 5: ... WPA PSK Wi Fi Protected Access PreShared Key WiMAX Worldwide Interoperability for Microwave Access WPS Wi Fi Protected Setup ...

Page 6: ...11 Appearance 11 LED Indicator 11 Interface Description 13 Installation 13 Inserting the modem 13 Connecting computer 14 Connecting the external power 14 Switching on your device 14 Power supply 14 Notes on Service and Coverage 15 Internet Access 16 Preparation 16 Settings 16 Login 16 WAN Connection 18 WiMAX Settings 18 Router 20 Wi Fi Settings 21 Firewall 26 Advanced 30 ...

Page 7: ...Logout 33 Disconnecting from the Internet 34 Troubleshooting 35 Technical Parameters 36 ...

Page 8: ...se use original accessories or accessories that are authorized by ZTE Unauthorized accessories may affect the router performance damage the router or cause danger to you Do not attempt to dismantle the router There are no user serviceable parts Do not allow the router or accessories to come into contact with liquid or moisture at any time Do not immerse the router in any liquid Do not place object...

Page 9: ... third party products provided that such defects is due to the combined usage vii Any other cause beyond the range of normal usage for Products End User shall have no right to reject return or receive a refund for any Product from ZTE under the above mentioned situations This warranty is end user s sole remedy and ZTE s sole liability for defective or nonconforming items and is in lieu of all othe...

Page 10: ...sed in accordance with the instructions may cause harmful interference to radio communications However there is no guarantee that interference will not occur in a particular installation If this equipment does cause harmful interference to radio or television reception which can be determined by turning the equipment off and on the user is encouraged to try to correct the interference by one or mo...

Page 11: ... the WiMAX network and supports data service Parts Supplied Parts Quantity Wireless Router 1 USB Modem 1 External power adapter 1 User manual 1 Certificate of quality 1 In this manual the USB Modem is produced by ZTE Appearance Top Bottom LED Indicator 11 ...

Page 12: ...F WLAN works abnormally ON Internet connected Blinking The router attempts to connect Internet 3 PPP OFF Internet disconnected and not attempt to connect ON WPS authentication is started and available Blinking WPS authentication is in progress or unavailable 4 WPS OFF WPS authentication is not started Off Out of Connection Solid Green Connection 5 LAN Flashing Green Data Service Process 12 ...

Page 13: ...ections to computer 4 POWER Socket Connection to the external power supply 5 POWER Switch Turn the router ON or OFF Hold on for 7 seconds to restore the factory default settings Installation This section shows you how to install the hardware Inserting the modem Insert the modem into the router 1 Rotate the front cover 2 Plug the USB connector into the USB port 13 ...

Page 14: ...he external power adaptor to a standard power outlet 2 Insert the plug into the socket at the rear of the router Switching on your device 1 Turn the power switch on to get started Notes Do not put anything on the top of the router Do not lay routers to overlap each other when using 2 Wait 1 2 minutes after turning the router on before you use the service The power indicator should be lit on Power ...

Page 15: ...rvice and Coverage If you cannot get service make sure that You are in an area which has sufficient network coverage Please wait 1 2 minutes for the modem to initialize attach to the network and obtain an IP address ...

Page 16: ...il Preparation Before using the data service make sure The modem is inserted into the router The Ethernet cable is connected properly The power light is on The PPP light is on Web browser requirement It is suggested that you use one of these web browsers to connect to the internet IE 6 0 or above Netscape version 9 0 Settings Do not change any settings unless instructed by your service provider To...

Page 17: ...dress bar and then input the username and password to log in You can use administrator or user to log in but user only can view the status of router the administrator can configure the router and the default administrator user name and password are as followings User Name admin Password admin Click Login to log in the router Check Save to let the explorer keep the user name and password When you s...

Page 18: ...tion Select WAN Connection WiMAX Connection the WiMAX connection is shown in the following figure Click connect to connect to the network or click disconnect to disconnect from network WiMAX Information Select WAN Connection WiMAX Information the WiMAX information is shown in the following figure WiMAX Settings Channel Settings Select WiMAX Settings Channel Settings the 3G wireless information is ...

Page 19: ...uency Band Settings Set the frequency band for each channel Click Apply to confirm your configuration WiMAX Authentication Select WiMAX Settings WiMAX Authentication the WiMAX authentication is shown in the following figure Authentication Select There are three options EAP TTLS MSCHAPv2 EAP TLS and EAP MD5 Default Identity Detailed please consult your service provider 19 ...

Page 20: ...e certificate file s provided by your service provider Click Apply to confirm your configuration If the Authentication type is EAP TTLS MSCHAPv2 the parameters are shown in the following figure If the Authentication type is EAP MD5 the parameters are shown in the following figure Router LAN Select Router LAN the LAN parameters are shown in the following figure 20 ...

Page 21: ... long the leased IP address will be expired UPNP Enable UPNP or not Click Apply to confirm your configuration or click Cancel to cancel your configuration DHCP Clients Select Router DHCP Clients All of the DHCP clients information will be shown in the following figure Click Refresh to update the information Wi Fi Settings Station list Select Wi Fi Settings Station List All of the wireless network ...

Page 22: ...ation When Enabled is selected each of your wireless clients will not be able to communicate with each other BSSID Show the MAC address of the Wi Fi Frequency Channel The frequency band in which the WLAN operates If some channels in your area may have interference from other electronic devices please choose the clearest channel to optimize the performance and coverage of your wireless network The ...

Page 23: ...Block ACK Block ACK Acknowledge Number or not during data transferring Decline BA Request Reject peer BA Request or not Click Apply to confirm your configuration or click Cancel to cancel your configuration Advanced Select Wi Fi Settings Advanced the advanced wireless network parameters and Wi Fi multimedia parameters are shown in the following figure Beacon Interval The router broadcasts beacon m...

Page 24: ...ncel to cancel your configuration Security Select Wi Fi Settings Security the Security parameters and Wireless MAC Filtering parameters are shown in the following figure Security Mode Including OPEN SHARED WEPAUTO WPA PSK WPA2 PSK or WPA PSK WPA2 PSK Encrypt Type Use WEP Encryption or not Add MAC Filtering Rule Choose the type of MAC filtering When you select disable the MAC addresses are not used...

Page 25: ...access point you must also enter the same key for the client adapter in the same order In other words WEP key 1 on the AP must match WEP key 1 on the client adapter WEP key 2 on the AP must match WEP key 2 on the client adapter etc A WEP is either 10 or 26 hexadecimal digits 0 9 a f and A F either 5 or 13 ASCII characters based on whether you select 64 bits or 128 bits in the Encryption Strength d...

Page 26: ...following figure Select Enable and then click Apply to configure the details The following figure shows you the current configuration of WPS Click Reset OOB on this page to restore the default value Click Generate on this page to generate a new AP PIN code Firewall MAC IP Port Filtering Select Firewall Mac Ip Port Filtering the Mac IP Port Filtering is shown in the following figure If you select E...

Page 27: ...ort numbers that will be filtered Source Port Range Set the source port numbers that will be filtered Action Set how to handle the packet if it matches with the rule Comment type comment for the filter settings Click Apply to confirm your configuration or click Reset to clear your configuration The following figure shows you the current MAC IP Port filtering rules in system Click Delete to delete ...

Page 28: ... area to clear your URL address Time Filtering Select Firewall Time Filtering the time filtering is shown in the following figure Select Days and Time Range and then click Apply to add the time rule The new time rule item will be shown in the Current Time rules area Click Reset to uncheck boxes before all rules Port Forwarding Select Firewall Port Forwarding the port forwarding is shown in the fol...

Page 29: ...ration And the current virtual servers will be shown in the current virtual servers in system area Click Reset to uncheck boxes before all rules DMZ Select Firewall DMZ the DMZ settings are shown in the following figure If you select Enable set the DMZ IP address and then click Apply to confirm your configuration System Security Select Firewall System Security the system security setting is shown ...

Page 30: ...Firewall Advanced Settings the advanced settings is shown in the following figure Enable or Disable DNS Proxy and NAT function and then click Apply to confirm your configuration Advanced Status Select Advanced Status the system information is shown in the following figure Statistics Select Advanced Statistics the system statistics information is shown in the following figure 30 ...

Page 31: ...Cancel to clear your configuration Notes If you change the Account or Password please make sure that you can remember the new Account or Password Time Select Advanced Time the time information is shown in the following figure You can select Manual Set time or SNTP Auto Synchronization and then click Apply to confirm your configuration Upgrade Select Advanced Upgrade to upgrade the software version...

Page 32: ...pgrade mode There are two modes FTP and TFTP Server Name Input the server name Server Port Input the server port FTP Username Input ftp user name FTP Password Input ftp password Remote Path File Name Input remote path file name Click Apply to confirm your configuration Restore Select Advanced Restore click Restore to set all the settings to their factory default values and the device will restart ...

Page 33: ... and then click Apply to confirm your configuration System Log Select Advanced System Log the system log is shown in the following figure Click Refresh to update the system log Click Export to save the system log as a file Click Clear to clear the system log Logout 1 Select Logout a pop up windows will appear as shown in the following figure 33 ...

Page 34: ...k OK to log out Disconnecting from the Internet Select disconnect from WAN Connection page if you want to terminate your Internet connection Tips Turn off the router can also terminate Internet connection 34 ...

Page 35: ...normal state Internet Related Problems Symptoms Possible Problems Solutions I cannot access the internet at all Please check your configuration settings Please wait 1 2 minutes for the router to initialize Check your service indicator LED The download or upload speeds are very slow The speed is dependent on signal strength Check your signal strength and network type ...

Page 36: ... Wireless Adapter LED Display i Power Indicator ii WLAN Indicator iii PPP Indicator iv WPS Indicator External Interface i External Power Socket ii Data Interface LAN Power Adapter Input 100V 240V AC 50 60Hz Output 5V DC 2A Dimensions W H D 93mm 70mm 25mm ...

Reviews: