background image

4

© Copyright 2015 Zoeller

®

 Co. All rights reserved.

General Information

GRINDER PUMP DESCRIPTION

1.  Pumps are constructed of class 30 cast iron protected with powder 

coated epoxy for long life when pumping sewage in submersible 

applications.  The cutter assembly is comprised of stainless steel 

components hardened to a value of 55-60 on the Rockwell C scale; 

a star shaped cutter and a precision ground flat disk.  Cutting action 

takes place with the rotation of the star cutter at 3450 RPM against 

the stationary cutter plate (see page 11).

2.  The cutter mechanism on the model X840 is bidirectional, enabling 

it to cut in either direction. A control panel with the reversing feature 

will alternate the pump’s rotational direction with each duty cycle. The 

cutter mechanism on the model X842 & X841 is single directional.

3.  Pump motors are available in single and three phase design.  Single 

phase motors require a Zoeller approved starting relay, starting 

capacitor and a run capacitor, which are mounted in a control panel 

(ref. page 5).

4.  The X800 Series Grinder Pumps are dual seal and have seal leak 

probes. Single phase units have an internal thermal overload. Three 

phase pumps have a thermal sensor.

5.  Three phase pumps require overload protection in the control 

panel.

6.  A Grinder Pump is an intermittent duty pump designed for pumping 

sanitary sewage. It is not a dewatering or trash pump.

FIELD ASSEMBLED INSTALLATION

1.  Installation and piping instructions are included with the control panel, 

rail system and basin instructions.  If pump is being retrofitted to an 

existing rail system, accessory parts may be required.  Consult the 

factory and advise make and model of rail system being used.

2.  Refer to the appropriate Indoor/Outdoor prepackaged instructions 

on pages 6-9 for more information on system installation.

3.  All electrical connections including pump to control box and power 

supply to control panels must comply with the “National Electrical 

Code” and applicable local codes.  Conduit and panel enclosure 

openings must have a gas and watertight seal.  Installation of 

electrical panels, conduit and connections should be made by a 

qualified licensed electrician.  A UL Listed potting kit, P/N 10-2350, 

is available from Zoeller Company.

4.  A properly sized disconnect switch, supplied by others, shall be 

installed on the service side of the pump and control panel.

5.  When installing a pump with a check valve, or a rail system with 

a check valve, you must give the pump case time to fill to help 

prevent air lock when lowering the unit into the liquid.  The pump 

case has an air vent located behind the discharge.  This air vent is 

across the pump housing mounting surface and must be cleaned 

before each reinstall.  An extra air vent hole (3/16") may be drilled 

in discharge pipe below the check valve to help prevent air lock. 

This drilled hole must be cleaned before each reinstall. After the 

pump is installed, run the unit submerged to assure the pump case 

is filled (Water should come out of 3/16" diameter hole).
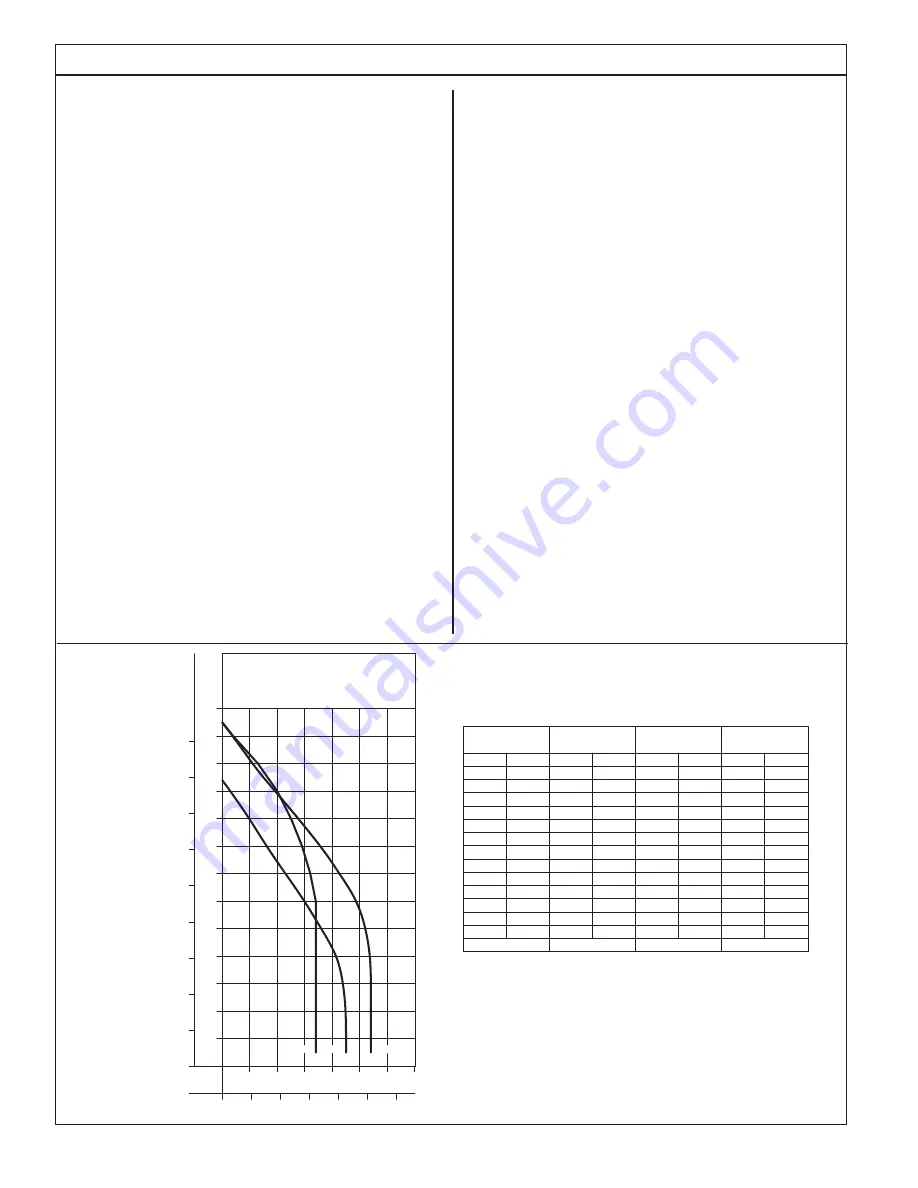
FIGURE 1.

016532

HEAD CAPACITY CURVE

MODEL X840/X841/X842

0

40

80

120

160

200

240

70

60

50

40

30

20

10

0

10

4

8

12

16

20

130

70

60

50

40

30

20

FLOW PER MINUTE

GALLONS
LITERS

TO

TAL D

YNAMIC HEAD

80

90

28

24

METERS

FEET

100

110

120

32

36

X840

X841

X842

TOTAL DYNAMIC HEAD/FLOW

PER MINUTE

SEWAGE

MODEL

Feet

Shut-off Head:

X840

Meters

Gal.

Liters

5

10
20
30

9.1

6.1

3.0

1.5

44

45

167

170

104 ft (31.7 m)

60

50

40

90

80

70

110

100

120

12.2
15.2
18.3

21.3
24.4
27.4
30.5
33.5
36.6

42
36
30

114

136

159

23
16
10

38

61

87

3

--
--

--

--

11

125 ft (38.1 m)

X841

Gal.

Liters

45

170

45

170

125 ft (38.1 m)

95

25

13

4

20

76
49
15

34

32
29

34

34

34
34

129

121

110

129

129

129
129

X842

Gal.

34
34

129
129

Liters

52
49

185

197

43
36
28

106

136

163

19

11

4

15

42

72

54

204

54

204

54

204

54

204

54

204

Summary of Contents for X800 Series

Page 1: ...ructions 7 Electrical Data 8 Operation 9 Cutter Maintenance 10 Service Checklist 11 REFER TO WARRANTY ON PAGE 2 This manual incorporates the installation operation maintenance and service instructions into one document to aid in the ownership of a Zoeller submersible wastewater product Please read and review this manual before installing the product Follow the steps in this manual for a proper sta...

Page 2: ...efromdefectsinmaterial and workmanship under normal use and service when properly used and maintained for a period of one year from date of purchase by the end user or 18 months from date of original manufacture of the product whichever comes first Parts that fail within the warranty period one year from date of purchase by the end user or 18 months from the date of original manufacture of the pro...

Page 3: ...oper rotation which is counterclockwise looking into impeller inlet See page 4 for instructions for checking 3 phase rotation 6 Grinder installations should be checked frequently for debris and or buildup which may interfere with the ON OFF cycles or the positions of variable level float control switches For repair and service other than cutter assembly maintenance contact factory 7 Care should be...

Page 4: ...stem installation 3 All electrical connections including pump to control box and power supply to control panels must comply with the National Electrical Code and applicable local codes Conduit and panel enclosure openings must have a gas and watertight seal Installation of electrical panels conduit and connections should be made by a qualified licensed electrician AULListed potting kit P N 10 2350...

Page 5: ...rical shock Do not remove the power supply cord and strain relief or connect conduit directly to pump Installation and checking of electrical circuits and hardware should be performed by a qualified licensed electrician FIGURE 2 LEAD IDENTIFICATION WIRING DIAGRAM SINGLE PHASE 2 BHP MODEL X840 SK1367 009048 THREE PHASE MODELS X840 X841 X842 FIGURE 4 FIGURE 3 L1 START RELAY START CAPACITOR GREEN RED...

Page 6: ...ation FIGURE 5 SK2843 36 MINIMUM SHUT OFF VALVE 2 DISCHARGE PIPE 3 4 GUIDE RAILS CHECK VALVE WEEP HOLE NON SPARKING RAIL SYSTEM 1 1 4 X 2 ANTI FLOATATION RING WEIGHTED FLOAT SWITCHES LEAD PUMP OFF FLOAT LEAD PUMP ON FLOAT ALARM FLOAT LAG PUMP ON FLOAT INLET FITTING SHIPPED LOOSE TO CONTROL PANEL 28 MIN OR PER STATE AND LOCAL CODES HATCH COVER HATCH COVER STEEL ALUMINUM GAS TIGHT CONTROL PANEL INST...

Page 7: ... the side of the basin using the sealant and hardware provided 6 The bottom of the excavation can now be properly backfilled compacted and leveled Set basin in hole Ensure the removable cover extends above the finished grade line and the grade slopes away from the unit Backfill and subbase should be 1 8 3 4 pea gravel or 1 8 1 2 crushed stone Reference basin installation instructions included with...

Page 8: ...specifications regarding Class I Division 1 Group C D environments Basin must be sized to allow a minimum 3 minute off time between starts 7 The tethered variable level float switches must be free and not hang up on pump or pit peculiarities Float switch circuits shall be intrinsically safe 8 If a rail system is used it should be non sparking Discharge elbow must be firmly anchored to the bottom o...

Page 9: ...dry sealed and securely installed Floats positioned properly Discharge valves open 3 16 vent hole drilled in pipe between check valve and pump Once the above has been verified proceed with the following checks Pump power cables and control floats properly installed and voltage verified Conduit connections to panel are properly sealed After installing the pump into the containment area with adequat...

Page 10: ...e the spacer shims located behind the star cutter 5 Remove the three cap screws holding the disc and remove disc from the pump 6 The disc and star cutter can be replaced with new service parts or resurfaced by grinding Resurfacing is accomplished by surface grindingbothdiscandstarcuttertoa32microfinish Donotattempt grinding in the field Send parts to a qualified machine shop or return to the facto...

Page 11: ...scontinuously atlowwaterlevel Low oil level in motor shell C Pump will not shut off Airlock debrisunderfloatassembly defectiveswitch incomingsewageexceeds capacity of pump D Pump operates but delivers little or no water Intakecloggedwithgreaseorsludge pumpairlocked clearventhole low orincorrectvoltage cloggeddischargeline operatingnearshut offhead E Pump starts and stops too often Check valve stuc...

Page 12: ...015 Zoeller Co All rights reserved MAIL TO P O BOX 16347 Louisville KY 40256 0347 SHIP TO 3649 Cane Run Road Louisville KY 40211 1961 502 778 2731 1 800 928 PUMP FAX 502 774 3624 Visit our website zoellerpumps com ...

Reviews: