background image

US922 USER GUIDE | 2016

25

Adding Work Codes

Scroll with the 


keys 

and highlight add from the 
drop-down menu. Then 
press

 .

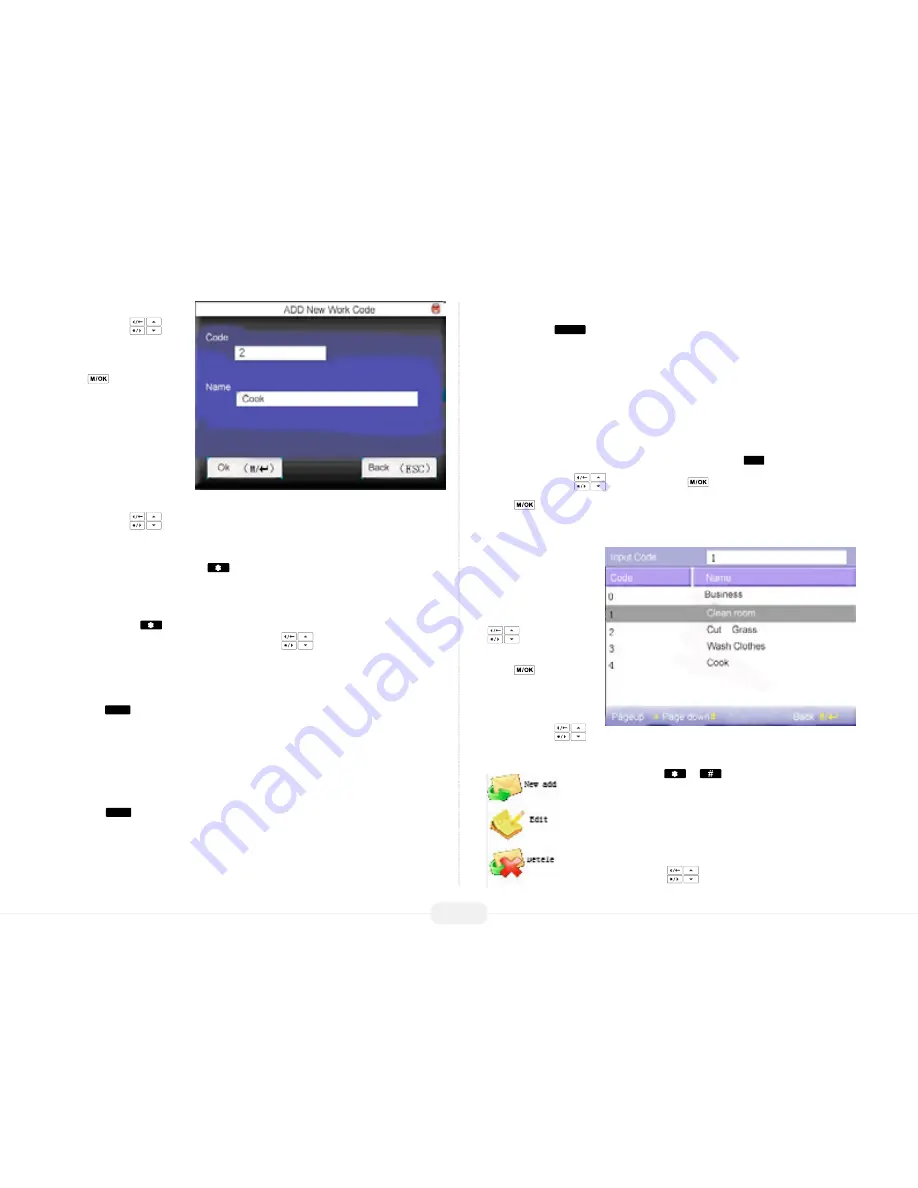
The ADD New Work Code 
screen will appear:

Code: 

The number which 

represents the Work Code.

Name:

 Description of work 

code.

Scroll with the 


keys and place the cursor in the Name field.

Use the US922 keyboard to create a 

”Work Code Name.”

Each time you press the asterisk 

 on the keypad you have the choice to enter 

either “letters” or “symbols.” When in “letter mode” you see [English] appear at the 
bottom of the screen.

Press the asterisk 

 key again and [symbol] appears at the bottom of the screen. 

While in “symbol mode” press the right scroll key 


to access more symbols.

How to create a Work Code Name

This example illustrates how to create the Work Code Name 

“Bar”

Press the 

2

 ABC

 key once.

Notice there are 6 choices:

0a 1b 2c  3A 4B 5C

To enter the Work Code Name Bar, press the 4 key to create an uppercase letter 

“B.” 

After entering the desired “letter,” the display will return to the [English] prompt. Now 
press the 

2

 ABC

 key once to continue entering the Work Code Name Bar.

Again, notice there are 6 choices:

0a 1b 2c  3A 4B 5C

To continue entering the Work Code Name Bar, press the 0 key to create a lowercase 

“a.”

After entering the desired “letter,” the display will return to the [English] prompt.

Now press the 

7

 PQRS

 key once to continue entering the Work Code Name Bar

Notice there are 8 choices:

0p 1q 2r 3r 4P 5Q 6R 7S

Finish entering the Work Code Bar by pressing the 2 key once to create a lower-
case 

“r.”

You have now completed adding a 

Work Code Name.

Once you have entered the Work Code and Name, press 

ESC

 .

Then use the scroll 


keys to highlight 

 .

Press 

 to accept.

You have now completed adding a Work Code.

Editing and 

Deleting Work 

Codes

From within the User 
Menu, scroll with the  


keys until 

Work 

Code

 is highlighted. 

Press 

  to accept.  

Examples of commonly 
used Work Codes:

Scroll with the 
keys to move through Work Codes line by line.

Scroll with the 

 or 

 keys to move through Work 

Codes page by page.

Highlight the desired Work Code to be edited or deleted.

Then press the   key.  The following drop-down menu 
will appear:

Scroll with thel 


keys and highlight to Add, Edit or 

Delete a Work Code. Then press OK.

Summary of Contents for S922 Series

Page 1: ...User Guide S922 Series Time Attendance Terminal This guide provides User instructions only For information regarding actual installation refer to the S922 Installation Guide...

Page 2: ...this document is complete and consistent with the US922 you have purchased Since the US922 is constantly being improved it is remotely possible that this document may not precisely coincide with the...

Page 3: ...After enrolling user s verify that his her enrolled fingerprint or password is recognized by the US922 Step 4 Configure the US922 communication settings and then download the users newly enrolled fin...

Page 4: ...nition Technology Island Dot Bifurcation Ending Ridges A core point is defined as the topmost point on the innermost upward recurring ridge line A user is considered enrolled in the US922 after his he...

Page 5: ...when hands have just been washed fingerprints often become very dry In this case the user should moisturize his her fingerprint simply by breathing on the fleshy pad of his her fingertip prior to pla...

Page 6: ...tional Fingerprint Matching The US922 supports two methods of fingerprint matching 1 N and 1 1 1 N Fingerprint Matching When using 1 N Fingerprint Matching the US922 will place the fingerprint 1 in it...

Page 7: ...matching is more consistent than 1 N matching How to Use 1 1 Fingerprint Matching PRIOR to placing his her finger on the US922 fingerprint sensor the user must FIRST enter his her ID number and press...

Page 8: ...e user is NOT prompted to enter his her password PWD this means that NO password has been registered to that ID number If the US922 prompts Error Enroll NO number this means the user has mistak enly e...

Page 9: ...s The US922 is designed to work as an Access Control terminal and a Time Attendance recorder Door Access Control deci sions are based upon Who the user is and When the user is permitted door access Th...

Page 10: ...change delete users fingerprint s password or authority Admin or user From the User Menu scroll with the keys until New User is highlighted Press to accept The User Menu allows you to Add Edit Delete...

Page 11: ...ew User Menu scroll with the keys until the cursor is in the Name field ID NO Account Number Unique identification number associated with each user Name Up to 24 characters can be entered FP Fingerpri...

Page 12: ...the 5 JKL key once Notice there are 6 choices 0j 1k 2l 3J 4K 5L To enter the username Joe press the 3 key to create an uppercase letter J After entering the desired letter the display will return to t...

Page 13: ...ally highlighted As noted the US922 will beep with each successful fingerprint template recording When all 3 fingerprint template recordings are successful a check mark will appear beside the 3 colore...

Page 14: ...eturn to the New User menu and the icon will display alongside Enroll Pwd This indicates a password has been saved and registered to that user Set New User Au thority AUTH The US922 recognizes two 2 t...

Page 15: ...hin the User Menu scroll with the keys until Manage is highlighted Press to select Notice the following screen appears Note In the above figure the icon indicates that particular user is a System Admi...

Page 16: ...so the drop down menu appears Use the scroll keys and highlight record Attlog Then press to select The selected user s attendance records will be displayed Press ESC to cancel and return to the previ...

Page 17: ...nger recognized possibly caused by injury or his her password has been forgotten The user is no longer employed and his her fingerprint s password and user information need to be deleted from the US92...

Page 18: ...hlight New User Then press the key to select The add options are the same as in the New User Menu Administrators can add a new user and register his her fingerprints name password and authority status...

Page 19: ...PANEL AND NOTTHE US922 WHICH CONTROLS DOOR ACCESS INTHIS CONFIGURATION THEREFORE WHEN USINGTHE US922 WITH A 3RD PARTY DOOR CONTROL PANEL REFER ALL ACCESS RELATED QUESTIONSTOTHE 3RD PARTY CONTROL PANE...

Page 20: ...figuring each user s individual door access rights security one at a time Creating a Group From within the User Access menu use the scroll keys and place the cursor in the Gp Group field Then enter a...

Page 21: ...Duress finger registered The Duress finger does not open the door The Duress finger ONLY sends a man ual alarm signal After pressing ESC a dialog box will appear and prompt for confirmation Press to...

Page 22: ...the icon will be displayed at the bottom of the Check Clock In screen during a pre defined time frame Employees should press the key to view the Public Short Message If a short message has been create...

Page 23: ...er entering the desired letter the display will return to the English prompt Now press the 5 JKL key once to continue entering the message Hello Again notice there are 6 choices 0j 1k 2l 3J 4K 5L Cont...

Page 24: ...Check Clock In screen has the envelope icon displayed at the bottom of the screen To view the Public Short Message press the key View Personal Short messages The Personal message will be displayed fo...

Page 25: ...t Now press the 2 ABC key once to continue entering the Work Code Name Bar Again notice there are 6 choices 0a 1b 2c 3A 4B 5C To continue entering theWork Code Name Bar press the 0 key to create a low...

Page 26: ...Work Code the user first needs to enter his her Work Code PRIOR to entering his her fingerprint or password Important Note To check clock in with a Work Code the user will FIRST press the asterisk ke...

Page 27: ...rademark of ZKTeco or a related company All other product and company names mentioned are used for identification purposes only and may be the trademarks of their respective owners All specifications...

Reviews: